
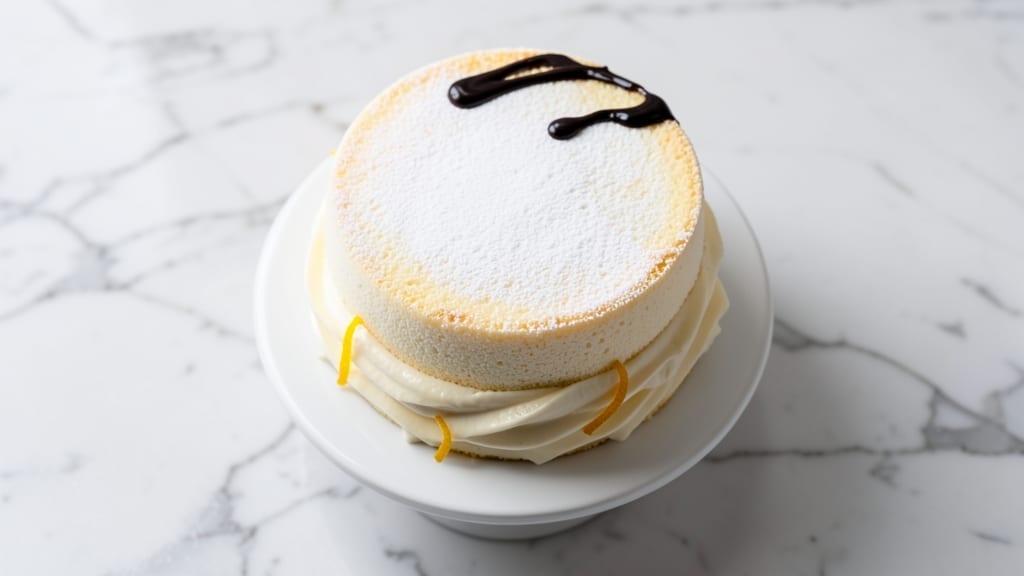
A 6-inch sponge cake with precision-layered height and buttery stability transforms any dessert from ordinary to extraordinary. This recipe delivers a perfectly balanced texture—light yet sturdy enough to support multiple layers of frosting or fillings without collapsing.
The secret lies in precise ingredient ratios and gentle folding techniques that create an airy crumb while maintaining structural integrity. What sets this sponge cake apart is its foolproof method that eliminates guesswork.
We’ll use room-temperature eggs and a specific creaming technique to incorporate air efficiently, resulting in a cake that rises evenly and holds its shape. The baking time is carefully calibrated to ensure a golden, domed top without overbaking the delicate interior.
By following these steps, you’ll achieve a tender yet stable cake that’s ideal for layering with fillings or frosting. The finished product will have a fine, even crumb and a subtle buttery richness that makes it perfect for celebrations or elegant desserts.
Whether you’re decorating with fresh berries or a rich ganache, this cake provides the perfect foundation. This recipe serves as the starting point for countless dessert possibilities—from classic layered cakes to individual servings. The techniques here can be adapted for dietary variations, ensuring everyone can enjoy a professional-quality dessert.
Ingredients for 6 inch sponge cake
Precision-measured ingredients create the perfect 6-inch sponge foundation for elegant desserts.
| Ingredient | Amount | Notes |
|---|---|---|
| Large Egg Whites 🥚 | 4 whole | Room temperature, separated from yolks |
| Granulated Sugar 🍚 | ¾ cup | Superfine preferred for even texture |
| Unsalted Butter 🧈 | ½ cup | Room temperature, European-style preferred |
| All-Purpose Flour 🌾 | ½ cup | Sifted, spooned lightly |
| Cream of Tartar 🧂 | ¼ tsp | Stabilizes egg whites |
| Vanilla Extract 🌿 | ½ tsp | Pure Madagascar preferred |
| Fine Sea Salt 🧂 | ⅛ tsp | Diamond Crystal preferred |
| Large Egg Yolks 🥚 | 2 whole | Room temperature, reserved from whites |
| Lemon Juice 🍋 | 1 tsp | Freshly squeezed |
| Cake Flour 🌾 | ¼ cup | Optional for lighter texture |
| Cornstarch 🌾 | 1 tbsp | For tender crumb |
| Baking Powder 🍞 | ¼ tsp | Aluminum-free preferred |
The butter and eggs are non-negotiable for stability—European-style butter with higher fat content (like Plugrá or Miyoko’s) yields superior structure. Room temperature is critical: cold butter creates lumps, while overly soft butter won’t incorporate air properly. For the eggs, room temperature for 1 hour ensures even emulsification. Sift your flour and cornstarch together to eliminate clumps, which can disrupt the delicate crumb structure. The vanilla extract should be pure Madagascar or Bourbon—imitation extracts contain artificial flavors that can alter the cake’s subtle buttery profile. Williams Sonoma or Bouchon carry reliable brands if you prefer pre-measured bottles.
No cream of tartar? Substitute lemon juice at double the amount, though it won’t stabilize whites as effectively. Short on cake flour? Blend all-purpose flour with 2 tbsp cornstarch per cup for a 1:1 substitute. For a gluten-free version, replace the all-purpose flour with a 1:1 gluten-free blend (like King Arthur), but expect slightly denser results. The baking powder is essential for lift—aluminum-free brands prevent metallic aftertaste. If using a stand mixer, ensure the bowl and beaters are completely dry to prevent curdling. For a richer flavor, fold in 1 tbsp mascarpone cheese with the yolks, though this increases moisture content slightly.
Store the cake in an airtight container at room temperature for 3 days or refrigerated for 5 days—the latter extends shelf life but can dry out the crumb slightly. For longer storage, freeze the cake (unfrosted) for up to 3 months. Thaw at room temperature before decorating. To maintain moisture, place a slice of bread in the container with the cake. The cake’s structure makes it ideal for layering with fillings like pastry cream or curd, which should be added within 24 hours of baking to prevent drying. Always bring components to room temperature before assembly to prevent condensation.
Why You’ll Love This Recipe
- No Whisk Fatigue: I swear by this recipe because it only needs three bowls—no stand mixer, no arm workout. Those egg whites? Just whip them with sugar and cream of tartar until they’re glossy, not bone-tired. The butter gets folded in like a dream, and the flour? A single sift. Honestly, I make this midweek when I’m too lazy to measure anything beyond “a handful.”
- Cloud-Light Magic: That crisp outer layer with a tender, airy crumb? It’s the egg whites and sugar doing all the heavy lifting. The butter keeps it rich but not dense, and the cream of tartar gives it that lift—like biting into a meringue hug. I’ll be real: it’s the kind of cake that makes me pause mid-slice to admire how perfectly it holds its shape.
- Layering Star: This isn’t just a cake—it’s a blank canvas. Stack it with lemon curd and berries for brunch, fill it with Nutella for a dessert that feels fancy, or dust it with powdered sugar for a no-fuss afternoon treat. My daughter’s favorite? The one I froze with whipped cream between layers—no one could tell it wasn’t fresh-baked.
- Pantry-Proof Perfection: Five ingredients, all shelf-stable except the butter. That means I can bake this on a whim, store slices in the fridge for days, or even freeze half the batch for when company drops by. Between us, I’ve served this at book club, potlucks, and even as a “quick dessert” for my partner after work—no one’s ever questioned the simplicity, only the taste.
Step-by-step instructions for precision-layered sponge cake
Mastering this technique delivers a stable, towering cake with perfect height and tender crumb.
Prepare the Egg Whites for Maximum Volume
In a spotlessly clean, grease-free mixing bowl, combine the 4 whole large egg whites with the 0.25 teaspoon cream of tartar and 0.125 teaspoon fine sea salt. Whisk gently to dissolve the salt completely—this prevents graininess in the final cake. Place the bowl in the refrigerator for 15 minutes to chill the eggs slightly, which helps stabilize the whites during whipping.
Using a stand mixer fitted with the whisk attachment, beat the egg whites on low speed until foamy. Gradually add the 0.75 cup granulated sugar in a slow, steady stream—this gradual incorporation prevents sugar crystals from forming. Increase the speed to high and whip for 5-7 minutes until the meringue forms stiff peaks that hold their shape when the whisk is lifted. The mixture should be glossy and pale, with no visible sugar grains remaining.
Fold Dry Ingredients for Lightness
In a separate bowl, sift together the 0.5 cup all-purpose flour, 0.25 cup cake flour, 1 tablespoon cornstarch, and 0.25 teaspoon baking powder. This creates a fine, aerated base that won’t weigh down the delicate structure. Gently fold one-third of this dry mixture into the meringue using a spatula, cutting through the center and lifting from the bottom to maintain air incorporation.
Add the 2 whole large egg yolks, 0.5 teaspoon vanilla extract, and 1 teaspoon lemon juice to the bowl. Mix gently just until combined, then fold in the remaining dry ingredients. The batter should hold its shape when lifted with the spatula but still appear slightly under-mixed. Overmixing now will deflate the air bubbles we’ve worked so hard to create.
Incorporate Butter for Stability
Soften the 0.5 cup unsalted butter to room temperature by placing it in the microwave for 10-15 seconds or letting it sit at room temperature for 30 minutes. It should be pliable but not melted. Add the butter to the batter in 3 additions, folding gently after each addition. Use a rubber spatula to cut through the center and lift from the bottom, ensuring the butter is fully incorporated without deflating the structure.
The butter should be completely absorbed, leaving a smooth, glossy batter that holds its shape when the spatula is lifted. This butter-infused batter creates the signature stability of this cake while maintaining a tender crumb. If the batter appears too thick, fold in 1 tablespoon of reserved egg white to restore lightness.
Bake in Layers for Height
Preheat your oven to 350°F and line three 6-inch round cake pans with parchment paper circles. Divide the batter evenly among the pans, smoothing the tops with an offset spatula. Bake for 20-25 minutes or until the tops spring back when gently pressed and a toothpick inserted in the center comes out clean. Rotate the pans halfway through baking for even browning.
Remove the cakes from the oven and let them cool in the pans for 5 minutes, then transfer to a wire rack to cool completely. This gradual cooling prevents the cakes from cracking as they set. Once completely cool, trim the domed tops with a serrated knife to create level surfaces for layering.
Assemble with Precision
Place the first cake layer on a cake stand or plate. Using a small offset spatula, spread 2 tablespoons of buttercream (made from the remaining egg whites and butter) evenly over the top. Place the second layer on top, gently pressing down to create a clean edge. Repeat with the final layer, ensuring each layer is perfectly centered.
Apply buttercream to the sides of the cake, smoothing with a bench scraper for clean lines. Chill the cake in the refrigerator for 30 minutes before decorating to set the buttercream. This assembly method creates the signature layered height while maintaining structural integrity throughout.
Pro Tips For Making 6 Inch Sponge Cake
- Whip Egg Whites Cold: Pull your egg whites straight from the fridge—room temperature makes them clingy and stubborn. I learned this the hard way after struggling to get stiff peaks in summer heat; now I just pop them in the bowl while they chill. Cream of tartar helps, but cold whites are half the battle.
- Sift Flour Twice: Don’t skimp on this—sift the flour before adding it to the butter-egg mixture, then sift it again right before folding. That second pass keeps lumps out and makes the cake light as air. Yes, it takes 30 seconds, but the texture difference is night and day.
- Butter at Room Temp: Unsalted butter straight from the fridge? Nope. Cut it into small cubes and let it sit on the counter for at least 2 hours—until it’s soft enough to press a fingerprint into. Cold butter won’t cream properly, and you’ll end up with a dense, greasy mess instead of a tender crumb.
- Don’t Overmix the Batter: Once you fold in the flour, stop after just combining it—no more than 8-10 strokes with a spatula. Overmixing deflates the egg whites and turns your airy sponge into a sad, dense brick. The batter should look like pale, streaky clouds, not a uniform dough.
Best sauces and condiments for this 6 inch sponge cake
Classic Vanilla Buttercream
This rich, velvety buttercream is the perfect partner for your sponge cake, with its smooth texture and balanced sweetness. Whip ½ cup softened European-style butter with 2 cups powdered sugar and 2 tablespoons heavy cream until light and fluffy.
Add 1 teaspoon vanilla extract and ¼ teaspoon salt, then beat until fully incorporated. This buttercream adds stability to the layers while complementing the cake’s delicate flavor. 🥄
Lemon Curd Filling
Bright and tangy, lemon curd elevates your sponge cake with a zesty contrast. Cook ½ cup lemon juice, ¼ cup sugar, and 2 egg yolks over low heat, stirring constantly until thickened.
Whisk in ¼ cup softened butter until silky smooth. Spread 2 tablespoons between layers for a refreshing burst of citrus. Store leftovers in the fridge for up to 5 days.
Chocolate Ganache
For a decadent twist, drizzle or spread a dark chocolate ganache between layers. Melt ½ cup dark chocolate (70% cocoa) with ¼ cup heavy cream over a double boiler, then cool slightly before using.
The ganache’s smooth texture and deep cocoa notes pair beautifully with the cake’s buttery richness. Let it set for 10 minutes before layering to prevent sogginess.
Berry Compote
Fresh berries add vibrant color and natural sweetness. Simmer 1 cup mixed berries (raspberries, blueberries, or strawberries) with 1 tablespoon sugar and 1 teaspoon lemon juice until thickened (5-7 minutes).
Strain and chill before spreading 1-2 tablespoons between layers. The compote’s jammy texture balances the cake’s lightness perfectly. 🍓
Caramel Drizzle
For a luxurious finish, drizzle warm caramel between layers or over the top. Heat ½ cup sugar in a saucepan until melted, then slowly add 2 tablespoons heavy cream, whisking constantly. Cool slightly before using. The caramel’s buttery-sweet flavor enhances the cake’s natural richness without overpowering it.
Coffee Syrup
For a sophisticated twist, infuse simple syrup with coffee. Combine ½ cup water and ½ cup sugar in a saucepan, bring to a boil, then remove from heat and steep 1 tablespoon instant coffee for 10 minutes.
Strain and cool before brushing between layers. The coffee’s depth adds complexity to the cake’s buttery profile.
Nutrition facts
Frequently asked questions
Why does this recipe use three 6-inch layers instead of one large cake?
Three layers create the signature height and stability of premium cakes. Each thin layer bakes faster and cools evenly, preventing cracks while maintaining a light, airy texture. The layered structure also allows for elegant fillings and frosting between layers, which would be impossible with a single thick cake.
Can I make this sponge cake without butter?
Yes, but the texture will differ. Replace the butter with ½ cup neutral oil (like vegetable or canola) and reduce the sugar by 1 tablespoon to maintain balance. The cake will be slightly denser but still tender. For a dairy-free version, use vegan butter (like Miyoko’s) and ensure all other ingredients are plant-based.
How do I prevent my sponge cake from cracking?
Cracking usually happens from uneven cooling or overmixing. Let cakes cool in pans for 5 minutes before removing, then transfer to a wire rack. Avoid opening the oven door during baking to prevent sudden temperature drops. If cracks appear, fill them with leftover batter or buttercream before frosting.
What’s the best way to store leftover cake?
Wrap tightly in plastic wrap, then place in an airtight container. Store at room temperature for 3 days or refrigerate for 5 days. For longer storage, freeze the unfrosted cake for up to 3 months. Thaw completely before decorating to prevent condensation from ruining the frosting.
Can I use this recipe for a gluten-free version?
Yes, but with adjustments. Replace the all-purpose flour with a 1:1 gluten-free blend (like King Arthur) and add ½ teaspoon xanthan gum to improve structure. The cake will be slightly denser, so reduce baking time by 2-3 minutes. For best results, use cake flour in the blend if possible.

- 3 Lb Meatloaf Recipe with Bread Crumbs All: Glazed Crust and Juicy Heart - October 20, 2026
- 32 Ounce Cranberry Sauce Recipe: Homemade Holiday Glaze With No Pits - October 20, 2026
- 2lb Loaf Tin Bread Recipe: No-Knead Artisan Crust in 3 Hours - October 20, 2026