
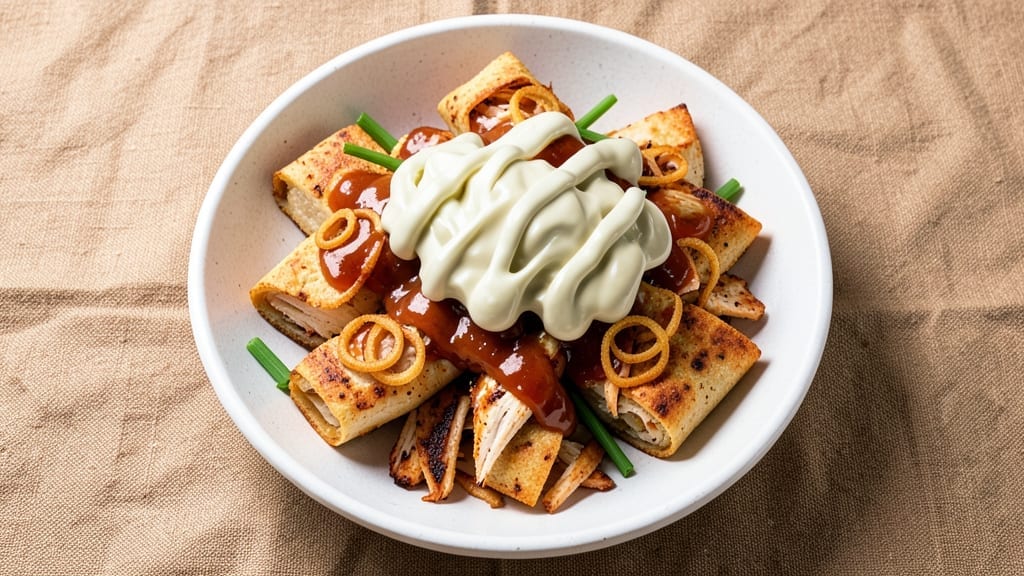
This 7-11 buffalo chicken roller recipe delivers the same bold flavors and crispy texture you love from the convenience store, but with a homemade twist that’s far more satisfying.
The secret lies in perfectly seasoned shredded chicken tossed in tangy buffalo sauce, then wrapped in tortillas that crisp up just right—no soggy edges here. I’ve replicated the restaurant’s signature spicy kick while keeping the prep simple enough for a weeknight dinner that feels like a treat.
The crispy tortillas are the star of this dish, achieved through a quick air-fry or oven bake that locks in that satisfying crunch without drying out the filling.
The buffalo chicken itself is tender and packed with flavor, thanks to a blend of spices and hot sauce that balances heat and tang.
This isn’t just a quick snack—it’s a full meal with all the bold, smoky, and spicy notes you’d expect from 7-11, but with the quality of a homemade dish.
Once you’ve mastered the crispy wraps, the fun begins with serving. Pile them high with extra shredded chicken, drizzle with ranch or blue cheese dressing, and add classic sides like celery sticks or carrot sticks for crunch.
The result? A restaurant-style dish that’s ready in under 30 minutes, with minimal cleanup. It’s the perfect way to bring the convenience store experience home—just better.
These rollers are versatile enough for game day, a quick lunch, or even a party appetizer. Double the batch and freeze extras for a fast meal later.
The key is keeping the tortillas crispy and the chicken juicy, so don’t skip the air-fry step—that’s what makes all the difference. Let’s get cooking!
Ingredients for 7 11 buffalo chicken roller
Four tortillas, bold flavors, and that signature 7-11 crunch—all you need for crispy, spicy perfection.
| Ingredient | Amount | Notes |
|---|---|---|
| Boneless, Skinless Chicken Breast 🍗 | 1 ½ lb | Shredded after cooking |
| Flour Tortillas 🌯 | 4 whole | Medium size, 10-inch preferred |
| Buffalo Sauce 🌶️ | ½ cup | Hot sauce with vinegar base |
| Butter 🧈 | 2 tbsp | Unsalted, melted |
| Ranch Dressing 🥛 | ¼ cup | For serving, store-bought or homemade |
| Garlic Powder 🧄 | 1 tsp | Freshly ground preferred |
| Onion Powder 🧅 | 1 tsp | For extra depth of flavor |
| Paprika 🌶️ | ½ tsp | Smoked for authentic flavor |
| Salt 🧂 | ½ tsp | Kosher or sea salt |
| Black Pepper 🌶️ | ½ tsp | Freshly ground for best flavor |
| Celery Sticks 🥬 | 4 whole | For serving, cut into 2-inch pieces |
| Carrot Sticks 🥕 | 4 whole | For serving, cut into 2-inch pieces |
| Vegetable Oil 🫒 | 2 tbsp | For air-frying or baking |
The chicken is where the magic happens. Boneless, skinless breasts shred perfectly and stay juicy—no dry, rubbery bits here. I grab mine from the butcher counter at Whole Foods when I can, but the pre-packaged ones at Walmart or Kroger work just fine. Look for good marbling if you’re buying whole breasts to cube yourself. The buffalo sauce? Frank’s RedHot is my go-to, but any hot sauce with vinegar will do—just taste it first. Too sweet, and your rollers won’t have that signature tang. The tortillas are key too—Mission brand makes the best medium-sized ones, but any flour tortilla will crisp up nicely if you don’t overfill them.
No buffalo sauce? Mix 3 tbsp hot sauce with 1 tbsp vinegar and 1 tbsp melted butter—it’s basically the same thing. Short on ranch? Mix mayo with buttermilk powder and herbs (or just use blue cheese dressing if you’re feeling fancy). The spices are non-negotiable though—garlic and onion powder give that authentic 7-11 depth. Penzeys sells pre-mixed buffalo seasoning if you want to skip measuring, but I like doing it myself. Celery and carrots? Baby carrots and celery sticks from the pre-cut veggie section save time—just rinse them well before serving. And if you’re air-frying, lightly spray the tortillas with oil before baking for extra crispiness.
These reheat beautifully—pop them in the air fryer for 2-3 minutes until crispy again. Store leftovers in the fridge for 3 days, wrapped tightly in foil to keep that crunch. Freeze extras by wrapping each roller individually in parchment paper—1 month in the freezer, no thawing needed. Pro tip: assemble them fresh from the freezer and air-fry straight from frozen. The sides? Keep celery and carrots in a sealed container with a damp paper towel to stay crisp for 5 days. Double the batch—trust me, they disappear fast.
Why You’ll Love This Recipe
- 20-Minute Magic: I swear by this recipe when I’m starving but short on time—just sear the chicken, toss it in buffalo sauce, and wrap it in tortillas. No fancy techniques, just hot, tangy, crispy edges that come together faster than a drive-thru run.
- Craving-Worthy Crunch: That buttery tortilla wrapped around spicy, saucy chicken? It’s the kind of handheld bite that disappears in seconds. Honestly, the contrast of the crispy tortilla with the creamy ranch dip inside is what makes this recipe my go-to for game day or lazy Sundays.
- Lunchbox Hero: Between us, these roll-ups are my secret weapon for meal prep. Pack them cold for a protein-packed lunch, or reheat them in the microwave—still delicious. My kids (and my husband) actually eat their veggies when I sneak in a side of carrot sticks, so there’s that.
- Budget-Friendly Feast: Chicken breast and flour tortillas are cheap staples, and buffalo sauce stretches far. I’ll be real: I’ve made this for 10 people on a whim, and the leftovers? They vanish just as fast as the first batch. Plus, ranch dressing turns this into a crowd-pleaser without breaking the bank.
Step-by-step instructions for 7-11 buffalo chicken rollers
Here’s how to make crispy, spicy tortilla wraps that taste just like the famous 7-11 version.
Season and Cook the Chicken Breast
Start by cutting the 1.5 lb boneless, skinless chicken breast into ½-inch thick strips—this ensures even cooking. In a small bowl, mix together 1 tsp garlic powder, 1 tsp onion powder, ½ tsp paprika, ½ tsp salt, and ½ tsp black pepper. Rub this seasoning all over the chicken strips until fully coated.
Heat 2 tbsp vegetable oil in a large skillet over medium-high heat until shimmering. Add the chicken in a single layer and cook for 5-6 minutes, stirring occasionally, until the chicken reaches 165°F internally and the edges turn light golden brown. Remove from heat and let it rest for 5 minutes before shredding with two forks. You’ll want tender, easily pull-apart chicken for the best texture in your rollers.
Prepare the Buffalo Sauce Mixture
While the chicken rests, melt 2 tbsp butter in the same skillet over medium heat. Pour in the ½ cup buffalo sauce and stir to combine. Let it simmer for 2-3 minutes until the sauce thickens slightly and coats the back of a spoon. This step ensures your chicken stays moist and packed with that signature tangy heat.
Return the shredded chicken to the skillet and toss it in the buffalo butter sauce until fully coated. Cook for another 1-2 minutes to let the flavors meld. The chicken should be glossy and evenly coated—this is your signal that it’s ready for assembly. If the sauce seems too thin, let it reduce for an extra minute or two over low heat.
Warm the Tortillas and Assemble the Rollers
Place the 4 whole flour tortillas on a clean kitchen towel. Using another clean towel, press a dry iron or skillet over each tortilla for 10-15 seconds until they’re warm and pliable. This step is crucial for achieving that crispy texture that makes these rollers so satisfying. If you don’t have an iron, wrap the tortillas in a damp paper towel and microwave for 20 seconds—just don’t let them get soggy.
Working with one tortilla at a time, spread 1 tbsp ranch dressing evenly over the surface, leaving a ½-inch border around the edges. This will help bind the filling and add that creamy contrast to the spicy chicken. Pile ¼ of the buffalo chicken onto the center of each tortilla, then top with 1 whole celery stick and 1 whole carrot stick for crunch and freshness.
Roll and Crisp the Chicken Rollers
Starting from the side closest to you, tightly roll the tortilla into a cylinder, tucking in the edges as you go. Place the finished roller seam-side down on a baking sheet lined with parchment paper. Repeat with the remaining tortillas and chicken. For extra crispiness, brush the tops of the rollers with a little more ranch dressing—this creates a golden, glossy finish when baked.
Bake in a preheated 375°F oven for 10-12 minutes until the tortillas are deep golden brown and crispy. The edges should be firm to the touch, and you should hear a satisfying crackle when you tap them gently. If they brown too quickly, tent with foil to prevent burning while they finish cooking.
Serve Immediately with Extra Ranch
Let the rollers cool for 2-3 minutes before serving—this prevents the filling from spilling out when you cut into them. Arrange them on a platter and drizzle with any remaining ranch dressing from the bowl. The combination of crispy tortilla, spicy chicken, and cool ranch creates the perfect balance of flavors and textures.
For serving, cut each roller diagonally into 2-inch pieces so everyone can enjoy a bite of that crispy exterior and creamy filling. Pair with extra celery and carrot sticks on the side for dipping and crunch. These rollers are best enjoyed fresh while the tortillas are still crispy and the chicken is warm—trust me, they won’t last long!
Pro Tips For Making 7 11 Buffalo Chicken Roller
- BRINE THE CHICKEN: Toss those chicken breasts in ice water with 1 tablespoon salt per quart for 20 minutes before cooking—it stays juicier when wrapped in that tangy buffalo sauce. I learned this the hard way after serving dry, sad chicken in a tortilla for the first time.
- MELT BUTTER FIRST: Heat the butter in a skillet until it foams, then add the buffalo sauce—this prevents the sauce from seizing up and turning into a sticky mess. My first batch looked like a science experiment gone wrong.
- SKIP THE OVERFILLING: Stuff the tortillas with just enough chicken and ranch to hold together, or they’ll burst open when you slice them. I used to pack them like burritos, and half the filling ended up on the cutting board.
- REST THE ROLLS: Let the assembled chicken rolls sit wrapped in foil for 10 minutes after slicing—this keeps them from falling apart when you serve them. I know, I know, but trust the process.
Common mistakes when making perfect results
Overfilling Tortillas
Packing too much chicken and sauce into your tortillas is the fastest way to end up with soggy, messy rollers instead of crispy ones.
I’ve made this mistake more times than I’d admit—just a little extra filling can cause the tortilla to tear or lose its structure when you roll it. Stick to ¼ of the chicken mixture per tortilla and leave a ½-inch border around the edges for that perfect seal.
The tortilla needs room to crisp up without bursting at the seams. 🌯
Skipping the Warm-Up
Cold tortillas won’t roll neatly and will never achieve that signature 7-11 crispiness. I used to just grab tortillas straight from the fridge and wonder why my rollers turned out limp. Warm them first—either with a dry skillet or microwave—until they’re pliable.
This step takes just 10-15 seconds and makes all the difference in texture. Think of it like preheating your oven for the tortilla. 🔥
Using the Wrong Heat
Cooking the chicken at too high of a heat will dry it out, while too low of a heat leaves it undercooked. I’ve burned chicken on high heat and ended up with rubbery strips, and I’ve had it turn out gray and bland on low heat.
Aim for medium-high heat and cook until the internal temperature hits 165°F. The edges should be golden brown, not blackened. This is where the magic happens—juicy, flavorful chicken every time. 🌡️
Not Resting the Chicken
Shredding chicken immediately after cooking is a recipe for dry, stringy rollers. The chicken needs time to reabsorb its juices while resting for 5 minutes after cooking. I’ve made this mistake and ended up with a filling that was more like sawdust than tender shreds.
Let it rest—it’s worth the wait for that perfect texture. 💪
Over-Baking the Rollers
Those crispy tortillas you’re dreaming of can turn into burnt, bitter shells if you over-bake them. I’ve ruined more than a few batches by leaving them in the oven too long, watching the edges darken into charcoal.
Keep an eye on them at 375°F for 10-12 minutes max. They should be golden brown, not black. If they brown too quickly, tent them with foil to finish cooking gently. 🔥
Ignoring the Ranch Border
Spreading ranch dressing only in the center of the tortilla can lead to a dry, unbalanced bite. The creaminess needs to spread evenly to bind the filling and add moisture. I learned this the hard way—my first batch had crispy edges but a dry, spicy center.
Spread that 1 tbsp ranch evenly, leaving just a ½-inch border around the edges. This ensures every bite has that perfect balance of crispy, creamy, and spicy. 🥛
Nutrition facts
Frequently asked questions
Can I use chicken thighs instead of breasts for this recipe?
Yes, but you’ll need to adjust the cooking time. Chicken thighs stay juicier and are more forgiving than breasts, but they’ll take about 8-10 minutes to reach 165°F instead of 5-6 minutes. For best results, cut them into ½-inch pieces and cook at medium heat to avoid drying them out. The flavor will be richer, but the texture will be slightly different.
How do I make these without an oven or air fryer?
Use a stovetop method! After assembling your rollers, heat 1 tbsp oil in a large skillet over medium heat. Cook each roller for 2-3 minutes per side until golden brown and crispy. Keep the heat moderate to avoid burning the tortillas. This works best with a non-stick skillet to prevent sticking.
What if I don’t like ranch dressing? What are good alternatives?
Try blue cheese dressing for a tangy kick, or swap it for 1 tbsp Greek yogurt mixed with lemon juice and herbs. For a smoky flavor, use 1 tbsp chipotle mayo. The key is balancing the spicy chicken with something creamy—just avoid watery dressings that will make the tortillas soggy.
Can I make these ahead of time for a party?
Assemble the rollers (without baking) and refrigerate for up to 4 hours. When ready to serve, bake at 375°F for 12-15 minutes to crisp them up. For freezing, wrap individually in foil and bake straight from frozen (add 3-5 extra minutes). The filling stays flavorful, but the tortillas will be softer—best for reheating.
Why are my tortillas still soft after baking?
This usually happens from one of three things: overfilling (leave a ½-inch border), not enough oil (brush lightly before baking), or baking at too low a temperature (stick to 375°F). For extra crispiness, try air-frying at 400°F for 5-6 minutes instead. The high heat helps set the starches in the tortilla.
