
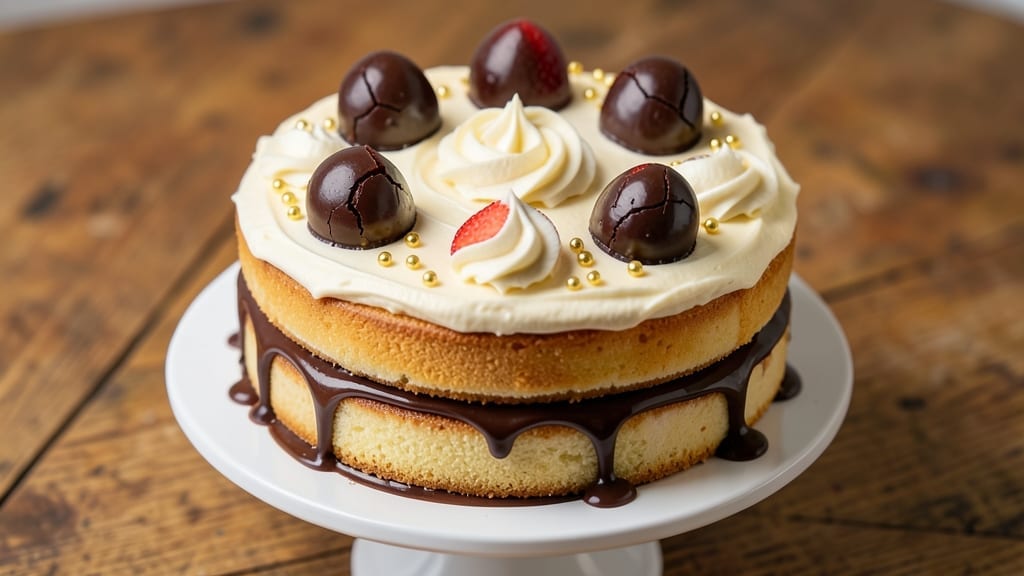
A 12-inch birthday cake with a bold vanilla base and a hidden chocolate swirl delivers the perfect balance of rich flavor and elegant presentation—every slice reveals that secret surprise. This recipe builds on a foolproof vanilla cake formula, where the chocolate swirl adds depth without overpowering the classic taste.
The key is precise layering and proper cooling to ensure clean cuts and professional results every time.
What sets this cake apart is the hidden chocolate swirl—achieved through a simple technique that keeps the surprise intact until the first slice. The recipe uses standard pantry ingredients, including all-purpose flour, eggs, and butter, making it accessible for home bakers.
A 350°F oven and 30-35 minutes per layer ensure evenly baked, moist crumbs with a golden finish.
The frosting—a smooth vanilla buttercream—creates a velvety texture that complements both the vanilla and chocolate layers. Decorating is flexible: you can keep it classic with a simple crumb coating and sprinkles, or go bold with fondant figures and hand-piped designs.
The two-layer structure makes it easy to customize for any celebration, from kids’ birthdays to elegant adult gatherings.
This recipe delivers restaurant-quality results at home, with tips for avoiding common pitfalls like uneven layers or overmixing. Whether you’re a beginner or an experienced baker, the step-by-step instructions ensure success. Let’s get started on a cake that will wow everyone at the table.
Ingredients for 12 inch birthday cake
Standard pantry staples plus a few specialty touches create this showstopping two-layer cake.
| Ingredient | Amount | Notes |
|---|---|---|
| All-Purpose Flour 🌾 | 3 cups | Sifted for even texture |
| Granulated Sugar 🍚 | 2 cups | White or light brown |
| Unsalted Butter 🧈 | 1 ½ cups | Cold, cubed for creaming |
| Large Eggs 🥚 | 4 whole | Room temperature |
| Pure Vanilla Extract 🌿 | 2 tsp | High-quality, not imitation |
| Baking Powder 🧂 | 2 tsp | Diamond Crystal preferred |
| Salt 🧂 | ½ tsp | Fine sea salt |
| Whole Milk 🥛 | 1 cup | Room temperature |
| Dark Chocolate Chips 🍫 | 1 cup | 60% cocoa, semi-sweet |
| Powdered Sugar 🍚 | 4 cups | For buttercream |
| Heavy Whipping Cream 🥛 | 1 cup | Chilled for buttercream |
| Vanilla Bean Paste 🌿 | 1 tbsp | For enhanced flavor |
| Cake Flour 🌾 | ½ cup | Optional for lighter texture |
| Cocoa Powder 🍫 | ¼ cup | Unsweetened, Dutch-processed |
The flour is critical here—King Arthur or Gold Medal brands yield the best results. For the chocolate swirl, Ghirardelli 60% cocoa chips melt perfectly without overpowering the vanilla. If you can’t find cake flour, substitute 1/4 cup cornstarch with 2 1/4 cups all-purpose flour. The butter should be cold when creamed to avoid dense layers. Walmart or Kroger stock reliable brands for all ingredients, but specialty baking stores offer superior vanilla extracts and cocoa powder for that restaurant-quality depth.
No vanilla bean paste? Double the extract and add a pinch of vanilla sugar. Substitute milk with evaporated milk or coconut milk for a richer texture. For the chocolate swirl, melted dark chocolate bars work just as well as chips—just ensure they’re 60% cocoa or higher. The cocoa powder in the frosting can be swapped for Dutch-processed cocoa if you prefer a smoother finish. Prefer a lighter cake? Omit the cake flour and increase all-purpose flour by 1/2 cup, adjusting milk by 2 tbsp for moisture balance.
Store cake layers in an airtight container with parchment between them for up to 3 days at room temperature. Buttercream keeps 5 days refrigerated or 3 months frozen in an airtight container. For the chocolate swirl, prepare it fresh the day of baking—it doesn’t store well. If assembling ahead, wrap the unfrosted cake layers in plastic and refrigerate. Bring to room temperature before frosting to prevent condensation. The secret to clean slices? Chill the cake 4 hours before cutting—this ensures professional results every time.
Why You’ll Love This Recipe
- One-Bowl Wonder: I swear by this recipe—just mix, bake, and forget about the mess. No fancy equipment, no stressing over layers or frosting. The buttercream? Smooth as silk, and the vanilla extract makes every slice taste like a bakery secret.
- Buttercream Bliss: That rich, creamy frosting—made with just butter, sugar, and vanilla—is where this cake shines. It’s not too sweet, not too heavy; just that perfect balance that makes you want to lick the bowl. (Yes, I’ve been there.)
- Birthday Every Day: Twelve inches is the ideal size—big enough to share but not so massive it goes uneaten. Honestly, I’ve used this for birthdays, graduations, and even just because. It’s the cake that works for anything.
- Leftover Magic: Between us, this cake keeps beautifully for days. The flour and butter combo means it stays moist, so you can slice it up for lunches or midnight snacks without a single crumb of regret. Budget-friendly? Absolutely.
Step-by-step instructions for bold vanilla cake with hidden chocolate swirl
This method delivers a perfectly moist vanilla cake with rich chocolate swirls that surprise and delight.
Cream Butter and Sugars for Maximum Volume
In a stand mixer fitted with the paddle attachment, beat the 1.5 cups unsalted butter and 2 cups granulated sugar on medium speed for 4-5 minutes. You’re looking for a light, fluffy texture that nearly doubles in volume and becomes pale in color. This thorough creaming incorporates air, which creates that signature tender crumb structure we want.
I press down on the butter mixture with a spatula every 30 seconds during the first minute to ensure even distribution. The butter should leave a slight indentation when pressed—this confirms it’s properly softened but not melted. If the mixture feels too warm, chill it in the fridge for 5 minutes before proceeding. The temperature matters more than you might think for proper cake rise.
Incorporate Eggs and Dry Ingredients
Add the 4 whole large eggs, one at a time, mixing on low speed for 30 seconds after each addition. This gradual incorporation prevents the eggs from scrambling. After the eggs are fully incorporated, add the 2 teaspoons pure vanilla extract and mix for another 15 seconds until just combined.
In a separate bowl, whisk together the 3 cups all-purpose flour, 0.5 cup cake flour (if using), 2 teaspoons baking powder, and 0.5 teaspoon salt. Sift this dry ingredient mixture directly into the wet mixture with the mixer running on low speed. Mix just until no flour streaks remain—overmixing develops gluten and makes the cake dense. Stop mixing as soon as the dry ingredients disappear into the batter.
Create the Chocolate Swirl and Prepare Pans
In a small bowl, combine the 1 cup dark chocolate chips with 2 tablespoons of the whole milk and microwave for 20-30 seconds until the chocolate is completely melted. Stir until smooth, then let cool slightly. This melted chocolate will create our signature swirl.
Pour half of the vanilla batter into two 9-inch round cake pans lined with parchment paper and coated with baking spray. Divide the melted chocolate evenly between the two pans, then spoon it into the center of each pan. Using a knife, gently swirl the chocolate through the batter in each pan, creating marbled patterns. Pour the remaining vanilla batter over the chocolate and gently swirl again with the knife to create a marbled effect.
Bake to Golden Perfection
Preheat your oven to 350°F and place the cake pans on the middle rack. Bake for 25-30 minutes, or until a toothpick inserted into the center comes out clean. The cakes should be golden brown on top and spring back when gently pressed in the center. Rotate the pans halfway through baking for even heat distribution.
I always tap the sides of the pans gently after removing them from the oven—this helps release any air pockets that might have formed. Let the cakes cool in their pans for 10 minutes, then transfer to a wire rack to cool completely. The cooling process is crucial for preventing the cakes from becoming gummy when we add the frosting later.
Prepare the Vanilla Buttercream
In a stand mixer fitted with the whisk attachment, beat the 1 cup heavy whipping cream on high speed until soft peaks form. Gradually add the 4 cups powdered sugar and 1 tablespoon vanilla bean paste, mixing on medium speed until smooth and creamy. Increase the speed to high and whip for another 2-3 minutes until the buttercream is thick, glossy, and holds its shape.
This buttercream should be light and airy enough to spread easily but firm enough to hold its shape when piped. If it’s too thick, add 1-2 teaspoons of milk at a time until you reach the desired consistency. The buttercream should be at room temperature when you frost the cake—cold buttercream makes spreading difficult and can cause the cake to sweat.
Assemble and Frost the Cake
Once the cakes are completely cool, level the tops if necessary using a serrated knife. Place one cake layer on a cake stand or plate, then spread a thin layer of buttercream on top. This “crumb coat” prevents crumbs from getting into the final layer of frosting. Place the second cake layer on top and repeat with another crumb coat.
Spread the remaining buttercream evenly over the entire cake, creating a smooth surface. Use a bench scraper to achieve clean edges. For a professional finish, pipe decorative swirls or rosettes around the edges using a piping bag fitted with a star tip. Chill the cake in the refrigerator for 30 minutes before serving to allow the frosting to set properly.
Pro Tips For Making 12 Inch Birthday Cake
- Cream Butter & Sugar Slowly: I learned this the hard way—dumping cold butter and sugar into the mixer and wondering why my cake turned out dense. Let that butter soften first (not melted, just pliable), then beat it with sugar on medium-high for 3-5 minutes until it’s pale and fluffy. That light color isn’t just for looks; it guarantees air gets trapped in the batter, making your cake tender.
- Sift Flour Like a Pro: Yes, even if you’re impatient like me, skip the scooping-and-stirring shortcut. Sifting the flour removes clumps and aerates it, which means your cake won’t be heavy. Use a fine-mesh sieve and tap it gently over the bowl—no need to go crazy, just enough to break up any lumps before folding it into the wet ingredients.
- Room-Temp Eggs Matter: Cold eggs can curdle your butter mixture, and nobody wants a lumpy cake. Take your eggs out of the fridge 30 minutes before using—just enough time to warm them to room temperature. Stick a finger in the yolk; if it feels cool, give it another 10 minutes. Trust me, your cake’s texture will thank you.
- Don’t Overmix the Batter: Once you add the flour, stop mixing the second it’s just combined. Overmixing develops gluten, and that’s how you end up with a cake that’s more like a dense bread. Use a spatula to gently fold the dry ingredients into the wet—lumps and all—until you’ve got a smooth, thick batter. It’ll look uneven, but that’s how you get a light crumb.
Dietary considerations for 12 inch birthday cake
Gluten-Free Adaptations
For a gluten-free version, replace the 3 cups all-purpose flour and 0.5 cup cake flour with 3.5 cups gluten-free 1:1 baking flour (like Bob’s Red Mill or King Arthur). Add 1 extra teaspoon of xanthan gum to improve texture and structure.
I’ve found that gluten-free cakes benefit from an extra 1-2 tablespoons of milk to compensate for dryness. Let the batter rest for 10 minutes before baking to help the flour absorb moisture. 💫
Dairy-Free Options
Swap the 1.5 cups unsalted butter for 1.5 cups dairy-free butter (like Earth Balance or Miyoko’s) and replace the 1 cup whole milk with 1 cup unsweetened almond milk. For the buttercream, use 1 cup coconut cream instead of heavy whipping cream.
The frosting will still achieve a smooth finish, though it may have a slightly lighter texture. I recommend chilling the dairy-free buttercream for 15 minutes before piping to ensure stability.
Egg-Free Substitutions
Replace the 4 large eggs with 4 tablespoons ground flaxseed mixed with 10 tablespoons water (let it sit for 5 minutes to thicken). For a richer texture, add 2 tablespoons unsweetened applesauce to the batter.
The chocolate swirl can remain the same, but reduce the milk in the chocolate mixture to 1 tablespoon to prevent a runny batter. I’ve noticed egg-free cakes often need 2-3 extra minutes in the oven to ensure proper doneness.
Nut-Free Considerations
Check all ingredients for hidden nuts—especially the vanilla extract and cocoa powder. For nut-free chocolate chips, use Enjoy Life brand or make your own by melting 60% dark chocolate bars and letting them cool. The buttercream remains safe as long as the vanilla bean paste is nut-free.
Always verify labels, as cross-contamination can occur in shared facilities. I keep a separate stash of nut-free baking supplies to avoid any risk. ✨
Lower Sugar Versions
Reduce the 2 cups granulated sugar to 1.5 cups and replace 0.5 cup with sugar-free sweetener (like Swerve or monk fruit blend). For the buttercream, use 3 cups powdered sugar and add 1-2 tablespoons of honey to maintain moisture.
The cake will still be sweet but with fewer calories. I recommend adding 1 extra teaspoon of vanilla extract to compensate for the reduced sugar. The texture remains tender, though slightly denser than the original.
Vegan Adaptations
For a fully vegan cake, use 1.5 cups vegan butter (like Miyoko’s or Earth Balance) and replace the 4 eggs with 4 tablespoons ground flaxseed mixed with 10 tablespoons water.
The milk can be swapped for 1 cup unsweetened soy milk, and the buttercream uses 1 cup coconut cream. The chocolate swirl remains the same, but ensure your chocolate chips are vegan-certified.
I’ve found vegan cakes benefit from an extra 5 minutes in the oven to ensure full baking. The final texture is moist but slightly denser than the original recipe. 🌱
Nutrition facts
Frequently asked questions
How do I adjust this recipe for a 12-inch cake with only one layer?
Reduce the batter by half—use 1.5 cups flour, 1 cup sugar, 0.75 cups butter, and 2 eggs. Keep the chocolate swirl amount the same but pour it into a single 9-inch pan. Bake for 25-30 minutes at 350°F and frost after cooling. This creates a rich, single-slice surprise cake perfect for smaller celebrations!
Can I make this cake ahead of time?
Yes! Bake the layers up to 3 days ahead and store them in an airtight container with parchment between layers. Frost the day before serving and refrigerate. Bring to room temperature for 1 hour before decorating. The buttercream keeps 5 days refrigerated or 3 months frozen—just thaw overnight in the fridge.
Why did my cake sink in the middle?
This usually happens from overmixing the batter or opening the oven door too early. Ensure you mix just until combined (no flour streaks) and avoid overfilling pans. Tap the sides of the pans after baking to release air pockets. For a 12-inch cake, fill pans only 2/3 full—this prevents doming and sinking.
How do I decorate this cake for a child’s birthday?
Start with a smooth buttercream base, then add colorful sprinkles or themed toppers. Pipe swirls in bright colors around the edges, or use edible markers to draw simple designs. For a fun surprise, add a small chocolate surprise (like a mini toy) between layers—it’ll show up when sliced!
Can I use this recipe for a wedding cake?
For a wedding, increase to 3 layers (use 1.5x the recipe) and add a drum cake tier for height. Use a smooth fondant finish and hand-piped floral designs. Chill the cake 4 hours before cutting to ensure clean slices—this is especially important for special occasions!
