
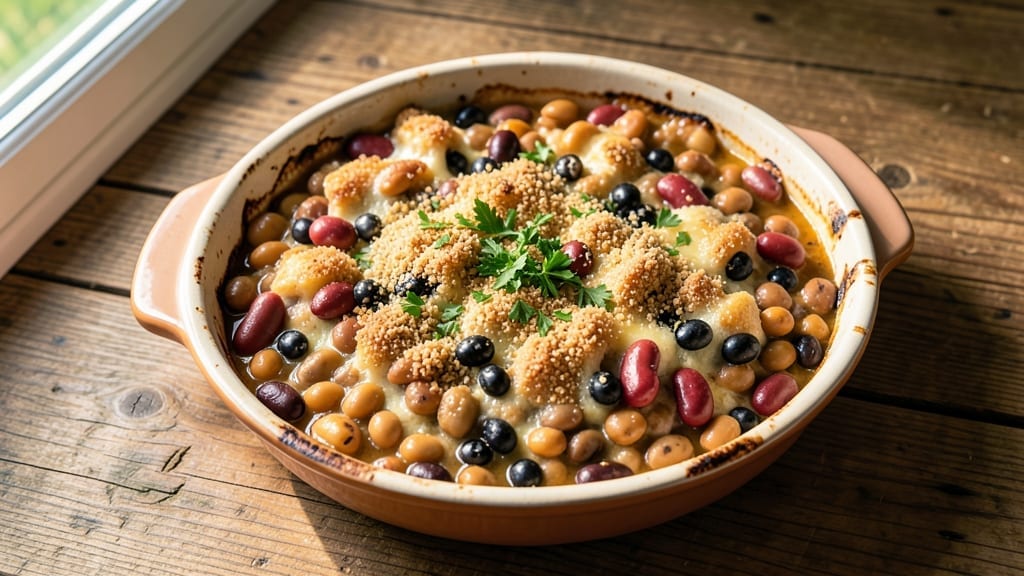
This 7 bean casserole recipe delivers the ultimate one-pan comfort dish with layers of tender beans, creamy soup, and a crispy breadcrumb topping that’s impossible to resist. 🔥 The secret lies in balancing textures—soft beans, velvety soup, and a crunchy finish—that make every bite satisfying.
I’ve perfected this version to be hearty enough for a main dish or a side that steals the show at holiday tables.
The beauty of this recipe is its adaptability—whether you prefer classic cream of mushroom soup or a lighter celery-based version, the technique remains the same. I’ve included tips for vegetarian swaps and gluten-free adjustments, so everyone at the table can enjoy it.
The beans cook until tender while absorbing the rich, savory flavors of the soup, creating a dish that’s both nostalgic and elevated.
What you’ll end up with is a bistro-style casserole that’s warm, hearty, and packed with protein, perfect for chilly evenings or family gatherings. The crispy topping adds a satisfying crunch, while the creamy soup base ties everything together.
This is the kind of dish that feels like a hug in food form—simple to make but impossible to forget.
Serve it alongside roasted meats, grilled vegetables, or even as a standalone meal with crusty bread. The leftovers reheat beautifully, making it ideal for meal prep. Here’s how to make it—your taste buds will thank you.
Ingredients for 7 bean casserole
Pantry staples meet bistro-style comfort in this hearty, protein-packed bean casserole.
| Ingredient | Amount | Notes |
|---|---|---|
| Great Northern Beans (Dried) 🌱 | 1 ½ cups | Soaked overnight for tenderness |
| Navy Beans (Dried) 🌱 | 1 cup | Soaked overnight for tenderness |
| Kidney Beans (Dried) 🌱 | 1 cup | Soaked overnight for tenderness |
| Black-Eyed Peas (Dried) 🌱 | 1 cup | Soaked overnight for tenderness |
| Small Red Beans (Dried) 🌱 | 1 cup | Soaked overnight for tenderness |
| Pinto Beans (Dried) 🌱 | 1 cup | Soaked overnight for tenderness |
| Lentils (Green or Brown) 🌱 | ½ cup | Rinsed before cooking |
| Cream of Mushroom Soup (Vegetarian) 🍄 | 2 cups | Homemade or high-quality canned |
| Chicken-Free Vegetable Broth 💧 | 2 cups | Low-sodium preferred |
| Onion (Yellow or Red) 🧅 | 1 whole | Diced, medium-sized |
| Garlic Cloves 🧄 | 3 cloves | Minced for depth of flavor |
| Celery Stalk 🥬 | 1 whole | Diced, for freshness |
| All-Purpose Flour 🌾 | ½ cup | For crispy topping |
| Panko Breadcrumbs 🍞 | ½ cup | Gluten-free if needed |
| Shredded Cheddar Cheese (Vegetarian) 🧀 | 1 cup | Sharp or mild variety |
| Dried Thyme Leaves 🌿 | 1 tsp | Or 1 tbsp fresh thyme |
| Salt 🧂 | 1 ½ tsp | Diamond Crystal preferred |
| Black Pepper 🌶️ | ½ tsp | Freshly ground |
| Olive Oil 🫒 | 2 tbsp | Extra-virgin for richness |
The beans are the soul of this dish—dried varieties (not canned) give the best texture. Bob’s Red Mill or Whole Foods bulk bins are my go-tos for quality, but any grocery store dried beans work. Soak them overnight in plenty of water to soften—this cuts cooking time dramatically. If you’re short on time, use pre-soaked beans from the canning aisle, but drain and rinse well. The lentils? Green or brown both work, but green holds its shape better. Pro tip: Taste-test your broth after adding the aromatics—adjust salt here, not later.
No cream of mushroom soup? Make your own with mushrooms, cream, and a splash of milk (or coconut milk for vegan). Short on thyme? Dried oregano at half the amount works in a pinch. The celery adds freshness, but if you skip it, extra onion keeps the flavor balanced. For the topping, gluten-free panko is a game-changer if you need it—just use a 1:1 swap. The cheese can be any melty variety: Pepper Jack or Gouda add extra zing. And if you’re prepping ahead, make the topping mix first—it keeps for weeks in the fridge.
This casserole tastes even better the next day as flavors meld. Portion into individual dishes before baking for easy reheating—just pop in the microwave for 2 minutes. Leftovers keep for 4-5 days in the fridge or 3 months frozen. For meal prep, assemble the bean mixture and soup base, then refrigerate uncovered for 1 hour to thicken slightly before adding the topping. Bake straight from the fridge for a restaurant-style finish—the cold beans won’t shift when you add the hot topping.
Why You’ll Love This Recipe
- One-Pot Magic: I swear by this recipe because it’s literally dump-and-bake. Soak the dried beans overnight (or use canned if you’re in a rush), toss them with onions, garlic, and a handful of spices, then layer it all under cheese and breadcrumbs. No chopping, no fuss—just 45 minutes to a dish that smells like home.
- Texture Obsession: That crispy, golden top meets the creamy, hearty bean mix? It’s the best of both worlds. The navy beans add a satisfying bite, while the black-eyed peas bring a little sweetness—honestly, I’ve caught myself eating it straight from the pan when I think no one’s looking.
- Meal Prep MVP: This casserole begs to be made ahead. The flavors deepen overnight, and it reheats like a dream—whether you’re packing lunches for the week or feeding a crowd at Thanksgiving. (Yes, even on a Tuesday night, because let’s be real, who has time for complicated dinners?)
- Pantry Powerhouse: Dried beans are my budget secret weapon, and this recipe stretches them into something extraordinary. No fancy ingredients, just simple, affordable staples that deliver serious comfort. Plus, leftovers taste just as good the next day—proof that good food doesn’t have to break the bank.
Step-by-step instructions for a hearty 7 bean casserole
This bistro-style casserole delivers restaurant-quality comfort in one pan—crispy topping, tender beans, and rich flavors.
🍳 Step 1: Sauté the Aromatic Base
Heat the 2 tbsp olive oil in a large skillet over medium heat. Add the diced 1 whole onion (yellow or red), diced 1 whole celery stalk, and minced 3 cloves garlic cloves. Sauté for 5-6 minutes until the vegetables soften and the garlic releases its fragrant aroma—you should smell a sweet, earthy perfume filling your kitchen.
Here’s the thing—don’t rush this step. The vegetables need time to break down and develop flavor. If they start to brown too quickly, reduce the heat slightly. Once properly softened, transfer the aromatic mixture to your 9×13-inch baking dish—this will form the flavor foundation for your entire casserole.
👨🍳 Step 2: Combine Beans and Liquid Base
Drain and rinse all the soaked beans—1.5 cups Great Northern Beans, 1 cup Navy Beans, 1 cup Kidney Beans, 1 cup Black-Eyed Peas, 1 cup Small Red Beans, and 1 cup Pinto Beans—then add them to the baking dish with the sautéed vegetables. Stir in the 0.5 cup Lentils (Green or Brown) you’ve rinsed earlier.
Pour in the 2 cups Cream of Mushroom Soup (Vegetarian) and 2 cups Chicken-Free Vegetable Broth, then sprinkle with 1 tsp Dried Thyme Leaves, 1.5 tsp Salt, and 0.5 tsp Black Pepper. Give everything a thorough mix—you want the beans completely coated with the flavorful liquid. The mixture should look like a thick, hearty stew at this point.
🥘 Step 3: Prepare the Crispy Topping
In a medium bowl, whisk together the 0.5 cup All-Purpose Flour and 0.5 cup Panko Breadcrumbs until evenly combined. This is your topping base—it needs to be uniform for even crispiness. Stir in 1 cup Shredded Cheddar Cheese (Vegetarian) until the cheese is evenly distributed throughout the crumb mixture.
Here’s where it gets fun—sprinkle this mixture evenly over the bean mixture in the baking dish. You want about ¼-inch thickness of topping across the entire surface. Press down gently with the back of a spoon to help it adhere to the beans below. This step ensures every bite gets that satisfying crunch.
🔥 Step 4: Bake to Golden Perfection
Transfer the baking dish to a preheated 375°F oven and bake for 45-50 minutes. The topping should turn a beautiful golden brown, while the beans underneath bubble and release their rich aromas. You’ll know it’s ready when the edges are crispy and the center has just a slight jiggle—this indicates the beans are tender but not mushy.
I like to tent the dish loosely with foil during the last 10 minutes of baking if the topping is browning too quickly. This prevents burning while still allowing the beans to finish cooking. The casserole should smell like a cozy bistro—earthy beans, cheesy topping, and thyme-infused warmth.
⏰ Step 5: Rest and Serve with Confidence
Remove the casserole from the oven and let it rest for 10 minutes before serving. This resting period allows the beans to absorb any remaining liquid and the topping to set slightly—it makes all the difference in texture. The beans should be fork-tender with just a slight bite, and the topping should be crispy enough to stand up to a spoonful of beans.
Serve warm with crusty bread to soak up every last bit of that creamy bean mixture. The contrast between the crispy topping and tender beans is what makes this dish so satisfying. Real talk: leftovers taste even better the next day as the flavors meld further.
Pro Tips For Making 7 Bean Casserole
- Soak Beans Overnight: Dried beans need time to soften—don’t rush it. I used to skimp on soaking, and the result was a mushy, uneven texture. Cover them in cold water with a pinch of salt, let them sit 8+ hours (or overnight), then drain. This guarantees even cooking and prevents that sad, half-soft mess in your casserole.
- Sort and Rinse Beans: Picking through dried beans for rocks or shriveled bits is tedious, but worth it. A quick rinse in a colander removes dust and debris that’ll turn your casserole gritty. Skip this, and you’ll be chewing on surprises—trust me, I’ve done it.
- Simmer Gently After Boiling: Boil beans hard for 2 minutes to soften skins, then drop the heat to a low simmer. High heat after boiling breaks them down too fast, turning your casserole into a thick paste. Keep it at a gentle bubble—this is where texture makes or breaks the dish.
- Use Half Butter, Half Oil: The topping needs fat to crisp, but butter burns fast. Mix 2 tablespoons melted butter with 2 tablespoons neutral oil (like vegetable or canola) for a golden, flavorful crust without the risk of a bitter, burnt top. Yes, it’s a tiny effort, but it changes everything.
Common mistakes when making this recipe
Over-Soaking Beans
Don’t let your beans soak for more than 12 hours—they’ll absorb too much water and turn mushy when cooked. I’ve ruined a batch by leaving them in overnight, only to find them waterlogged and bland.
Drain and rinse them thoroughly before adding to the casserole, and pat dry if possible. This keeps the texture firm and prevents a soggy final dish. 🌱
Skipping the Sauté
Skipping the aromatic base (onion, celery, garlic) means missing out on 80% of the flavor. These ingredients build the foundation—sauté them until soft and fragrant, not just until they’re “cooked.”
If you rush, the dish will taste flat. Pro tip: Use a nonstick skillet to prevent sticking while developing those flavors. 🧅
Uneven Topping
An uneven topping leads to some bites being soggy, others burnt. Spread the flour-panko-cheese mix in a ¼-inch layer and press gently with a spoon. For extra insurance, chill the topping mix for 15 minutes before adding—it’ll crisp up better.
I once forgot this and ended up with a patchy, sad-looking top. 🍞
Underbaking the Beans
Don’t pull the casserole out too soon—45-50 minutes at 375°F is non-negotiable. The beans need time to become fork-tender, not just “soft.” Check for doneness by piercing a bean with a fork—it should collapse easily. If you cut corners, you’ll end up with a mushy, unappetizing mess. 🔥
Ignoring the Rest Time
Skipping the 10-minute rest after baking means a soggy topping and beans that’ll fall apart. This pause lets the beans absorb residual juices and the topping set. I’ve learned the hard way—when I served it immediately, the crunch disappeared by the second bite. Patience pays off here! ⏰
Using Low-Quality Soup
Cheap, watery cream of mushroom soup will make your casserole taste dull and thin. Opt for homemade soup or a high-quality canned brand like Campbell’s Cream of Mushroom (not the “low-fat” version). The richness is key to that bistro-style depth. I’ve tried the budget brands—don’t make my mistake. 🍄
Nutrition facts
Frequently asked questions
Can I use canned beans instead of dried?
Yes, but with adjustments! Use 2 (15 oz) cans of each bean type (drained and rinsed) instead of dried. For best texture, combine them with 1 cup cooked lentils to maintain the hearty consistency. Dried beans develop deeper flavor, but canned beans save time—just don’t skip the sautéed aromatics for flavor depth.
How do I make this vegetarian?
This recipe is already vegetarian-friendly! Just ensure your cream of mushroom soup and vegetable broth contain no animal products. For extra richness, swap the cheddar for vegan cheese or nutritional yeast. The lentils and beans provide plenty of plant-based protein.
Can I make this gluten-free?
Replace the all-purpose flour with gluten-free flour blend and use gluten-free panko breadcrumbs. For the topping, you can also use crushed gluten-free crackers or almond flour for extra crunch. The rest of the recipe remains the same.
What’s the best way to reheat leftovers?
Reheat in 10-minute increments at 350°F to prevent the topping from getting soggy. Cover loosely with foil for the first 5 minutes, then uncover to crisp up. For microwave reheating, use 30-second bursts on 50% power, stirring between each interval. Leftovers taste even better the next day!
Can I substitute other beans?
Yes, but maintain the mix of textures and colors. Swap 1-2 bean types with chickpeas, lima beans, or white beans for variety. Avoid all white beans—you’ll lose visual appeal and some heartiness. For a Southern twist, add ½ cup cooked collard greens to the bean mixture.

- Baked Potatoes in Crock Pot Recipe: Buttery Interiors and Crispy Top Magic - November 1, 2026
- Braised Beef Short Ribs Recipe: Crock Pot Fall-Off-Bone Magic in 6 Hours - November 1, 2026
- Crock Pot Cocoa Recipe: Velvety Warmth With Hidden Spice Magic - November 1, 2026