
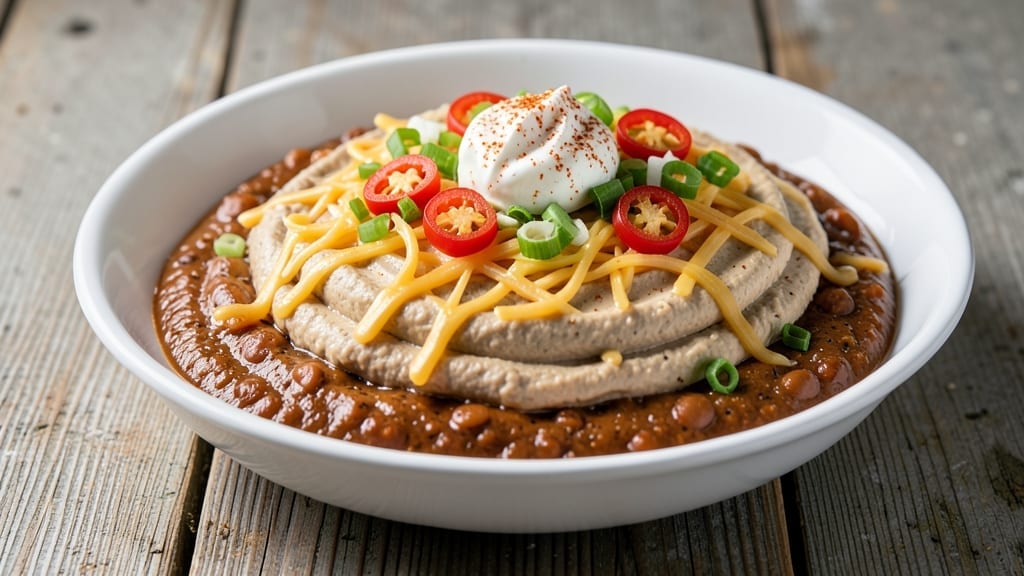
This 7-layer chili dip recipe delivers all the smoky, cheesy goodness of a full meal in one showstopping bowl—perfect for game day, parties, or when you just want to impress. 🔥 The secret lies in layering each component carefully: starting with a rich chili base, then building up with refried beans, cheese, sour cream, and more until you’ve created a vibrant, textured masterpiece that disappears faster than you can say “second helping.”
What sets this recipe apart is the balance of flavors and textures—creamy, spicy, tangy, and savory all in one bite. The chili needs to be heated just right so it doesn’t overpower the layers, while the cheese melts into a gooey blanket that binds everything together.
I’ve tested this recipe countless times, and the key is patience: letting each layer set slightly before adding the next ensures clean slices and no messy slides.
By the time you’re done assembling, you’ll have a dip that looks as stunning as it tastes—vibrant reds, creamy whites, and golden browns stacked in perfect harmony. Serve it with tortilla chips, crackers, or even as a topping for nachos, and watch it vanish in minutes.
The best part? It’s easier to make than you’d think, with just a few simple ingredients and a little layering know-how.
Pro tip: For extra flair, garnish with chopped green onions or jalapeños before serving, and keep the dip warm in a slow cooker or chafing dish so the cheese stays perfectly melted. This is the kind of dish that turns casual gatherings into unforgettable feasts—let’s get layering!
Ingredients for 7 layer chili dip
Seven layers of smoky, cheesy, creamy goodness—this dip is a game-day MVP.
| Ingredient | Amount | Notes |
|---|---|---|
| Canned Chili with Beans 🍅 | 2 cups | Heated and seasoned to preference |
| Refried Beans 🌽 | 1 ½ cups | Canned or homemade, warmed |
| Shredded Monterey Jack Cheese 🧀 | 2 cups | Shredded fresh for best melt |
| Sour Cream 🥛 | 1 cup | Full-fat for creamy texture |
| Diced Green Onions 🧅 | ½ cup | Freshly chopped for garnish |
| Diced Jalapeños 🌶️ | ¼ cup | Pickled or fresh, seeded |
| Tortilla Chips 🍞 | 3 cups | Crushed for base layer |
| Salsa 🍅 | ½ cup | Mild or medium for topping |
| Ground Cumin 🌿 | 1 tsp | Toasted for deeper flavor |
| Smoked Paprika 🌶️ | ½ tsp | For smoky depth in chili |
| Salt 🧂 | ½ tsp | Kosher or sea salt |
| Black Pepper 🌶️ | ¼ tsp | Freshly ground preferred |
| Olive Oil 🫒 | 1 tbsp | For layering and binding |
The chili is the foundation, so grab canned chili with beans—the kind with chunky tomatoes and kidney beans works best. Trader Joe’s has a great one, or check the Latin foods aisle for bold flavors. For extra smokiness, add 1/2 tsp smoked paprika and 1/4 tsp cumin to the chili while heating. The refried beans? Canned is fine, but homemade tastes like a hug. Warm them with a splash of water or broth if they’re thick. Monterey Jack melts like a dream, but cheddar mixed in adds a nice tang—just don’t overmix or you’ll lose that layered look.
No tortilla chips? Crushed corn chips or even saltines work in a pinch, but trust me, the classic blue corn chips add that perfect crunch. The jalapeños can be pickled or fresh—pickled keeps things bright, fresh gives a little heat. Sour cream is non-negotiable for creaminess, but Greek yogurt works too if you’re watching calories. Pro move: Toast the crushed chips in olive oil for 2 minutes before assembling—it keeps them from getting soggy. And if you’re feeling fancy, swap the salsa for mango-habanero for a sweet-spicy kick.
Assemble this dip in a 9-inch oven-safe dish so you can warm it straight from the fridge. The layers set best when chilled for at least 1 hour, but if you’re in a hurry, pop it in the oven at 350°F for 10 minutes to melt the cheese. Keeps 3-4 days in the fridge, covered tightly. For parties, make it ahead and reheat in 10-minute bursts—microwaving can make the layers slide. Garnish with extra jalapeños and green onions right before serving, because fresh toppings always taste better
Why You’ll Love This Recipe
- Pantry to Plate: I swear, this dip comes together with stuff I already have. Open a can, spread some beans, sprinkle cheese—it’s like building a snack tower with zero stress.
- Creamy Spicy Magic: That first bite? Warm chili, cool sour cream, melty cheese—it’s the perfect push-and-pull of textures and heat. The green onions add a fresh little zing that ties it all together.
- Game for Any Gathering: Superbowl spread? Kids’ soccer party? My lazy Sunday. This dip shows up for everything, and honestly, I’ve never had a guest not ask for seconds.
- Leftovers? More Like Leftovers?: Make it once, eat it twice. The layers hold up in the fridge, and it’s even better the next day when flavors meld. Plus, it’s cheap enough to stretch for a week without guilt.
Step-by-step instructions for 7 layer chili dip
Here’s how to assemble this smoky, cheesy masterpiece—layer by layer!
🥘 Step 1: Build the Crunchy Chip Base
Start by crushing the 3 cups tortilla chips into small, even pieces using your hands or a rolling pin. This creates the perfect textured foundation. Spread the crushed chips evenly across the bottom of a 9-inch oven-safe dish, pressing them down lightly with your fingers to create a compact base. This layer will hold everything together and provide that addictive crunch with every bite.
Here’s the thing—don’t skip pressing the chips down. If they stay loose, your dip will be unstable and topple over. I like to use a glass to gently press them into the dish, creating an even surface for the layers to come. This first layer is the most important—it sets the stage for all the flavors to come!
🍳 Step 2: Spread the Chili and Seasoned Beans
Heat the 2 cups canned chili with beans in a saucepan over medium heat for 3-4 minutes until warmed through. Stir in the 1.5 cups refried beans, 1 tsp ground cumin, 0.5 tsp smoked paprika, 0.5 tsp salt, and 0.25 tsp black pepper. Spread this mixture evenly over the chip layer, smoothing it out with a spatula. You want a thin, even layer that covers the entire surface—this ensures every bite has that perfect balance of chili and beans.
Watch for the chili to bubble gently as it heats. If it starts to boil vigorously, reduce the heat slightly. The beans should be warmed through but not dry. Once spread, give it a quick press with the back of a spoon to help it adhere to the chips. This layer carries the hearty, smoky flavor that makes this dip so irresistible!
🥛 Step 3: Add the Cheese and Sour Cream Layers
Sprinkle the 2 cups shredded Monterey Jack cheese evenly over the chili mixture, pressing down lightly with your fingers to help it stick. Next, spread the 1 cup sour cream in a thin, even layer over the cheese. Use the back of a spoon to smooth it out—you want it to cover the cheese completely but stay thin enough that it doesn’t pool in the center. This layering technique creates that perfect creamy texture that balances the rich chili flavors.
Don’t worry if it looks like too much cheese—trust me, it’s just right for this recipe. The sour cream adds that cool, creamy contrast that makes every bite so satisfying. Here’s where it gets fun: if you like extra creaminess, you can add a thin layer of sour cream between the cheese and the next layer, but I find this amount works perfectly for a rich but not overly heavy dip.
🌶️ Step 4: Top with Jalapeños, Green Onions, and Salsa
Scatter the 0.25 cup diced jalapeños and 0.5 cup diced green onions evenly over the sour cream layer. Finally, drizzle the 0.5 cup salsa in a thin layer over the top, spreading it out with the back of a spoon. These final toppings add freshness, a little heat, and vibrant color that makes the dip look as good as it tastes. The jalapeños bring a nice kick, while the green onions add a fresh, crisp contrast to the rich layers below.
Here’s a pro tip: if you’re using fresh jalapeños, remove the seeds and membranes for a milder heat. For extra flavor, you can lightly toast the jalapeños in a dry skillet for 1-2 minutes before adding them to the dip. This enhances their natural sweetness and brings out their flavor even more. The salsa should be spread thinly—just enough to add color and a little tangy brightness without overwhelming the other flavors.
🔥 Step 5: Bake Until Bubbly and Golden
Drizzle the 1 tbsp olive oil evenly over the top of the dip. Place the dish on a baking sheet (to catch any potential drips) and bake at 375°F for 15-20 minutes, until the cheese is fully melted, bubbly, and golden brown around the edges. You’ll know it’s ready when the top is set but still has a slight sheen from the melted cheese. If the edges start to brown too quickly, tent the dish with foil to prevent over-browning.
Resist the urge to peek in the oven during baking—every time you open it, you risk losing heat and steam, which can cause the cheese to separate or the layers to shift. Once it comes out of the oven, let it cool for 5-10 minutes before serving. This resting time allows the layers to set slightly, making it easier to slice and serve. The dip should be warm, gooey, and ready to impress your guests!
Pro Tips For Making 7 Layer Chili Dip
- Warm the refried beans: I used to just scoop them straight from the can, but that’s a texture disaster—lumpy, cold, and clumpy. Heat them gently in a small saucepan with a splash of water or milk (about 2 tablespoons) until they’re smooth and just warm enough to spread. This keeps the layers from separating later, and your dip won’t taste like you microwaved a brick.
- Layer sour cream last: If you add sour cream too early, it’ll get soggy and watery before you even serve it. Spread it as the topmost layer right before serving—it’ll stay thick and creamy, not turn into a sad, thin glaze. Pro move: Use a spoon to gently press it into the cheese layer so it sticks.
- Skip the pre-shredded cheese: Pre-shredded cheese has anti-caking agents that make it clump like a science experiment gone wrong. Buy a block of Monterey Jack, shred it yourself with a box grater, and pat it dry with a paper towel to remove excess moisture. Your layers will stay clean and crisp, not gloppy.
- Chill it 30 minutes before serving: I know, you want to eat it immediately, but giving it time in the fridge lets the flavors meld and the layers set properly. If you’re impatient, at least let it sit uncovered for 10 minutes at room temp—this prevents a sad, runny mess when you cut into it. Trust me, the wait makes the dip taste better.
Troubleshooting your 7 layer chili dip
Chili Too Watery?
If your chili looks soupy after heating, stir in 1-2 tablespoons of cornstarch mixed with 1 tablespoon cold water while warming. Simmer for 2-3 minutes until it thickens slightly. For extra insurance, add 2 tablespoons of refried beans to the chili layer—they’ll absorb excess moisture and add stability.
I’ve found this trick works especially well with canned chilis that have thin sauces. 🔥
Cheese Not Melting?
If your cheese stays clumpy or doesn’t melt smoothly, try pre-shredding it yourself instead of using pre-shredded cheese (which contains anti-caking agents). For extra meltability, mix 1 teaspoon of milk or cream cheese into the shredded cheese before adding it to the dip.
Also, bake at 375°F for 10-15 minutes instead of the full 20 minutes—sometimes high heat causes cheese to separate. 🧀
Layers Sliding Apart?
Press each layer firmly with the back of a spoon or a flat-bottomed glass before adding the next one. For extra adhesion, lightly brush each layer with 1 teaspoon olive oil between additions.
If your dip still slides, chill it in the fridge for 30 minutes before baking—this helps the layers set before the cheese melts. I’ve also had success using a 9-inch pie dish instead of a round casserole dish for better stability. ✨
Too Spicy or Bland?
Adjust heat by reducing jalapeños to 2 tablespoons for mild or adding 1 teaspoon cayenne powder to the chili for extra kick. For blandness, boost flavor by adding ½ teaspoon garlic powder and ¼ teaspoon onion powder to the chili layer.
I like to toast the spices in a dry pan for 30 seconds before mixing to deepen their flavor. 🌶️
Dip Too Dry?
If your dip lacks creaminess, add an extra ¼ cup sour cream or 2 tablespoons Greek yogurt between the cheese and jalapeño layers. For moisture, drizzle 1 tablespoon hot water over the chili layer before adding cheese—this steams the cheese slightly for a creamier texture.
I’ve also seen success adding 2 tablespoons of cream cheese to the sour cream layer. 🥛
Nutrition facts
Frequently asked questions
Can I make this dip ahead of time?
Assemble the dip up to 24 hours ahead and refrigerate uncovered. The layers will set perfectly, making it easier to slice. When ready to serve, bake at 375°F for 15 minutes to melt the cheese. For parties, this is a game-changer—just pop it in the oven before guests arrive!
What’s the best way to serve it?
Classic tortilla chips are ideal, but you can also serve it with corn chips, crackers, or even as a nacho topping. For extra flair, arrange it on a platter with fresh jalapeños and green onions on the side. Keep it warm in a slow cooker on low heat for serving. Pro tip: Use a serrated knife to slice clean portions!
Can I make this dip vegetarian?
Yes! Swap the chili for a vegetarian chili (check labels for meat-free options) or use a mix of black beans, kidney beans, and lentils with tomato sauce. Add 1 teaspoon cumin and smoked paprika for depth. The refried beans and cheese layers stay the same—it’ll still be packed with flavor!
Why does my dip slide apart when slicing?
This usually happens if layers aren’t pressed firmly or the dip isn’t chilled long enough. Press each layer with a spoon or glass before adding the next, and chill for 30 minutes before baking. For extra stability, use a 9-inch pie dish instead of a round casserole dish. A quick fix: freeze for 10 minutes before slicing!
How can I make it less spicy?
Reduce the jalapeños to 1 tablespoon or omit them entirely. For extra mildness, use pickled jalapeños (they’re less potent than fresh). If you love heat but want balance, add 1/4 cup sour cream to the top layer—it cools the spice beautifully!

- 12 Bean Chili Recipe: Hearty Slow-Cooked Depth With 12 Legumes - October 17, 2026
- 5 Seed Bread Recipe: Nutty Crunch and Artisan Flavor in One Loaf - October 17, 2026
- 1 Lb Macaroni Salad Recipe: Bold, Crunchy, and Crowd-Pleasing - October 17, 2026