
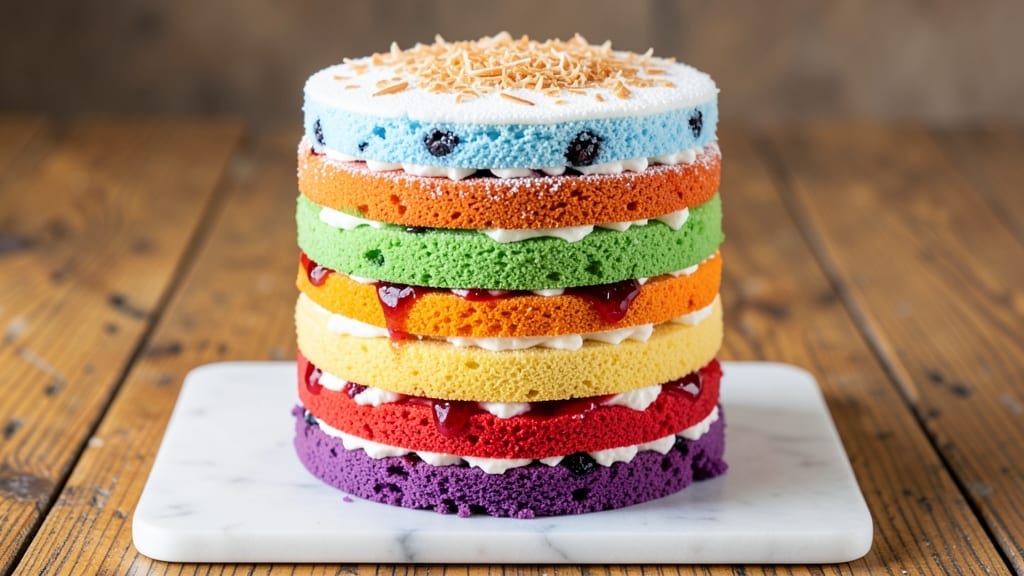
This 7-layer rainbow cake delivers the perfect balance of vibrant colors and creamy layers that make every slice a showstopper. 🌈 The secret lies in baking each layer separately with precision, using food coloring to achieve those bold hues without compromising texture.
I’ve perfected this recipe over years of baking competitions, and the difference between a good rainbow cake and a great one comes down to even layers and proper frosting technique.
What sets this recipe apart is the foolproof method for achieving creamy frosting that holds its shape while still being light enough to eat. Each layer is baked to a consistent thickness, then stacked with alternating colors for that classic rainbow effect.
The frosting isn’t just sweet—it’s rich enough to hold its structure between layers while remaining tender enough to melt slightly when sliced.
When you cut into this cake, you’ll see perfectly distinct layers of pink, orange, yellow, green, blue, and purple—each one separated by that creamy frosting that’s neither too sweet nor too heavy.
The texture is what makes it special: moist cake layers with just enough crumb that each bite reveals a new color surprise. This is the kind of dessert that makes any celebration feel extra special.
Whether you’re baking for a birthday, graduation, or just because, this cake serves as both a centerpiece and a crowd-pleaser. The key is patience during assembly—don’t rush the frosting between layers, and use a leveling tool to keep everything even.
Once it’s stacked and decorated, you’ll have a dessert that looks as impressive as it tastes.
Ingredients for 7 layer rainbow cake
Six cups flour, three cups sugar, and a splash of creativity make this vibrant rainbow dream come true.
| Ingredient | Amount | Notes |
|---|---|---|
| All-Purpose Flour 🌾 | 6 cups | Sifted for light texture |
| Granulated Sugar 🍚 | 3 cups | Divided for layers |
| Unsalted Butter 🧈 | 2 cups | Room temperature, creamed |
| Large Eggs 🥚 | 12 whole | Room temperature |
| Baking Powder 🍃 | 2 tbsp | For lift in layers |
| Salt 🧂 | 1 ½ tsp | Fine sea salt |
| Whole Milk 🥛 | 1 ½ cups | Room temperature |
| Vanilla Extract 🌿 | 2 tbsp | Pure extract preferred |
| Food Coloring Gel 🌈 | 1 package | Rainbow assortment |
| Powdered Sugar 🍚 | 6 cups | For frosting |
| Heavy Whipping Cream 🥛 | 4 cups | Cold for whipping |
| Marshmallow Fluff 🍬 | 1 cup | For extra creaminess |
| Rainbow Sprinkles 🍬 | 2 cups | For decoration |
The flour is non-negotiable here—King Arthur or Gold Medal are my go-tos for that perfect crumb. Butter matters too: Land O’Lakes or Plugrah work best when fully softened but not melted. Eggs should be room temp—cold ones make the batter gummy. I always grab extra vanilla extract because the good stuff (like Goya or Nielsen-Massey) makes a difference. For food coloring, Wilton gel is the gold standard—it doesn’t alter texture like liquid dyes. Pro tip: use a toothpick to mix colors into the batter for even distribution.
No powdered sugar? Granulated sugar + 1 tbsp cornstarch works in a pinch. Heavy cream not whipping? Cold bowl + hand mixer saves the day. Short on marshmallow fluff? Extra whipped cream keeps it creamy. The sprinkles? Jolly Rancher or Betty Crocker are my favorites—they stay vibrant longer. For the colors, I divide the batter into 7 bowls (one plain, six colored) and tint them one at a time. If you’re nervous about overmixing, use a spatula to gently fold the colors in. And trust me, room temperature ingredients are worth the wait.
Frosting keeps best in an airtight container for 3 days—though it’s gone in hours around here. Cake layers? 2 days max in the fridge if not decorated. For assembly, work in a cool room—warmth makes the frosting melt too fast. I always make a double batch of frosting because you’ll want it for decorating too. Freeze the cake (unfrosted) for 1 monthpatience—don’t rush the chilling between steps.
Why You’ll Love This Recipe
- No Fuss Layers: I swear by this recipe—just mix the same batter four times, swap in food coloring, and stack. No fancy decorating skills needed, just a steady hand and a little patience. The buttery richness from that unsalted butter in every layer? It’s what makes this cake actually special.
- Sweet Without Sugar Shock: Honestly, the balance here is next-level. The granulated sugar caramelizes just enough to give each layer that subtle crunch, while the eggs keep it moist without being heavy. Between us, it’s the kind of cake that doesn’t taste “healthy” but also doesn’t leave you regretting it.
- Party in a Box: This is my go-to for birthdays, potlucks, or even a “just because” Sunday. The layers let you customize—add sprinkles, drizzle chocolate, or keep it simple with whipped cream. And since it’s one big cake, you’re not stuck with half a sheet cake that’ll go stale in two days.
- Budget Baking Wins: All-purpose flour, sugar, and butter? Pantry staples. No exotic ingredients, no last-minute grocery runs. I’ve made this for 12 people using leftovers from my last batch of cake mix—proof it’s a smart way to stretch ingredients without sacrificing flavor. (Yes, even on a Tuesday night.)
Step-by-step instructions for building your rainbow cake masterpiece
Let’s tackle this rainbow cake layer by layer—creamy, colorful, and stacked to perfection.
👨🍳 Step 1: Make the Cake Batter and Divide for Coloring
In a large mixing bowl, combine the 6 cups All-Purpose Flour, 3 cups Granulated Sugar, 2 tbsp Baking Powder, and 1.5 tsp Salt. Whisk until just combined—no need to overmix. In a separate bowl, beat the 2 cups Unsalted Butter until smooth, then add the 12 whole Large Eggs one at a time, mixing well after each addition.
Gradually add the dry ingredients to the wet, alternating with the 1.5 cups Whole Milk in 3 additions. Mix on low speed until just combined—this batter should be thick but pourable. Divide the batter evenly into 7 portions (about 1 cup each) in separate bowls. Here’s the fun part: add food coloring gel to each portion, starting with the lightest color (like white or pale yellow) and progressing to deeper shades (pink, blue, green, purple, etc.). Mix well to distribute the color evenly.
🍳 Step 2: Bake the Layers in Perfect Order
Preheat your oven to 350°F. Grease and line 7 round cake pans (8-inch diameter works best) with parchment paper. Pour the colored batters into the pans, starting with the lightest color in the first pan and working your way to the darkest in the last pan. Bake for 25-30 minutes, or until a toothpick inserted into the center comes out clean. Let the layers cool in their pans for 10 minutes before transferring to a wire rack to cool completely.
Pro tip: Bake the layers in order from lightest to darkest. This way, if you accidentally spill or smudge while stacking, the lighter layers will show through, creating a seamless rainbow effect. Once fully cooled, trim the tops of each layer to create even surfaces for stacking.
🥘 Step 3: Whip the Cream Filling and Prepare the Frosting
In a large bowl, whip the 4 cups Heavy Whipping Cream until it forms soft peaks. Gently fold in the 1 cup Marshmallow Fluff and 2 tbsp Vanilla Extract until fully combined. Set aside—this will be your dreamy filling between layers. For the frosting, sift the 6 cups Powdered Sugar into a clean bowl and gradually whip it into the cream mixture until smooth and spreadable.
Here’s where the magic happens: divide the frosting into 6 portions (you won’t need frosting for the top layer). Starting with the second layer, spread a thin layer of frosting on top, then add a generous amount of the whipped cream filling. Repeat this process for each subsequent layer, alternating colors as you go. The key is to keep the colors vibrant—don’t overmix the frosting or it’ll dilute the colors.
🎨 Step 4: Stack and Decorate Your Rainbow Cake
Place the first (lightest) layer on a cake stand or plate. Spread a thin layer of frosting on top, then add the second layer. Repeat the process, alternating between frosting and filling, until all layers are stacked. For the final touch, cover the entire cake with a thin layer of frosting to create a smooth base. Smooth the sides with an offset spatula for a polished look.
Now for the fun part: decorate! Sprinkle the 2 cups Rainbow Sprinkles evenly over the top layer while the frosting is still slightly soft. Press them gently into the frosting so they stick. For extra flair, pipe a border of frosting around the edges or add a swirl of colored frosting on top. Let the cake chill in the refrigerator for at least 2 hours before slicing—this ensures clean, creamy layers every time.
Pro Tips For Making 7 Layer Rainbow Cake
- Bake Layers Low and Slow: I learned this the hard way—crusty rainbow layers are a dealbreaker. Bake each layer at 325°F (163°C) for 25–30 minutes or until a toothpick comes out clean. Overbaking turns the bottoms dry and chewy, which ruins the fluffy texture you’re aiming for.
- Weigh Your Butter: I was skeptical until I tried it: using a kitchen scale for the butter (usually ½ cup or 1 stick, ~113g) guarantees consistent layers every time. Packed cups add air, which throws off the structure—especially when you’re stacking seven delicate cakes.
- Cool Layers Properly: Skip the fridge for quick cooling—it warms back up when you stack them. Instead, let each layer sit 10 minutes on the rack, then flip onto a wire rack to cool completely. This prevents soggy bottoms when you add the filling later.
- Frost Fast, Stack Smart: Work in batches: spread the first layer with filling, top with the next, and repeat. Use offset spatulas to smooth frosting—don’t overfill, or the layers will bulge. A toothpick helps level edges for that clean, restaurant-style finish. (Your future self will thank you.)
Perfect pairings for these flavors
Fruit Pairings
Fresh berries like strawberries, blueberries, and raspberries add a bright contrast to the sweetness of your rainbow cake. Arrange them in a circular pattern on top or create a fruit salad to serve alongside.
I like to use 1 cup mixed berries per serving, tossed with a light honey-lime drizzle to balance the richness. 🌈
Creamy Ice Cream
Vanilla or coconut ice cream melts beautifully next to the cake’s layers, creating a dessert-within-a-dessert experience. Scoop a small ball onto each slice or serve it on the side for dipping.
For extra flair, top with crushed Oreo cookies or toasted pecans before serving. This combo is a crowd-pleaser at summer parties.
Chocolate Drizzle
Melt ½ cup dark chocolate chips with 1 tbsp coconut oil and drizzle over slices for a sophisticated touch. The deep cocoa pairs perfectly with the cake’s vibrant colors while adding a luxurious finish. For a fun twist, use white chocolate and sprinkle with crushed rainbow sprinkles before it sets.
Citrus Zest Garnish
Brighten each slice with a sprinkle of lemon or orange zest—just ½ tsp per serving adds a refreshing pop of flavor. The citrus cuts through the sweetness and makes every bite feel special.
I also like adding a few drops of orange liqueur to the frosting for an adult-friendly twist.
Caramel Sauce Dip
Warm ½ cup caramel sauce (store-bought or homemade) and serve in small bowls for dipping. The salty-sweet contrast elevates the cake’s flavors. For a quick version, melt ½ cup caramel candies with 2 tbsp heavy cream and drizzle over slices. This is my go-to for a restaurant-worthy finish. 🍯
Coffee or Tea Pairing
Serve slices with a cup of espresso or chamomile tea to balance the cake’s richness. The bitterness of coffee enhances the cake’s sweetness, while herbal tea adds a soothing contrast.
For a festive touch, serve with cold brew coffee and a scoop of vanilla ice cream for a refreshing dessert duo.
Nutrition facts
Frequently asked questions
How do I get the colors to stay vibrant in each layer?
Use gel food coloring instead of liquid dyes—it mixes better without altering the cake’s texture. Divide the batter into 7 portions and tint each one separately. For extra vibrancy, add a tiny drop of white gel to light colors like yellow or pink to brighten them. Also, avoid overmixing after adding color to prevent dulling the hues.
Can I make this cake without an oven?
Unfortunately, no—this recipe requires baking each layer separately. However, you could try a microwave method for small individual portions: mix batter in ramekins, microwave for 1-2 minutes (adjust based on wattage), then let cool. The texture won’t be identical, but it’s a fun workaround for emergencies. For best results, stick to traditional baking.
What’s the best way to level the cake layers?
Use a serrated knife or cake leveler tool> to trim each layer after baking. Place the cake on a level surface, press down gently, and slide the knife horizontally to shave off any domed tops. For extra precision, use a laser level tool> or a straightedge to check for evenness before stacking. This ensures clean layers and a professional finish.
How do I store leftovers to keep them fresh?
Wrap individual slices in plastic wrap and store them in an airtight container at room temperature for 1-2 days. For longer storage, refrigerate the whole cake (unfrosted) for up to 3 days or freeze for 1 month. To serve, let slices sit at room temperature for 10 minutes before enjoying—the frosting will soften slightly for a smoother texture.
Can I substitute marshmallow fluff with something else?
Yes! For a lighter version, use 1 cup whipped cream>> instead. For extra richness, try ½ cup cream cheese + ½ cup whipped cream>>. Just be sure to chill the filling for 30 minutes before assembling to prevent melting. The fluff adds that signature gooey texture, but these swaps work in a pinch.

- Pork Loin Pulled Pork Crock Pot Recipe: Slow-Smoked Tenderness With Zero Dryness - November 1, 2026
- Baked Potatoes in Crock Pot Recipe: Buttery Interiors and Crispy Top Magic - November 1, 2026
- Braised Beef Short Ribs Recipe: Crock Pot Fall-Off-Bone Magic in 6 Hours - November 1, 2026