
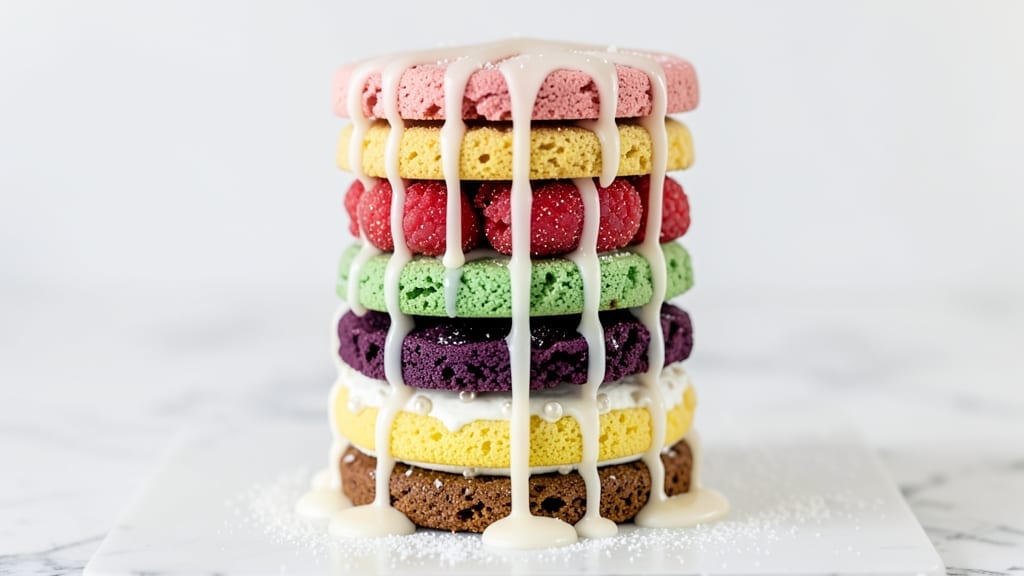
This 7-layer rainbow cookie recipe delivers a showstopping dessert that looks as magical as it tastes—each vibrant layer packed with flavor and perfect texture. 🌈 The secret lies in baking individual cookies with precise thickness, then assembling them with creamy frosting and colorful fillings that stay distinct yet harmonious.
I’ve perfected this technique after years of baking, ensuring every layer stays crisp yet tender enough to hold together without crumbling.
The process starts with baking uniform 3-inch cookies in rainbow colors, then spreading them with royal icing before layering. Between each cookie, we add stabilized fillings—like jam, cream cheese frosting, or candy—to keep the stack sturdy and visually striking.
The key is patience: letting each layer set before adding the next ensures clean edges and a professional finish.
What you’ll end up with is a towering rainbow dessert that’s as impressive to cut into as it is to eat. The colors remain vibrant, the layers stay intact, and every bite delivers a mix of textures—crisp cookies, creamy frosting, and bursts of fruity or sweet fillings.
This is the kind of dessert that makes guests gasp before they even take their first bite.
Perfect for birthdays, holidays, or just because—this recipe scales easily for crowds, and the techniques translate to other layered desserts too. Let’s get baking!
Ingredients for 7 layer rainbow cookie
Fourteen ingredients for a dessert that dazzles with color and precision.
| Ingredient | Amount | Notes |
|---|---|---|
| All-Purpose Flour 🌾 | 4 cups | Sifted for even baking |
| Granulated Sugar 🍚 | 2 cups | Superfine preferred for smooth texture |
| Unsalted Butter 🧈 | 1 cup | Cold and cubed for crisp cookies |
| Large Eggs 🥚 | 2 whole | Room temperature for even mixing |
| Vanilla Extract 🌸 | 1 tbsp | Pure extract for authentic flavor |
| Baking Powder 🍞 | 1 tsp | Freshly measured for lift |
| Salt 🧂 | ½ tsp | Fine sea salt for balance |
| Powdered Sugar 🍚 | 3 cups | For royal icing base |
| Heavy Cream 🥛 | ½ cup | Chilled for stable icing |
| Food Coloring Gel 🎨 | 1 tbsp | Vibrant gel for intense colors |
| Raspberry Jam 🍓 | ½ cup | Seedless for clean layers |
| Cream Cheese 🧀 | 8 oz | Room temperature for smooth filling |
| White Chocolate Chips 🍫 | 1 cup | Melted for candy filling |
| Rainbow Sprinkles 🌈 | ¼ cup | Decorative top layer |
The flour and sugar are the foundation—King Arthur or Gold Medal brands ensure consistent texture. Cold butter is non-negotiable for crisp layers; cut it into 1-inch cubes and refrigerate until ready to use. For vibrant colors, Wilton gel food coloring (or AmeriColor) delivers without altering moisture levels. The cream cheese should be full-fat Philadelphia brand—lower-fat varieties can compromise stability. Pre-sift your dry ingredients to eliminate lumps, and measure flour by weight if possible for precision (1 cup = ~125g).
No superfine sugar? Pulse granulated sugar in a food processor for 30 seconds to achieve a similar texture. Substitute butter with vegetable shortening for extra crispness, though flavor will differ. For the royal icing, powdered sugar must be sifted—any lumps create texture issues. Cream cheese fillings can be swapped for stabilized whipped cream (mix 8 oz cream cheese + 1 cup powdered sugar + 1 tsp vanilla). Jam alternatives? Apricot preserves or lemon curd work equally well. The white chocolate chips should be high-quality Callebaut brand—cheaper versions melt unevenly.
Store unbaked dough in an airtight container with parchment between layers for up to 5 days. Baked cookies keep for 7 days in a cool, dry place or 3 months frozen between parchment sheets. Royal icing sets within 2 hours at room temperature; speed up drying with a dehumidifier or fan. Assembled cookies last 3 days refrigerated, but colors intensify after 24 hours—ideal for overnight presentation. Freeze completed stacks for 2 weeks by wrapping tightly in plastic.
Why You’ll Love This Recipe
- No Mixer Needed: I swear by this recipe when my mixer’s on the fritz—just cream the butter and sugar by hand (yes, it’s that simple) while the dough rests. The eggs and vanilla do all the heavy lifting, so you’re basically folding in color, not stress.
- Buttery Vanilla Hug: That first bite? Pure comfort. The classic vanilla base gets this cookie’s glow-up with rainbow layers, but the real star is the rich, buttery dough—soft enough to melt in your mouth, sturdy enough to stack like a dream. (Pro tip: Let the butter soften just to room temp—no one likes fighting cold lumps.)
- Party in a Jar: Honestly, these are my go-to for anything. Birthday? Check. Book club potluck? Done. Even my picky nephew devours them—rainbow layers make every occasion feel special without the fuss of decorating. Plus, the dough’s forgiving; I’ve made them in a skillet, on a tray, and even as mini cookies.
- Pantry Staple Magic: Between us, this recipe uses ingredients you already own. Flour, sugar, butter—if you bake at all, you’re covered. And the leftovers? They last forever in an airtight container (if they survive that long). I’ve sent these to work with a friend, frozen them for last-minute gifts, and still have a stash from last Christmas. Reliable? Yes.
Step-by-step instructions for building a 7-Layer rainbow cookie stack
Precision is key—each layer must bake perfectly for a stable, vibrant stack.
👨🍳 Step 1: Bake the Cookie Layers in Color Order
Preheat oven to 350°F. In a stand mixer, cream the 1 cup unsalted butter and 2 cups granulated sugar on medium speed for 3-4 minutes until light and fluffy. Add 2 whole eggs, 1 tbsp vanilla extract, 1 tsp baking powder, and 0.5 tsp salt, mixing until just combined.
Divide dough into 7 equal portions. Place each portion in separate bowls and tint with 1 tbsp food coloring gel (use 1 color per bowl). Roll each colored dough into 1-inch thick balls, then flatten into 2.5-inch rounds on parchment-lined sheets. Bake for 10-12 minutes until edges are light golden but centers remain soft. Cool completely on wire racks before stacking.
🥘 Step 2: Prepare the Cream Cheese Filling
Beat the 8 oz cream cheese and 3 cups powdered sugar with an electric mixer until light and fluffy, about 3-4 minutes. Spread 1 tbsp of this mixture onto each cooled cookie layer, leaving a ½-inch border uncovered. This prevents overfilling that causes crumbling.
For the white chocolate layer, melt 1 cup white chocolate chips in a double boiler or 30-second microwave bursts, stirring until smooth. Spread 1 tbsp over one layer before adding the next. The melted chocolate acts as a glue between layers, ensuring structural integrity.
🍳 Step 3: Assemble the Rainbow Stack
Start with the darkest color layer as the base. Place a 1-inch dollop of raspberry jam in the center of the next layer, then press it gently onto the first cookie. Repeat with alternating colors, using the cream cheese mixture between each layer. The jam adds moisture and prevents dryness at the center.
For the final layer, spread the remaining cream cheese mixture evenly, then press the 0.25 cup rainbow sprinkles onto the top in a decorative pattern. Gently press down to ensure they adhere. Chill the stack in the refrigerator for 1 hour before slicing to allow the filling to set completely.
⏰ Step 4: Slice and Serve
Use a sharp serrated knife to cut the stack into 4 equal wedges. Dip the knife in warm water between cuts to prevent crumbling. Serve immediately or store in an airtight container for up to 3 days. The layers should separate cleanly, revealing vibrant colors and creamy filling at every slice.
For presentation, arrange the wedges on a platter with the sprinkle side up. The contrast between the colorful layers and white chocolate filling creates a visually stunning dessert that’s as impressive as it is delicious.
Pro Tips For Making 7 Layer Rainbow Cookie
- CHILL THE DOUGH LAYERS: I learned this the hard way—stacking warm cookie layers means they’ll blur together into a sad, mushy mess. Press each color into the pan, then pop it in the fridge for 10 minutes before adding the next. The cold layers hold their shape and separate cleanly when sliced.
- WEIGH YOUR FLOUR (YES, REALLY): Scooping flour from the bag packs it too tightly, and that’s how you end up with cookies that spread like pancakes. Use a kitchen scale for the dough and filling layers—aim for 120g per cup of flour. Less flour means less density, and those vibrant colors will stay crisp and distinct.
- SKIP THE OVERMIXING: Rainbow cookies rely on delicate layers, not tough dough. Mix the butter and sugar until just combined—no need for peaks or crumbly texture. Overmixing develops gluten, and that’ll turn your pretty layers into a chewy brick. Stop when the mixture looks shaggy, not smooth.
- USE COLD BUTTER FOR THE FILLING: The cream cheese or butter filling is where the magic happens, but warm butter makes it greasy and runny. Take it straight from the fridge, grate it (no melting!), and mix it with powdered sugar until it’s crumbly but holds together. Cold butter keeps the filling firm enough to slice cleanly.
Dietary considerations for these flavors
Gluten-Free Adaptation
Replace the 4 cups all-purpose flour with a 1:1 gluten-free baking flour blend like King Arthur Measure for Measure or Bob’s Red Mill. These blends include xanthan gum, which mimics gluten’s structure for stability.
For vibrant colors, use gel-based food coloring—liquid dyes can alter texture. Bake gluten-free cookies 1-2 minutes longer at 350°F since they spread less. Chill the stack 2 hours before slicing to prevent crumbling. 🌈
Dairy-Free Options
Swap the 1 cup unsalted butter for Earth Balance vegan butter or coconut oil (solid at room temp). Use dairy-free cream cheese like Kite Hill for fillings, and powdered sugar remains safe.
For the white chocolate layer, opt for Enjoy Life brand dairy-free white chocolate chips. Test colors first—some vegan butters can slightly alter hue intensity.
Nut-Free Version
This recipe is naturally nut-free, but always verify sprinkles and food coloring labels for cross-contamination warnings. Use rainbow jimmies instead of sprinkles if concerned. For extra stability, add 1 tsp cornstarch to the cookie dough to prevent crumbling during assembly.
Store nut-free stacks in separate containers from other desserts to avoid accidental mixing.
Lower Sugar Swaps
Reduce the 2 cups granulated sugar by 30% and replace with monk fruit sweetener or erythritol (use a 1:1 ratio). For the cream cheese filling, blend 1 cup powdered sugar substitute (like Swerve) with 8 oz cream cheese until smooth.
Test texture—some sweeteners can make cookies denser. Adjust baking time by 1-2 minutes if needed.
Vegan Adaptations
Use flax eggs (1 tbsp ground flax + 3 tbsp water per egg) and vegan butter (like Miyoko’s). Replace honey in jam with agave syrup. For the royal icing, mix 3 cups powdered sugar with 3 tbsp aquafaba (chickpea brine) and 1 tsp vanilla.
Chill the stack 3 hours to ensure stability—vegan fillings set slower than dairy-based ones.
Nutrition facts
Frequently asked questions
How do I prevent my rainbow cookie layers from crumbling when cutting?
Chill the completed stack in the refrigerator for at least 1 hour before slicing—this lets the cream cheese filling set properly. Use a sharp serrated knife and dip it in warm water between each cut to create a clean break. Avoid cutting too soon after assembly, as the layers need time to bond.
Can I make this recipe with fewer than 7 layers?
You can easily adapt this for 3 or 5 layers by reducing the number of cookies and fillings proportionally. The key is maintaining the same ratio of cookie-to-filling-to-icing. For example, a 3-layer version would use 3 cookies, 2 tbsp cream cheese filling, and 1 tbsp jam.
What’s the best way to store these cookies to keep them fresh?
Store the assembled stack in an airtight container at room temperature for up to 3 days. For longer storage, freeze the entire stack (unwrapped) for up to 2 weeks. Thaw overnight in the fridge before slicing. The colors will remain vibrant, but the cream cheese filling may soften slightly after freezing.
How do I get the colors to stay bright after baking?
Use gel-based food coloring instead of liquid dyes—it’s more concentrated and won’t alter the dough’s moisture. Bake the cookies at 350°F for the full 10-12 minutes to avoid undercooking, which can make colors dull. Let them cool completely before assembling to prevent melting the frosting.
Can I make this recipe without royal icing?
Yes! Replace royal icing with a simple cream cheese frosting (mix 8 oz cream cheese + 2 cups powdered sugar + 1 tsp vanilla) or even buttercream. Spread a thin layer between cookies to hold them together. The stack will be slightly less stable but still delicious!

- 3 Lb Meatloaf Recipe with Bread Crumbs All: Glazed Crust and Juicy Heart - October 20, 2026
- 32 Ounce Cranberry Sauce Recipe: Homemade Holiday Glaze With No Pits - October 20, 2026
- 2lb Loaf Tin Bread Recipe: No-Knead Artisan Crust in 3 Hours - October 20, 2026