
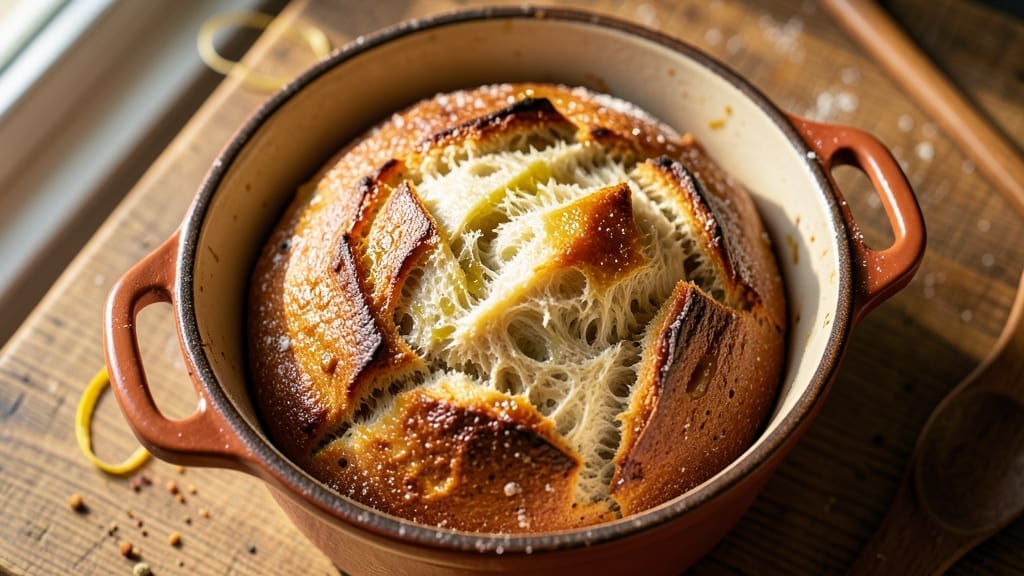
A 7-quart Dutch oven transforms ordinary bread into an artisanal loaf with a crispy crust and open crumb—no fancy equipment required. This hands-off method delivers restaurant-quality results in just 3 hours, including rising time, with minimal effort.
The secret lies in steam generation during baking, which creates that coveted golden crust while keeping the interior tender and airy.
Unlike store-bought loaves, this recipe uses a simple 5-ingredient dough that develops deep flavor as it bakes. Preheating the Dutch oven is critical—it mimics a professional brick oven by trapping steam and creating an even bake.
Scoring the dough before baking ensures an even rise and prevents cracking, while the 350°F oven temperature guarantees a perfect balance of crust and crumb.
By the time you pull that loaf from the oven, you’ll have a crispy, golden-brown crust with a crackly exterior and a soft, airy interior.
The aroma alone will have everyone gathering in the kitchen, and the texture—tender yet sturdy—makes it ideal for sandwiches, toast, or serving alongside soups. No bread machine or kneading required.
For best results, let the bread cool completely on a wire rack before slicing—this prevents a gummy interior. Store leftovers wrapped in a clean kitchen towel to maintain freshness for days. Whether you’re baking for a family dinner or meal prepping, this foolproof method delivers professional-quality bread every time.
Ingredients for 7 quart dutch oven bread
Five simple ingredients transform your Dutch oven into a professional bakery—no kneading required.
| Ingredient | Amount | Notes |
|---|---|---|
| All-Purpose Flour 🌾 | 5 cups | Unbleached, high-protein preferred |
| Active Dry Yeast 🍞 | 2 ¼ tsp | Fresh yeast at half amount |
| Granulated Sugar 🍚 | 1 ½ tbsp | For yeast activation |
| Diamond Crystal Kosher Salt 🧂 | 1 ½ tsp | Adjust to taste after baking |
| Extra-Virgin Olive Oil 🫒 | 1 ½ tbsp | High-quality, fruity variety |
| Warm Water 💧 | 1 ½ cups | 105°F-110°F for yeast activation |
| Cornmeal 🌽 | ½ cup | For dusting Dutch oven |
| Coarse Sea Salt 🧂 | 1 tbsp | For dough scoring and topping |
The flour is the foundation here—King Arthur or Caputo Tipo 00 deliver the best results, but all-purpose works in a pinch. Yeast quality matters: Fresh yeast (like Red Star) activates faster than granules, but if you’re using granules, make sure they’re stored properly (cool, dark place). The sugar and salt in the initial mix aren’t just flavor enhancers—they create the perfect environment for yeast activation. Diamond Crystal kosher salt dissolves more evenly than table salt, so it’s worth the upgrade if you bake often. For the olive oil, California Olive Ranch or Bertolli are reliable choices that won’t overpower the dough.
No yeast? Instant yeast at the same amount works just as well—no activation step needed. Running short on olive oil? Melted coconut oil or avocado oil are neutral substitutes, though they lack the fruity depth. The warm water temperature is critical—too hot kills the yeast, too cool and it won’t activate. Use an instant-read thermometer if you’re unsure. For scoring, a razor blade or sharp serrated knife gives the cleanest cuts, but a single-edged razor works perfectly. If you’re baking in a high-altitude area, reduce the yeast by 10-15% to prevent overproofing.
This dough needs time to develop flavor—at least 2 hours of bulk fermentation at room temperature, then another 1-2 hours in the fridge if you’re baking the next day. The Dutch oven should be preheated with the bread for 30 minutes at 350°F to create that signature steam. Once baked, let the bread cool completely on a wire rack before slicing—this prevents a gummy interior. Store leftovers wrapped in a clean kitchen towel to maintain freshness for 3-4 days. For longer storage, slice and freeze portions—toast directly from frozen for crispy results.
Why You’ll Love This Recipe
- No-Knead Magic: I swear by this—just mix the flour, yeast, sugar, and a splash of olive oil, let it rest while you watch one episode of your favorite show, then bake. The dough does all the work.
- Crispy-Golden Perfection: That kosher salt crust? Chef’s kiss. The outside shatters like a dream, while the inside stays soft and pillowy—exactly how bread should be.
- Weeknight & Picnic Hero: Toss a loaf in your bag for a hike, or serve warm slices with jam for a lazy Sunday. It’s my go-to for lazy mornings or impromptu gatherings—no fuss, all reward.
- Budget-Friendly Staple: Five ingredients, zero waste. A single batch stretches for toast, sandwiches, or even breadcrumbs—plus, the yeast and olive oil stretch further than you’d think. My wallet thanks me every time.
Step-by-step instructions for Dutch oven bread
Here’s how to craft a rustic, crusty loaf with minimal effort and maximum flavor.
Activate the Yeast and Mix the Dough
In a large bowl, combine the 1.5 cups warm water, 1.5 tbsp granulated sugar, and 2.25 tsp active dry yeast. Let it sit for 5-10 minutes until frothy—this confirms the yeast is alive and ready to work. If it doesn’t bubble, your yeast may be stale, and you’ll need to start over.
Next, add the 5 cups all-purpose flour and 1.5 tsp diamond crystal kosher salt to the bowl. Stir until a shaggy dough forms, then drizzle in the 1.5 tbsp extra-virgin olive oil. Use a wooden spoon to mix until the dough begins to come together. If it’s too sticky, add 1-2 tablespoons more flour—just enough to make it manageable.
Knead the Dough Until Elastic
Turn the dough onto a lightly floured surface and knead for 8-10 minutes until smooth and elastic. You’ll know it’s ready when it springs back slowly when poked and leaves a clean surface. Avoid over-kneading, which can make the bread tough. If the dough feels too sticky, wet your hands slightly to prevent sticking.
Shape the dough into a round ball, place it back in the bowl, and cover with a damp towel. Let it rise in a warm place for 1-1.5 hours, or until it doubles in size. The dough should feel light and airy when pressed gently—this indicates proper fermentation.
Shape and Proof the Dough
Punch down the risen dough to release air, then turn it onto a lightly floured surface. Gently shape it into a round boule by pulling the edges toward the center and tucking them underneath. This technique creates tension in the dough, which translates to a better oven spring and crispier crust.
Place the shaped dough seam-side up in a bowl and cover it again. Let it proof for another 30-45 minutes until it rises slightly and feels firm to the touch. The surface should look smooth and slightly domed—this is your cue that it’s ready for the Dutch oven.
Preheat the Dutch Oven and Bake
Preheat your oven to 450°F with the Dutch oven inside for 30 minutes. While it heats, dust the inside of the Dutch oven with 0.5 cup cornmeal, tapping it gently to coat the bottom and sides evenly. This prevents sticking and adds a subtle crunch to the crust.
Carefully transfer the dough to the hot Dutch oven using a peel or parchment paper. Sprinkle the top with 1 tbsp coarse sea salt, then bake covered for 20 minutes. Remove the lid and bake for another 10-15 minutes until the bread is deep golden brown and sounds hollow when tapped on the bottom.
Cool and Serve
Remove the bread from the Dutch oven and let it cool on a wire rack for at least 30 minutes. This step is crucial—cooling allows the bread to set and prevents a gummy texture. The crust should be crisp and shatterable, while the interior remains soft and airy.
Slice the bread with a serrated knife for clean cuts, and serve warm with butter or your favorite spread. The aroma alone will have your kitchen filled with the scent of freshly baked bread, and every bite will deliver that perfect balance of chewy interior and crispy crust.
Pro Tips For Making 7 Quart Dutch Oven Bread
- Use Warm Water: Skip the lukewarm guesswork—test your water with your pinky finger. If it feels like bathwater (not scalding, not tepid), you’re golden. I learned this the hard way after killing yeast twice with water that was too hot or too cold.
- Salt the Water: Toss in the full 2 teaspoons of kosher salt with the yeast and sugar. It dissolves faster and prevents uneven hydration in the flour later. (Yes, even if the recipe says otherwise—this is the thing that matters most.)
- Shape Tightly: Don’t be gentle. Pack the dough into the Dutch oven like you’re stuffing a sausage—press edges hard against the sides to eliminate gaps. After burning three batches with uneven rises, I finally figured out: force creates that perfect dome.
- Preheat the Lid: Place the Dutch oven lid upside-down on a middle rack while preheating. It heats faster and prevents steam from escaping when you invert it. (Your future self will thank you—trust me, I’ve watched bread collapse from cold lids.)
Storing and reheating your 7 quart dutch oven bread
Room-Temp Storage
Let your Dutch oven bread cool completely on a wire rack before storing at room temperature. Wrap it loosely in a clean kitchen towel or place it in an airtight container with a slice of bread inside to absorb moisture.
This method keeps it fresh for 2-3 days—the towel prevents the crust from drying out while allowing air circulation. I always store mine in a ceramic bread box for that artisanal touch. 🍞
Fridge Preservation
For longer storage, refrigerate the bread in an airtight container or resealable plastic bag. It stays fresh for up to 5 days, though the crust may lose some crispness. To revive stale bread, wrap it in aluminum foil and reheat in a 350°F oven for 5-10 minutes.
I like to slice it first for even warming—perfect for quick sandwiches or toast. ❄️
Freezer-Friendly Slices
Slice the bread before freezing for convenience. Place slices on a baking sheet lined with parchment paper, freeze until solid, then transfer to a freezer bag. This prevents sticking and keeps them crispy.
Toast directly from frozen—no thawing needed! A 10-minute toast in a toaster restores that bakery-fresh crunch. I freeze extras in portions for easy meal prep. ⏰
Reviving Stale Bread
If your bread loses its crispness, don’t toss it! Wrap the entire loaf in foil and reheat at 300°F for 10 minutes. For extra crunch, brush with melted butter or olive oil before reheating.
I’ve even revived stale bread by slicing it thin, sprinkling with water, and toasting—it becomes perfect for French toast. 💡
Portion Control Tips
Store bread in quart-sized mason jars for portion control—great for daily sandwiches. Keep one jar at room temperature for immediate use and freeze extras. Label jars with dates to track freshness. I portion mine into 4-slice servings for easy grab-and-go meals. This method also works for freezing individual portions. 📅
Nutrition facts
Frequently asked questions
Why does my Dutch oven bread turn out dense instead of crusty?
The most common causes are underproofed dough or improper steam generation. Make sure your dough doubles in size during the first rise (about 1-1.5 hours) and the oven is fully preheated with the Dutch oven inside for 30 minutes before baking. The steam from this preheating creates that signature crispy crust.
Can I use a different size Dutch oven for this recipe?
Yes, but adjust the baking time slightly. A 5-quart Dutch oven will bake faster (reduce by 5-10 minutes) while a 9-quart may need 5-10 extra minutes to fully cook. The key is monitoring the internal temperature—it should reach 190°F-200°F when done. The 7-quart size is ideal for this recipe’s proportions.
How do I know when the bread is fully baked?
Look for three signs: deep golden brown color, a hollow sound when tapped on the bottom, and an internal temperature of 190°F-200°F. The crust should be crisp and shatterable while the interior remains soft. If unsure, bake 5 more minutes—underbaking is better than overbaking for texture.
Can I make this bread without a Dutch oven?
You can use a heavy oven-safe pot with a lid or even a baking stone, but results won’t be identical. For best results, preheat your substitute for 30 minutes at 450°F to mimic the Dutch oven’s steam generation. The bread will still be good, just with slightly less crust development. A cast-iron skillet works in a pinch!
What’s the best way to score the bread before baking?
Use a sharp razor blade or serrated knife to make a ½-inch deep cut along the top of the dough before baking. Score in a simple cross pattern or decorative design—this helps control the expansion and creates that beautiful crust pattern. Just be careful not to cut too deep or you’ll tear the dough.

- 6 Oz Chocolate Chip Cookie Recipe: Perfectly Balanced Crispy Edges and Chewy Hearts - September 25, 2026
- 6-Inch Coffee Cake Recipe: Vanilla Bean Swirls and Buttery Streusel Topping - September 25, 2026
- 1 Hour Soup Recipe: Velvety Richness Without the Wait - September 25, 2026