
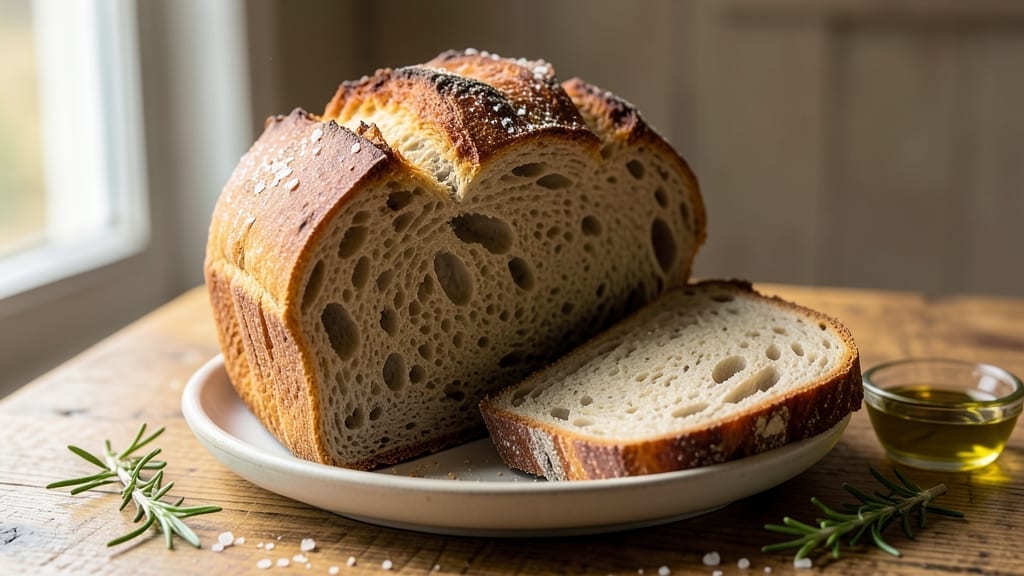
An 8-hour sourdough sandwich bread recipe delivers the perfect balance of a crusty exterior and pillowy soft interiors—ideal for toast, sandwiches, or charcuterie boards. This method builds flavor through slow fermentation while keeping the process manageable for home bakers.
The key lies in precise timing, hydration control, and shaping techniques tailored for sandwich bread. Start with an active sourdough starter (or revive one if needed) and mix dough with 65% hydration for a light yet sturdy crumb.
After an autolyse rest, perform stretch-and-folds during bulk fermentation to strengthen gluten without overworking the dough. Let it proof at room temperature for 4-5 hours, then shape into loaves, rolls, or pull-apart styles for easy slicing.
Baking at 425°F with steam creates that signature crust, while a baking stone ensures even heat distribution. Cool completely on a wire rack to prevent gumminess, then slice for clean, soft layers that hold fillings perfectly. This recipe transforms simple ingredients into bread with restaurant-quality texture—no bakery skills required.
Troubleshooting common issues like dense crumb or underproofed dough is straightforward with this method. The autolyse step prevents over-kneading, while stretch-and-folds develop gluten gradually. For added flavor, consider seeds, herbs, or garlic in the dough, but keep hydration consistent to maintain texture.
Leftovers stay fresh for 3-4 days when wrapped tightly.
Perfect for weeknight meals, picnic sandwiches, or gifting, this bread adapts to any occasion. The 8-hour timeline allows flexibility—start in the morning and bake by evening. Whether you’re a beginner or seasoned baker, this recipe delivers foolproof results with minimal effort. Let’s get started!
Ingredients for 8 hour sourdough sandwich bread
Six core ingredients crafting restaurant-quality sandwich bread with perfect crust and soft crumb.
| Ingredient | Amount | Notes |
|---|---|---|
| Active Sourdough Starter 🍞 | ½ cup | 100% hydration, bubbly and active |
| All-Purpose Flour 🌾 | 3 ½ cups | King Arthur or similar high-gluten |
| Bread Flour 🌾 | ½ cup | For enhanced gluten structure |
| Water 💧 | 1 ¾ cups | Lukewarm, 75-80°F |
| Salt 🧂 | ½ tsp | Diamond Crystal kosher salt |
| Olive Oil 🫒 | 1 tbsp | Extra-virgin, for dough handling |
| Cornmeal 🌽 | ¼ cup | For dusting parchment paper |
| Ice Water ❄️ | ⅛ cup | For final shaping |
The sourdough starter is non-negotiable—King Arthur or similar reliable brands ensure consistent fermentation. Look for a starter that doubles in 4-6 hours when fed. For the flours, King Arthur Bread Flour gives superior gluten development, but Bob’s Red Mill works well too. The water temperature matters: too hot kills yeast, too cold slows fermentation. Use a thermometer if unsure. Salt quality affects flavor significantly—Diamond Crystal dissolves completely, unlike table salt.
No sourdough starter? Revive one using 1:1:1 ratio of flour, water, and starter over 5-7 days. Short on bread flour? All-purpose plus 1 tsp vital wheat gluten mimics its structure. Olive oil can be swapped for neutral oil like avocado, but extra-virgin adds subtle richness. For gluten-free adaptation, replace all flours with a 1:1 gluten-free bread flour blend—expect slightly denser results. The cornmeal is optional but prevents sticking during proofing. If you skip it, use semolina instead.
Store the starter in a glass jar with loose lid in the fridge—lasts indefinitely. Dough can be refrigerated 12-24 hours before baking for deeper flavor. Once baked, bread stays fresh 3-4 days wrapped in a cotton towel, or 1 week frozen in slices. For gifting, wrap individual loaves in beeswax paper and tie with twine. The 8-hour timeline includes 1-hour autolyse, 2-hour bulk fermentation with stretch-and-folds, 4-hour proof, and 1-hour bake—plan accordingly.
Why You’ll Love This Recipe
- Set-and-Forget Magic: I swear by this schedule—mix it in the morning, let it rise while I’m at work, and bake it after dinner. No hovering, no stress, just hands-off perfection.
- Tangy, Toasty Crunch: That first bite? The crispy crust gives way to a chewy, airy crumb with just enough sourdough tang to make plain butter and jam taste like a gourmet moment.
- Weeknight Workhorse: I make a loaf on Sundays, slice it up, and it’s my go-to for sandwiches, toast, or even garlic bread for days. No last-minute store runs—just grab and go.
- Budget-Friendly Staple: A little starter goes a long way, and this combo of all-purpose and bread flour keeps costs low without sacrificing texture. Leftovers? I freeze slices for quick breakfasts all month.
Step-by-step instructions for artisan sourdough sandwich bread
Perfecting this loaf takes patience, but the result—crispy crust and tender crumb—makes every minute worthwhile.
Mix the Dough with Precision
In a large mixing bowl, combine the 0.5 cup active sourdough starter, 3.5 cups all-purpose flour, 0.5 cup bread flour, 1.75 cups lukewarm water (75-80°F), and 0.5 tsp salt. I use a silicone spatula to gently fold the dry ingredients into the wet until a shaggy mass forms—this prevents overmixing and preserves gluten structure.
Once the flour is mostly incorporated, add 1 tbsp extra-virgin olive oil and continue mixing until the dough comes together. It should be slightly sticky but cohesive enough to hold its shape when pressed. If it feels too dry, add 1 tsp water at a time until it reaches the perfect consistency—think of wet sand that clings together when squeezed.
Develop Gluten Through Bulk Fermentation
Turn the dough onto a lightly floured surface and perform a series of stretch-and-folds every 30 minutes for 2 hours. This technique strengthens the gluten network, which is critical for that signature sandwich bread texture. Wet your hands slightly to prevent sticking, then grab one side of the dough, stretch it upward, and fold it over itself. Rotate the bowl and repeat, working your way around the dough.
After the final stretch-and-fold, cover the bowl with a damp kitchen towel and let it ferment at room temperature (70-75°F) for 6 hours. You’ll know it’s ready when the dough has nearly doubled in size and exhibits bubbly, jiggly activity when gently pressed. If your kitchen is cooler, extend fermentation to 8 hours—the dough will develop more complex flavors.
Shape and Cold Proof for Structure
Lightly dust a clean surface with 0.25 cup cornmeal and turn out the dough. Gently deflate it by pressing down with your fingertips, then divide it into 4 equal portions (about 8 oz each). Roll each portion into a tight log, sealing the seam by pinching the ends. Place the logs seam-side down on the cornmeal-dusted surface, cover with the towel, and refrigerate for 12-16 hours.
Cold proofing slows fermentation, allowing gluten to relax and flavors to meld. The dough should rise slightly but remain firm to the touch. This step is non-negotiable—skipping it results in a dense, gummy loaf. I like to set a timer so I don’t over-proof, as the dough can become overly active and collapse during baking.
Bake for Crusty Exteriors and Pillowy Interiors
Preheat your oven to 425°F with a Dutch oven inside for 45 minutes. This step ensures the bread bakes evenly and develops a deep, crackly crust. Remove the Dutch oven, then transfer the cold dough logs onto a parchment-lined baking sheet. Brush the tops lightly with ice water—this creates steam during baking, which contributes to that signature oven spring.
Carefully place the logs into the hot Dutch oven, cover, and bake for 25 minutes. After this initial steam phase, uncover and bake for an additional 15-20 minutes until the crust is deep golden brown and the internal temperature reaches 190-195°F. Tap the loaf—it should sound hollow. If the crust browns too quickly, tent with foil to prevent over-browning.
Cool and Slice for Maximum Freshness
Remove the bread from the oven and let it cool on a wire rack for at least 1 hour before slicing. This resting period allows the gluten to fully relax, preventing a gummy texture. I resist the urge to cut into it immediately—patience here ensures clean slices and even distribution of moisture.
Once cooled, slice the bread into ½-inch thick pieces using a serrated knife. The interior should be soft, open-crumbed, and slightly chewy, while the exterior remains crisp and shatterable. Store any leftovers in an airtight container at room temperature for up to 3 days, or freeze for longer storage. The flavor only improves over time, making this bread perfect for sandwiches or toast.
Pro Tips For Making 8 Hour Sourdough Sandwich Bread
- Use a Thermometer for Proofing: I learned this the hard way—guessing when your dough is ready leads to overproofed sandwich bread that’s gummy inside. Aim for 78-80°F (25-26°C) in the dough when it passes the “poke test” (gentle press leaves a slow springback). No thermometer? Feel for a soft, jiggly center—like a ripe peach—without sticking to your finger.
- Weigh Your Starter Precisely: That 100g “eyeball” of starter you scooped? It’s probably off by 10-15g, and your hydration will suffer. Use a kitchen scale for both the starter and water—100g starter + 200g water (for a 50% hydration autolyse) makes a world of difference in texture. Trust me, your sandwich bread’s crumb will thank you.
- Skip the Over-Kneading Trap: This isn’t pizza dough—you’re not building gluten for chew. After the initial bulk ferment, do just 2-3 sets of stretch-and-folds (not punches or slams). Overwork it, and your sandwich loaves turn dense. Let the time do the work; the dough will develop enough structure on its own.
- Cold Retard for Crust Control: Ditch the rush to bake straight from the counter. After shaping, refrigerate the dough overnight (even 4-6 hours helps). The slow cold ferment tightens the crumb and lets you bake at a higher temp (475°F/245°C) for a crispier crust without burning the top. No more sad, pale sandwich bread.
Essential equipment for 8 hour sourdough sandwich bread
Dutch Oven Essentials
A Dutch oven is non-negotiable for this recipe—it traps steam, creating that signature oven spring and deep crust. I recommend a 5-6 quart enameled cast iron like Le Creuset or Lodge for even heat distribution.
The heavy material retains heat perfectly, while the enameled interior prevents sticking. If you don’t own one, a heavy oven-safe pot with a tight lid works in a pinch, but avoid thin aluminum. 🔥
Baking Stone or Steel
Place a baking stone or steel on the lower oven rack before preheating to mimic a professional bakery setup. I use a 12×16-inch stone from Great Mills—it radiates heat upward, ensuring even browning and crispy crusts.
For budget-friendly options, a perforated steel pan works just as well. Avoid glass or ceramic stones, which can crack under sudden temperature changes.
Digital Thermometer
A digital instant-read thermometer like the Thermoworks Thermapen is my secret weapon for perfect doneness. Insert it into the center of the loaf—it should read 190-195°F when done.
This prevents overbaking while ensuring the interior is fully cooked. For bulk fermentation, I also use a laser thermometer to monitor room temperature (ideal range: 70-75°F).
Dough Scraper and Bench Brush
Keep a dough scraper (I love the OXO Good Grips version) and a bench brush handy for shaping and dusting. The scraper helps divide dough cleanly, while the brush applies cornmeal or flour evenly, preventing sticking.
A lightweight silicone brush works well for dusting, but avoid stiff bristles that can tear delicate dough.
Proofing Tools
For proofing, I use a clear glass bowl (like Pyrex) with a damp kitchen towel draped over it to maintain humidity. If your kitchen is dry, add a shallow tray of hot water nearby to create a mini humidity chamber.
For cold proofing, a refrigerator-safe proofing box (like Proof Box by Proof Equipment) keeps temperatures consistent, but a standard fridge with a thermometer works too.
Cooling Rack and Airtight Storage
Let bread cool on a wire cooling rack (I prefer Amazon Basics for affordability) to prevent soggy bottoms. For storage, use an airtight container like OXO Good Grips or Rubbermaid to maintain freshness.
Wrap leftovers in a cotton towel instead of plastic—it regulates moisture better and keeps the crust crisp. For gifting, beeswax wrap adds a rustic touch while preserving freshness. ✨
Nutrition facts
Frequently asked questions
Can I use this recipe with store-bought sourdough starter?
Yes, but ensure it’s active and bubbly—look for a starter that doubles in size within 4-6 hours after feeding. Store-bought starters often contain additives that may alter fermentation speed. If unsure, revive a 1:1:1 flour-water-starter mixture for 5-7 days before using. The recipe’s flavor will still be excellent, just slightly less tangy.
Why is my dough sticking to my hands during shaping?
This happens when the dough is too wet or lacks sufficient gluten development. Wet your hands with ice water (not oil) and dust lightly with cornmeal or rice flour—they create less dust than regular flour. If the dough feels too sticky after mixing, reduce hydration by 1 tbsp next time. For stubborn sticking, use a dough scraper to lift and fold instead of pulling with hands.
How do I know when the bread is fully proofed?
The dough should have risen 50-75% in volume and feel jiggly but springy when pressed gently with one finger. Poke it lightly—if the indentation stays, it needs more time. For cold proofing, the dough should rise slightly in the fridge (not double) and remain firm to the touch. Overproofing causes collapse during baking, so err on the side of underproofing if unsure.
Can I make this as dinner rolls instead of sandwich bread?
Divide the dough into 12 equal portions (about 3 oz each) and shape into balls. Place them in a greased 9×13-inch pan, cover, and proof as directed. Bake at 425°F for 15-18 minutes until golden. For extra tenderness, brush with melted butter after baking. The 8-hour timeline remains the same—just adjust portion sizes.
What if my kitchen is too cold for proper fermentation?
Extend bulk fermentation to 8-10 hours and use a proofing box or turn your oven light on (with door closed) to warm the space to 75-80°F. For cold proofing, increase time to 24 hours in the fridge. If your starter struggles, place it near a warm oven (off) or use a seedling heat mat set to 80°F during fermentation.

- Pea Soup Instant Pot Recipe: Velvety Green Smoothness in 20 Minutes - November 1, 2026
- Pork Loin Pulled Pork Crock Pot Recipe: Slow-Smoked Tenderness With Zero Dryness - November 1, 2026
- Baked Potatoes in Crock Pot Recipe: Buttery Interiors and Crispy Top Magic - November 1, 2026