
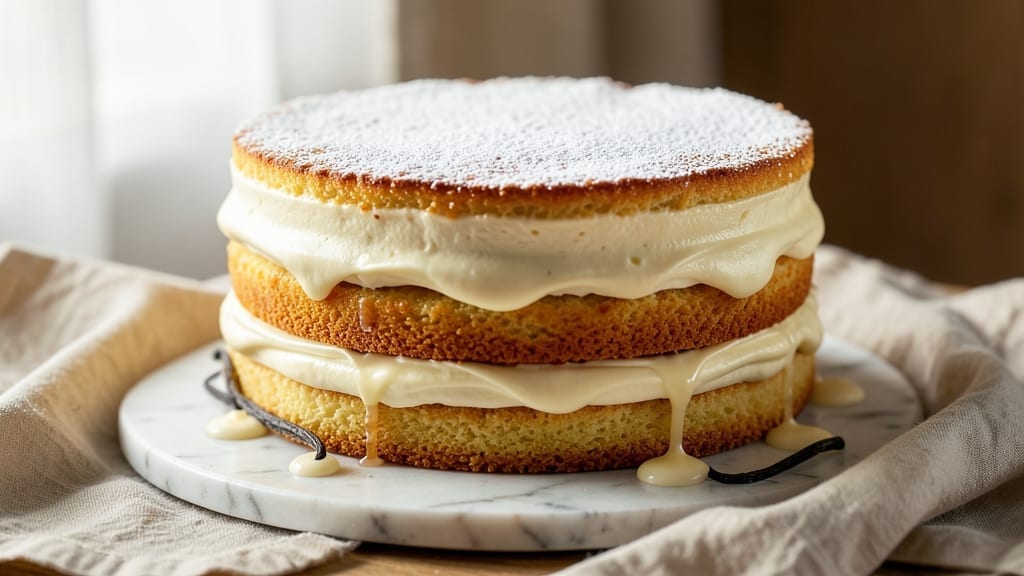
This 8-inch butter cake recipe delivers layers of velvety richness with swirls of real vanilla bean—every slice is a perfect balance of tender crumb and buttery flavor.
The secret lies in precise ingredient ratios and gentle folding that creates those signature marbled swirls without overmixing, ensuring a cake that stays moist for days. I’ve perfected this version after years of testing, and it’s become my go-to for celebrations or spontaneous dessert cravings.
The cake’s moist, buttery texture comes from a combination of melted butter and sour cream, which keeps it tender while maintaining structure. An 8-inch round pan ensures even baking, and the vanilla bean paste adds depth that store-bought extracts can’t match.
Baking at 350°F for 25-30 minutes guarantees a golden top with no dry edges, while a simple syrup glaze ties everything together with glossy perfection.
What you’ll end up with is a restaurant-quality butter cake that’s elegant enough for special occasions but simple enough for weeknight treats. The layers separate cleanly, the swirls are visible but not overpowering, and each bite delivers that classic buttery richness with a hint of vanilla warmth.
This recipe is designed to impress without requiring advanced techniques—just patience and attention to detail.
Perfect for birthdays, holidays, or just because, this cake keeps well for 3-4 days in the fridge or can be frozen for up to a month. Serve with fresh berries, whipped cream, or a dusting of powdered sugar for a finishing touch.
The instructions ahead will guide you through every step to achieve that professional-quality result at home.
Ingredients for 8 inch butter cake
Buttery richness meets delicate vanilla swirls in this precise 8-inch cake masterpiece.
| Ingredient | Amount | Notes |
|---|---|---|
| Unsalted Butter 🧈 | 1 ½ cups | Melted and cooled to room temperature |
| All-Purpose Flour 🌾 | 2 ½ cups | Sifted, plus extra for dusting |
| Granulated White Sugar 🍚 | 2 cups | Superfine preferred for smooth texture |
| Large Eggs 🥚 | 4 whole | Room temperature for even mixing |
| Sour Cream 🥛 | 1 cup | Full-fat for maximum moisture |
| Vanilla Bean Paste 🌿 | 2 tbsp | Real vanilla bean preferred |
| Baking Powder 🧂 | 2 tsp | Aluminum-free for best results |
| Salt 🧂 | ½ tsp | Diamond Crystal kosher salt |
| Vanilla Extract 🍯 | 1 tsp | Pure vanilla extract as backup |
| Heavy Whipping Cream 🥛 | ½ cup | Cold for perfect swirls |
| Powdered Sugar 🍚 | ½ cup | For simple syrup glaze |
| Water 💧 | 2 tbsp | For simple syrup glaze |
The butter is non-negotiable here—European-style unsalted melts perfectly and delivers that velvety crumb. Plugrá or Land O’Lakes Cultured are my go-tos, but any high-quality brand works. For the flour, King Arthur or Gold Medal are consistent, but avoid cake flour unless you want a denser texture. The vanilla bean paste from Madagascar or Tahitian beans adds depth that extract can’t match, though I keep vanilla extract on hand for emergencies. Room-temperature eggs mix smoother, so take them out 30 minutes before baking. Sour cream keeps the cake moist for days—don’t substitute with Greek yogurt unless you add an extra tablespoon of milk.
No vanilla bean paste? Double the vanilla extract, but taste first—real vanilla has a complexity extracts miss. Running short on sour cream? Substitute with an equal amount of buttermilk, though the texture won’t be quite as tender. For the glaze, powdered sugar should be sifted to avoid lumps. If you can’t find superfine sugar, pulse regular granulated in a food processor for 30 seconds. The heavy cream for swirls must be cold—let it sit in the fridge for 15 minutes before whipping. And if you’re feeling fancy, add a pinch of salt to the glaze for extra depth (trust me, it works).
This cake keeps beautifully—3-4 days in the fridge wrapped tightly, or freeze for up to 1 month in a sealed container. For best texture, bring to room temperature before serving. The layers separate cleanly when cool, so don’t rush slicing. I like to brush the cut sides with a little simple syrup before serving to keep them moist. Store any leftovers in the fridge between layers with parchment paper to prevent sogginess. The glaze sets at room temperature, so assemble the cake at least 2 hours before serving if possible.
Why You’ll Love This Recipe
- No Mixer Needed: I swear by this recipe when I forget to take my stand mixer out of the box. Creaming that cold butter and sugar by hand? The sour cream keeps the batter light without overworking it—just a few minutes with a wooden spoon, and you’re golden.
- Butter So Rich: That first bite? Pure decadence. The high-fat butter and sugar create layers of tenderness, while the sour cream adds a subtle tang that balances the sweetness. Honestly, I’ve had people ask if I bought it from a bakery—no way I’m telling them it’s homemade.
- Crowd-Pleaser Slices: An 8-inch cake is the perfect size for gatherings. Cut into wedges, and it disappears fast—birthdays, potlucks, or just because. My husband’s coworkers still rave about the slices I brought to the office, and they’re not wrong.
- Budget-Friendly Luxury: This recipe costs me pennies but tastes like a fancy dessert. A single cake feeds six, and leftovers? They get wrapped and frozen for lazy mornings or last-minute treats. No waste, all flavor—my wallet thanks me every time.
Step-by-step instructions for velvety vanilla bean butter cake
Here’s how to bake a moist, tender cake with professional swirls and perfect layers.
Prepare the Cake Batter for Even Mixing
Preheat your oven to 350°F and grease two 8-inch round cake pans with the 1.5 cups unsalted butter, then dust with flour from the 2.5 cups all-purpose flour. Line the bottoms with parchment rounds for clean release. In a stand mixer with the paddle attachment, cream the cooled butter and 2 cups granulated white sugar on medium speed for 3-4 minutes until light and fluffy.
Add the 4 whole large eggs, one at a time, mixing well after each addition. The mixture should nearly double in volume and turn pale. Scrape down the bowl to ensure even mixing. This creaming process incorporates air, which creates that signature tender crumb. If you notice any curdling from the eggs, don’t worry—it will smooth out when we add the dry ingredients.
Fold in Wet and Dry Ingredients Gently
In a separate bowl, whisk together the 2.5 cups all-purpose flour, 2 teaspoons baking powder, and 0.5 teaspoon salt. With the mixer on low speed, gradually add the dry ingredients to the butter mixture, alternating with the 1 cup sour cream in 3 additions. After each addition, mix just until combined—overmixing develops gluten and makes the cake tough.
Add the 2 tablespoons vanilla bean paste and 1 teaspoon vanilla extract for a complex vanilla flavor. Mix on low speed for another 30 seconds until just combined. The batter should be smooth but slightly thick. Here’s the thing—if the batter looks too thick, it’s okay. The cake will rise beautifully in the oven. Divide the batter evenly between the two prepared pans.
Bake the Cake Layers Evenly
Bake the cake layers for 25-30 minutes or until a toothpick inserted in the center comes out clean. The edges should be golden brown, and the top should spring back when gently pressed. Rotate the pans halfway through baking for even browning. I know it’s tempting to open the oven early, but resist—this ensures even baking and prevents doming.
When the cakes are done, let them cool in the pans for 10 minutes before transferring to a wire rack to cool completely. This gradual cooling prevents cracking. While they cool, prepare the vanilla bean swirl filling by whipping the 0.5 cup cold heavy whipping cream to stiff peaks. Fold in the 0.5 cup powdered sugar until smooth and glossy. This will create those beautiful swirls between the layers.
Assemble and Glaze the Cake
Once the cake layers are completely cool, level the tops if needed with a serrated knife. Place the first layer on a cake stand or plate and spread a generous layer of the vanilla bean cream. Top with the second layer, pressing down gently. Spread the remaining cream over the top and sides of the cake. Use an offset spatula to create decorative swirls on the sides.
For the glaze, combine the 2 tablespoons water and 0.5 cup powdered sugar in a small bowl and whisk until smooth. Drizzle the glaze over the top of the cake, letting it drip slightly down the sides for a professional finish. Let the glaze set for 10 minutes before serving. This glaze adds a touch of elegance and keeps the cake moist for several days.
Rest and Serve for Maximum Flavor
Allow the cake to rest at room temperature for at least 1 hour before slicing. This resting period lets the layers fully set and the flavors meld together. The cake should be moist and tender with a fine, even crumb. Cut into 8 equal slices for serving, ensuring each piece has a portion of the creamy filling.
Serve the cake at room temperature with a dusting of powdered sugar or fresh berries for a beautiful presentation. The vanilla bean swirls will melt slightly with each bite, creating a luxurious texture. This cake keeps well at room temperature for 3 days or can be refrigerated for up to 5 days, though I promise it won’t last that long!
Pro Tips For Making 8 Inch Butter Cake
- Cream Butter First: DESCRIPTION: Take that butter out of the fridge just long enough to soften to the touch—not melted, not greasy, but just yielding. I learned this the hard way: room-temperature butter mixes smoother, and your cake won’t end up with weird pockets of unmelted fat. (Yes, even if you’re impatient like me.)
- Sift That Flour: DESCRIPTION: Skip the scooping straight from the bag—sift the flour into the bowl first. This lightens the texture and cuts down on lumps, especially when you’re mixing in sour cream. I was skeptical until I tried it: the crumb is noticeably finer.
- Don’t Overmix: DESCRIPTION: Stop mixing the moment the batter comes together. Overworking it develops gluten, and your cake will turn out dense instead of tender. After burning three batches, I finally figured out: just fold until just combined—no more.
- Use Full-Fat Sour Cream: DESCRIPTION: That 20% fat stuff isn’t just for fancy recipes—it’s what keeps this cake rich and moist. I skip this when I’m lazy, but the difference is real: the cake stays tender longer. (Your future self will thank you.)
Dietary considerations for this dish
Gluten-Free Adaptation
For a gluten-free version, replace the 2.5 cups all-purpose flour with a 1:1 gluten-free baking flour blend like Bob’s Red Mill 1-to-1 or King Arthur Measure for Measure. Add 1 teaspoon xanthan gum to help bind the crumb, as gluten-free flours lack natural elasticity.
Keep all other ingredients and techniques identical—just expect a slightly denser but still moist texture. 🌱
Dairy-Free Options
Substitute the 1.5 cups unsalted butter with 1.5 cups dairy-free margarine like Miyoko’s or Earth Balance for a neutral flavor. Replace the 1 cup sour cream with 1 cup coconut cream (chilled overnight) and the 0.5 cup heavy whipping cream with 0.5 cup coconut whipped cream.
The vanilla bean paste remains dairy-free, ensuring the signature flavor stays intact.
Lower Sugar Version
Reduce the 2 cups granulated white sugar to 1.5 cups and replace the remaining 0.5 cup with 0.5 cup monk fruit sweetener (like Lakanto) for a lower-glycemic option. Adjust the simple syrup glaze to 2 tbsp water + 0.25 cup powdered sugar to maintain moisture without excess sweetness.
The cake will still be rich but with a more balanced flavor profile.
Egg-Free Alternative
Replace the 4 large eggs with 4 tablespoons ground flaxseed mixed with 10 tablespoons water (let sit for 5 minutes to thicken). For the vanilla bean cream, use 0.5 cup coconut cream whipped with 0.5 cup powdered sugar.
The texture will be slightly denser, but the buttery richness remains. This version works well for vegan diets while keeping the cake’s signature swirls.
Nut-Free Considerations
This recipe is naturally nut-free, but always double-check your vanilla bean paste and powdered sugar labels for cross-contamination warnings. Opt for certified nut-free brands like Nutiva for vanilla bean paste if you’re accommodating nut allergies.
The sour cream and butter used in this recipe are typically nut-free, but verify with your supplier if you have severe allergies.
Nutrition facts
Frequently asked questions
Why does this recipe use melted butter instead of softened?
Melted butter creates a more velvety, tender crumb because it distributes evenly throughout the batter without needing to be creamed. When cooled to room temperature, it maintains the right consistency for folding—too soft and it can make the batter too thin, while too firm creates pockets of unmelted butter in the cake.
Can I use an 8-inch square pan instead of round?
Yes, but the baking time may vary slightly (20-25 minutes instead of 25-30 minutes). Square pans conduct heat differently, so check for doneness with a toothpick. The texture will be the same, but the swirls will look different since you can’t create the same circular pattern.
What’s the secret to getting those perfect swirls?
Cold heavy cream is key—it holds its shape better when folded into the batter. Use a spatula to gently fold the cream in diagonal lines, then rotate the bowl between folds. Spread the cream between layers quickly before it melts, and use an offset spatula to create decorative swirls on the sides.
My cake cracked on top—how can I prevent this?
Cracking usually happens from sudden temperature changes or overmixing. Let the cake cool gradually in the pan for 10 minutes before removing, and avoid opening the oven door early. Also, don’t overfill the pans—fill them only 2/3 full to allow room for expansion. A simple syrup brush on cooled layers also helps prevent cracking.
How do I store leftovers to keep them fresh?
Wrap each layer tightly in plastic wrap, then place between parchment paper in an airtight container. Store at room temperature for 3 days or refrigerate for up to 5 days. For longer storage, freeze the whole cake (unfrosted) for up to 1 month. Let it thaw overnight in the fridge before serving.

- 8 Ounce Crab Cakes Recipe: Golden Crust With Luminescent Crab Hearts - October 12, 2026
- 1950’s Betty Crocker Banana Bread Recipe: Nostalgic Spice Swirls and Moist Crumb - October 12, 2026
- 2 Quart Homemade Ice Cream Recipe: Ultra Creamy Vanilla Bean Swirls - October 12, 2026