
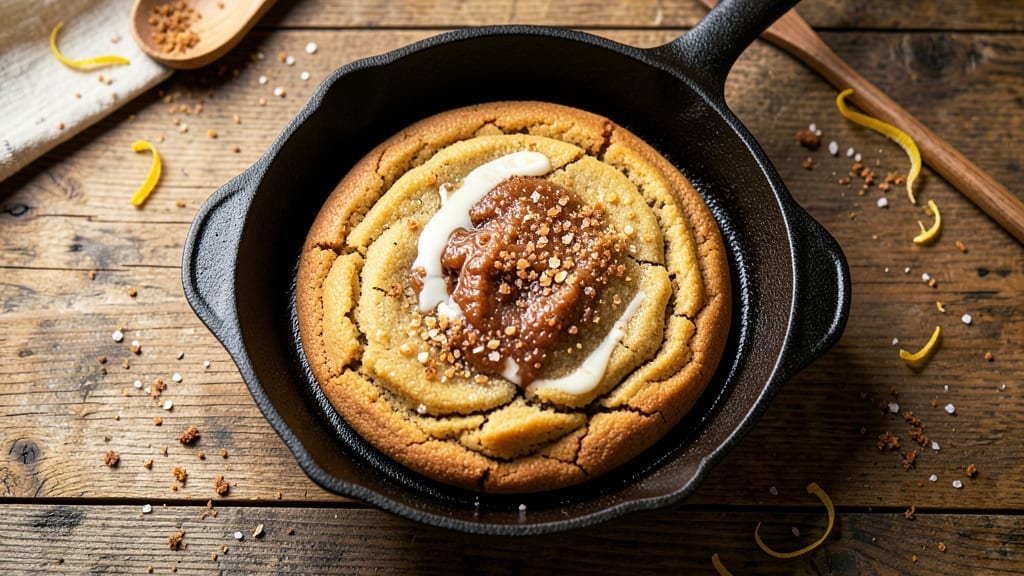
Baking cookies in an 8-inch cast iron skillet transforms a simple dessert into something restaurant-worthy—crisp edges, gooey centers, and that signature caramelized crust only cast iron delivers.
The secret lies in preheating the skillet until it’s nearly smoking hot, then spreading the dough thin enough to crisp while keeping the middle tender. This isn’t your average cookie sheet recipe; it’s about mastering heat control and dough technique for that perfect balance of textures.
The process starts with a foolproof dough that spreads just enough to create those coveted crisp edges while maintaining a soft, chewy center. You’ll work with room-temperature butter and a precise ratio of flour to sugar, ensuring the cookies develop that signature buttery crunch without burning.
The cast iron’s ability to retain and distribute heat evenly is what makes this method so reliable—no more worrying about uneven baking or soggy middles.
What you’ll end up with is a skillet full of golden-brown cookies with crisp, almost crackly edges and centers that stay soft enough to melt in your mouth.
The cast iron’s natural nonstick properties mean less sticking, and the residual heat keeps them warm as you transfer them to a wire rack. These cookies are perfect for impressing guests or treating yourself to a dessert that feels like a special occasion.
Once you try this method, you’ll never go back to baking cookies on a regular sheet pan. The flavor concentration and texture are unmatched, and the skillet’s versatility means you can use it for breakfast, dinner, or dessert. Here’s how to achieve that buttery crunch with gooey centers every time.
Ingredients for 8 inch cast iron skillet cookie
Room-temperature butter and precise sugar ratios create the perfect skillet cookie dough.
| Ingredient | Amount | Notes |
|---|---|---|
| Unsalted Butter 🧈 | ½ cup | Room temperature, full-fat preferred |
| Granulated White Sugar 🍚 | ¾ cup | Superfine sugar for faster dissolving |
| Light Brown Sugar 🍚 | ¼ cup | Packed firmly for moisture |
| Large Eggs 🥚 | 1 whole | Room temperature for even mixing |
| Vanilla Extract 🌿 | 1 tsp | Pure vanilla for best flavor |
| All-Purpose Flour 🌾 | 1 ½ cups | Sifted for light texture |
| Baking Soda 🧂 | ¼ tsp | Freshly opened for potency |
| Diamond Crystal Kosher Salt 🧂 | ½ tsp | Fine grain preferred |
| Ground Cinnamon 🌶️ | ½ tsp | Freshly ground for warmth |
| Pure Vanilla Bean Seeds 🌿 | 1 tsp | Scraped from 1 vanilla bean (optional) |
| Flaky Sea Salt 🧂 | ¼ tsp | For finishing before serving |
| Dark Chocolate Chips 🍫 | ½ cup | 70% cocoa or higher |
The butter is non-negotiable here—room temperature is key for even mixing, but don’t let it get too soft. I grab Plugrá butter from the store because it’s always reliable, but any good unsalted butter works. For the sugars, superfine sugar dissolves faster, but regular granulated works if you pulse it in a food processor. The vanilla? Pure extract beats imitation every time—trust me on this. Flour matters too; King Arthur or Gold Medal are my go-tos for consistent results. If you’re using a vanilla bean, scrape those seeds and toss the pod in warm water for extra depth (though it’s optional).
No vanilla extract? Vanilla bean paste works in a pinch, or even a splash of almond extract if that’s what’s on hand. The cinnamon adds warmth, but if you’re not a fan, nutmeg at half the amount gives a similar cozy vibe. Chocolate chips optional, but I always add them—Ghirardelli or Guittard are my favorites, but any 70% cocoa or higher will do. For the salt? Diamond Crystal kosher is my standard, but any fine sea salt works. Pro tip: if your dough feels dry, add 1 tbsp milk or heavy cream to help bind it.
This dough keeps for 3 days in the fridge, wrapped tightly in plastic. For longer storage, freeze portions for up to 3 months—just thaw in the fridge overnight. The skillet? Preheat it until smoking hot before adding dough—this is non-negotiable for that perfect crisp edge. Once baked, cookies stay warm for 10 minutes on a rack, so work fast if you’re serving right away. The flaky sea salt? Sprinkle it on immediately after baking while the cookies are still warm.
Why You’ll Love This Recipe
- Skillet Magic: I swear by this—just mix, pour, bake. The cast iron handles the heat so well, I don’t even need a timer. Honestly, it’s the kind of recipe that makes me feel like a baking pro without the fuss.
- Butter-Sugar Bliss: That perfect balance of white and brown sugar? It caramelizes just enough to give these cookies this almost chewy, almost crisp edge. And the vanilla? It’s like a warm hug in every bite—rich, buttery, and impossible to resist.
- Party in a Pan: One skillet, one batch—perfect for potlucks or when I need a last-minute dessert. Between us, these cookies disappear faster than my famous chili at gatherings. (Yes, even on a Tuesday night.)
- Zero-Waste Sweetness: The leftovers? They’re just as good the next day, if there are any. I’ve got a 9-year-old who’ll devour them straight from the fridge, and they freeze like a dream. Plus, using a cast iron means I’m not buying disposable pans. Win-win.
Step-by-step instructions for buttery cast iron skillet cookies
Here’s how to make perfectly crisp-edged, gooey-centered cookies using your cast iron skillet.
Cream Butter and Sugars to Light and Fluffy
In a large mixing bowl, combine the 0.5 cup unsalted butter with the 0.75 cup granulated white sugar and 0.25 cup light brown sugar. Using a hand mixer or stand mixer fitted with the paddle attachment, beat on medium speed for 3-4 minutes until the mixture is light and fluffy, nearly doubling in volume.
Here’s the thing—you want to incorporate as much air as possible at this stage. You’ll see the mixture go from pale to nearly white as the butter emulsifies with the sugars. If you’re using room temperature butter, it should create a smooth, creamy texture without any graininess. Stop mixing when you can see the beater marks hold their shape for a few seconds.
Add Eggs and Vanilla for Rich Flavor
Add the 1 whole large egg to the butter-sugar mixture, mixing on low speed for 30 seconds until fully incorporated. Then add the 1 tsp vanilla extract and 1 tsp pure vanilla bean seeds, mixing for another 10 seconds to combine.
This is where the vanilla really shines. The vanilla bean seeds add a depth of flavor that pure extract can’t match. If you’re using the optional vanilla bean seeds, scrape them directly from the pod using the side of a knife. The mixture might look slightly curdled after adding the egg, but don’t worry—it will come together perfectly when you add the dry ingredients.
Combine Dry Ingredients for Perfect Texture
In a separate bowl, whisk together the 1.5 cups all-purpose flour, 0.25 tsp baking soda, 0.5 tsp diamond crystal kosher salt, and 0.5 tsp ground cinnamon. With the mixer on low speed, gradually add the dry ingredients to the wet mixture, mixing just until combined. Be careful not to overmix—you want to see a few small flour streaks remaining.
Overmixing develops gluten, which can make your cookies tough. You’re aiming for a dough that comes together but still looks slightly shaggy. Once combined, remove the bowl from the mixer and gently fold in the 0.5 cup dark chocolate chips using a silicone spatula, making sure they’re evenly distributed throughout the dough.
Chill the Dough for Better Shape and Flavor
Cover the bowl with plastic wrap and refrigerate for at least 30 minutes (I prefer 1 hour for best results). Chilling the dough is crucial—it firms up the butter, which prevents excessive spreading in the oven, and allows the flour to fully hydrate for a better texture.
While the dough chills, preheat your 8-inch cast iron skillet over medium heat until it’s hot to the touch. The skillet needs to be properly heated before you add the dough to create that signature crispy edge. This step makes a world of difference in the final texture of your cookies.
Bake in Cast Iron for Perfect Crispy Edges
Once the dough has chilled and your skillet is hot, place it on the stovetop over medium heat. Drop 2 tablespoon portions of dough into the skillet, spacing them about 2 inches apart. Cook for 3-4 minutes until the edges are golden brown and the centers still look slightly underdone.
Here’s the moment that matters: you’ll know they’re ready when the edges are crispy and the centers still have a slight wobble. Transfer the skillet to a 350°F preheated oven and bake for an additional 5-7 minutes until the centers are set but still gooey. Finish each cookie with a sprinkle of 0.25 tsp flaky sea salt while they’re still warm.
Pro Tips For Making 8 Inch Cast Iron Skillet Cookie
- Preheat Skillet Like It’s 1950: Cast iron holds heat forever, so get that skillet screaming hot over medium-high for 5-7 minutes—until you can barely hold your hand an inch above it. I used to rush this, and the cookies would spread into sad, flat pancakes instead of crisp-edged chewiness. (Yes, even if you’re impatient like me.)
- Cream Butter Cold: Take your unsalted butter straight from the fridge and beat it with the sugars until it’s just starting to soften—think tiny pea-sized lumps, not a smooth paste. My grandmother swore by this, and she was right: cold butter creates pockets of steam that make these cookies light, not dense. (Skip this, and you’ll end up with a brick.)
- Skip the Overmixing: Once you add the eggs and vanilla, mix just until the dry ingredients are barely incorporated—lumps and all. Overmixing develops gluten, and your cookies will turn out tough instead of tender. I learned this the hard way after kneading dough like I was making bread. (Your future self will thank you.)
- Rotate the Skillet: After 8-10 minutes of baking, swap the skillet’s position front-to-back and side-to-side. Cast iron heats unevenly, and cookies on the edges will dry out faster than the center. I was skeptical until I tried it—now I religiously rotate, and every cookie gets that perfect golden crunch. (Does it look weird? Yes. Does it work? Every single time.)
Regional styles of this dish
Southern-Style Skillet Cookies
In the South, cast iron skillet cookies often feature brown sugar as the dominant sweetener, creating a deeper caramelized flavor. I like adding 1 tbsp molasses to the dough for a rich, almost gingerbread-like depth—just mix it with the wet ingredients.
These cookies are perfect with a glass of sweet tea or milk, and they’re a staple at Southern cookouts. 🌶️
Midwest Molasses Twist
The Midwest takes skillet cookies in a spiced direction, often incorporating 2 tsp molasses and ½ tsp ginger for a snickerdoodle-inspired flavor. I’ve found that using light corn syrup (1 tbsp) instead of some of the sugar keeps the cookies extra tender.
These work beautifully with apple cider or peppermint tea for a cozy pairing.
Pacific Northwest Chocolate-Dipped
On the West Coast, skillet cookies often get a dark chocolate drizzle after baking. I melt ½ cup dark chocolate (70% cocoa) with 1 tbsp coconut oil and drizzle it over warm cookies before sprinkling with flaky sea salt.
This version pairs perfectly with espresso or berry compote for a dessert-worthy finish. 🍫
New England Spiced Variety
New England cooks love adding ½ tsp cardamom and ¼ tsp clove to their skillet cookies for a warm, aromatic twist. I’ve also seen maple syrup (2 tbsp) used instead of some of the sugar, giving the cookies a distinct autumnal flavor.
Serve with maple cream or spiced cider for a true New England touch.
Texas-Style Cinnamon Roll Cookies
In Texas, skillet cookies often mimic cinnamon roll dough, with ½ cup cream cheese mixed into the butter and a cinnamon-sugar swirl before baking. I like adding ½ tsp orange zest to the dough for brightness.
These are best served with iced coffee or vanilla ice cream for a decadent treat. 🌟
California Almond Joy Fusion
West Coast bakers love adding ½ cup chopped almonds and ½ cup shredded coconut to the dough, inspired by Almond Joy bars. I also add 1 tsp almond extract for extra depth. These cookies pair wonderfully with chilled chai tea or white chocolate ganache for a tropical-inspired dessert. 🌴
Nutrition facts
Frequently asked questions
Why do cast iron skillet cookies get crispier edges than sheet pan cookies?
The cast iron’s ability to retain and distribute intense heat creates that signature crispy edge. When you preheat the skillet until nearly smoking hot, the direct contact with the dough caramelizes the sugars instantly, creating a crackly crust. Sheet pans can’t match this heat concentration, which is why these cookies have a restaurant-quality texture.
Can I use this recipe with a different skillet size?
Yes, but adjust the baking time and portion size. A 10-inch skillet will require 4-5 minutes on the stovetop (edges first) and 7-9 minutes in the oven. For a 6-inch skillet, reduce to 2 tablespoon portions and bake 2-3 minutes on the stovetop, then 4-5 minutes in the oven. The key is maintaining the same heat intensity and spacing between cookies.
What if my cookies spread too much or burn?
Too much spreading usually means your dough wasn’t chilled long enough or the butter wasn’t cold enough. For future batches, chill the dough for 2 hours and use slightly less butter (0.4 cups). Burning happens when the skillet is too hot—reduce to medium-low heat and watch closely. A 325°F oven finish instead of 350°F can also help prevent over-browning.
Can I make these cookies ahead of time?
Bake them up to 2 days ahead and store in an airtight container at room temperature. For longer storage, freeze the baked cookies (without the flaky salt) for up to 3 months. Reheat in a 300°F oven for 5 minutes to restore crispness. The texture stays perfect—just add fresh salt when serving.
What’s the secret to getting gooey centers?
The gooey center comes from using room-temperature butter and baking just until the edges are set but the middle still has a slight wobble. Don’t overbake! The residual heat in the cast iron keeps the centers warm for 10-15 minutes after baking. For extra gooeyness, add 1 tbsp corn syrup to the dough—it keeps the texture tender longer.

- 7up Jello Salad With Cream Cheese Recipe: Nostalgic 70s Party Bites - October 5, 2026
- 20 Cookies Recipe: Double Batch Crunchy Edges, Chewy Centers - October 5, 2026
- 1955 Green Bean Casserole Recipe: Crispy Top, Creamy Mushroom Magic - October 5, 2026