
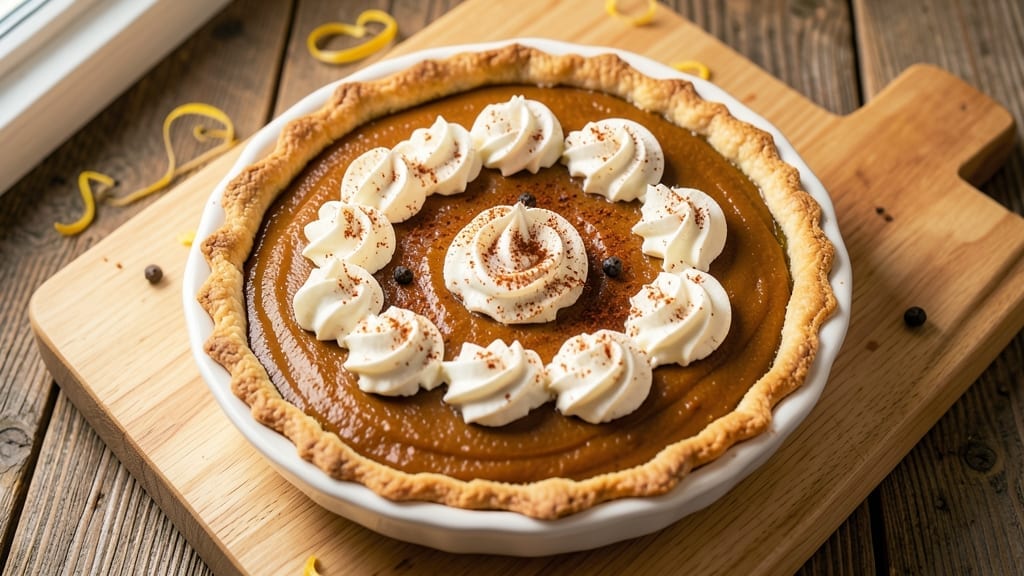
An 8-inch pumpkin pie recipe with a flaky crust and spiced vanilla bean swirls delivers the perfect balance of autumn warmth and elegant presentation—ideal for holiday gatherings or cozy weeknight desserts.
The secret lies in a tender, buttery crust that holds its shape while yielding to the first bite, paired with a filling so richly spiced it transforms ordinary pumpkin into something extraordinary. This isn’t just dessert; it’s a showstopper that pairs beautifully with whipped cream or a drizzle of caramel.
What sets this recipe apart is the vanilla bean swirl, a subtle yet transformative detail that elevates the classic pumpkin pie. While traditional recipes rely solely on ground spices, this version incorporates real vanilla bean for depth and a whisper of floral aroma that lingers on the tongue.
The filling is silky-smooth, with just the right amount of cinnamon, nutmeg, and ginger to create warmth without overpowering the natural sweetness of the pumpkin.
Baking time is 50-60 minutes at 350°F, ensuring a golden crust and perfectly set filling that’s still tender at the center. The crust stays crisp along the edges while remaining tender beneath, a texture that’s the hallmark of a well-made pie.
Cooling properly is key—allowing it to rest for at least 2 hours ensures clean slices and a clean plate every time.
This recipe is adaptable for dietary preferences, from gluten-free crusts to dairy-free alternatives, without sacrificing flavor. Whether you’re serving it at Thanksgiving, Christmas, or a simple fall dinner, the combination of a flaky crust and aromatic filling makes it a dessert worth celebrating.
Let’s get started on creating your perfect pie.
Ingredients for 8 inch pumpkin pie
Nine core ingredients plus a few pantry staples create this showstopping pie with perfect flaky crust and aromatic filling.
| Ingredient | Amount | Notes |
|---|---|---|
| Pumpkin Puree 🎃 | 1 ½ cups | Unsweetened, canned or homemade |
| Granulated Sugar 🍚 | 1 ¼ cups | White or light brown |
| Large Eggs 🥚 | 2 whole | Room temperature preferred |
| Evaporated Milk 🥛 | 1 cup | Full-fat for creaminess |
| All-Purpose Flour 🌾 | ½ cup | For thickening filling |
| Ground Cinnamon 🌿 | 2 tsp | Freshly ground preferred |
| Ground Nutmeg 🌿 | ½ tsp | Freshly grated nutmeg better |
| Ground Ginger 🌶️ | 1 ½ tsp | Freshly ground preferred |
| Salt 🧂 | ½ tsp | Diamond Crystal preferred |
| Vanilla Bean 🌸 | 1 whole | Seeds scraped and pod added |
| Unsalted Butter 🧈 | ½ cup | Cold, cubed for crust |
| All-Purpose Flour 🌾 | 1 ½ cups | Plus 1 tbsp for dusting |
| Ice Water 💧 | ¼ cup | For pie crust |
| Granulated Sugar 🍚 | ¼ cup | For crust sprinkle |
The vanilla bean is non-negotiable here—Madagascar Bourbon beans from Penzeys or your local specialty store deliver the best flavor. Look for plump, moist pods with visible seeds inside. If you can’t find whole beans, high-quality vanilla extract works in a pinch, but the seeds add that special floral note. For the pumpkin, Libby’s 100% puree is my go-to—no added spices or sugar. The crust butter should be cold and cubed; don’t let it warm up before mixing. Store your vanilla beans in a cool, dark place—they’ll keep for years.
No vanilla bean? Double the vanilla extract and add a pinch of vanilla sugar for depth. For the crust, lard or shortening can replace butter if you prefer a flakier texture, but butter gives that unmatched richness. The filling can be made ahead—up to 2 days in advance—and the crust can be pre-baked for 1 hour before adding the filling. If your pumpkin puree is watery, strain it through a fine-mesh sieve before using. The crust flour should be sifted for a lighter texture, but if you’re in a hurry, just whisk it vigorously in the bowl.
This pie keeps beautifully—5 days in the fridge covered tightly, or 3 months frozen. For serving, let it sit at room temperature for 30 minutes before slicing. The crust stays crisp if you reheat slices in the oven for 5 minutes at 350°F. I always make an extra crust—freeze the dough balls for up to 3 months and bake fresh whenever you need a pie. The filling reheats well too, so you can turn this into a warm dessert any time.
Why You’ll Love This Recipe
- No-Fuss Filling: I swear by this recipe because it’s basically foolproof—just whisk the pumpkin puree, sugar, eggs, and evaporated milk until smooth, then stir in the flour. No whisking to oblivion, no overmixing, and no stressing over measurements. The eggs and evaporated milk give it that perfect creamy texture without requiring a stand mixer.
- Spiced Perfection: Honestly, the flavor is what keeps me coming back. That balance of sweet sugar and the warm spices hiding in the pumpkin puree (cinnamon, nutmeg, cloves—yes, they’re in there) makes every bite taste like autumn. The crust might not be fancy, but the filling? Ridiculously good.
- Portion Control: An 8-inch pie is the perfect size for small gatherings or when you just want a slice without committing to a whole 9-inch pie. It feeds 6-8 people nicely, so it’s great for game nights, potlucks, or when your family “accidentally” eats dessert first. (We’ve all been there.)
- Budget-Friendly Leftovers: Here’s what sold me—the ingredients are cheap, and the pie reheats beautifully for breakfast or a snack. I’ve had leftover slices the next day, warmed with a drizzle of whipped cream, and no one ever complains. Plus, the evaporated milk keeps it rich without breaking the bank. Win-win.
Step-by-step instructions for 8-Inch pumpkin pie with vanilla bean swirls
Mastering this pie means perfecting two components simultaneously—here’s how to achieve both flawless crust and velvety filling.
Prepare the Vanilla Bean Spiced Filling
In a large mixing bowl, combine the 1.5 cups pumpkin puree with the 1.25 cups granulated sugar. Whisk until completely smooth—no lumps should remain. This ensures an even texture throughout the pie.
Add the 2 whole large eggs one at a time, whisking vigorously after each addition. Then stir in the 1 cup evaporated milk, 0.5 cup all-purpose flour, 2 teaspoons ground cinnamon, 0.5 teaspoon ground nutmeg, 1.5 teaspoons ground ginger, and 0.5 teaspoon salt. Mix until fully incorporated, scraping down the sides of the bowl as needed.
Scrape the seeds from the 1 whole vanilla bean and add them to the mixture along with the empty pod. This adds depth of flavor that regular extract can’t match. Let the filling sit at room temperature while you prepare the crust—this allows the spices to bloom and enhances their aromatic qualities.
Craft the Flaky Pie Crust
In a food processor, pulse the 1.5 cups all-purpose flour with the 0.5 teaspoon salt until combined. Add the 0.5 cup cold unsalted butter, cut into cubes, and process until the mixture resembles coarse crumbs with pea-sized butter pieces remaining. This texture is crucial for achieving flaky layers.
With the processor running, gradually add the 0.25 cup ice water, 1 tablespoon at a time, until the dough just comes together when pressed. Avoid overmixing—just until the dough forms a rough ball. Turn it out onto a lightly floured surface and gently shape into a disk. Wrap in plastic and refrigerate for at least 1 hour to firm up.
Preheat your oven to 375°F while the dough rests. Roll out the chilled dough between two sheets of parchment paper to 12-inch diameter, about ⅛-inch thick. Transfer carefully to a 9-inch pie dish, trimming any excess dough. Sprinkle the edges with the remaining 0.25 cup granulated sugar—this creates that signature caramelized crust edge.
Assemble and Bake the Pie
Pour the prepared filling into the pre-baked crust, spreading it evenly with a spatula. The filling should come about ½-inch from the crust’s edge—this prevents overflow during baking. Gently tap the pie dish on the counter to release any air bubbles that may have formed.
Place the pie on a baking sheet (to catch any potential drips) and bake for 45-50 minutes until the filling is set but still slightly jiggly in the center. A toothpick inserted should come out with a few moist crumbs attached—this indicates perfect doneness. Watch closely after 40 minutes as ovens vary in heat distribution.
Remove from the oven and let cool completely on a wire rack. The filling will continue thickening as it cools, achieving that signature creamy texture. For best results, refrigerate for at least 4 hours before serving—this allows flavors to fully develop and the crust to crisp up beautifully.
Pro Tips For Making 8 Inch Pumpkin Pie
- Preheat That Oven: I learned this the hard way—skipping the preheat or using a half-hearted 350°F leads to a pie that either bakes unevenly or sits there forever. Crank it to 375°F for the first 15 minutes, then drop to 350°F. The crust gets set fast (no soggy bottoms), and the filling starts cooking through before the edges lag behind.
- Whisk the Eggs Well: That “just mix it” advice is lazy. Beat the eggs until no streaks remain—at least 2 minutes with a whisk or mixer—or you’ll end up with a lumpy filling that looks unappealing and sets unevenly. I used to rush this, and the pie always had those sad, uneven patches. Not worth it.
- Strain the Pumpkin Puree: Store-bought puree often hides stringy bits or watery texture, and those ruin the smoothness of your pie. Strain it through a fine-mesh sieve before mixing—even if it’s labeled “smooth.” Sounds weird, but it works: your filling will be velvety, not grainy, and the pie slices cleaner. (Yes, even if you’re impatient like me.)
- Vent That Crust: Skip the foil tent if your crust looks puffy or the filling’s rising too fast—cut a few small slits in the top crust instead. This lets steam escape without letting the filling overflow, and it prevents that sad, collapsed middle. I was skeptical until I tried it: no more pie disasters at the 45-minute mark.
Troubleshooting this recipe
Filling Too Watery
If your filling looks too thin or watery after baking, it’s likely due to excess moisture in the pumpkin puree or overmixing the ingredients. Always use unsweetened pumpkin puree—brands like Libby’s work best. Strain any watery puree through a fine-mesh sieve before using.
For extra insurance, add 1 extra tablespoon of flour to thicken. If the filling separates during baking, whisk it gently before pouring into the crust. 💧
Crust Too Tough
A tough crust usually means overworking the dough or using warm butter. Keep your butter cold and cube it before mixing—never let it soften. Pulse the dough in a food processor just until it comes together, then handle it as little as possible.
If the crust feels dry, add 1 teaspoon of ice water at a time. Chilling the dough for at least 1 hour before rolling also prevents toughness. 🧈
Filling Not Setting
An undercooked filling often results from opening the oven too soon or underbaking. The center should be slightly jiggly (not liquid) when done—this firms up as it cools. If your pie looks underdone after 50 minutes, bake for 5-10 more minutes.
Avoid overmixing the filling, as eggs can scramble if the oven runs hot. A toothpick test is key: it should come out with a few moist crumbs, not wet batter. ⏱️
Bubbles or Cracks
Air bubbles or cracks in the filling usually happen from uneven heat distribution or rapid cooling. Tap the pie dish gently on the counter before baking to release air bubbles. If cracks form, sprinkle a little powdered sugar over the filling before serving to mask them.
For future pies, bake on the middle rack of your oven for even heat. Let the pie cool gradually on a wire rack—never place it on a cold surface. 🌡️
Soggy Bottom Crust
A soggy bottom is almost always caused by a filling that’s too wet or a crust that wasn’t pre-baked long enough. For a foolproof crust, blind-bake it at 375°F for 15 minutes with pie weights or dried beans before adding the filling.
If you skip pre-baking, ensure the filling isn’t too runny—add 1 extra tablespoon of flour if needed. Let the pie cool completely before slicing to prevent moisture from seeping into the crust. 🍞
Burnt Edges
Overly browned or burnt edges happen when the crust cooks too quickly. Sprinkle the crust edges with granulated sugar before baking to create a caramelized barrier, but don’t overdo it—¼ cup is plenty.
If your oven runs hot, reduce the temperature to 350°F and add 5-10 minutes to the baking time. Cover the edges loosely with aluminum foil if they start browning too fast. 🔥
Nutrition facts
Frequently asked questions
Can I make this pumpkin pie in a different-sized dish?
Yes! For a 9-inch pie, reduce baking time by about 10-15 minutes (40-45 minutes total). For an 8-inch tart pan, bake for 35-40 minutes—just ensure the filling is ½-inch from the edge. Adjust oven racks to the middle for even heat distribution. The filling-to-crust ratio matters most, so don’t overfill any dish.
How do I store or reheat leftover pumpkin pie?
Store covered at room temperature for 2 days or refrigerate for 5 days. For reheating, slice pieces and warm in the oven at 350°F for 5-10 minutes until edges are crisp. Microwaving works in 20-second bursts, but it can make the crust soggy. Freeze slices wrapped tightly for 3 months—thaw overnight in the fridge before reheating.
What’s the best way to serve this pie?
Classic pairings include whipped cream, vanilla ice cream, or a drizzle of caramel sauce. For a modern twist, add toasted pecans or a sprinkle of sea salt before serving. Chill the pie for 4+ hours before slicing—this ensures clean cuts and a firm texture. Serve with spiced apple cider or coffee for a complete autumn dessert experience.
Can I substitute ingredients for dietary restrictions?
For gluten-free crust, use a 1:1 gluten-free flour blend and add ½ teaspoon xanthan gum. Dairy-free? Replace butter with coconut oil and evaporated milk with full-fat coconut milk. For vegan pies, use flax eggs (1 tbsp ground flax + 3 tbsp water per egg) and ensure your vanilla bean is alcohol-free. Always adjust liquid measurements when substituting.
Why does my crust sometimes puff up in the oven?
This happens when steam gets trapped between the filling and crust during baking. To prevent it, poke 3-4 small holes in the filling before baking to release air. Another trick: pre-bake the crust for 10 minutes before adding filling. If puffing occurs, don’t worry—it won’t affect flavor, just the appearance. The crust will settle as it cools.

- Pea Soup Instant Pot Recipe: Velvety Green Smoothness in 20 Minutes - November 1, 2026
- Pork Loin Pulled Pork Crock Pot Recipe: Slow-Smoked Tenderness With Zero Dryness - November 1, 2026
- Baked Potatoes in Crock Pot Recipe: Buttery Interiors and Crispy Top Magic - November 1, 2026