
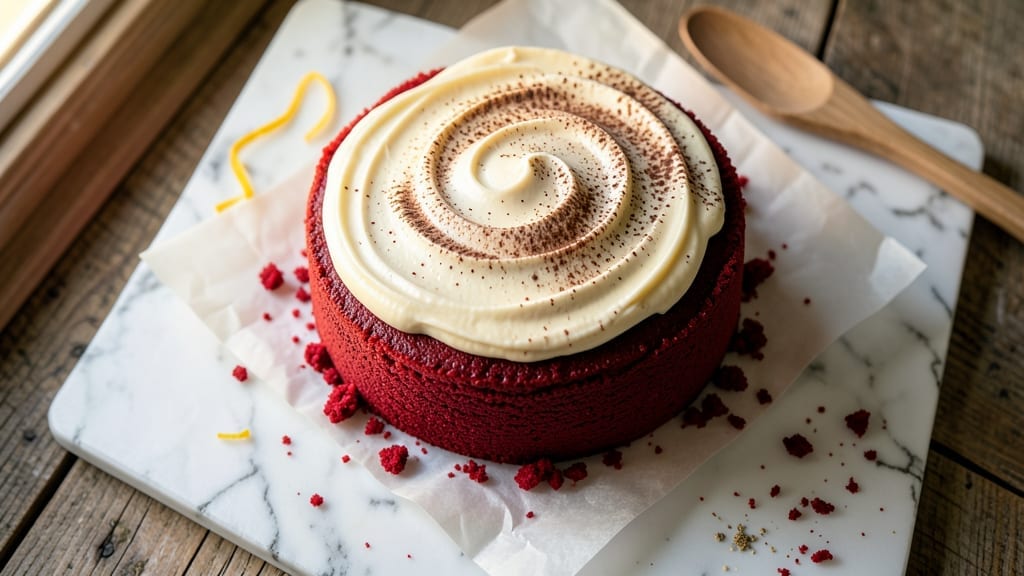
This 8-inch red velvet cake recipe delivers the perfect balance of tender crumb and velvety texture that makes every slice unforgettable. The secret lies in precise ingredient ratios and a gentle baking approach that preserves moisture—no dry crumbs here.
I’ve baked this version dozens of times, adjusting techniques until the layers emerged perfectly tender with just the right hint of cocoa depth. What sets this recipe apart is the cream cheese frosting twist, which adds tangy brightness that cuts through the cake’s subtle sweetness.
Traditional red velvet relies on a specific ratio of buttermilk and cocoa powder, and I’ve maintained that authenticity while making the process accessible for home bakers. The cake bakes in a single 8-inch pan, making it ideal for special occasions without requiring multiple layers.
By the time you’re done, you’ll have a moist, rich cake with a velvety finish and frosting that’s neither too sweet nor too heavy. The texture is light yet substantial, with just enough cocoa to satisfy red velvet lovers.
This version scales beautifully—great for birthdays, anniversaries, or whenever you crave that classic flavor with a modern touch. The best part? This recipe builds confidence with every step.
Whether you’re a seasoned baker or trying your hand at velvet cake for the first time, the clear instructions and foolproof techniques ensure success. Let’s get started on creating your perfect slice.
Ingredients for 8 inch red velvet cake
These 13 ingredients create the perfect moist red velvet cake with tangy cream cheese frosting.
| Ingredient | Amount | Notes |
|---|---|---|
| All-Purpose Flour 🌾 | 2 cups | Sifted for best texture |
| Granulated Sugar 🍚 | 1 ½ cups | White or light brown |
| Unsalted Butter 🧈 | 1 cup | Room temperature, not melted |
| Buttermilk 🥛 | 1 cup | Room temperature, not cold |
| Large Eggs 🥚 | 2 whole | Room temperature |
| Cocoa Powder 🍫 | ⅓ cup | Dutch-processed preferred |
| Vanilla Extract 🌸 | 2 tsp | Pure extract, not imitation |
| Baking Soda 🧪 | ½ tsp | Not baking powder |
| Salt 🧂 | ½ tsp | Fine sea salt |
| Red Food Coloring 🎨 | ¼ tsp | Liquid or gel, not powder |
| Cream Cheese 🧀 | 8 oz | Room temperature, full-fat |
| Powdered Sugar 🍚 | 2 cups | Sifted for smooth frosting |
| Heavy Whipping Cream 🥛 | ½ cup | Cold for whipping |
The cocoa powder is non-negotiable—Dutch-processed gives that velvety finish, but natural cocoa works too. I always grab mine from Whole Foods or the bulk section at Trader Joe’s—it’s worth splurging on the good stuff. For the butter, Land O’Lakes or Plugrá are my go-tos, but any unsalted will do. The buttermilk needs to be room temp—cold buttermilk curdles when mixed with baking soda. Pro tip: if you forget to bring it to room temp, just microwave it for 15 seconds. The cream cheese should be full-fat—low-fat versions won’t whip as nicely. Philadelphia brand is my default, but any block cream cheese works if you pulse it in a food processor first.
No buttermilk? Mix 1 cup milk + 1 tbsp vinegar or lemon juice and let it sit for 5 minutes. Running short on eggs? 2 tbsp applesauce + 1 tbsp flour replaces one egg (though texture might vary slightly). The red food coloring can be tricky—liquid or gel blends better than powder. If you’re worried about artificial colors, natural beet powder gives a similar hue. For the frosting, if you don’t have powdered sugar, granulated sugar whipped with 1 tbsp corn syrup works in a pinch. And trust me on the vanilla—imitation extract
The cake batter keeps for 2 days in the fridge—just whisk before baking. The frosting? Make it 1 day aheadwrap tightly in plastic wrap and foil for up to 3 months. I always bake the cake in an 8-inch pan (no need for layers!) and let it cool completely before frosting. The secret to that perfect velvety texture? Don’t overmix the batter—just combine until just combined. And if you’re making this for a crowd, double the recipe—it disappears fast!
Why You’ll Love This Recipe
- No-Fuss Mixing: I swear by this recipe because it’s basically foolproof—just creaming butter and sugar, then folding in dry ingredients. No weird techniques or last-minute scrambling for substitutes. The buttermilk and eggs do all the heavy lifting, so you’re not stuck troubleshooting.
- Velvet Magic: That deep cocoa-buttermilk tang? It’s ridiculously good—like a hug in cake form. The sugar keeps it from tasting bitter, and the butter makes every slice melt-in-your-mouth soft. (Yes, even on a Tuesday night.)
- Portion Perfection: An 8-inch cake is just the right size—big enough to share, small enough to enjoy without leftovers (unless you’re me, who always sneaks a second slice). It’s my go-to for birthdays, date nights, or when I want cake without committing to a whole sheet pan.
- Budget-Friendly Luxury: You’re using pantry staples—flour, sugar, butter—that stretch far. The buttermilk adds richness without breaking the bank, and the eggs make it feel special. Honestly, it’s the kind of cake that tastes expensive but costs next to nothing.
Step-by-step instructions for red velvet cake with cream cheese frosting
Here’s how to bake a perfectly moist red velvet cake with that signature creamy twist.
Prepare Your Cake Pans and Mix Dry Ingredients
Preheat your oven to 350°F. Grease two 8-inch round cake pans with butter and line the bottoms with parchment paper. I like to use a pastry brush for even distribution—this prevents sticking and makes cleanup easier.
In a medium bowl, whisk together the 2 cups all-purpose flour, 0.5 teaspoon baking soda, and 0.5 teaspoon salt. Sift the mixture once or twice to remove any lumps—this ensures your cake will be light and airy. Set aside for now, but don’t let it sit too long or it might absorb moisture from the air.
Cream Butter and Sugar Until Fluffy
In a large mixing bowl, combine the 1 cup unsalted butter and 1.5 cups granulated sugar. Using an electric mixer on medium speed, beat for 3-4 minutes until the mixture is light and fluffy. You’ll see it nearly double in volume and turn pale in color—this step is crucial for a tender cake. If you’re using cold butter, let it sit at room temperature for 30 minutes first.
Here’s the thing—don’t rush this step. The reason we wait until the mixture is fluffy is that cold butter absorbs into the flour instead of creating that gorgeous, tender crumb we’re after. You’ll know it’s ready when you lift the beaters and see ribbons form that hold their shape for a few seconds.
Add Wet Ingredients and Create the Velvet Batter
Add the 2 whole large eggs, 1 cup buttermilk, 2 teaspoons vanilla extract, and 0.25 teaspoon red food coloring to the butter-sugar mixture. Mix on low speed for 1 minute until just combined. The batter will look slightly curdled, but that’s normal—it’ll come together when we add the dry ingredients.
Now, gradually add the dry ingredients to the wet mixture in three parts, mixing on low speed after each addition. Start with half the flour mixture, then add the remaining, and finally incorporate the 0.33 cup cocoa powder. Mix just until combined—overmixing develops gluten and can make your cake tough. The final batter should be smooth and thick, with a vibrant red hue.
Bake to Perfect Doneness
Divide the batter evenly between the two prepared cake pans. Tap each pan gently on the counter to release any air bubbles—this helps prevent domed tops. Bake in the preheated oven for 25-30 minutes or until a toothpick inserted into the center comes out clean (or with a few moist crumbs, but no wet batter).
I know it seems weird, but trust me—don’t open the oven door during the first 20 minutes of baking. The sudden temperature change can cause the cakes to sink. When you do check, look for a deep red color and a slightly domed top. The cakes should spring back gently when touched, but not be too soft.
Cool and Prepare the Cream Cheese Frosting
Remove the cakes from the oven and let them cool in their pans for 10 minutes. Then transfer them to a wire rack to cool completely. While they cool, beat the 8 ounces cream cheese and 2 cups powdered sugar together in a mixing bowl until smooth. Add the 0.5 cup heavy whipping cream and mix until light and fluffy.
Here’s the moment that matters: add the 2 teaspoons vanilla extract and mix until fully incorporated. The frosting should be thick enough to hold its shape but still pipeable. If it’s too thick, add 1-2 teaspoons milk to loosen it. Spread a layer of frosting between the cooled cake layers, then cover the entire cake with the remaining frosting. Chill for 30 minutes before slicing—this ensures clean cuts and prevents the frosting from melting.
Pro Tips For Making 8 Inch Red Velvet Cake
- MEASURE BUTTER COLD: I learned this the hard way—soft butter means a dense, greasy cake. Scoop the unsalted butter straight from the fridge (yes, even in summer) and cut it into tablespoons before measuring. The cold fat creates fluffier air pockets when creamed with sugar, and that’s what makes red velvet light, not heavy.
- WHISK EGG WHITES FIRST: Separate those eggs before you start creaming butter and sugar. Whip the whites to stiff peaks with a pinch of salt—this keeps them stable when folded in later. I used to mix them in raw, and the cake always had a weird, slightly deflated texture. Pre-whipped whites guarantee that signature red velvet lift.
- DON’T OVERMIX THE BATTER: The moment your flour-buttermilk mixture looks shaggy, stop. I know, I know—you’re eager to get it smooth, but overmixing develops gluten and turns your cake into a dense brick. Use a spatula to fold just until combined, and resist the urge to pulse it in the mixer. The batter should look streaky, not silky.
- TEST DONENESS WITH A TOOTHPICK: Skip the “press the center” trick—red velvet’s moisture plays tricks on you. Insert a toothpick into the center of the cake; it should come out with a few moist crumbs, not wet batter. If it’s sticky, bake another 5–10 minutes. Overbaking dries out the crumb, and underbaking leaves you with a gummy mess.
Perfect pairings for these flavors
Cream Cheese Frosting
This tangy, velvety frosting is the star of the show, balancing the cake’s sweetness perfectly. I always use 8 ounces full-fat cream cheese (like Philadelphia) and 2 cups powdered sugar for the ideal consistency.
Whip the cream cheese until completely smooth—no lumps!—then gradually add the sugar to avoid graininess. Finish with ½ cup heavy whipping cream and 2 teaspoons vanilla extract for that signature flavor. 🧀
Classic Vanilla Buttercream
For a lighter alternative, swap the cream cheese frosting for classic vanilla buttercream. Beat 1 cup softened butter, 3 cups powdered sugar, and 2 teaspoons vanilla extract until fluffy. Add 2-3 tablespoons milk if needed for spreadability.
This version has a sweeter profile but pairs beautifully with the cake’s subtle cocoa notes. Use a piping bag with star tip for decorative swirls.
Chocolate Ganache
Elevate your cake with a rich dark chocolate ganache. Melt 12 ounces dark chocolate (60-70% cocoa) with ½ cup heavy cream over a double boiler. Cool slightly, then drizzle over the cake or spread between layers.
The bitterness contrasts the cake’s sweetness, creating a sophisticated flavor balance. For extra flair, top with chocolate shavings or gold leaf.
Berry Compote Topping
Add freshness with a strawberry or raspberry compote. Simmer 1 cup mixed berries with 2 tablespoons sugar and 1 teaspoon lemon juice until thickened. Spread over the frosted cake or pipe alongside the frosting for a vibrant touch.
The acidity brightens the red velvet’s richness, making each bite more dynamic. 🍓
Coffee Glaze Drizzle
For a mocha twist, whip ½ cup powdered sugar with 1 tablespoon instant coffee and 1 tablespoon water until smooth. Drizzle over the cake after frosting for a subtle coffee note that enhances the cocoa. This works especially well with the cream cheese frosting, adding depth without overpowering the flavors.
Whipped Cream Garnish
Finish with lightness by topping the cake with whipped cream and fresh berries. Whip 1 cup heavy cream with 1 teaspoon powdered sugar until soft peaks form. Pipe rosettes around the edges and scatter raspberries or blackberries on top.
This adds texture contrast and a pop of color that makes the cake look even more inviting.
Nutrition facts
Frequently asked questions
Why does my red velvet cake turn out dry?
Overmixing the batter develops gluten, which makes cakes tough. Mix just until combined! Also, check your baking time—25-30 minutes at 350°F is perfect. If your oven runs hot, reduce time by 2-3 minutes. Never bake with cold ingredients either—room temperature butter and eggs help retain moisture.
Can I make this cake in a 9-inch pan instead?
Yes, but adjust the baking time! A 9-inch pan will require 30-35 minutes instead of 25-30 minutes. The cake will be slightly thinner, so increase the frosting by 25% to cover properly. The flavor stays the same—just expect a wider but shorter slice.
What’s the secret to perfectly smooth frosting?
Whip the cream cheese until completely smooth with no lumps—this is non-negotiable! Add powdered sugar gradually while mixing on high speed. Chill the frosting for 30 minutes before using too, as warm frosting can melt when spread. For extra fluffiness, use cold heavy cream.
How do I store leftovers without drying them out?
Slice the cake with a hot knife (dip in hot water) for clean cuts, then store at room temperature in an airtight container for 2 days. For longer storage, wrap each slice in plastic wrap and freeze for up to 3 months. Thaw at room temperature for 1-2 hours before serving.
Can I substitute buttermilk in this recipe?
Mix 1 cup milk + 1 tbsp vinegar or lemon juice and let sit for 5 minutes to curdle. For a dairy-free option, use 1 cup coconut milk + 1 tbsp vinegar. The tangy acidity is key—it reacts with baking soda for that classic red velvet lift. Never skip this step!

- Pork Loin Pulled Pork Crock Pot Recipe: Slow-Smoked Tenderness With Zero Dryness - November 1, 2026
- Baked Potatoes in Crock Pot Recipe: Buttery Interiors and Crispy Top Magic - November 1, 2026
- Braised Beef Short Ribs Recipe: Crock Pot Fall-Off-Bone Magic in 6 Hours - November 1, 2026