
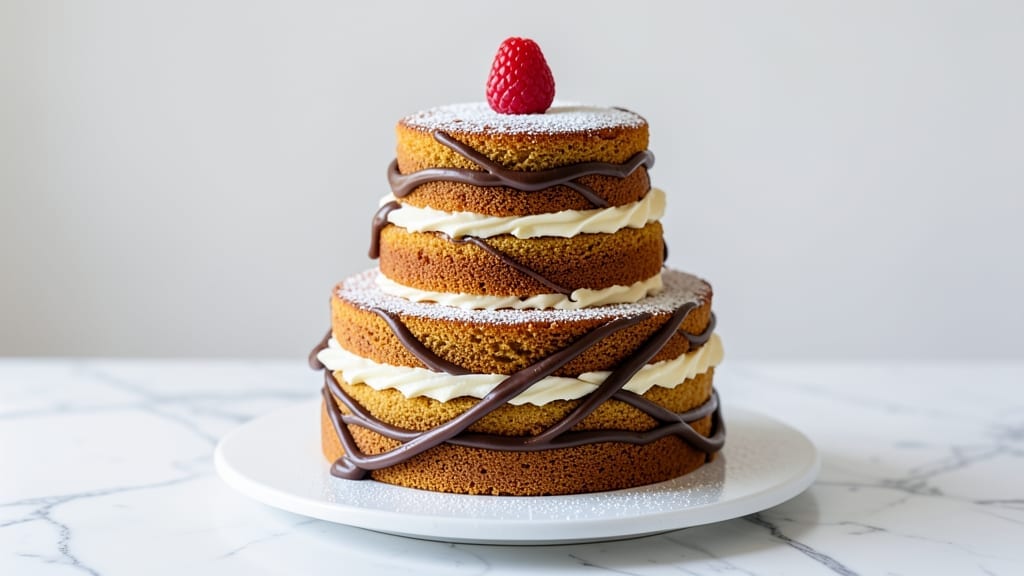
A 4-layer 6-inch cake with vanilla bean swirls and velvety cream cheese frosting is the showstopper you need for birthdays, weddings, or just because. ✨ This recipe delivers professional-level results with simple techniques—leveling layers, filling with swirls, and frosting like a pro. No fancy equipment required, just patience and precision.
The secret to success lies in baking the layers perfectly even and letting them cool completely before assembly. I use a vanilla bean for depth of flavor and a cream cheese frosting that’s light yet rich, with just enough sweetness to complement the cake.
Each layer gets filled with a thin layer of frosting before adding the swirls, ensuring every bite is moist and flavorful.
By the time you’re done, you’ll have a stunning cake with smooth, even layers, swirls of vanilla bean buttercream, and a flawless finish. The cream cheese frosting adds a tangy contrast that makes this cake unforgettable.
Perfect for celebrations or impressing guests, this recipe is foolproof with the right steps.
Whether you’re a beginner or an experienced baker, this method ensures a cake that looks and tastes like it came from a bakery. Let’s get started—your next celebration dessert is about to get an upgrade.
Ingredients for 4 layer 6 inch cake
Vanilla bean swirls and velvety cream cheese frosting start with these 15 essential ingredients.
| Ingredient | Amount | Notes |
|---|---|---|
| All-Purpose Flour 🌾 | 3 ½ cups | Sifted for light layers |
| Granulated Sugar 🍚 | 2 ¼ cups | Divided for dry mix and syrup |
| Unsalted Butter 🧈 | 1 ½ cups | Room temperature, European preferred |
| Large Eggs 🥚 | 6 whole | Room temperature for even baking |
| Vanilla Bean Paste 🌿 | 2 tbsp | High-quality for authentic flavor |
| Baking Powder 🧂 | 1 ½ tsp | Freshly opened for lift |
| Salt 🧂 | ½ tsp | Fine sea salt preferred |
| Whole Milk 🥛 | 1 ¼ cups | Room temperature for smooth batter |
| Vanilla Bean Seeds 🌿 | 1 whole | Scraped from 1 vanilla bean |
| Heavy Whipping Cream 🥛 | 1 ½ cups | Cold for perfect swirls |
| Cream Cheese 🧀 | 16 oz | Room temperature, full-fat |
| Powdered Sugar 🍚 | 3 cups | Sifted for smooth frosting |
| Lemon Juice 🍋 | 1 tbsp | Freshly squeezed for tang |
| Vanilla Extract 🌿 | 1 tsp | Pure vanilla for depth |
| Parchment Paper 📄 | 4 sheets | For even baking and easy release |
The vanilla bean is non-negotiable here—Madagascar or Tahitian beans from Williams Sonoma or specialty markets deliver the best flavor. If you can’t find fresh beans, high-quality paste works, but scrape the seeds yourself for that signature aroma. For the butter, European-style (like Plugrá or President) has higher fat content, giving your layers a tender crumb. Measure flour by spooning it into the cup and leveling off—never scoop, or your cake will be dense. Eggs should be at room temperature for even baking, so take them out 30 minutes before mixing.
No vanilla bean? Double the vanilla extract and add a pinch of ground vanilla bean seeds if you have them. For the frosting, Neufchâtel cheese (if you can find it) has a lower fat content but still works beautifully. Powdered sugar clumps easily—sift it before measuring to avoid lumps in your frosting. The lemon juice brightens the cream cheese flavor, so don’t skip it. If you’re short on time, store-bought vanilla extract, but pure vanilla extract (like McCormick Pure) elevates the flavor. For the swirls, whip the cream to soft peaks—over-whipping makes them grainy.
Butter and cream cheese should be at room temperature before mixing to avoid lumps—microwave in 20-second bursts if needed. Store cake layers wrapped in plastic at room temperature for 2 days, or freeze for up to 3 months (thaw overnight in the fridge). The frosting keeps for 5 days in the fridge, covered tightly. To assemble, let layers cool completely on a wire rack—patience here prevents soggy cake. For extra shine, brush the finished cake with a simple syrup (equal parts sugar and water, heated until dissolved) before adding final decorations.
Why You’ll Love This Recipe
- No Stand Mixer Needed: I swear by this recipe because it only requires a whisk and a bowl—no fancy equipment. The buttercream layers are forgiving, so even if your arms get tired, the result still looks (and tastes) like you put in effort.
- Vanilla Bomb Every Layer: That vanilla bean paste isn’t just flavor—it’s the star. The first bite hits with that rich, creamy sweetness, and the layers keep delivering. Honestly, I’ve tried store-bought cakes, and this one wins every time.
- Birthday to Brunch: This cake is my secret weapon for celebrations and lazy mornings. The 6-inch size is perfect for one person’s treat, but the layers scale up if you’re feeding a crowd. (Yes, even on a Tuesday night.)
- Pantry Staple Magic: You’re already using what’s in your cupboard—flour, sugar, butter, eggs. No specialty ingredients, no last-minute grocery runs. The leftovers? They disappear faster than I can say “second slice.”
Step-by-step instructions for vanilla bean swirl cake with cream cheese frosting
Here’s how to create a showstopping 4-layer cake with professional swirls and velvety frosting.
👨🍳 Step 1: Prepare the Cake Batter and Vanilla Syrup
Preheat your oven to 350°F and line four 6-inch round cake pans with the 4 sheets parchment paper, greasing the sides lightly with unsalted butter. In a stand mixer, cream the 1.5 cups unsalted butter and 1 cup granulated sugar (from the 2.25 cups total) on medium speed until light and fluffy, about 3-4 minutes. Add the 6 whole large eggs one at a time, mixing well after each addition.
In a separate bowl, whisk together the 3.5 cups all-purpose flour, 1.5 tsp baking powder, and 0.5 tsp salt. Gradually add this dry mixture to the butter mixture, alternating with the 1.25 cups whole milk, beginning and ending with the flour. Mix on low speed until just combined. Scrape the bowl and beaters to ensure even mixing.
For the vanilla syrup, combine 1 cup granulated sugar (remaining from the 2.25 cups) with 1.25 cups water in a small saucepan. Bring to a boil, then remove from heat and stir in the 2 tbsp vanilla bean paste and 1 whole vanilla bean seeds. Let steep for 10 minutes before straining.
🍳 Step 2: Bake the Layers and Create the Swirls
Divide the batter evenly among the prepared pans. Pour ¼ cup of the vanilla syrup into each pan, then swirl gently with a knife to create marbling. Bake for 20-25 minutes or until a toothpick inserted into the center comes out clean. Let the layers cool in the pans for 10 minutes, then transfer to a wire rack to cool completely.
Here’s the secret to perfect swirls: once the layers are completely cool, use a serrated knife to level the tops if needed. Then, using the same knife, make 4 vertical cuts into each layer, about ½ inch deep but not all the way through. This creates channels for the vanilla syrup to flow through when you reassemble.
🥘 Step 3: Assemble the Cake with Vanilla Cream Filling
Whip the 1.5 cups heavy whipping cream with 1 tbsp lemon juice and 1 tsp vanilla extract until soft peaks form. In a separate bowl, beat the 16 oz cream cheese until smooth, then gradually add the 3 cups powdered sugar and mix until creamy. Gently fold in half of the whipped cream to lighten the mixture.
Place the first layer on a cake stand or plate. Spread a thin layer of the vanilla cream cheese mixture, then pipe a generous border of the remaining whipped cream around the edges. Add the second layer, then repeat the process. Top with the final layer and cover the entire cake with the remaining whipped cream mixture. Use a spatula to create smooth sides, then swirl the top with a knife for a professional finish.
🍽️ Step 4: Chill and Decorate for Perfect Texture
Refrigerate the cake for at least 4 hours or overnight to allow the filling to set completely. This chilling step is crucial—it ensures your cake holds its shape and the frosting stays perfectly smooth. When ready to serve, carefully remove from the refrigerator 30 minutes before serving to let it soften slightly.
For decoration, dust the top with a light layer of powdered sugar or add fresh berries and mint leaves for a pop of color. The contrast between the creamy vanilla layers and the tangy cream cheese filling will make every slice unforgettable. Slice with a warm knife for clean cuts and serve immediately to enjoy the perfect balance of textures.
Pro Tips For Making 4 Layer 6 Inch Cake
- Weigh Your Butter: I used to eyeball butter measurements for years—until my cakes turned out unevenly dense. For a 6-inch cake, use a kitchen scale: 1 stick of butter is exactly 113g, not “about ½ cup.” Cold, cubed butter mixes smoother into the flour, and you’ll avoid greasy layers that sink instead of rise.
- Scrape the Vanilla: Vanilla bean paste isn’t just for flavor—it’s for texture. After whisking the paste into your batter, scrape the pod with a butter knife to get every last drop of seeds. I skipped this once and the cake tasted flat, like someone forgot to add the vanilla at all.
- Rotate the Pan: Your oven’s heat isn’t even, and a 6-inch cake is small enough that it matters. After 10 minutes of baking, rotate the pan 180 degrees and swap the top and bottom racks halfway through. This keeps the edges from burning while the center sets properly—no more undercooked goo in the middle or charred crust.
- Chill the Layers: Let your cake layers cool completely on a wire rack before frosting, but don’t skip the 10-minute fridge break afterward. Warm layers compress under frosting, ruining that clean, professional look. A quick chill firms them up so they hold their shape—no soggy bottoms or crumbling edges.
Regional styles of this dish
Classic Southern Vanilla Bean
In the South, this cake is often called a “vanilla bean beauty” and serves as the centerpiece for birthday celebrations. The key Southern twist? Adding a touch of bourbon (about 1 tsp) to the vanilla syrup for depth.
Many families use a cast iron skillet for baking—it creates a crispier edge that Southerners love. Serve with a side of peach cobbler for the ultimate Southern combo. 🌶️
New England Cream Cheese
New England bakers take this cake to heart with their cream cheese frosting variations. They often add a pinch of cardamom (about ½ tsp) to the frosting for a subtle, aromatic twist.
The frosting is also frequently piped into roses or shell borders for a refined look. Pair it with maple-glazed apples for a cozy New England touch. ❄️
Midwest German Influence
The Midwest has its own take with a “German butterbox” twist—using buttercream instead of whipped cream for the swirls. The frosting is often spiced with cinnamon (about ¼ tsp) and dusted with powdered sugar for a snowy finish.
It’s a staple at Oktoberfest gatherings and paired with apple strudel for a hearty dessert spread. 🍂
West Coast Modern Twist
West Coast bakers love to experiment with matcha powder (about 1 tsp) in the vanilla syrup for a vibrant green swirl. The frosting is sometimes infused with citrus zest (like lemon or orange) for a bright, zesty kick.
This version is perfect for brunch parties and pairs beautifully with fresh berries or toasted nuts. 🌴
French-Inspired Layering
For a French-inspired touch, some bakers use angel food cake layers instead of vanilla. The frosting is piped into intricate lace patterns and dusted with edible gold leaf for elegance. Serve with champagne or espresso for a sophisticated finish. This version is ideal for weddings or galas. 🍾
Mexican Vanilla-Cinnamon
In Mexican bakeries, this cake is often spiced with cinnamon (about 1 tsp) in both the cake batter and frosting. The frosting is sometimes tinted pink or yellow with natural dyes for festive occasions. Pair it with churros or Mexican hot chocolate for a sweet, spicy dessert experience. 🌶️
Nutrition facts
Frequently asked questions
Can I bake this cake in 8-inch pans instead of 6-inch?
Yes, but you’ll need to adjust the baking time and quantities. For 8-inch pans, reduce the oven temperature to 325°F and bake for 30-35 minutes instead of 20-25. The batter will spread more, so use ⅓ of the batter per pan instead of dividing evenly. The layers will be thicker, so let them cool completely before leveling.
How do I prevent my cake layers from cracking when frosting?
Cracking happens when layers aren’t fully cooled or when frosting is too thick. Let layers cool completely on a wire rack before assembling. Use a thin layer of frosting between layers (about ⅛ inch) and chill the cake for 4 hours before decorating. If cracks appear, cover them with extra frosting or decorative elements like sprinkles.
What’s the best way to store leftover cake?
Store the cake in an airtight container at room temperature for up to 2 days. For longer storage, wrap each layer individually in plastic wrap, then place the assembled cake in a freezer bag. Freeze for up to 3 months. Thaw overnight in the fridge before serving. Frosting can be stored separately in the fridge for 5 days—just rewhip briefly before using.
Can I make this cake gluten-free?
Replace the all-purpose flour with a 1:1 gluten-free baking flour blend (like Bob’s Red Mill). Add ½ tsp xanthan gum to help bind the layers. Reduce milk by ¼ cup since gluten-free flours absorb more liquid. For the frosting, use a gluten-free powdered sugar. Expect a slightly denser texture, but the flavor will still be delicious.
Why did my cream cheese frosting turn grainy?
Grainy frosting usually means the cream cheese wasn’t soft enough or the powdered sugar had lumps. Always use room-temperature cream cheese (microwave in 20-second bursts if needed). Sift the powdered sugar and whip the cream to soft peaks before folding. If it’s already grainy, beat in 1 tsp lemon juice to help smooth it out.

- 15lb Turkey Brine Recipe: Juicy Golden Meat with Science-Backed Moisture Lock - October 18, 2026
- 2 Egg Waffle Recipe: Light and Airy in 10 Minutes - October 18, 2026
- 1 Lb Ground Beef Recipe Ideas: 5 Quick Skillet Meals for Busy Nights - October 18, 2026