
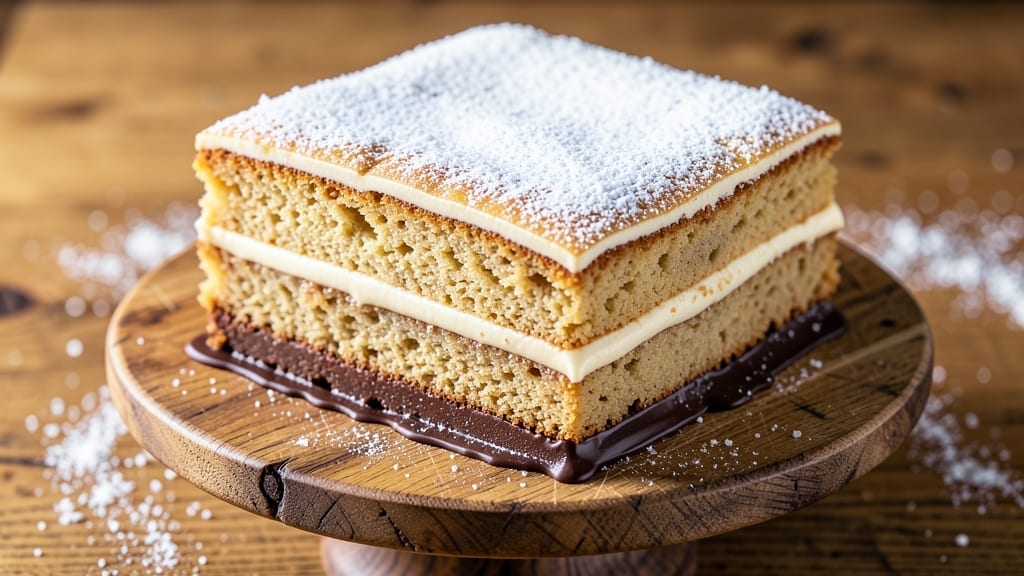
An 8-inch square cake delivers the perfect balance of elegance and practicality—ideal for small gatherings, individual servings, or testing new recipes without committing to a full sheet pan.
This layered vanilla and chocolate version combines rich flavor with clean layers, where the contrast between moist cake and velvety frosting creates every bite into a moment of indulgence. The secret lies in precise measurements and gentle baking techniques that prevent cracking while ensuring a tender crumb.
What sets this recipe apart is its foolproof structure: two distinct layers—one vanilla, one chocolate—separated by a luscious cream cheese filling that binds them together without overwhelming the delicate flavors.
The cake batter is designed to bake evenly in an 8-inch pan, producing edges that stay tender while the center remains moist. This method eliminates guesswork, making it perfect for both beginners and experienced bakers looking to refine their skills.
The result is a visually stunning dessert with golden-brown layers, smooth frosting, and a texture that’s neither too dense nor too crumbly. Each slice reveals the harmony of vanilla’s sweetness and chocolate’s depth, while the cream cheese filling adds a subtle tang that cuts through the richness.
Whether you’re celebrating a milestone, hosting a small dinner, or simply craving a treat, this cake delivers restaurant-quality results with minimal effort.
For added versatility, you can customize the flavors—swap the vanilla for lemon or add espresso powder to the chocolate layer—or decorate with fresh berries, chocolate shavings, or a simple dusting of powdered sugar.
The possibilities are endless, but the foundation remains the same: a perfectly proportioned, evenly baked square cake that’s as impressive as it is delicious.
Ingredients for 8 inch square cake
Eight slices of layered perfection—vanilla and chocolate harmony in an 8-inch pan.
| Ingredient | Amount | Notes |
|---|---|---|
| All-Purpose Flour 🌾 | 2 ½ cups | Sifted for even texture |
| Granulated Sugar 🍚 | 2 cups | White or light brown |
| Unsalted Butter 🧈 | 1 ½ cups | Room temperature, softened |
| Large Eggs 🥚 | 4 whole | Room temperature for blending |
| Vanilla Extract 🌿 | 2 tsp | Pure, high-quality extract |
| Baking Powder 🧂 | 2 tsp | Diamond Crystal preferred |
| Salt 🧂 | ½ tsp | Fine sea salt preferred |
| Milk 🥛 | 1 cup | Whole milk for richness |
| Unsweetened Cocoa Powder 🍫 | ½ cup | Dutch-processed for smoothness |
| Espresso Powder ☕ | 1 tsp | Optional for chocolate depth |
| Cream Cheese 🧀 | 8 oz | Room temperature, full-fat |
| Powdered Sugar 🍚 | 2 cups | Sifted for smooth frosting |
| Heavy Whipping Cream 🥛 | 1 cup | Cold for whipping |
| Fresh Berries 🍓 | 1 cup | Optional for garnish |
| Chocolate Shavings 🍫 | ¼ cup | Dark or semi-sweet |
The flour and cocoa are non-negotiable here. King Arthur flour or Bob’s Red Mill give the best texture, but any all-purpose works in a pinch. For the cocoa, Hershey’s Special Dark or Valrhona make a difference—avoid the cheap stuff that tastes like dust. Room-temperature butter is critical; if it’s too cold, the batter gets lumpy. I always grab Land O’Lakes unsalted from the store, but any brand works if it’s fresh. The cream cheese? Philadelphia is foolproof, but Kraft is cheaper and still delicious. Measure it accurately—this isn’t a place to eyeball.
No vanilla extract? Vanilla bean paste works just as well, or scrape seeds from a pod. Short on cocoa? Melted dark chocolate at half the amount gives depth, but it’ll be richer. The espresso powder is optional but worth it—it enhances the chocolate flavor without bitterness. For the frosting, powdered sugar matters: Domino is fine, but Confectioners’ sugar from a bulk bin stays fresher longer. The heavy cream should be cold when you whip it—never room temp, or it won’t stiffen properly. And if you’re skipping the berries or chocolate shavings, a dusting of powdered sugar still looks elegant.
Batter keeps for 2 days in the fridge, covered tightly. The frosting? 3 days max—it gets grainy after that. I always bake one layer, let it cool completely, then frost it before adding the second layer. That way, the filling doesn’t get soggy. For make-ahead bakers, assemble the whole cake (unfrosted) and refrigerate for up to 24 hours—just frost right before serving. The chocolate shavings? Store them in an airtight container for up to 2 weeks, or freeze for 3 months. Fresh berries go on the day of serving, but if you must prep ahead, toss them in water with a splash of lemon juice.
Why You’ll Love This Recipe
- No Mixer Needed: I swear by this one—just cream the butter and sugar by hand (or use a fork in a pinch), then fold in the eggs and vanilla like you’re making a giant pancake batter. The flour comes together in seconds, and the batter’s so smooth you’ll forget you didn’t use a stand mixer.
- Butter-Sugar Magic: That rich, creamy butter-sugar combo? It’s the secret weapon here. The cake turns out tender with a subtle crumb, and the vanilla ties it all together—simple, but somehow ridiculously satisfying. Honestly, it’s the kind of flavor that makes you pause mid-slice and think, “Wait, is this too good to be true?”
- Slice and Serve: This 8-inch square is the perfect size for one person’s dessert or a small gathering—no awkward leftovers looming over you. Cut it into bars, serve it warm with ice cream, or pack it for lunch the next day. It’s my go-to for birthdays, potlucks, or just because I crave cake at 3 PM.
- Pantry Staples Only: Between us, this recipe is cheap to make. You’re using flour, sugar, butter, eggs, and vanilla—things you already have. No fancy ingredients, no last-minute grocery runs. I’ve made this with store-brand butter and still ended up with a cake that tasted like it cost $20. Solid. Reliable. My secret weapon.
Step-by-step instructions for layered vanilla and chocolate Magic
Here’s how to create a showstopping 8-inch square cake with perfect layers and silky fillings.
Prepare the Vanilla and Chocolate Cake Layers
Preheat your oven to 350°F and grease two 8×8-inch baking pans with butter, then line them with parchment paper. For the vanilla layer, cream together the 1.5 cups unsalted butter and 2 cups granulated sugar until light and fluffy—about 3-4 minutes with an electric mixer. This step is crucial for incorporating air that keeps your cake tender.
Add the 4 whole large eggs one at a time, mixing well after each addition. Stir in the 2 tsp vanilla extract, then sift in the 2.5 cups all-purpose flour, 2 tsp baking powder, and 0.5 tsp salt. Finally, pour in the 1 cup milk and mix until just combined. Pour the batter into one prepared pan and bake for 25-30 minutes until a toothpick inserted in the center comes out clean.
For the chocolate layer, repeat the same process but add the 0.5 cup unsweetened cocoa powder and 1 tsp espresso powder to the dry ingredients. Pour this batter into the second pan and bake alongside the vanilla layer for the same amount of time. Let both layers cool in their pans for 10 minutes before transferring to a wire rack to cool completely.
Make the Cream Cheese Filling
While the cakes cool, beat the 8 oz cream cheese with the 2 cups powdered sugar until smooth and creamy. This should take about 3-4 minutes with an electric mixer. In a separate bowl, whip the 1 cup heavy whipping cream to stiff peaks—don’t overwhip or you’ll end up with butter.
Gently fold the whipped cream into the cream cheese mixture until fully combined. The filling should be light and airy with a smooth consistency. Here’s the thing—if the filling looks too thick, you can soften it slightly by adding a teaspoon of milk at a time until it reaches a spreadable consistency. This filling will be the star between your layers, so take your time to get it just right.
Assemble the Cake Layers
Once both cake layers are completely cool, level the tops if needed using a serrated knife. Place the vanilla layer on a cake stand or plate, then spread half of the cream cheese filling evenly over the top. Here’s where it gets fun—place the chocolate layer on top and spread the remaining filling over it.
For a polished look, you can use a spatula to create a slight overhang on the sides of the cake. This step is all about precision—make sure the filling is evenly distributed so every slice has that perfect balance of flavors. Don’t worry if it looks messy at first; you’ll smooth it out in the next step.
Frost and Garnish the Cake
To create a smooth finish, use an offset spatula to spread the remaining filling over the entire cake, covering the sides as well. This technique, called “crimping,” ensures a professional look. For extra flair, top the cake with 1 cup fresh berries and sprinkle the 0.25 cup chocolate shavings over the top. The berries add a pop of color and freshness, while the chocolate shavings give it that final touch of elegance.
Let the cake set in the refrigerator for at least 1 hour before slicing. This chilling time allows the filling to firm up slightly, making it easier to serve clean slices. When you’re ready to serve, cut into 8 equal squares—each slice will reveal that perfect balance of moist vanilla and rich chocolate layers with the creamy filling in between.
Pro Tips For Making 8 Inch Square Cake
- Weigh Your Butter: Cold butter makes a lighter cake—no one wants a dense brick. Use a kitchen scale for 8 oz (225g) of unsalted butter, cut it into 1-inch cubes, and let it sit at room temp for exactly 30 minutes before creaming. I used to eyeball it, and the texture suffered every time.
- Mix Just Until Combined: Overmixing turns your cake into a chewy disaster. Once the flour and sugar are fully incorporated, stop folding—just 10-12 strokes after the batter clears the beaters. I learned this after a batch turned out like a dense brownie, and now my cakes stay tender.
- Preheat Pan and Oven: A cold pan + cold oven = uneven baking. Place your 8-inch square pan in the oven while preheating to 350°F (175°C) for 10 minutes, then grease it with butter and dust with flour. This ensures the edges bake evenly and rise properly—no more sunken centers.
- Room-Temp Eggs Matter: Cold eggs curdle when mixed with warm butter, leaving streaks in your batter. Pop the eggs out of the fridge 30 minutes before using—just crack them into a bowl first, so you’re not scrambling while the timer runs. Trust me, your cake’s texture will thank you.
Essential equipment for this dish
Must-Have Pans
An 8×8-inch metal baking pan is non-negotiable for this recipe—it conducts heat evenly and prevents warping. I swear by Wilton Perfect Results pans (they’re affordable and reliable), but Nordic Ware Natural Aluminum is my go-to for professional results.
Avoid nonstick pans for this recipe; they can cause uneven baking. Line the pans with parchment paper to ensure easy release and prevent sticking. 🧈
Mixing Essentials
A stand mixer with a whisk attachment (like the KitchenAid Artisan Series) makes creaming butter and sugar effortless, but a hand mixer works in a pinch. For precise measurements, use a digital kitchen scale—especially for ingredients like cocoa powder and espresso powder.
A microplane comes in handy for grating chocolate shavings if you’re skipping store-bought ones. 🍫
Frosting Tools
An offset spatula (I use OXO Good Grips) is your best friend for spreading filling smoothly. A cake turntable (even a lazy Susan works) helps you rotate the cake while frosting for a flawless finish.
For garnishing, a small offset spatula or even a butter knife works for placing berries neatly. Don’t skip the cake leveler—it’s a game-changer for trimming uneven cake tops. 🍓
Optional Upgrades
A cake stand elevates your presentation, but a sturdy plate works too. For extra precision, a cake comb creates decorative patterns on the frosting. If you’re feeling fancy, a piping bag with a star tip adds professional flair to the sides.
Even a small bowl for holding chocolate shavings keeps your workspace tidy. 💫
Storage Solutions
An airtight container (like Rubbermaid Brilliance) keeps your cake fresh for up to 3 days at room temperature. For longer storage, a vacuum sealer preserves moisture and flavor. If you’re prepping ahead, parchment-lined cake boxes protect slices during transport. Label everything—trust me, you’ll thank yourself later. ❄️
Nutrition facts
Frequently asked questions
Can I bake this cake in a different-sized pan?
This recipe is specifically designed for 8×8-inch pans to achieve the perfect texture and even baking. If you must adjust, use a 9-inch round pan (reduce baking time by 5 minutes) or a 9×9-inch square pan (reduce baking time by 10 minutes). Never use a smaller pan or the cake will overflow. For round pans, divide the batter evenly between two pans.
How do I prevent the cake from cracking?
Cracking usually happens from overmixing or opening the oven too soon. Mix the batter just until combined—stop when no dry flour remains. Bake until a toothpick comes out clean, then let the cakes cool in the pans for 10 minutes before transferring. Avoid rapid temperature changes when moving pans. Also, don’t overfill the pans—batter should reach about 2/3 full.
Can I substitute the cream cheese filling?
For a lighter option, try whipped cream mixed with 1 teaspoon vanilla extract. For a tangier flavor, use a lemon curd filling (replace half the cream cheese with curd). If you prefer no dairy, a mango or raspberry jam works beautifully—just warm it slightly to spread easily. Adjust sweetness to match your preference, but keep the texture smooth and spreadable.
Why did my chocolate layer turn out too dense?
Density in the chocolate layer usually means the cocoa powder was overmeasured or the butter wasn’t properly softened. Use a digital scale for accuracy (cocoa powder is deceptive when scooped). Also, make sure your butter is at room temperature—it should dent when pressed but not be greasy. If the batter looks too thick, add 1 tablespoon milk at a time until it reaches a smooth consistency similar to the vanilla batter.
How far in advance can I make this cake?
You can assemble the cake (unfrosted) up to 24 hours ahead and refrigerate it. For the frosting, make it 1 day in advance and store it in an airtight container. The day you serve, simply frost the cake and add garnishes. If transporting, wrap the assembled cake tightly in plastic wrap and place it in a cake box. For best texture, serve within 4 hours of final assembly.

- Baked Potatoes in Crock Pot Recipe: Buttery Interiors and Crispy Top Magic - November 1, 2026
- Braised Beef Short Ribs Recipe: Crock Pot Fall-Off-Bone Magic in 6 Hours - November 1, 2026
- Crock Pot Cocoa Recipe: Velvety Warmth With Hidden Spice Magic - November 1, 2026