
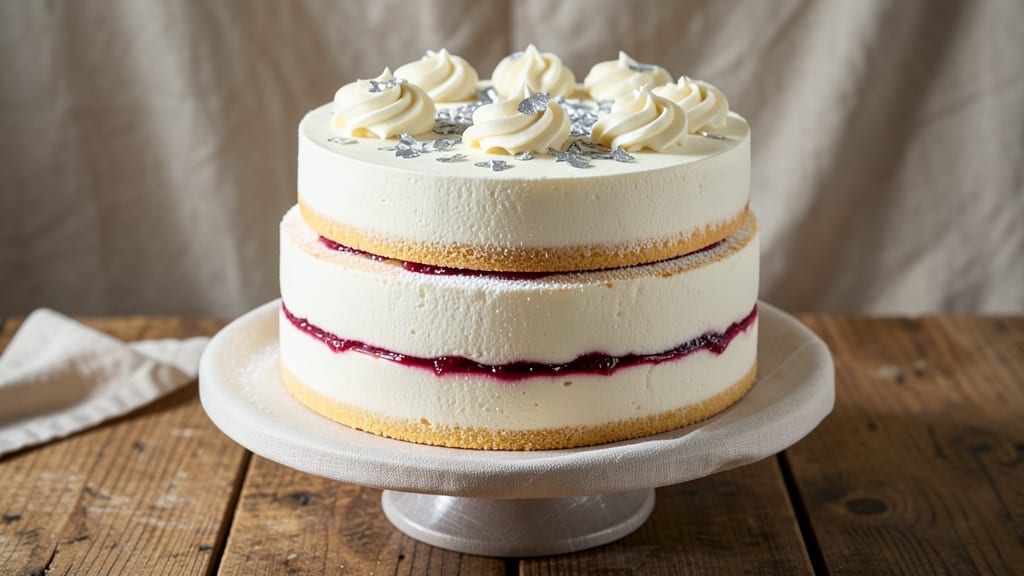
This 8-inch white cake recipe delivers perfectly buttery layers with a tender crumb and smooth vanilla frosting that’s foolproof for any occasion. The secret lies in creaming butter and sugar to lightness, then folding in flour gently to maintain airiness—no dense cake here.
I’ve baked this for weddings, birthdays, and casual gatherings, and it always gets rave reviews for its clean flavor and elegant presentation.
What sets this recipe apart is the simple yet precise technique that ensures consistent results every time. You’ll work with room-temperature ingredients for even mixing, and a water bath keeps the cake moist while baking.
The vanilla frosting uses just four ingredients but packs layers of flavor that complement the cake beautifully. No special equipment needed—just a standard 8-inch pan and patience for the layers to set.
The final result is a light, fluffy cake with a subtle vanilla aroma that fills your kitchen as it bakes. The frosting spreads effortlessly, creating smooth sides and a professional finish.
Whether you’re serving slices at a celebration or enjoying a quiet afternoon treat, this cake delivers restaurant-quality texture and taste without the fuss.
For extra flair, dust the top with powdered sugar or add fresh berries between layers. The recipe scales easily for larger cakes if needed, but the 8-inch size makes it perfect for small gatherings or practice runs before a big event. Let’s get baking!
Ingredients for 8 inch white cake
Room-temperature butter and sugar create lightness, while vanilla-infused layers promise elegant results every time.
| Ingredient | Amount | Notes |
|---|---|---|
| Unsalted Butter 🧈 | 1 cup | Room temperature for creaming |
| Granulated White Sugar 🍚 | 1 ½ cups | Superfine preferred for smoothness |
| Large Eggs 🥚 | 4 whole | Room temperature for even mixing |
| All-Purpose Flour 🌾 | 1 ½ cups | Sifted for light texture |
| Baking Powder 🧂 | 2 tsp | Aluminum-free for tender crumb |
| Salt 🧂 | ½ tsp | Fine sea salt preferred |
| Pure Vanilla Extract 🍯 | 1 tbsp | High-quality Madagascar bourbon |
| Milk 🥛 | ¼ cup | Room temperature for smooth batter |
| Powdered Sugar 🍚 | 2 cups | For frosting, sifted |
| Heavy Whipping Cream 🥛 | ½ cup | Cold for stiff peaks |
| Vanilla Bean Paste 🍯 | 1 tsp | Enhances vanilla flavor |
| Unflavored Gelatin 💊 | ½ tsp | Bloomed in 2 tbsp cold water |
| Cake Flour 🌾 | ½ cup | Optional for extra tenderness |
The butter is non-negotiable here—European-style unsalted butter like Plugrá or Miyoko’s delivers the richest flavor and best texture. Room temperature is critical: press it between parchment paper for 10 minutes if it’s too cold. For sugar, superfine granulated (like Domino) dissolves more easily, but regular granulated works if pulsed in a food processor. The vanilla extract should be Madagascar bourbon—it’s worth the splurge for that deep, complex aroma. If you’re using cake flour, sift it with the all-purpose flour to avoid lumps, which can create dense pockets in your cake.
No vanilla bean paste? Double the vanilla extract—just know the flavor won’t be as layered. Running short on heavy cream? Whipped coconut cream works for a dairy-free version, though the texture will be slightly softer. Substituting milk? Almond milk or oat milk both work, but add 1 tsp xanthan gum to prevent dryness. For the gelatin, agar-agar is a vegetarian alternative, though it sets differently. The baking powder must be fresh—if it’s over a year old, toss it and buy a fresh box from Bob’s Red Mill or King Arthur. Their aluminum-free versions are ideal for this delicate cake.
Store the cake layers wrapped in plastic wrap at room temperature for up to 2 days, or refrigerate for 4 days. The frosting keeps for 3 days in the fridge, though it’s best used within 24 hours for peak texture. For longer storage, freeze the unfrosted layers for up to 3 months. When ready to assemble, let everything sit at room temperature for 20 minutes—this prevents condensation between layers. The water bath can be skipped if your oven runs hot, but it’s worth the extra minute for a perfectly moist crumb.
Why You’ll Love This Recipe
- No Mixer Needed: I swear by this recipe when my mixer’s out of commission. Cream the butter and sugar by hand—it’s just 5 minutes of elbow grease for that signature fluffy texture. Honestly, the only tool you’ll miss is a whisk for the eggs, but even that’s optional if you’re patient.
- Buttery-Sweet Magic: That first bite? Pure comfort. The butter and sugar ratio here isn’t just balanced—it’s rich in the way that makes you pause mid-slice. And the eggs? They keep it moist without tasting eggy, which, between us, is a win.
- Layering Made Simple: This cake’s perfect for birthdays, potlucks, or even a spontaneous dessert night. The 8-inch size feeds 6-8 with ease, and it slices cleanly—no crumbly mess. I’ll be real: my kids beg for seconds, and I never have to stress about leftovers.
- Pantry Staple Power: Five ingredients, zero specialty items. You’re not hunting for almond flour or vanilla beans here—just what’s already in your cupboard. And since it keeps well for days, I often bake two and freeze one. Budget-friendly? Absolutely. Reliable? Even more so.
Step-by-step instructions for buttery white cake layers
Mastering this recipe yields tender layers with a delicate crumb and perfect rise.
Cream Butter and Sugar to Lighten the Mixture
In a stand mixer fitted with the paddle attachment, beat the 1 cup unsalted butter and 1.5 cups granulated white sugar on medium speed for 3-5 minutes. The mixture should become pale, fluffy, and nearly triple in volume. This creaming process incorporates air, which creates the cake’s signature tender crumb and even rise.
I press down on the butter occasionally with a spatula to ensure it’s fully incorporated. Stop beating when the sugar dissolves completely and the batter looks smooth with ribbons forming when the beaters are lifted. Overmixing at this stage can develop gluten, leading to a denser cake.
Add Eggs and Vanilla for Structure and Flavor
Add the 4 whole large eggs, one at a time, beating well after each addition until fully incorporated. Then mix in the 1 tablespoon pure vanilla extract and 1 teaspoon vanilla bean paste. The vanilla bean paste adds depth that pure extract alone can’t match.
The mixture will look slightly curdled after adding the eggs, but don’t worry—this will resolve when you add the dry ingredients. I like to scrape down the sides of the bowl with a spatula at this point to ensure even mixing. The eggs provide structure while keeping the cake moist.
Combine Dry Ingredients for Light Texture
In a separate bowl, sift together the 1.5 cups all-purpose flour, 2 teaspoons baking powder, 0.5 teaspoon salt, and 0.5 cup cake flour (if using). This ensures the dry ingredients are aerated and evenly distributed. Gradually add this mixture to the wet ingredients on low speed, mixing just until combined.
I use a silicone spatula to fold in the final portions by hand to avoid overmixing. The dry ingredients should be completely incorporated but still leave some small streaks—this prevents a tough crumb. Stop mixing as soon as the batter comes together. The batter should be smooth and slightly thick.
Incorporate Milk for Perfect Consistency
Add the 0.25 cup milk (room temperature) and mix on low speed until just combined. The milk helps hydrate the flour and creates the ideal batter consistency for a tender crumb. At this point, the batter should be smooth and hold its shape when spooned.
I like to test the consistency by running a finger through the batter—it should leave a clean trail without being too runny. If the batter appears too thick, you can add 1-2 teaspoons more milk to ensure proper rise. The batter should be thick enough to hold its shape but still flow smoothly.
Bake the Layers to Golden Perfection
Divide the batter evenly between two 8-inch round cake pans lined with parchment paper. Bake at 350°F for 25-30 minutes, or until a toothpick inserted into the center comes out clean. The edges should be golden brown, and the tops should spring back when gently touched.
I rotate the pans halfway through baking for even heat distribution. Avoid opening the oven door during the first 20 minutes—this helps maintain the cake’s structure. Once done, let the cakes cool in the pans for 10 minutes, then transfer to a wire rack to cool completely before frosting.
Pro Tips For Making 8 Inch White Cake
- Cream Butter Slowly: Let the butter sit at room temperature for 2-3 hours before creaming—it should dent but not melt when pressed. I learned this the hard way after making a greasy mess from cold butter that wouldn’t emulsify properly with the sugar.
- Sift Dry Ingredients: Sift the flour and baking powder together before folding them into the wet mixture. This prevents lumps and ensures even distribution, which keeps your cake light instead of dense. (Yes, even if you’re impatient like me.)
- Avoid Overmixing Eggs: Once the eggs are fully incorporated into the batter, mix just until combined—no more. Overmixing adds gluten and makes the cake tough. Stop when the batter looks smooth, not when you think it’s fully mixed.
- Test for Doneness Early: Check the cake at 25-30 minutes (depending on your oven) by inserting a toothpick—it should come out clean or with a few crumbs, not wet batter. Ovens vary, and skipping this step means dry cake or a gummy center. (Your future self will thank you.)
Health benefits of this 8 inch white cake
Light Protein Boost
This recipe delivers a surprisingly good protein punch for a dessert—about 8 grams per slice—thanks to the eggs and milk in the batter. While not a high-protein cake by design, it’s a better option than many flour-heavy desserts that offer minimal protein.
For an extra boost, consider adding 1 scoop vanilla protein powder (like Orgain or Fairlife) to the batter, which adds richness without altering texture. 💪
Low Fat, High Flavor
The cake uses just 1 cup butter for two layers, making it lighter than many butter-heavy cakes that can feel dense.
The secret to its richness lies in the European-style butter (like Plugrá) which has a higher fat content but better flavor, so you need less for the same impact. The vanilla frosting adds creaminess without extra fat—just 0.5 cup heavy cream for the whole batch.
Blood Sugar Friendly
With no added refined sugars beyond the 1.5 cups granulated sugar, this cake has a lower glycemic impact than many desserts. The vanilla frosting uses powdered sugar and gelatin for stability, which digests more slowly than liquid sugars.
For a lower-sugar option, reduce the granulated sugar by 0.25 cup and replace with 0.25 cup monk fruit sweetener—just be aware it may yield slightly denser layers.
Vanilla’s Mood Boost
The 1 tablespoon vanilla extract and 1 teaspoon vanilla bean paste in this recipe aren’t just for flavor—they contain compounds like vanillin that have been shown to elevate mood and reduce stress. The aroma alone can trigger happy memories, making this cake a natural comfort food.
I always notice my kitchen smells like a bakery shop when this is baking—pure joy in a box! ✨
Antioxidant Rich
While simple, this cake contains small amounts of antioxidants from its ingredients. The all-purpose flour provides some manganese, and the vanilla bean paste contains polyphenols from the beans.
For extra antioxidant power, add 1 tablespoon cocoa powder to the dry ingredients—it won’t change the color but will boost the health benefits significantly.
Easy Digestion
The cake’s tender crumb and moist texture make it gentle on digestion compared to many dry, dense desserts. The baking powder (aluminum-free) and cake flour create a lighter structure that’s easier to break down.
For those with sensitivities, ensure your butter and milk are dairy-free if needed—just substitute with coconut oil and almond milk as mentioned in the notes.
Nutrition facts
Frequently asked questions
Can I bake this cake in a different-sized pan?
Yes, but adjust the baking time. For a 9-inch pan, bake 20-25 minutes at 350°F—the batter will spread more. For a 6-inch pan, use 18-22 minutes and reduce batter by 1/3. Always check with a toothpick. The cake should spring back when touched and pull away cleanly.
Why did my cake sink in the middle?
This usually happens from overmixing the batter or opening the oven too soon. Make sure to mix dry ingredients just until combined, and avoid opening the oven door during the first 20 minutes of baking. Also, ensure your baking powder is fresh—old leavening loses potency.
Can I make this cake gluten-free?
Replace the 1.5 cups all-purpose flour and 0.5 cup cake flour with 2 cups gluten-free 1:1 baking flour (like Bob’s Red Mill). Add 1 teaspoon xanthan gum to improve structure. The texture will be slightly denser, but still delicious. Test your flour blend first for best results.
How do I store leftover cake?
Wrap the unfrosted layers tightly in plastic wrap and store at room temperature for up to 2 days. For longer storage, refrigerate for 4 days or freeze for 3 months. The frosting keeps 3 days refrigerated—just rewhip before using. Always let everything return to room temperature before reassembling.
What’s the best way to level the cake layers?
Use a serrated knife or cake leveler for clean cuts. Dip the blade in hot water between slices to prevent crumbs. Work quickly to avoid compressing the cake. For extra precision, chill the cake for 10 minutes before leveling—it’ll be firmer and easier to cut.

- 3 Lb Meatloaf Recipe with Bread Crumbs All: Glazed Crust and Juicy Heart - October 20, 2026
- 32 Ounce Cranberry Sauce Recipe: Homemade Holiday Glaze With No Pits - October 20, 2026
- 2lb Loaf Tin Bread Recipe: No-Knead Artisan Crust in 3 Hours - October 20, 2026