
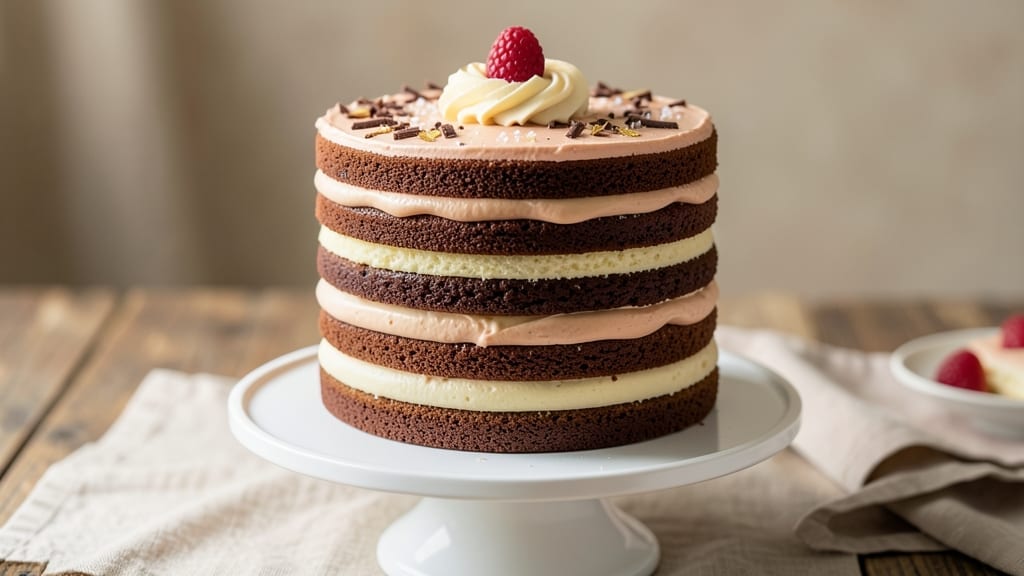
This 8-layer cake recipe delivers showstopping height and flavor without the complexity—vanilla and chocolate layers stacked in perfect harmony. 🌟 The secret lies in precise layering techniques that ensure each tier bakes evenly and chills properly, creating a towering masterpiece with minimal fuss.
What makes this recipe stand out is the foolproof method for leveling each layer and assembling them like a pro, even if you’re new to multi-layer cakes.
With simple ingredients and just one pan, this cake becomes a manageable project for any home baker. Each layer is baked to golden perfection, then chilled to create the ideal structure for stacking.
The frosting—a rich, creamy blend—binds everything together while adding that professional finish. No special equipment is needed beyond a standard cake pan and a few basic tools.
By the time you’re done, you’ll have a stunning 8-layer cake that looks like it came from a bakery, complete with smooth, even layers and a flawless finish. The contrast of vanilla and chocolate creates a flavor profile that keeps every bite exciting.
Whether you’re celebrating a milestone or just treating yourself, this cake is sure to impress.
Ready to tackle this project? We’ll cover everything from baking times to assembly tips, ensuring your cake turns out as beautifully as it tastes. Let’s get started!
Ingredients for 8 layer cake
Precision-measured ingredients for flawless vanilla-chocolate layers that stack like a bakery masterpiece.
| Ingredient | Amount | Notes |
|---|---|---|
| All-Purpose Flour 🌾 | 8 cups | Sifted for even baking texture |
| Granulated Sugar 🍚 | 4 cups | Divided equally for vanilla/chocolate |
| Unsalted Butter 🧈 | 2 cups | Room temperature, softened |
| Large Eggs 🥚 | 12 whole | Room temperature for even mixing |
| Vanilla Extract 🌿 | 2 tbsp | Pure Madagascar bourbon preferred |
| Unsweetened Cocoa Powder 🍫 | 1 cup | Natural, not Dutch-processed |
| Baking Powder 🧂 | 2 tbsp | Freshly opened for best rise |
| Salt 🧂 | 1 ½ tsp | Fine sea salt preferred |
| Milk 🥛 | 2 cups | Whole milk for richness |
| Heavy Whipping Cream 🥛 | 4 cups | Full-fat for frosting stability |
| Powdered Sugar 🍚 | 6 cups | Sifted for smooth frosting |
| Vanilla Bean Paste 🌿 | 2 tbsp | For deeper vanilla flavor |
| Lemon Zest 🍋 | 1 tbsp | Brightens vanilla layers |
| Espresso Powder ☕ | 1 tbsp | Enhances chocolate depth |
The flour and sugar are your foundation—King Arthur flour and Domino brand sugar are my go-tos for consistent results. Butter temperature is critical: it should dent when pressed but not melt completely. Room temperature eggs (about 70°F) ensure even mixing, so take them out 30 minutes before baking. For the cocoa powder, Hershey’s Special Dark is my preferred brand—it’s natural and won’t alter your batter’s pH. Pre-sift all dry ingredients to eliminate air pockets that could cause uneven baking. The milk should be cold when added to the dry ingredients to prevent premature curdling of the butter.
No vanilla extract? Vanilla bean paste works beautifully, though it’s pricier—Trader Joe’s carries a good budget option. Running short on eggs? Flax eggs (1 tbsp ground flaxseed + 3 tbsp water per egg) can substitute, though texture may differ slightly. For the chocolate layers, if you can’t find natural cocoa powder, Dutch-processed works at 1/4 cup less sugar. The espresso powder is non-negotiable for depth—Starbucks brand is my secret weapon, but instant coffee works in a pinch. For the frosting, Land O’Lakes heavy cream whips most consistently, but any full-fat brand will work if properly chilled.
Store all dry ingredients in airtight containers away from heat sources—they’ll keep for 6-12 months. Butter should be kept in its original wrapping until needed, then transferred to a covered container. The vanilla extract and bean paste last 1 year unopened, 6 months once opened. For the cake layers, bake immediately after mixing for optimal texture. If you must refrigerate the batter, do so for no longer than 24 hours—longer storage can affect rise. The finished cake keeps 5 days refrigerated, though flavor peaks within the first 2 days.
Why You’ll Love This Recipe
- No-Fail Layers: I’ve made this cake more times than I can count, and the layers always come out even—no guesswork, no collapsed mess. The trick? Room-temperature butter and eggs, plus a light hand with the flour. Honestly, even my first attempt (which I almost didn’t photograph) turned out fine.
- Butter-Sugar Bliss: That creamy, melt-in-your-mouth texture? Pure magic from the butter-to-sugar ratio. The vanilla extract ties it all together—subtle but undeniable—while the sugar keeps it tender without being dry. Between us, this is the kind of cake that makes you close your eyes mid-bite.
- Party or Picnic: Serve it at a birthday bash or pack slices for a hike—this cake holds up everywhere. The layers stay moist for days, and the neutral vanilla base means it’s a blank canvas for fillings (think whipped cream, jam, or even Nutella). I’ve fed crowds with this; it’s my go-to for any gathering.
- Budget-Friendly Luxury: You’re using pantry staples here—no fancy ingredients, just good basics done right. A single batch feeds 12, and leftovers? They’re better the next day (yes, really). I’ll be real: this is the cake I make when I want to impress but don’t want to break the bank.
Step-by-step instructions for stacked vanilla and chocolate cake
Precision timing and layering create this showstopping cake—follow each step carefully.
👨🍳 Step 1: Prepare the Pans and Divide Ingredients
Preheat oven to 350°F and grease eight 3-inch round cake pans with unsalted butter, then dust with all-purpose flour. Line the bottoms with parchment circles. Divide the 4 cups granulated sugar equally—2 cups for vanilla layers and 2 cups for chocolate layers. Sift the 8 cups all-purpose flour and set aside.
For the vanilla layers, whisk together 1 cup of the reserved sugar with 1 tbsp vanilla extract and 1 tbsp vanilla bean paste. For the chocolate layers, mix 1 cup sugar with 1 cup unsweetened cocoa powder, 1 tbsp espresso powder, and 1 tbsp lemon zest. This division ensures perfect flavor balance in each layer.
🍳 Step 2: Bake the Vanilla and Chocolate Layers
In a stand mixer, cream the 2 cups unsalted butter with 1 cup of the vanilla sugar mixture until light and fluffy. Add 6 whole large eggs, 1 tbsp vanilla extract, and 1.5 tsp salt, mixing until fully combined. Gradually add 4 cups of the sifted flour and 1 tbsp baking powder, mixing just until incorporated.
Divide the batter evenly among four of the prepared pans. For the chocolate layers, repeat the process using the chocolate sugar mixture and 2 cups milk instead of vanilla extract. Bake all layers for 12-15 minutes until a toothpick inserted comes out clean. Let layers cool in pans for 5 minutes before removing to wire racks.
🥘 Step 3: Assemble the Cake with Vanilla Buttercream
In a separate bowl, beat the 4 cups heavy whipping cream until stiff peaks form. Gradually add the 6 cups powdered sugar while mixing on low speed until smooth. Fold in the remaining 1 tbsp vanilla extract and 1 tbsp vanilla bean paste for a rich, velvety frosting.
Place the first vanilla layer on a cake stand and spread a thin layer of buttercream. Add the second vanilla layer, repeating this process until all four vanilla layers are stacked. Chill the cake for 30 minutes to set the layers before adding the chocolate layers with additional buttercream between each.
⏰ Step 4: Decorate and Set the Final Layers
Once all layers are stacked, spread a final layer of buttercream over the top and sides of the cake, creating a smooth base for decoration. Use a piping bag fitted with a star tip to create a textured finish or smooth the frosting with a bench scraper for an elegant look.
Chill the completed cake for at least 4 hours (or overnight) before slicing. This resting period allows the flavors to meld and the layers to set properly, resulting in clean slices with perfect texture and flavor balance.
Pro Tips For Making 8 Layer Cake
- Weigh Your Butter: I learned this the hard way—packing butter into measuring cups leaves air pockets, and your cake layers will be uneven. Use a kitchen scale for 227g (1 cup) of softened butter, packed just enough to hold its shape when pressed. No guessing, no dense spots.
- Room-Temp Eggs Matter: Cold eggs curdle faster and make your batter look weird. Pull eggs out of the fridge 30 minutes before mixing—warm hands work too in a pinch. The goal? Smooth, creamy batter that doesn’t separate when folded.
- Rotate Pans Mid-Bake: Ovens have hot spots, and an 8-layer cake is huge. Swap pans front-to-back halfway through baking (around 15–20 minutes in). This evens out browning so no layer gets overdone while others lag behind.
- Sift Flour Twice: Yes, even if your flour looks fine. Sift it before measuring into the bowl, then sift again after mixing dry ingredients. This cuts lumps and guarantees a light, airy crumb—no one wants a dense layer hiding under frosting.
Make-ahead tips for this 8 layer cake
Batter Prep Ahead
Mix your vanilla and chocolate batters up to 24 hours in advance and store them in separate airtight containers in the refrigerator. Label clearly—vanilla batter should be room temperature when baking, so take it out 30 minutes before starting.
The chocolate batter can stay cold longer since milk-based batters tolerate chilling better. This head start lets you focus on baking without rushing. 💡
Layer Baking Schedule
Bake layers in two batches to maintain oven temperature consistency. Start with four vanilla layers first, then bake the chocolate layers while the first set cools. Use a timer and label each pan with its layer number (1-8) to avoid confusion.
This staggered approach prevents overcrowding and ensures even baking. The chocolate layers will take 1-2 minutes longer than vanilla due to cocoa powder density.
Frosting Prep
Make your buttercream 1 day ahead and refrigerate it in a covered container. Bring it to room temperature before using—this prevents lumps and ensures smooth piping.
For extra stability, add 1 tsp cornstarch to the powdered sugar mixture. Chilled frosting also makes assembly easier since it won’t melt prematurely during layering. 🥛
Assembly Timeline
Stack vanilla layers first, then chill for 30 minutes before adding chocolate layers. This prevents the heavier chocolate from compressing the vanilla layers. Use a cake leveler to trim any domed tops before frosting.
For large gatherings, assemble the cake 2 days ahead—it tastes even better after flavors meld during storage. Wrap tightly in plastic wrap and store at room temperature if serving within 3 days.
Freezing Tips
Fully assembled cakes freeze beautifully for up to 3 months. Wrap each layer individually in plastic wrap, then stack them with parchment between layers. Place the entire cake in a freezer bag with all air removed.
Thaw in the refrigerator overnight before serving. The texture remains moist, though the frosting may soften slightly—repipe if needed before serving. ❄️
Nutrition facts
Frequently asked questions about 8-Layer cake mastery
Why do I need 3-inch pans instead of larger ones?
Smaller 3-inch pans create perfectly proportioned layers that stack evenly without toppling. Larger pans would make each layer too thick, leading to uneven baking and structural issues when stacked. The 3-inch size gives you the height and stability needed for an 8-layer masterpiece while keeping each slice manageable.
Can I substitute cake flour for all-purpose flour?
Yes, but adjust carefully! Replace 1 cup all-purpose flour with 1 cup minus 2 tbsp cake flour plus 2 tbsp cornstarch. Cake flour creates a lighter texture, but the recipe’s structure relies on the protein in all-purpose flour for proper layering. The vanilla-chocolate contrast works best with the original ratio for balanced flavor.
How do I fix cracked layers after baking?
Cracks usually mean overbaking or uneven cooling. For minor cracks, simply frost generously—the buttercream will camouflage them. For severe cracks, trim the cracked edges with a serrated knife before frosting. Always bake until a toothpick comes out clean but not dry, and let layers cool 5 minutes in pans before removing.
What’s the best way to level cake layers?
Use a serrated knife and a leveling guide (or a plate). Place the cake on the plate, then gently press down with the knife at a slight angle to shave off any domed tops. Work quickly to avoid compressing the cake. For perfect results, chill layers 10 minutes before leveling—they’ll be firmer and easier to trim.
Can I make this cake without a stand mixer?
Use a hand mixer or even whisk in a large bowl. Cream the butter and sugar vigorously for 3-5 minutes until light and fluffy. For the frosting, beat the cream by hand in a chilled bowl until stiff peaks form. The key is patience—just mix longer than you think you need to achieve the same airy texture.

- 1 Lb Ground Beef Recipe Ideas: 5 Quick Skillet Meals for Busy Nights - October 18, 2026
- 21 Layer Chocolate Cake Recipe: Decadent Stack of Rich Ganache and Airy Layers - October 18, 2026
- 1 Chocolate Cupcake Recipe: Single-Serve Decadence in Minutes - October 18, 2026