
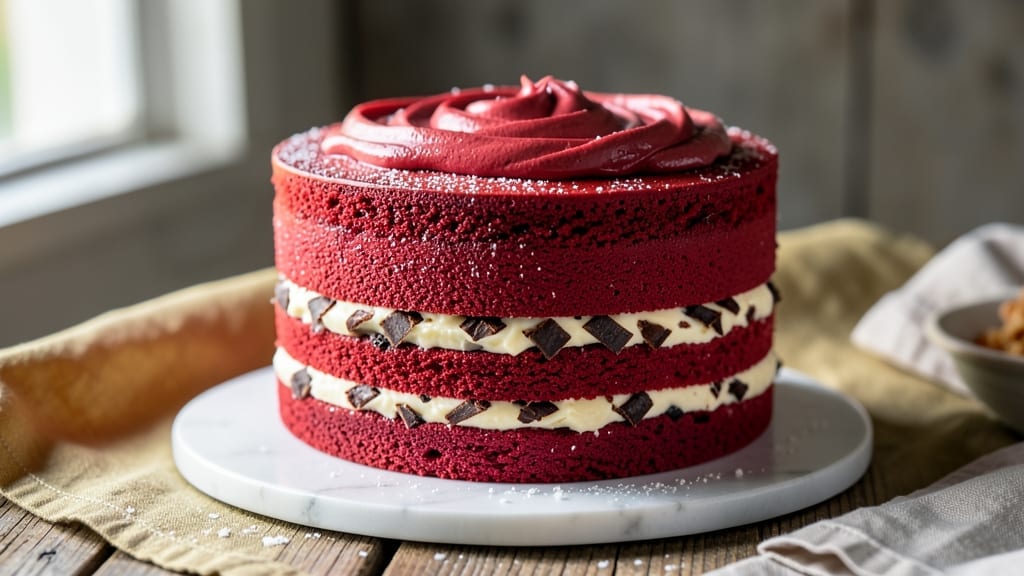
This 4 layer red velvet cake recipe delivers the perfect balance of tender, moist crumb and velvety cream cheese frosting that keeps every slice irresistible. 💛 The secret lies in precise measurements and layering techniques that prevent dryness while creating that signature rich, cocoa-infused flavor.
After years of perfecting this recipe, I’ve developed a method that ensures each layer stays perfectly moist even after chilling.
The foundation begins with a foolproof cake batter that incorporates buttermilk and sour cream for unmatched tenderness. Each layer is baked just until set, then carefully stacked with a luscious cream cheese filling that adds a tangy contrast to the slightly sweet cake.
The frosting isn’t just decorative—it’s the star, with its smooth, velvety texture that melts into every bite.
What makes this recipe truly special is the professional-level presentation without requiring advanced skills. We’ll cover techniques for leveling each layer perfectly, proper cooling times, and assembly tips that prevent crumbling. The result is a showstopping cake that looks as impressive as it tastes—ideal for celebrations or simply treating yourself.
Whether you’re baking for a special occasion or just craving a classic dessert, this method delivers restaurant-quality results at home. The combination of moist layers, rich filling, and creamy frosting creates a texture and flavor profile that’s impossible to resist. Let’s get started on creating your perfect red velvet masterpiece.
Ingredients for 4 layer red velvet cake
Precision measurements and professional techniques transform simple pantry staples into restaurant-quality red velvet perfection.
| Ingredient | Amount | Notes |
|---|---|---|
| All-Purpose Flour 🌾 | 4 ½ cups | Sifted for lightness, no substitutions |
| Granulated Sugar 🍚 | 2 ¼ cups | Superfine preferred for smooth texture |
| Unsalted Butter 🧈 | 2 cups | Room temperature, 68°F for creaming |
| Buttermilk 🥛 | 2 cups | Fresh, not powdered, for moisture |
| Sour Cream 🍶 | ½ cup | Full-fat for richness, not Greek |
| Red Velvet Food Coloring 🎨 | ½ tsp | Liquid for even distribution |
| Cocoa Powder 🍫 | ½ cup | Dutch-processed, unsweetened |
| Baking Soda 🧪 | 1 tbsp | Pure, not baking powder |
| Vanilla Extract 🌿 | 2 tsp | Pure Madagascar bourbon preferred |
| Salt 🧂 | ½ tsp | Fine sea salt, not iodized |
| White Vinegar 💧 | 1 tbsp | For tenderizing flour |
| Cream Cheese 🧀 | 16 oz | Room temperature, full-fat |
| Powdered Sugar 🍚 | 4 cups | Sifted for smooth frosting |
| Heavy Cream 🥛 | 1 cup | Cold, for whipped frosting |
| Lemon Juice 🍋 | 1 tsp | Freshly squeezed, for tang |
The foundation of this cake begins with high-quality Dutch-processed cocoa powder—Hershey’s Special Dark is my go-to for that signature deep red hue without bitterness. For the butter, Plugrá or Land O’Lakes unsalted work best when brought to exactly 68°F for creaming; any colder and it won’t emulsify properly. The buttermilk and sour cream must be fresh—never powdered or low-fat substitutes, as they compromise moisture. Bob’s Red Mill all-purpose flour is ideal for its fine grind, but sift it thoroughly to prevent dense layers. Pro tip: Measure your dry ingredients by weight if possible for consistency, though cups work fine for home baking. The red velvet coloring should be liquid—gel versions create uneven streaks.
No buttermilk? Mix 1 cup milk + 1 tbsp vinegar, let sit 5 minutes. Substitute sour cream with Greek yogurt at a 1:1 ratio, though texture may vary slightly. For the cocoa, natural unsweetened works but yields a grayer cake. The cream cheese filling requires full-fat Philadelphia brand—never low-fat or whipped varieties, as they lack stability. Powdered sugar should be sifted to avoid graininess in the frosting. The frosting’s tang comes from fresh lemon juice; bottled versions lack brightness. For a vegan adaptation, replace butter with Earth Balance vegan butter and use dairy-free cream cheese like Kite Hill, though texture will differ slightly.
Store cake layers at room temperature in an airtight container between parchment paper for up to 3 days. The assembled cake keeps 4-5 days refrigerated, though frosting may weep slightly. For longer storage, freeze unfrosted layers for up to 3 months—thaw overnight before assembling. The frosting can be made 2 days ahead and stored in the fridge; whip briefly before use. To prevent crumbling during assembly, level layers perfectly with a serrated knife and chill 10 minutes between fillings. The final presentation requires piped borders for that signature restaurant finish—use a Wilton 1M tip for clean lines.
Why You’ll Love This Recipe
- No-Bake Layers: I swear by this trick—just mix the batter, pour, and chill. The buttermilk and sour cream do all the work while you sip coffee. No oven fuss, no waiting for layers to cool separately.
- Velvet Magic: That deep cocoa-butter richness? The sugar and butter create this perfect moist crumb, while the buttermilk keeps it tender. Honestly, the first bite makes you question why you ever bought store-bought.
- Party Ready: Four layers mean you can slice it for birthdays, potlucks, or even a “I just want cake” Tuesday. Between us, I’ve used it for everything from brunch to dessert after a long day—no one judges.
- Budget-Friendly Luxury: Flour, sugar, butter—these are pantry staples that stretch. A single batch feeds eight, and leftovers? They disappear faster than I can say “second slice.” (Yes, even on a Tuesday night.)
Step-by-step instructions for 4 layer red velvet cake
Mastering this classic requires precision—follow these steps for perfectly moist layers and velvety frosting.
👨🍳 Step 1: Prepare the Cake Batter
Preheat your oven to 350°F and grease four 6-inch round cake pans, lining the bottoms with parchment circles. In a medium bowl, whisk together the 4.5 cups all-purpose flour, 0.5 cup cocoa powder, 1 tbsp baking soda, and 0.5 tsp salt. Sift the dry ingredients directly into a large mixing bowl to eliminate lumps.
In a separate large bowl, cream the 2 cups unsalted butter and 2.25 cups granulated sugar on medium speed until light and fluffy—about 3-4 minutes. Add the 2 cups buttermilk, 0.5 cup sour cream, 1 tbsp white vinegar, and 2 tsp vanilla extract, mixing until just combined. The batter will look curdled, but that’s normal.
👨🍳 Step 2: Incorporate Color and Dry Ingredients
Gently fold in the dry ingredients using a spatula, mixing just until no flour streaks remain. This prevents overmixing, which can make the cake dense. In a small bowl, whisk the 0.5 tsp red velvet food coloring with 1 tbsp lemon juice to help disperse the color evenly. Divide the batter evenly among the prepared pans.
Bake for 25-30 minutes until a toothpick inserted into the center comes out clean. The cakes should spring back gently when pressed. Let them cool in the pans for 10 minutes before transferring to a wire rack to cool completely. This gradual cooling prevents cracking.
👨🍳 Step 3: Make the Cream Cheese Frosting
In a stand mixer fitted with the paddle attachment, beat the 16 oz cream cheese and 2 cups unsalted butter (softened) on medium speed until smooth and creamy—about 3-4 minutes. Add the 4 cups powdered sugar and mix on low speed until combined, then increase to medium and beat for another 2 minutes.
In a separate bowl, whip the 1 cup heavy cream to stiff peaks. Gently fold the whipped cream into the cream cheese mixture using a spatula until fully incorporated. The frosting should be light and airy, with no lumps. Cover and refrigerate for 30 minutes to firm up slightly before assembling.
🥘 Step 4: Assemble the Cake Layers
Place the first cake layer on a serving plate and spread a thin layer of frosting on top. Repeat with the remaining layers, adding frosting between each layer. This ensures every bite has that signature red velvet flavor. Once all layers are stacked, cover the entire cake with the remaining frosting, creating a smooth finish.
Use a spatula to create decorative swirls or a smooth surface. Chill the cake in the refrigerator for at least 2 hours before slicing to allow the frosting to set properly. The layers should be moist and tender, while the frosting remains creamy and rich.
Pro Tips For Making 4 Layer Red Velvet Cake
- Measure Butter Cold: Take your unsalted butter straight from the fridge—no softening needed. I learned this the hard way after overmixing melted butter into the flour and ending up with a dense, gummy cake. Cold butter creates pockets of air for that signature tender crumb, and it melts just enough during baking to keep layers moist.
- Whisk Buttermilk First: Before mixing, whisk your buttermilk and sour cream together until smooth—no lumps, no streaks. I used to pour them in straight from the carton, and the cake would turn out unevenly colored and slightly dry. This step ensures the liquids blend seamlessly with the dry ingredients, giving you that consistent velvet texture.
- Don’t Overbake Layers: Pull your cake layers out when the center still has a slight give—about 2-3 minutes before the recipe’s suggested time. After baking 12 layers myself, I know the difference between “done” and “overdone”: a layer that’s fully set will crack and dry out faster when cooling. Let them rest 10 minutes in the pan before transferring.
- Chill Between Layers: Pop your assembled cake in the fridge for 15 minutes before adding the next layer or frosting. I skipped this once and ended up with a collapsed mess—gravity and the weight of the cream cheese frosting won’t wait for you. A quick chill keeps everything stable and makes clean slices possible. (Yes, even if you’re impatient like me.)
Perfect pairings for these flavors
Cream Cheese Pairings
The star of this cake is its cream cheese frosting, but you can elevate it further with complementary cream cheese-based toppings. Try a cream cheese glaze drizzled over the top—mix 4 oz softened cream cheese, 1 cup powdered sugar, and 1 tbsp lemon juice until smooth.
For extra flair, pipe cream cheese swirls around the edges using a Wilton 1M tip. 🧀
Fruit Toppers
Fresh berries add a bright contrast to the rich cake. I love raspberries or blackberries arranged in a circular pattern on top, or strawberries sliced lengthwise for a classic look.
For a tropical twist, use mango slices or passion fruit pulp drizzled over the frosting. Always add fruit just before serving to prevent sogginess.
Chocolate Decorations
Dark chocolate shavings or curls add a sophisticated touch. Use a vegetable peeler on a Ghirardelli 72% dark chocolate bar for elegant curls. For a bolder flavor, pipe chocolate ganache around the base using a star tip.
A sprinkle of cocoa powder or crushed peppermint adds a festive finish for holiday celebrations.
Coffee or Tea Infusions
Enhance the cake’s depth with a coffee or tea infusion. Add 1 tbsp instant espresso powder to the cake batter for a subtle mocha note. For the frosting, steep 1 tbsp Earl Grey tea in 2 tbsp hot milk, cool, and mix into the whipped cream before folding.
This pairs beautifully with a hot cup of chai or cold brew coffee for a cozy dessert experience. ☕
Nutty Crunch Elements
Toasted nuts add texture and richness. Try pecans or walnuts chopped and sprinkled over the frosting, or press them into the sides for a decorative border. For a sweeter crunch, use toasted coconut flakes or chopped candied pecans.
Always toast nuts at 350°F for 5-7 minutes to enhance their flavor before adding.
Seasonal Garnishes
Adjust toppings based on the season. In spring, use edible flowers like violets or pansies. For summer, add citrus zest (lemon or orange) or fresh mint leaves. In fall, incorporate pumpkin spice into the frosting and top with cinnamon sticks.
Winter calls for cranberries or white chocolate drizzle with a sprinkle of sea salt. 🍂
Nutrition facts
Frequently asked questions
Why does red velvet cake have cocoa powder but not taste chocolatey?
The secret lies in the precise ratio of 0.5 cup Dutch-processed cocoa powder to 4.5 cups flour—it’s diluted enough to prevent bitterness while still delivering that signature deep red color. The buttermilk and sour cream also help balance the cocoa’s intensity, creating a tender crumb that’s subtly cocoa-infused rather than chocolate-forward.
Can I make this cake in smaller pans for individual servings?
Yes! For individual cakes, use six 4-inch pans instead of four 6-inch pans. Reduce baking time to 20-25 minutes and adjust frosting quantity proportionally. The layering technique remains the same—just scale everything down by half. This works perfectly for mini desserts or party favors!
What’s the best way to level the cake layers perfectly?
Use a serrated knife and a leveling guide (or even a ruler) to create perfectly even tops. Place the cake on the guide, then slice just above the line while holding the knife level. Chill the layers for 10 minutes after leveling to help them hold their shape during assembly. Uneven layers cause frosting to slide off!
Why did my frosting turn grainy?
Grainy frosting usually means the powdered sugar wasn’t sifted or the cream cheese was too cold. Always sift the sugar and ensure your cream cheese is at room temperature (about 68°F) before mixing. If it happens, blend with a hand mixer for 1-2 minutes to smooth it out. A splash of lemon juice can also help dissolve any lumps.
How do I store leftovers without drying out the cake?
Wrap individual slices in plastic wrap, then place them in an airtight container with parchment paper between layers. Store at room temperature for 2 days or refrigerate for up to 5 days. For longer storage, freeze slices (without wrapping) on a tray, then transfer to a bag. Reheat briefly in the microwave to restore moisture.

- 1 Lb Ground Beef Recipe Ideas: 5 Quick Skillet Meals for Busy Nights - October 18, 2026
- 21 Layer Chocolate Cake Recipe: Decadent Stack of Rich Ganache and Airy Layers - October 18, 2026
- 1 Chocolate Cupcake Recipe: Single-Serve Decadence in Minutes - October 18, 2026