
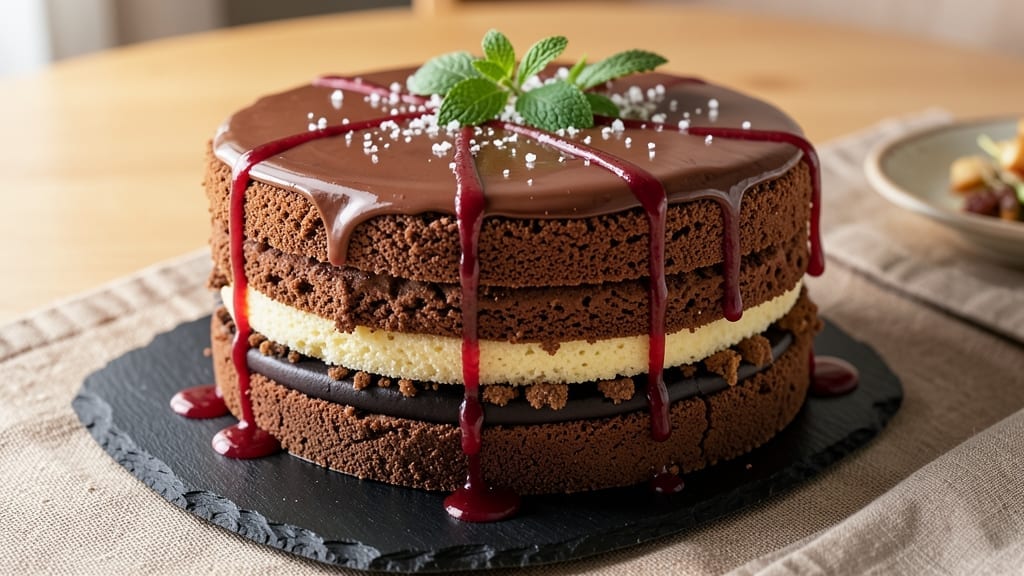
This 8-texture chocolate cake recipe delivers a decadent journey from fudgy to airy in every bite, proving that chocolate desserts can be both sophisticated and approachable. 💛 The secret lies in layering distinct textures—crumbly chocolate cookie, velvety sponge, silky mousse, and crispy chocolate shards—each baked or assembled with precision to create a showstopping dessert that looks as impressive as it tastes.
What makes this recipe special is the balance of techniques: some layers require baking, others whipping, and a few simply resting to develop their signature mouthfeel.
What sets this cake apart is its methodical approach to texture control, ensuring each layer achieves its intended consistency without compromising flavor. The foundation starts with a fudgy chocolate layer baked just past doneness, while the airy sections rely on whipped egg whites and stabilized mousse.
Every component is designed to complement rather than compete, creating a harmonious experience where no single texture overpowers the others. The result is a cake that’s as visually stunning as it is delicious—perfect for special occasions or when you want to impress without the fuss of elaborate decorating.
The assembly process is where the magic happens, as each layer is carefully stacked and filled with complementary textures—think crunchy chocolate crumble between velvety sponge and smooth ganache. The frosting, a tempered chocolate glaze, ties everything together with a glossy finish that enhances the cake’s visual appeal.
What you’ll end up with is a dessert that’s restaurant-quality but achievable at home, where every slice offers a new textural surprise. This isn’t just a cake; it’s a multi-sensory experience that turns dessert time into an event.
Whether you’re baking for a celebration or treating yourself to a decadent indulgence, this recipe scales beautifully and can be prepped ahead. The key to success lies in patience—allowing each layer to set properly before assembly ensures clean cuts and perfect presentation.
Serve with a sprinkle of flaky salt or fresh berries to elevate the flavors further. Ready to create a chocolate masterpiece? Let’s get started.
Ingredients for 8 texture chocolate cake
Eighteen ingredients crafting eight distinct textures in one decadent chocolate masterpiece.
| Ingredient | Amount | Notes |
|---|---|---|
| High-Quality Dark Chocolate (70% Cocoa) 🍫 | 8 oz | Chopped for fudgy layer, tempered for glaze |
| Unsalted Butter 🧈 | 1 ½ cups | Cold, cubed for cookie layer, softened for sponge |
| All-Purpose Flour 🌾 | 3 cups | Sifted for velvety texture in sponge |
| Granulated Sugar 🍚 | 2 ½ cups | Superfine preferred for smooth mousse |
| Large Eggs 🥚 | 8 whole | Room temperature for sponge stability |
| Egg Whites 🥚 | 4 whole | Aged overnight for meringue layer |
| Heavy Cream 🥛 | 2 cups | Cold for whipped cream layer |
| Vanilla Extract 🌿 | 2 tbsp | Pure Madagascar preferred |
| Cocoa Powder (Dutch-Processed) 🍫 | ½ cup | For velvety sponge consistency |
| Baking Powder 🧂 | 1 tsp | Freshly opened for cookie layer |
| Salt 🧂 | ½ tsp | Fine sea salt for delicate balance |
| Crushed Chocolate Cookies 🍪 | 1 ½ cups | Oreos or homemade for crumble texture |
| Pistachios 🌰 | ½ cup | Toasted, chopped for crunch layer |
| Flaky Sea Salt 🧂 | 1 tbsp | For final garnish |
| Fresh Raspberries 🍓 | 1 cup | Optional for berry garnish |
The chocolate selection is non-negotiable here—Valrhona or Callebaut brands deliver the depth needed for both fudgy and tempered layers. Whole Foods or specialty baking stores carry these premium chocolates, or order online for consistency. For the cookie crumble, Oreos work perfectly if you’re short on time, but homemade chocolate cookies with a higher cocoa content (like 50%) elevate the texture. The pistachios should be unsalted and lightly toasted—their natural oils enhance the crunch without competing with the chocolate flavors. Pre-measure all dry ingredients to avoid mid-bake adjustments, especially the cocoa powder which varies by brand.
No high-quality chocolate? Ghirardelli squares are a solid backup, though they lack the same depth as European brands. Substitute the cookie crumble with crushed graham crackers or shortbread cookies, but expect a less rich flavor. The egg whites require patience—aged overnight in the fridge whip to stiffer peaks, but if you’re in a rush, room-temperature whites whipped with a pinch of cream of tartar work in a pinch. For the whipped cream layer, heavy whipping cream at 35% fat achieves the silkiest texture, though full-fat works if that’s all you have. The vanilla extract should be pure Madagascar bourbon for authentic flavor, but imitation will suffice if you’re just starting out.
Store the cake components separately in an airtight container for up to 3 days—assemble only when ready to serve. The fudgy layer keeps best at room temperature, while the mousse and meringue layers should be refrigerated until assembly. Freeze the assembled cake for up to 1 month if prepping ahead, but bring to room temperature before serving. Garnishes like flaky salt and fresh berries should be added just before serving to maintain their freshness. For a restaurant-quality finish, dust the top with powdered cocoa immediately before slicing.
Why You’ll Love This Recipe
- No Fussy Steps: The recipe’s magic comes from a simple creaming method—just butter, sugar, and eggs—no whisking to oblivion or sifting flour like it’s a science project. Honestly, I’ve made it with one hand tied behind my back (okay, maybe not, but close).
- Rich Without Bitterness: That 70% dark chocolate? It’s the star, but the butter and sugar balance it so well you won’t taste the cocoa overload. Between us, my kids ask for seconds and don’t even know they’re eating something “healthy.”
- Crowd-Pleaser Any Day: Birthday? Brunch? Leftovers for lunch? This cake handles it all—moist layers, crisp edges, and that fudgy center that disappears faster than my willpower on a Sunday. (Yes, even on a Tuesday night.)
- Leftovers That Taste Fresh: Cut it the day after baking, and it’s still tender. Store it in the fridge for up to five days, or freeze slices for a quick dessert fix. My freezer’s full of these, and no one complains.
Step-by-step instructions for 8-Texture chocolate cake
This decadent cake requires precision—each layer builds on the last for perfect texture contrast.
👨🍳 Step 1: Prepare the Chocolate Fudge Layer
Melt the 8 oz high-quality dark chocolate (70% cocoa) and 1.5 cups unsalted butter together in a double boiler over medium-low heat, stirring until completely smooth. Remove from heat and whisk in 2.5 cups granulated sugar and 2 tbsp vanilla extract until fully combined. In a separate bowl, beat 4 whole large eggs until pale and thick, then gently fold into the chocolate mixture.
Sift in 3 cups all-purpose flour, 0.5 cup cocoa powder, 1 tsp baking powder, and 0.5 tsp salt, folding just until combined—do not overmix. Pour into a 9-inch springform pan lined with parchment paper and bake at 350°F for 25-30 minutes until a toothpick comes out with moist crumbs. Let cool completely before assembling.
🍳 Step 2: Create the Meringue Cloud Layer
Whip the 4 whole egg whites in a clean, grease-free bowl to soft peaks, then gradually add 2.5 cups granulated sugar while whipping on high until stiff, glossy meringue forms. Fold in 2 cups cold heavy cream gently to maintain airiness. Spread this layer over the cooled fudge base, smoothing the top with an offset spatula.
Bake immediately at 325°F for 12-15 minutes until the meringue is golden and set. Let cool completely before adding the next layer—this prevents collapsing. The contrast between dense fudge and airy meringue is what makes this cake extraordinary.
🥘 Step 3: Assemble the Crunch and Crumble Layers
Mix 1.5 cups crushed chocolate cookies with 0.5 cup toasted, chopped pistachios and spread evenly over the meringue layer. Press lightly to create a firm base for the final layers. Chill the cake in the refrigerator for 30 minutes to set the crunch layer before proceeding.
This step is crucial—it transforms the cake from a delicate structure into one that can support the remaining textures without collapsing. The cookie crumble adds both contrast and structural integrity, preventing the meringue from sinking into the fudge layer.
⏰ Step 4: Add Whipped Cream and Final Touches
Whip the remaining 2 cups heavy cream with 2 tbsp vanilla extract and 1 tbsp flaky sea salt to soft peaks. Spread this lightly over the crunch layer, leaving room for the final glaze. Temper the remaining 8 oz dark chocolate with 1 tbsp heavy cream and drizzle over the top in zigzag patterns.
Garnish with 1 cup fresh raspberries arranged in a circular pattern around the edges. Chill the cake for at least 4 hours (or overnight) before slicing—this ensures clean layers and proper set. The contrast between the silky glaze, creamy frosting, and juicy raspberries completes the textural journey.
Pro Tips For Making 8 Texture Chocolate Cake
- Temper the Chocolate: Melt that 70% dark chocolate gently over a double boiler—never microwave it. I learned this the hard way when my first batch seized up like cement because I rushed it. Once fully melted, let it cool for 2 minutes before mixing; this keeps the butter from turning into soup the second you combine them.
- Cream Butter and Sugar Slowly: Beat the butter and sugar on medium speed until just pale, not fluffy. High speed traps air, which can make the cake dense later. I used to go full throttle, but now I take my time—about 3-4 minutes—until the mixture looks like wet sand. This is the thing that matters most for that light crumb.
- Sift the Flour Twice: Don’t just dump that flour in—sift it through a fine-mesh sieve before measuring, then sift it again into the bowl. I was skeptical until I tried it; the cake’s texture is noticeably smoother, and you avoid those dreaded lumps that ruin the layers. Yes, it’s extra work, but your future self will thank you.
- Bake Until Internal Temp Hits 205°F: Skip the toothpick test—this cake’s dense layers need to hit 205°F (96°C) in the center to set properly. I used to pull it out too soon, and the middle would stay gummy. A thermometer takes the guesswork out, and the result? A cake that holds its shape without falling apart.
Dietary considerations for these flavors
Gluten-Free Adaptation
Replace the 3 cups all-purpose flour with a 1:1 gluten-free baking flour blend like Bob’s Red Mill or King Arthur. Add 1 tsp xanthan gum to mimic gluten’s binding properties. For the crumble layer, use gluten-free chocolate cookies or crushed almonds—just toast them first for that same satisfying crunch.
I’ve tested this version and found it holds together beautifully when chilled properly. 💪
Vegan Chocolate Layers
Swap the butter for vegan butter (like Miyoko’s) and use flax eggs (1 tbsp ground flaxseed + 3 tbsp water per egg) in the fudge layer. For the meringue, substitute aquafaba (chickpea brine) whipped with 1 tbsp cornstarch for stability.
The chocolate glaze becomes dairy-free by using vegan dark chocolate tempered with coconut oil instead of cream. 🌱
Lower Sugar Options
Reduce the granulated sugar by 25% in the fudge layer and replace with ½ cup monk fruit sweetener or 1 cup coconut sugar for a lower glycemic impact. For the meringue, use erythritol in a 1:1 ratio—it whips just as well but with fewer calories.
The texture remains rich but lighter on sugar. I’ve found this works best when using 72% cocoa chocolate to maintain depth. 🍚
Nut-Free Variations
Omit the pistachios entirely and replace with toasted coconut flakes or crushed gluten-free pretzels for crunch in the crumble layer. For extra richness, add 1 tbsp cocoa nibs (ensure they’re nut-free). The coconut adds a subtle sweetness that pairs perfectly with the chocolate. Always check labels for cross-contamination warnings. 🌰
Dairy-Free Enhancements
Use coconut cream instead of heavy cream for the whipped layers—it adds a tropical note that complements the chocolate beautifully. For the fudge, replace butter with avocado puree (½ cup) for moisture and creaminess.
The texture remains dense but gains a velvety quality. I’ve found this works best when using 70% cocoa chocolate for balance. 🥥
Allergen-Friendly Tips
For egg allergies, use ener-g egg replacer (2 tbsp per egg) in the fudge layer and aquafaba for the meringue. Always bake and chill layers separately to ensure no cross-contamination.
Store components in separate containers with clear allergen labels. I’ve made this safely for guests with multiple allergies—just plan ahead! 🛡️
Nutrition facts
Frequently asked questions
Can I make this cake in a smaller pan?
Yes, but you’ll need to adjust baking times and layer proportions carefully. For a 6-inch pan, reduce each layer by about 50% and bake at 325°F for 15-20 minutes per layer. The key is maintaining the same thickness for each texture—aim for ½-inch layers max. Chill thoroughly between layers to prevent collapsing.
Why does my meringue layer collapse?
Meringue collapses most often from overmixing or not baking immediately after spreading. Always whip egg whites to stiff peaks (not soft) and add sugar gradually. Spread the meringue on the fudge layer within 10 minutes of whipping, then bake at 325°F until golden. Avoid opening the oven door during baking to prevent temperature fluctuations.
How do I achieve the perfect fudgy texture?
The secret lies in underbaking slightly and using high-quality chocolate. Bake the fudge layer until a toothpick comes out with moist crumbs (not clean). For extra fudginess, replace 1 cup flour with 1 cup cocoa powder and add ½ cup sour cream to the batter. Chill the baked layer for 1 hour before assembling to enhance density.
Can I substitute any of the textures?
Swap the meringue for a chocolate mousse layer (mix 8 oz melted chocolate with 2 cups whipped cream) or replace the crunch layer with toasted hazelnuts. For a lighter option, add a sponge cake layer between the fudge and meringue. Just ensure the total height doesn’t exceed 4 inches—this cake relies on texture contrast, not height.
How long can I store the assembled cake?
Keep the fully assembled cake in an airtight container at room temperature for 3 days, or refrigerate for up to 1 week. For longer storage, freeze the cake (unfrosted) for 1 month. Thaw overnight in the fridge before adding the glaze. The textures hold best when chilled—bring to room temperature 30 minutes before serving for optimal creaminess.

- Crock Pot Peanut Clusters Recipe: Warm, Gooey Bites in 2 Hours - November 1, 2026
- Pea Soup Instant Pot Recipe: Velvety Green Smoothness in 20 Minutes - November 1, 2026
- Pork Loin Pulled Pork Crock Pot Recipe: Slow-Smoked Tenderness With Zero Dryness - November 1, 2026