
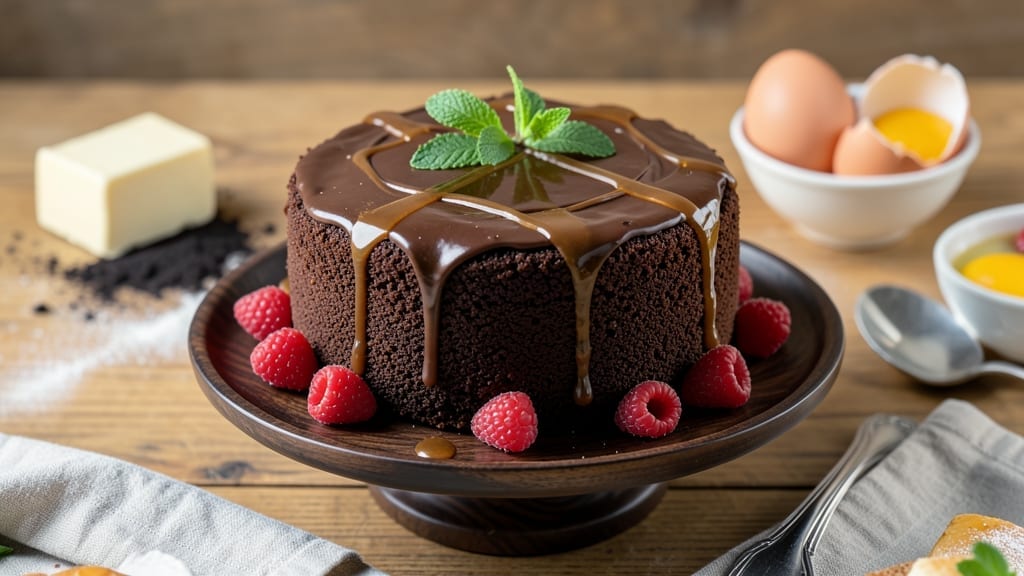
This 9-inch chocolate sponge cake recipe delivers layers of moist, tender crumb and a velvety fudge frosting that melts in your mouth—no dry crumbs or heavy frosting in sight. 💛 The secret lies in properly creaming the butter and sugar, then gently folding in whipped egg whites for that signature lightness.
I perfected this recipe after years of baking experiments, and it’s now my go-to for birthdays, anniversaries, or just because. What sets this apart is the foolproof technique that ensures even baking in a standard 9-inch pan.
You’ll need just 5 simple ingredients (plus cocoa powder) for the cake itself, and the frosting comes together in minutes with powdered sugar and melted chocolate. The result? A cake that’s rich yet airy, with a perfectly set center that won’t leave you waiting.
The frosting is where the magic happens—a silky fudge that’s neither too sweet nor too thick, spreadable without sliding off. It pairs beautifully with the cake’s deep chocolate flavor, creating a dessert that’s restaurant-quality but made at home. No special tools required, just patience and a steady hand.
Serve it with fresh berries for contrast or a sprinkle of sea salt to enhance the chocolate. This cake is versatile, impressive, and guaranteed to disappear faster than you can say “second slice.” Let’s get baking!
Ingredients for 9 inch chocolate sponge cake
Five simple ingredients for the cake, three for the frosting—all you need for restaurant-quality chocolate perfection.
| Ingredient | Amount | Notes |
|---|---|---|
| Unsalted Butter 🧈 | 1 cup | Room temperature for creaming |
| Granulated Sugar 🍚 | 1 ½ cups | Superfine preferred for smoothness |
| Large Eggs 🥚 | 4 whole | Room temperature, separated |
| All-Purpose Flour 🌾 | 1 cup | Sifted, spooned lightly |
| Unsweetened Cocoa Powder 🍫 | ½ cup | Dutch-processed for richness |
| Baking Powder 🧂 | ½ tsp | Aluminum-free preferred |
| Salt 🧂 | ¼ tsp | Fine sea salt |
| Vanilla Extract 🌿 | 1 tsp | Pure Madagascar preferred |
| Powdered Sugar 🍚 | 2 cups | For frosting, sifted |
| Dark Chocolate Bars 🍫 | 8 oz | 70% cocoa, chopped |
| Heavy Cream 🥛 | ½ cup | Cold, for frosting |
| Fresh Raspberries 🍓 | 1 cup | For garnish, optional |
The butter and sugar are the foundation here. Grab European-style butter (like Plugrá or Land O’Lakes) for better flavor—it’s worth the splurge. Room temperature is critical (about 65°F), so pop it out 1 hour before baking. Sugar matters too: superfine sugar dissolves faster for a smoother batter, but regular granulated works if you pulse it in a food processor. Eggs should be room temperature too—cold eggs curdle when whipped. For cocoa, Dutch-processed (like Hershey’s Special Dark) gives deeper flavor than natural cocoa. Store all dry ingredients in airtight containers away from heat.
No superfine sugar? Pulse regular granulated sugar in a food processor for 30 seconds—it’ll work in a pinch. Dutch-processed cocoa unavailable? Natural cocoa powder works, but add an extra 1/4 tsp baking powder to compensate for acidity. Want to skip the raspberries? Fresh strawberries or mint leaves add a nice contrast. For the chocolate, Ghirardelli squares melt beautifully, but any 70% cocoa bar will do. If you’re short on time, microwave the chocolate in 20-second bursts instead of melting it on the stove. The frosting can be made ahead—just cover it tightly and let it soften at room temperature before spreading.
This cake keeps beautifully for 3 days at room temperature, wrapped tightly in plastic. For longer storage, refrigerate for up to 1 week or freeze the unfrosted cake for 3 months. The frosting will firm up in the fridge—let it sit at room temp for 10 minutes before spreading. To serve, slice with a hot knife for clean edges. Leftovers? Store in an airtight container with parchment between layers. The cake actually tastes better the next day—all that moisture has time to distribute perfectly.
Why You’ll Love This Recipe
- No Mixer Needed: I swear by this recipe when I’m in a rush—just cream the butter and sugar by hand until light, fold in the eggs one at a time, and let the whisk do the rest. The eggs add structure without needing a stand mixer, and honestly? The cake’s so tender it’ll fool everyone into thinking you slaved over it.
- Rich Without Bitterness: That cocoa powder isn’t just any cocoa—it’s the good stuff, melted into the butter first to bloom the flavor. The result? A deep chocolate taste that’s smooth, not overpowering, and the sugar keeps it from tasting dry. (Yes, even my coffee-drinking husband asks for seconds.)
- Weeknight Crowd-Pleaser: This feeds six with ease, and the leftovers? They last forever in the fridge—perfect for when you’re hosting but don’t want to stress. Slice it thin, and it’s great for breakfast toast or dessert after dinner. (My kids beg for it at 8 p.m. on school nights.)
- Pantry Staple Magic: You’re using things you already have—no specialty ingredients, no last-minute grocery runs. Butter, sugar, eggs, flour, cocoa: that’s it. And since it’s a single 9-inch pan, it’s half the mess of baking two layers. Between us, this is my go-to when I’m broke but still want to impress.
Step-by-step instructions for 9-Inch chocolate sponge cake
Here’s how to bake layers so tender they crumble like clouds.
👨🍳 Step 1: Cream Butter and Sugars to Fluffy Perfection
In a stand mixer fitted with the paddle attachment, beat the 1 cup unsalted butter and 1.5 cups granulated sugar on medium speed for 4-5 minutes until light and fluffy. You’re aiming for a pale, airy texture that nearly doubles in volume. I like to scrape down the sides every minute to ensure even mixing.
This creaming process incorporates air, which creates that signature light, airy crumb. If you’re using regular sugar instead of superfine, pulse it in a food processor first for smoother texture. The mixture should be thick enough to leave a trail when the paddle lifts but still hold its shape.
👨🍳 Step 2: Incorporate Eggs and Dry Ingredients
Add the 4 whole large eggs, one at a time, mixing well after each addition. Then stir in the 1 tsp vanilla extract. The batter will look slightly curdled at first, but don’t worry—it will come together. In a separate bowl, whisk together the 1 cup all-purpose flour, 0.5 cup unsweetened cocoa powder, 0.5 tsp baking powder, and 0.25 tsp salt. Sift this dry mixture over the wet ingredients and gently fold together using a spatula.
Here’s the thing—overmixing develops gluten, which makes the cake tough. Mix just until the flour disappears, about 15-20 strokes. The batter should be thick and glossy, like pudding. If it’s too thick to spread easily, you can add 1-2 tablespoons of cold water to loosen it slightly.
🔥 Step 3: Bake the Layers to Moist Perfection
Preheat your oven to 350°F and grease three 9-inch round cake pans with butter and flour, or use parchment paper liners. Divide the batter evenly among the pans. Bake for 25-30 minutes or until a toothpick inserted in the center comes out clean. The edges should be set, but the center should still have a slight bounce—this ensures moisture.
I know it’s tempting to open the oven early, but resist! The cake needs that full baking time to develop proper structure while staying moist. If the tops brown too quickly, tent the pans with foil. Let the cakes cool in the pans for 10 minutes, then transfer to a wire rack to cool completely before frosting.
🍳 Step 4: Make the Silky Chocolate Fudge Frosting
In a heatproof bowl over simmering water, melt the 8 oz dark chocolate bars with the 0.5 cup heavy cream. Stir until smooth, then remove from heat. Whisk in the 2 cups powdered sugar until fully combined. Let the frosting cool to room temperature—it should thicken slightly as it cools, becoming spreadable but still glossy.
This is where the magic happens: the contrast between the rich chocolate frosting and the tender cake layers. If the frosting is too thick, warm it gently and whisk in 1-2 teaspoons of milk to loosen. For extra richness, you can add 1 tablespoon of cocoa powder to the cooled frosting, but it’s already decadent as is.
🥘 Step 5: Assemble and Garnish Like a Pro
Place one cake layer on a plate and spread a generous layer of frosting. Repeat with the remaining layers, finishing with the last layer on top. Use a long serrated knife to trim any uneven edges. For a smooth finish, dip the knife in hot water between cuts. Chill the cake in the refrigerator for 30 minutes to set the frosting.
Before serving, top with the 1 cup fresh raspberries, pressing them gently into the frosting. The acidity of the raspberries cuts through the richness of the chocolate, creating perfect balance. Serve at room temperature for the best texture contrast—warm cake with cool frosting is pure indulgence.
Pro Tips For Making 9 Inch Chocolate Sponge Cake
- Whisk Eggs Until Ribbon Stage: I learned this the hard way—stopping too early means a dense, gummy cake. Beat the eggs and sugar on medium-high until the mixture leaves a clear, slow-moving trail when the whisk is lifted. That’s your cue to fold in the dry ingredients gently. (Yes, even if you’re impatient like me.)
- Melt Butter Slowly: Dumping cold butter into hot sugar? Big mistake. Melt the butter over a double boiler or in the microwave at 50% power until it’s just liquid—not even slightly browned. Cold butter creates lumps that never dissolve, and your cake will taste uneven.
- Sift the Cocoa Twice: Unsweetened cocoa powder clumps like a stubborn toddler. Sift it through a fine-mesh sieve before measuring, then sift it again right into the dry ingredients. Skipping this step means pockets of undissolved cocoa, and your cake will have a weird, gritty bite.
- Preheat Pan with Butter: Grease that 9-inch pan with softened butter, then dust with flour—then preheat the oven with the pan inside for 5 minutes. This creates a nonstick barrier that actually works. I used to skip this, and my cakes always stuck, no matter how much I greased afterward. (Your future self will thank you.)
Creative variations of this 9 inch chocolate sponge cake
Decadent Espresso Twist
Add 1 tablespoon instant espresso powder to the dry ingredients for a subtle coffee kick that enhances the chocolate flavor. I like to use Starbucks Via for consistent results.
This variation works especially well with a dark chocolate ganache frosting instead of the regular fudge. The espresso deepens the chocolate notes without overpowering the cake’s delicate crumb. 💫
Orange Zest Brightness
Zest 1 large orange and fold it into the batter along with the vanilla for a citrusy contrast that brightens the rich chocolate. Pair this with a white chocolate frosting infused with 1 teaspoon orange extract for a sophisticated twist.
The acidity of the orange zest cuts through the sweetness beautifully, creating a balanced flavor profile.
Salted Caramel Layers
Spread a thin layer of homemade salted caramel between the cake layers for a gourmet touch. Use 1 cup granulated sugar, ½ cup heavy cream, and ¼ cup unsalted butter to make the caramel, then finish with a pinch of flaky sea salt.
This variation elevates the cake to restaurant-quality decadence while keeping the sponge cake’s signature lightness intact.
Peanut Butter Swirl
Mix ½ cup creamy peanut butter into the batter before baking, then swirl it in with a knife after dividing the batter into pans. Top with the regular fudge frosting for a classic peanut butter-chocolate combination.
I recommend Smucker’s Natural peanut butter for the best flavor. This variation is a crowd-pleaser that adds a nutty depth to the cake’s chocolate richness.
Matcha Green Tea Fusion
Replace ¼ cup of the cocoa powder with ¼ cup matcha powder for an earthy, umami twist. Use a white chocolate frosting to balance the matcha’s intensity. This variation is perfect for tea lovers and adds a unique visual contrast with the green hue.
The matcha enhances the cake’s moisture while introducing a sophisticated flavor profile. 🌿
Boozy Chocolate Cherry
Add 2 tablespoons brandy or cherry liqueur to the frosting for a boozy depth, then top with ½ cup pitted cherries (fresh or maraschino). The alcohol enhances the chocolate flavor while the cherries add a tart contrast.
This variation is ideal for special occasions and pairs beautifully with a glass of Port wine or champagne.
Nutrition facts
Frequently asked questions
Why does my chocolate sponge cake turn out dense instead of light?
Overmixing the batter develops gluten, which makes the cake tough. Mix just until the flour disappears (about 15-20 strokes) and avoid creaming the butter and sugar for too long. Also, make sure your butter and eggs are room temperature—cold ingredients can prevent proper air incorporation.
Can I bake this cake in a different-sized pan?
Yes, but adjust the baking time. For a 8-inch pan, bake 20-25 minutes; for a 10-inch pan, bake 30-35 minutes. The cake should be done when a toothpick comes out clean. Always check 5 minutes early—ovens vary! The batter should fill the pan only about 2/3 full for even baking.
How do I fix cracked frosting on my cake?
If the frosting cracks after chilling, don’t panic! Spread a thin layer of warm frosting over the cracks, then smooth it with a spatula. For a seamless finish, dip your knife in hot water between cuts when trimming. If the frosting is too thick, warm it gently and whisk in 1 teaspoon of milk to loosen.
Can I make this cake without eggs?
Yes, but the texture will differ. Replace the 4 eggs with 1 cup applesauce or 1 cup mashed banana (for moisture) plus 1 teaspoon baking soda (for lift). For a more stable structure, use 1/2 cup unsweetened applesauce + 1/2 cup Greek yogurt. The cake will be slightly denser but still delicious—just reduce baking time by 3-5 minutes.
How long can I store the unfrosted cake layers?
Unfrosted layers keep well for 3 days at room temperature wrapped tightly in plastic. For longer storage, refrigerate for up to 1 week or freeze for 3 months. Thaw frozen layers at room temperature, then frost as directed. The frosting should be made fresh after thawing for best texture—it won’t reabsorb moisture well if applied to cold layers.

- 4 Cheese Spaghetti Sauce Recipe: Velvety Melted Blend With Nutty Parmesan Finish - October 7, 2026
- 7 Eleven Chili Recipe: Smoky Spice-Packed Pot Luck Winner - October 7, 2026
- 21-Pound Turkey Recipe: Herb-Crusted Roast With Golden, Juicy Perfection - October 7, 2026