
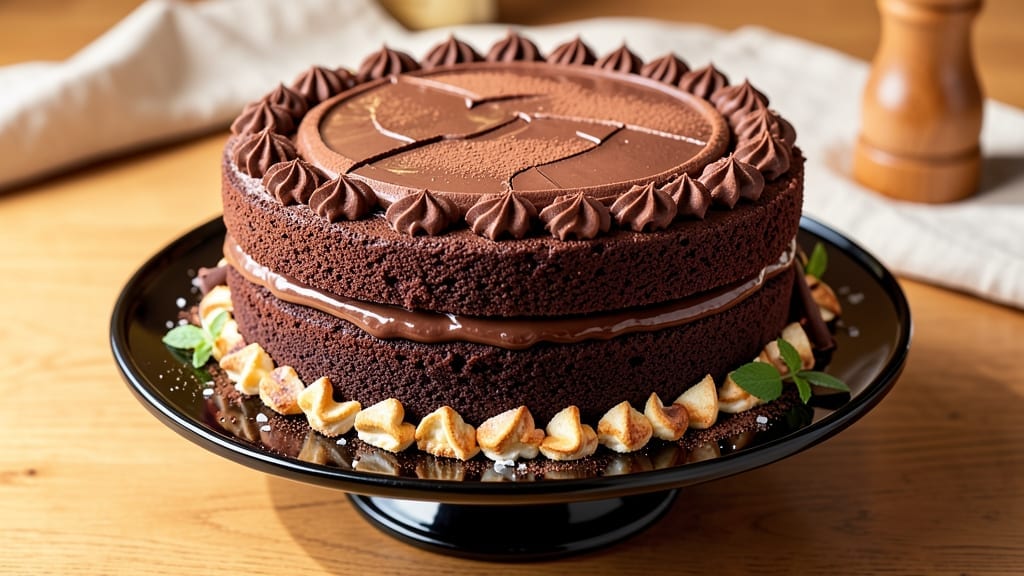
This 9-inch chocolate cake recipe delivers decadent triple layers of moist, rich chocolate cake with a velvety fudgy frosting that melts in your mouth. 💛 The secret lies in precise layering and a foolproof frosting technique that creates that signature restaurant-quality finish.
I’ve perfected this recipe over years of baking, ensuring every slice is moist, tender, and packed with chocolate flavor.
What sets this recipe apart is the balance of ingredients—just the right amount of cocoa powder for deep chocolate flavor without bitterness, and a touch of espresso powder to enhance the richness.
The cake layers are baked in 9-inch pans, creating perfectly portioned slices that are ideal for serving a crowd or enjoying a single indulgent piece. The frosting, made with high-quality chocolate and butter, is thick enough to hold its shape but still light enough to spread smoothly.
By the time you’re done, you’ll have a stunning cake with three perfectly moist layers separated by luscious chocolate frosting. The texture is a perfect harmony—tender cake that doesn’t crumble and frosting that’s rich yet not overly sweet.
This cake is ideal for birthdays, anniversaries, or any occasion that calls for a showstopping dessert.
The best part? This recipe is beginner-friendly, with clear instructions for layering and frosting that even first-time bakers can master. Let’s get started on creating a cake that will impress everyone at the table.
Ingredients for 9 chocolate cake
Twelve essential ingredients for triple-layered perfection—each one carefully chosen for restaurant-quality chocolate cake.
| Ingredient | Amount | Notes |
|---|---|---|
| All-Purpose Flour 🌾 | 3 cups | Sifted for even texture |
| Unsalted Butter 🧈 | 2 cups | Room temperature for creaming |
| Granulated Sugar 🍚 | 2 ½ cups | Superfine preferred for smoothness |
| Cocoa Powder 🍫 | 1 cup | Dutch-processed for richness |
| Espresso Powder ☕ | 1 tbsp | Enhances chocolate depth |
| Large Eggs 🥚 | 6 whole | Room temperature for even baking |
| Milk 🥛 | 1 ½ cups | Whole milk for moisture |
| Vanilla Extract 🌿 | 2 tsp | Pure Madagascar preferred |
| Baking Powder 🍞 | 1 tsp | Ensures proper rise |
| Salt 🧂 | ½ tsp | Fine sea salt preferred |
| Semisweet Chocolate Chips 🍫 | 1 ½ cups | High-quality for frosting |
| Heavy Cream 🥛 | 1 ½ cups | Cold for whipped consistency |
| Powdered Sugar 🍚 | 3 cups | Sifted for smooth frosting |
The cocoa powder and espresso powder are non-negotiable for that deep, sophisticated chocolate flavor. Valrhona or Guittard cocoa powders deliver the best results—avoid the bargain brands that can taste bitter. For espresso powder, Starbucks or Lavazza are reliable choices, but instant espresso granules work in a pinch. The butter must be unsalted and room temperature—cold butter creates dense cake. I always buy Land O’Lakes or Plugrá for consistent quality. The chocolate chips in the frosting should be high-cocoa (60% or higher)—avoid the generic supermarket brands that melt unevenly.
No cocoa powder? Melted dark chocolate (70% cocoa) at double the amount works, but texture may vary. Running short on eggs? Flax eggs (1 tbsp ground flax + 3 tbsp water per egg) substitute well, though texture will be slightly denser. Whole milk unavailable? Evaporated milk or almond milk (unsweetened) at equal amounts maintain moisture. For the frosting, if you can’t find semisweet chips, chop a chocolate bar (like Ghirardelli) into chips. The vanilla extract matters—imitation vanilla will taste artificial in the finished cake. And always sift your dry ingredients to prevent dense layers.
Store cake layers at room temperature in airtight containers for up to 3 days, or freeze for 3 months. The frosting keeps 5 days refrigerated or 2 months frozen. For assembly, bring layers and frosting to room temperature first—cold frosting melts too quickly. Bake one layer at a time to avoid overcrowding your oven. The cake improves overnight as flavors meld, so make it a day ahead if possible for the best texture.
Why You’ll Love This Recipe
- The secret’s in the balance: rich cocoa powder and just a pinch of espresso powder to cut through the sweetness. It’s decadent but not overpowering—like a hug from a chocolate lover who knows their way around a kitchen.
- No Mixer Needed: I swear by this recipe when I’m too tired to cream butter and sugar by hand. Just melt the butter, fold in the flour and cocoa—it’s like baking with your hands tied (but in a good way). That espresso powder does the work of deep flavor without extra effort.
- Rich Without Bitterness: The secret’s in the balance: rich cocoa powder and just a pinch of espresso powder to cut through the sweetness. It’s decadent but not overpowering—like a hug from a chocolate lover who knows their way around a kitchen.
- Party-Ready in Hours: Double the batter, bake it in layers, and you’ve got a showstopper cake that feeds a crowd. The layers stay moist for days, so you can assemble it ahead of time and still impress everyone with that perfect slice of fudgy perfection.
Step-by-step instructions for triple-layered chocolate cake
Master this decadent triple-layered cake with velvety texture and fudgy frosting—every step ensures restaurant-quality results.
👨🍳 Step 1: Prepare the Cake Batter
Preheat your oven to 350°F and grease three 9-inch round cake pans with butter or baking spray, then line the bottoms with parchment paper. In a medium bowl, whisk together the 3 cups all-purpose flour, 1 cup cocoa powder, 1 tsp baking powder, and 0.5 tsp salt. Sift the mixture to remove any lumps and set aside.
In a large mixing bowl, cream the 2 cups unsalted butter and 2.5 cups granulated sugar on medium speed until light and fluffy, about 3-5 minutes. The mixture should nearly double in volume and look pale. Add the 6 whole large eggs one at a time, mixing well after each addition. This step ensures a tender crumb by incorporating air into the batter.
Gradually add the dry ingredients to the wet mixture, alternating with the 1.5 cups milk in three additions. Begin and end with the dry ingredients. Mix on low speed until just combined—do not overmix. Fold in the 1.5 cups semisweet chocolate chips by hand using a spatula. Divide the batter evenly among the prepared pans, spreading it smoothly to the edges.
🔥 Step 2: Bake the Layers to Perfection
Bake the cakes for 25-30 minutes, or until a toothpick inserted into the center comes out clean. Rotate the pans halfway through baking for even browning. The cakes should be slightly domed and set but still moist. Let them cool in the pans for 10 minutes before transferring to a wire rack to cool completely. This gradual cooling prevents cracking and ensures even layers.
Here’s the thing—don’t rush the cooling. If you attempt to frost warm cakes, the frosting will melt and slide off. Patience here guarantees a stable cake structure. While the cakes cool, prepare the frosting by whipping the 1.5 cups heavy cream to soft peaks in a chilled bowl. This step is critical for a light, airy frosting that won’t weigh down the cake.
🥘 Step 3: Make the Fudgy Chocolate Frosting
In a separate large bowl, combine the 3 cups powdered sugar, 2 tsp vanilla extract, and 1 tbsp espresso powder. Sift the powdered sugar first to avoid clumps. Gradually add the whipped cream to the sugar mixture, mixing on low speed until smooth and fully incorporated. The frosting should be thick but spreadable—like a rich, velvety ganache.
For extra decadence, fold in ½ cup of the 1.5 cups semisweet chocolate chips reserved earlier. This adds pockets of melted chocolate that create that signature fudgy texture. Taste and adjust the sweetness if needed—sometimes the espresso powder can make the frosting taste slightly bitter, so a pinch more sugar might be necessary.
🍽️ Step 4: Assemble the Triple-Layered Cake
Place the first cake layer on a cake stand or plate. Spread a generous layer of frosting evenly over the top, leaving a ½-inch border unfrosted. Repeat with the second and third layers, frosting the top of each layer and the sides of the cake. This crumb coat technique prevents frosting from sliding off during assembly.
Once all layers are stacked, apply the remaining frosting to the entire cake, creating smooth sides with a spatula. For a polished finish, dip the spatula in hot water and wipe it clean between each swipe to remove any excess frosting. Chill the cake in the refrigerator for 30 minutes before serving. This resting period allows the frosting to set and the flavors to meld, resulting in clean slices and perfect presentation.
Pro Tips For Making 9 Chocolate Cake
- Whisk Butter First: Melt the butter just until it’s liquid—no browning—and pour it into the dry ingredients while the mixer’s running. I used to add cold butter straight from the fridge, and the batter turned out greasy and uneven. This way, the fat distributes like butter in silk.
- Sift the Cocoa: Sift the cocoa powder twice (yes, really) to break up clumps before measuring. I learned this after a cake turned out dense and bitter—turns out, cocoa powder packs differently than flour. Weigh it if you can, but if you’re scooping, level that spoon.
- Don’t Overmix: Stop folding in the flour as soon as it’s just incorporated—no streaks, no dry bits. Overmixing makes the cake tough, and with this recipe, you’ll end up with a sad, rubbery texture. Think “marbled,” not “glued together.”
- Use Room-Temp Eggs: Let eggs sit in warm water for 5 minutes before adding them to the batter. Cold eggs curdle when mixed with melted butter, and nothing ruins a chocolate cake faster than lumpy batter. Trust me, your future self will notice the difference.
Essential equipment for this dish
Must-Have Pans
You’ll need three 9-inch round cake pans with removable bottoms for perfect layers. I recommend Wilton Perfect Results pans—they release beautifully and create even layers. Avoid dark-colored pans that can overbake the edges.
If you’re short on space, use 9×13-inch pans instead, but bake for 30-35 minutes and cut into thirds after cooling. 🧑🍳
Mixing Essentials
A stand mixer with a whisk attachment is my top recommendation for creaming butter and sugar—it incorporates air perfectly. The KitchenAid Artisan Series is my go-to, but a hand mixer works if you’re patient.
For sifting dry ingredients, a fine-mesh sifter (like OXO Good Grips) prevents lumps. A medium mixing bowl (5-quart capacity) holds all ingredients comfortably without spills.
Frosting Tools
For smooth frosting, invest in a flexible offset spatula (I love Michaelen’s 12-inch)—it glides effortlessly over cake layers. A chilled metal bowl is crucial for whipping heavy cream to stiff peaks without overheating.
For precision, use a bench scraper to divide batter evenly between pans. Don’t skip a cake turntable—it makes frosting sides effortless, especially for beginners.
Cooling & Storage
Let cakes cool on a wire rack to prevent sogginess—never stack them while warm. For storage, airtight containers (like Rubbermaid Brilliance) preserve moisture for days. A digital thermometer ensures your frosting is at 68°F before assembly—too cold and it won’t spread; too warm and it’ll slide off.
For chilling, a large cake board keeps the structure stable during the 30-minute fridge rest.
Budget-Friendly Swaps
No stand mixer? A hand mixer works—just mix in 2-minute bursts to avoid overheating. Replace offset spatulas with a butter knife for quick frosting. For pans, glass baking dishes (like Pyrex) conduct heat evenly.
Skip the turntable? Use a plate** and carefully rotate the cake by hand. The key is patience—take your time with each step for professional results. ✨
Nutrition facts
Frequently asked questions
Can I make this recipe with fewer layers?
For a single-layer cake, use one 9-inch pan and reduce the batter by ⅓. The frosting quantity can stay the same, but spread it thinly for a single layer. Double-layer version? Divide batter evenly between two pans and halve the frosting. The key is adjusting baking time—single layers bake 20-25 minutes while double layers need 25-30 minutes.
Why does my chocolate cake turn out dense?
Overmixing the batter or using cold butter are the top culprits. Always cream butter and sugar until light and fluffy (3-5 minutes), and mix just until combined after adding dry ingredients. Also, ensure your cocoa powder is fresh—old cocoa loses moisture and can make cakes dry. For extra tenderness, replace ½ cup milk with ½ cup buttermilk.
How can I make this cake gluten-free?
Swap the all-purpose flour for a 1:1 gluten-free baking flour blend (like Bob’s Red Mill) and add ½ tsp xanthan gum if your blend doesn’t include it. Reduce the milk to 1 cup to prevent a gummy texture. For the frosting, ensure your powdered sugar is gluten-free certified. The cake will be slightly denser but still delicious with these adjustments.
Can I bake the layers ahead of time?
Yes! Bake layers 1-2 days ahead and store them wrapped in plastic at room temperature. For longer storage (up to 1 week), freeze layers in airtight containers. Thaw completely before frosting. The frosting can be made 2 days ahead and refrigerated—just bring it to room temperature before assembling. This makes prep easier for special occasions!
What’s the secret to smooth frosting?
Chill all your tools and ingredients! Whip the heavy cream in a cold metal bowl with a chilled whisk attachment to stiff peaks. Sift the powdered sugar to remove clumps, and let the frosting rest 10 minutes before spreading—this helps it thicken. For extra smoothness, use a fine-mesh sieve when adding powdered sugar to the cream mixture.

- 12 Bean Chili Recipe: Hearty Slow-Cooked Depth With 12 Legumes - October 17, 2026
- 5 Seed Bread Recipe: Nutty Crunch and Artisan Flavor in One Loaf - October 17, 2026
- 1 Lb Macaroni Salad Recipe: Bold, Crunchy, and Crowd-Pleasing - October 17, 2026