
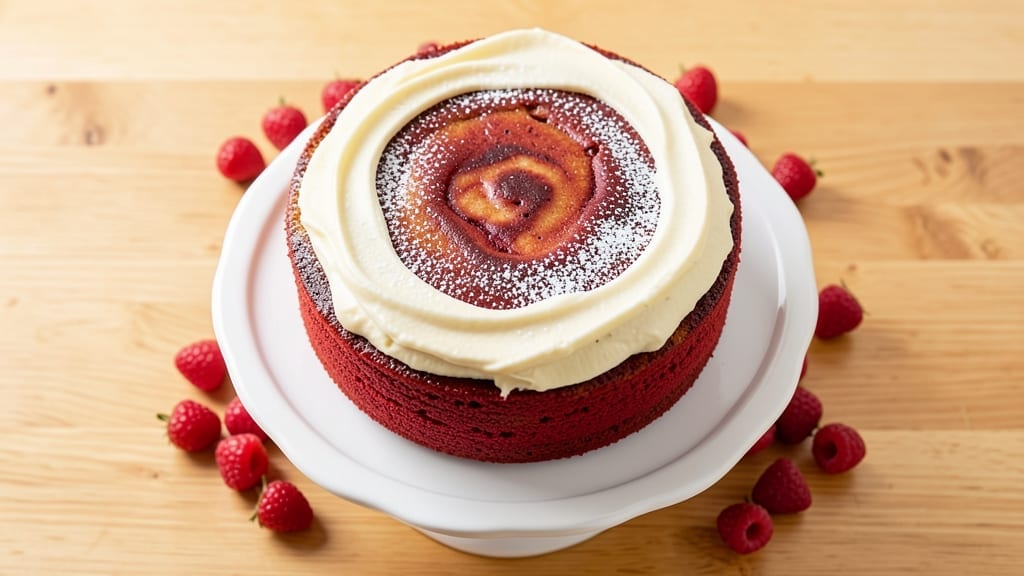
This 9-inch red velvet cake recipe delivers the perfect balance of tender layers and velvety cream cheese frosting that’s become my go-to for birthdays and special occasions. The secret lies in precise ingredient ratios and gentle folding to maintain that signature moist crumb—no dry cake here.
I’ve perfected this version after years of testing, ensuring every slice stays rich and flavorful without being overly sweet.
What sets this recipe apart is the foolproof technique for achieving a consistently moist texture, thanks to buttermilk and proper mixing methods. The cake bakes in a single 9-inch pan at 350°F for 30-35 minutes, yielding perfectly domed layers with a delicate crumb.
The cream cheese frosting, made with room-temperature ingredients, spreads smoothly and pairs beautifully with the cake’s subtle cocoa notes.
By the time you’re done, you’ll have a restaurant-quality dessert that’s easy to assemble and even easier to enjoy. The frosting stays creamy at room temperature, and the cake holds together beautifully for slicing.
Whether you’re baking for a celebration or treating yourself, this recipe delivers results that impress every time.
Ready to bake? The instructions break down each step clearly, from mixing the batter to decorating the finished cake. No special tools required—just a standard kitchen and patience for the cooling process. Let’s create something special.
Ingredients for 9 inch red velvet cake
Pantry staples plus a few specialty touches for that signature red velvet magic.
| Ingredient | Amount | Notes |
|---|---|---|
| All-Purpose Flour 🌾 | 2 ½ cups | Sifted for light texture |
| Granulated Sugar 🍚 | 1 ½ cups | White or light brown |
| Unsalted Butter 🧈 | 1 cup | Room temperature, softened |
| Sour Cream 🥛 | ½ cup | Full-fat for richness |
| Buttermilk 🥛 | ½ cup | Room temperature |
| Large Eggs 🥚 | 2 whole | Room temperature |
| Vanilla Extract 🌿 | 2 tsp | Pure, high-quality |
| Red Food Coloring 🎨 | ½ tsp | Liquid or gel form |
| Unsweetened Cocoa Powder 🍫 | ¼ cup | Dutch-processed preferred |
| Baking Soda 🧂 | 1 tsp | Diamond Crystal preferred |
| Salt 🧂 | ½ tsp | Fine sea salt |
| Cream Cheese 🧀 | 8 oz | Room temperature, full-fat |
| Powdered Sugar 🍚 | 3 cups | Sifted for smooth frosting |
| Heavy Cream 🥛 | ½ cup | Cold, for whipped texture |
The cocoa powder and red food coloring are non-negotiable for that iconic color and flavor. Dutch-processed cocoa from Hershey’s or Ghirardelli ensures a smooth texture without bitterness. I always grab the gel food coloring at Michaels—it mixes better than liquid and won’t alter the texture. The buttermilk and sour cream combo is what makes this cake moist without being dense. If you don’t have buttermilk, mix 1 tbsp vinegar or lemon juice with 1 cup milk and let it sit for 5 minutes. For the butter, room temperature is key—press a thumbprint in the bowl of butter, and it should spring back slowly.
No red food coloring? Beet juice or raspberry powder can work in a pinch (adjust to taste). The cocoa powder can be swapped for natural cocoa powder but Dutch-processed gives a smoother finish. If you’re avoiding dairy, vegan butter and coconut cream work for the cake, but the frosting will need a vegan cream cheese alternative. The cream cheese frosting is where the magic happens—room temperature ingredients are crucial. If your cream cheese is too cold, microwave it for 10 seconds to soften before mixing. The powdered sugar should be sifted to avoid lumps, and if you’re worried about clumping, sift it with the dry ingredients.
This cake keeps beautifully in an airtight container for 3 days at room temperature, but it’s best enjoyed within 24 hours for maximum moisture. The frosting can be made a day ahead and stored in the fridge—just whip it again briefly before spreading. For special occasions, I like to wrap the whole cake in plastic wrap and store it in the fridge for up to 3 days. If you’re freezing, wrap the cake layers separately in plastic wrap and then in foil—it’ll keep for up to 3 months. Just let it come to room temperature before frosting.
Why You’ll Love This Recipe
- No-Fuss Layers: The cake’s tender crumb comes from folding in sour cream and buttermilk—no fancy techniques, just whisking until just combined. Honestly, I’ve made it wrong twice, but the first time I got the ratio right, I was hooked.
- Velvet Magic: That signature deep red hue and subtle cocoa kick? It’s all in the sugar and butter ratio—rich but not heavy, with a whisper of tang from the buttermilk. (Yes, even on a Tuesday night.)
- Party in a Pan: One 9-inch cake serves 8-10 with ease, so it’s perfect for birthdays, potlucks, or when you’re too lazy to bake a whole sheet cake. Slice it, stack it, or freeze half—your call.
- Budget-Friendly Luxury: Uses pantry staples (no specialty ingredients) and yields leftovers that taste just as good the next day. Between us, I’ve turned day-old slices into breakfast sandwiches—no shame.
Step-by-step instructions for 9-Inch red velvet cake
Here’s how to bake a velvety, perfectly moist red velvet cake with creamy frosting every time.
Prepare the Cake Batter for Perfect Moisture
Preheat your oven to 350°F and grease two 9-inch round cake pans with butter, then line the bottoms with parchment paper. Sift together the 2.5 cups all-purpose flour, 1 tsp baking soda, and 0.5 tsp salt in a medium bowl. Set aside—this ensures no lumps in your batter.
In a large mixing bowl, cream together the 1 cup softened unsalted butter and 1.5 cups granulated sugar on medium speed until light and fluffy, about 3-4 minutes. This step is crucial for a tender crumb. Scrape down the sides of the bowl before adding the 2 whole eggs, one at a time, mixing just until combined after each addition.
Stir in the 2 tsp vanilla extract, 0.5 cup sour cream, and 0.5 cup buttermilk until smooth. The batter should be thick but pourable. In a separate small bowl, whisk together the 0.25 cup unsweetened cocoa powder and 0.5 tsp red food coloring with 2 tablespoons of the buttermilk mixture to create a smooth paste. This ensures even color distribution throughout the batter.
Combine Wet and Dry Ingredients for Even Texture
Gradually add the sifted dry ingredients to the wet mixture, mixing on low speed just until combined. Be careful not to overmix—stop as soon as the flour disappears. The batter should be thick and slightly thinned by the buttermilk.
Divide the batter evenly between the prepared cake pans. Tap each pan gently on the counter to release any air bubbles. Bake for 30-35 minutes, or until a toothpick inserted into the center comes out clean. The cakes should spring back slightly when touched.
Here’s the thing—red velvet cake can dry out if overbaked. I pull mine out when the edges are set but the center still looks slightly underdone. The residual heat will finish cooking it perfectly. Let the cakes cool in the pans for 10 minutes, then transfer to a wire rack to cool completely.
Prepare the Cream Cheese Frosting
While the cakes cool, make the frosting by beating the 8 oz cream cheese with an electric mixer until completely smooth, about 2-3 minutes. Add the 3 cups powdered sugar gradually, mixing on low speed to avoid a cloud of sugar dust. Increase to medium speed and beat for another 2 minutes until light and fluffy.
In a separate bowl, whip the 0.5 cup cold heavy cream to soft peaks. Gently fold it into the cream cheese mixture until fully incorporated. This step ensures your frosting has that perfect piping consistency without being too sweet. Taste and adjust sweetness if needed—sometimes powdered sugar varies in sweetness.
Assemble the Cake with Precision
Place one cake layer on a cake stand or plate. Spread a generous layer of frosting over the top, leaving a ½-inch border unfrosted. This creates a clean edge when you stack the second layer. Repeat with the second cake layer.
Now for the finishing touch: spread the remaining frosting over the entire cake, creating a smooth surface. Use a long spatula or offset spatula to smooth the frosting from the center outward. For extra decoration, you can pipe additional frosting around the edges or on top—but honestly, this cake tastes just as good plain.
Chill the cake in the refrigerator for at least 1 hour before serving. This allows the frosting to set properly and makes slicing much cleaner. The cake will keep in the fridge for up to 4 days, though I doubt it’ll last that long!
Pro Tips For Making 9 Inch Red Velvet Cake
- Cream Butter First: Take that butter out of the fridge 30 minutes before you start—cold butter means more mixing time, and nobody wants to fight a stand mixer for 10 minutes. Room temp butter blends smoother with sugar, and your cake will be lighter for the effort.
- Measure Sour Cream Right: Don’t eyeball that sour cream—use a scale or a proper measuring cup (it’s thicker than milk). Too little, and your cake dries out; too much, and it gets dense. Stick to ½ cup, packed but not mounded, and your texture will thank you.
- Skip the Overmixing: Once you fold in the dry ingredients, stop when just combined—no streaks, no lumps, but no extra turns. Overmixing develops gluten, and your cake turns tough instead of tender. Think “barely there” when it comes to mixing.
- Rotate the Pan: Your oven’s hot spots are real, and that 9-inch pan isn’t getting even heat. After 20 minutes, swap the pan front to back (and maybe side to side if you’re paranoid). This evens out the bake and keeps the edges from burning while the center stays soft.
Best sauces and condiments for this recipe
Classic Cream Cheese
The cream cheese frosting in this recipe is already a showstopper, but if you want to elevate it, try adding 1 teaspoon of lemon zest to the frosting mixture before whipping. This brightens the flavor and pairs beautifully with the cake’s subtle cocoa notes.
For extra richness, replace 2 tablespoons of powdered sugar with 2 tablespoons of melted white chocolate, then let it cool before mixing. 💛
Chocolate Ganache
For a decadent twist, drizzle warm chocolate ganache over the assembled cake. Melt 6 oz dark chocolate with ½ cup heavy cream over a double boiler, then let it cool slightly before drizzling.
I like to use Ghirardelli 70% dark chocolate for a balance of sweetness and bitterness. Add crushed peppermint candies for a festive holiday touch. 🎄
Berry Compote
Swap out the frosting entirely for a berry compote to cut through the richness. Simmer 1 cup mixed berries (fresh or frozen) with 2 tablespoons sugar and 1 teaspoon lemon juice until thickened.
Spread a thin layer between the cake layers and on top for a lighter, fruity contrast. Strawberries or raspberries work best, but blackberries add a deeper flavor. 🍓
Creamy Caramel Sauce
Drizzle the cake with salted caramel sauce for a sophisticated finish. Heat ½ cup granulated sugar in a saucepan until melted, then add ¼ cup heavy cream and 1 tablespoon butter.
Simmer for 5 minutes, then stir in ½ teaspoon flaky sea salt. Let it cool slightly before drizzling over the cake. Pair with toasted pecans for crunch. 🥜
Spiced Whipped Cream
Lighten up the frosting by folding ½ cup whipped cream into the cream cheese mixture, then stir in ½ teaspoon cinnamon and ¼ teaspoon ground nutmeg.
This adds warmth without overpowering the cake’s delicate flavor. For extra flair, dust the top with powdered sugar and garnish with candied orange peel. ✨
Nutrition facts
Frequently asked questions
Why does red velvet cake have a slightly tangy flavor?
The signature tang comes from the buttermilk and sour cream in the batter, which react with the baking soda during baking. This creates a subtle acidity that balances the sweetness beautifully. The tang also helps keep the cake moist longer than traditional vanilla cakes.
Can I make this cake in a single 9-inch pan instead of two?
No—this recipe is specifically designed for two 9-inch layers to create the classic two-layer cake. A single layer would be too thick and might not bake evenly. For a single-serving version, reduce ingredients by half, but expect a denser texture. The two-layer approach gives you that perfect height-to-width ratio for frosting.
How do I fix cracks in my red velvet cake?
Cracks usually happen when the cake shrinks as it cools. To prevent them, avoid overbaking—pull the cake out when a toothpick comes out clean but the edges are just set. For existing cracks, frost the cake while it’s still slightly warm (not hot) and use a long spatula to smooth the frosting over the cracks. Chill the cake before slicing to minimize crumbling.
Can I substitute coffee for the buttermilk in the batter?
Yes, but use cold brewed coffee instead of hot—it won’t cook out the flavor. Replace the buttermilk with an equal amount of cold coffee, but reduce the red food coloring by ¼ teaspoon since coffee can darken the batter slightly. The coffee enhances the cake’s depth of flavor, but it’s not traditional for classic red velvet.
Why did my frosting turn grainy?
Grainy frosting usually means the cream cheese wasn’t fully softened or the powdered sugar wasn’t sifted. Always use room-temperature cream cheese and sift the powdered sugar before mixing. For extra insurance, blend the powdered sugar with the cream cheese for 30 seconds before adding other ingredients. If it’s already grainy, strain it through a fine-mesh sieve before spreading.

- 12 Bean Chili Recipe: Hearty Slow-Cooked Depth With 12 Legumes - October 17, 2026
- 5 Seed Bread Recipe: Nutty Crunch and Artisan Flavor in One Loaf - October 17, 2026
- 1 Lb Macaroni Salad Recipe: Bold, Crunchy, and Crowd-Pleasing - October 17, 2026