
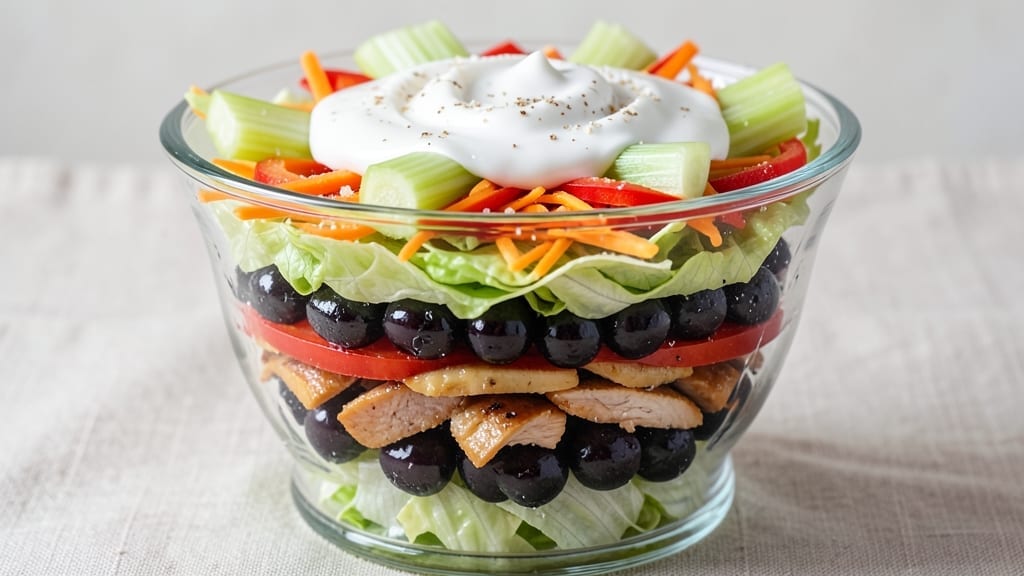
This 9-layer salad recipe transforms a simple bowl into a creamy, crunchy, protein-packed masterpiece—perfect for potlucks, office lunches, or a satisfying solo meal. 💛 The secret lies in layering textures and flavors strategically, starting with crisp vegetables at the bottom and ending with creamy dressing on top.
Each layer builds on the last, creating a salad that’s as visually stunning as it is delicious.
What sets this salad apart is its balanced structure: crunchy lettuce and celery at the base provide stability, while layers of protein (chicken, ham, or tofu) and creamy elements (cheese, ranch, and sour cream) add depth.
The foolproof assembly method ensures every bite delivers a mix of textures—crisp, creamy, and tender—without sogginess. No special skills required, just patience and precision.
By the time you’re done, you’ll have a showstopping salad that’s packed with nutrients, protein, and flavor—ready to serve immediately or store for up to 4 days. The layers stay distinct, and the dressing clings perfectly, making this the ultimate make-ahead dish.
Whether you’re feeding a crowd or meal prepping for the week, this recipe delivers restaurant-quality results at home.
For dietary flexibility, swap out proteins or cheeses as needed—this salad adapts effortlessly. Let’s build it layer by layer, starting with the foundation that holds everything together.
Ingredients for 9 layer salad
Nine layers of crunch, cream, and protein—this salad builds flavor with every bite.
| Ingredient | Amount | Notes |
|---|---|---|
| Iceberg Lettuce 🥬 | 1 head | Romaine or butter lettuce works too |
| Celery Stalks 🥬 | 4 whole | Thinly sliced for crunch |
| Red Bell Pepper 🍅 | 1 whole | Thinly sliced, any color |
| Shredded Carrots 🥕 | 1 ½ cups | Freshly grated for best texture |
| Cooked Chicken Breast 🍗 | 1 ½ lb | Diced into bite-sized pieces |
| Black-Olives 🫒 | 1 cup | Sliced, pitted variety |
| Shredded Cheddar Cheese 🧀 | 1 ½ cups | Sharp cheddar preferred |
| Blue Cheese Crumbles 🧀 | ½ cup | Optional for extra creaminess |
| Ranch Dressing 🥛 | 1 ½ cups | Homemade or store-bought |
| Sour Cream 🥛 | ½ cup | Full-fat for best texture |
| Fresh Crackers 🍞 | 2 cups | Ritz or water crackers |
| Salt 🧂 | ½ tsp | Kosher salt preferred |
| Black Pepper 🌶️ | ¼ tsp | Freshly ground |
| Garlic Powder 🧄 | ½ tsp | For subtle seasoning |
The lettuce is your foundation—iceberg holds up best (romaine if you prefer a slightly bitter edge), but butter lettuce works too. Trader Joe’s has the best pre-washed heads, saving you time. For celery, grab the thickest stalks—they stay crunchy longer. The bell pepper? Red or yellow adds vibrant color, but green works in a pinch. Shredded carrots should be fresh (the pre-shredded kind turns mushy fast). Store all your veggies in airtight containers, and they’ll stay crisp for days.
No chicken? Rotisserie chicken from the grocery store is a game-changer—shred it yourself for better texture. Swap the cheddar for Swiss or Monterey Jack if you prefer milder cheese. Blue cheese optional, but it ties everything together with that tangy creaminess. Ranch dressing can be homemade (mix mayo, buttermilk, herbs, and garlic powder) or store-bought—just check for no added sugar. The sour cream adds richness, so full-fat is worth it (trust me, you’ll taste the difference). For crackers, Ritz or water crackers stay sturdy—avoid soft ones that’ll dissolve in the dressing.
Assemble the salad in layers, starting with lettuce at the bottom and ending with dressing and crackers on top. Keeps best in the fridge for 4 days if stored in individual containers—prevents sogginess. For meal prep, build it the night before and let flavors meld. The dressing clings perfectly, so no soggy bottoms here. Double the batch—this disappears fast at potlucks (or in one sitting).
Why You’ll Love This Recipe
- No Chopping Chaos: I swear by this one—just slice the celery into sticks, dice the bell pepper, and shred the carrots (or buy pre-shredded). The iceberg stays whole, and the chicken? Already cooked. Honestly, I’ve made this in 15 minutes while waiting for dinner to bake.
- Crunchy, Tangy, Addictive: That crisp iceberg base? Perfect. The celery adds sharp freshness, the bell pepper brings sweetness, and the shredded carrots? They’re like little bursts of sunshine. Toss in the chicken and a zesty dressing, and you’ve got layers of flavor that keep me coming back.
- Lunchbox Legend: Between us, this is my go-to for packed lunches. The chicken stays juicy, the veggies hold up for days, and the layers keep it from getting soggy. I’ll be real: my kids pick out the bell pepper first, but they still ask for seconds.
- Budget-Friendly Feast: Iceberg lettuce and carrots last forever, celery’s cheap, and chicken breast is a protein powerhouse. I’ve fed six people for under $12 with this—no fancy ingredients, just smart layering. Leftovers? Even better the next day.
Step-by-step instructions for 9 layer salad
Here’s how to build this towering, crunchy, creamy masterpiece layer by layer.
🥘 Step 1: Prep and Layer the Base
Start with the sturdy foundation: tear the 1 head iceberg lettuce into bite-sized pieces and spread evenly across the bottom of a large glass bowl. This layer should be about ½ inch thick—press down gently to create a stable base for your tower. You want it compact enough to hold up the layers above without collapsing.
Next, sprinkle the 0.5 tsp garlic powder evenly over the lettuce. This subtle seasoning will permeate through all the layers, adding depth to every bite. Give it a quick toss with your hands to distribute the powder completely before moving to the next layer. The garlic powder won’t be overpowering but will enhance the creamy elements we’ll add later.
🥘 Step 2: Build Crunchy Layers 1-3
Add the 1.5 cups shredded carrots directly on top of the lettuce. The bright orange color will peek through the other layers, adding visual appeal. Spread them evenly, pressing down very lightly with the back of a spoon to help them adhere to the lettuce base.
Now for the crunch: thinly slice the 4 whole celery stalks on the diagonal for extra texture, then scatter them evenly over the carrots. Follow with the 1 whole red bell pepper, sliced into thin strips. The bell pepper’s crispness will contrast beautifully with the creamy layers coming next. Press down gently on each layer as you go—this prevents the salad from toppling when you serve it.
🥘 Step 3: Add Protein and Creamy Elements
Spread the 1.5 lb cooked chicken breast, diced into bite-sized pieces, evenly over the vegetables. The chicken should be completely cooled before adding to prevent melting the other layers. Sprinkle with 0.5 tsp salt and 0.25 tsp black pepper right on top of the chicken—this seasoning will penetrate through to every layer.
Next comes the creamy foundation: mix the 1.5 cups ranch dressing with the 0.5 cup sour cream in a small bowl until smooth. Pour this mixture evenly over the chicken layer, letting it soak in completely. The dressing will create that signature creamy texture we’re building toward, while the sour cream adds richness without overpowering the other flavors.
🥘 Step 4: Top with Cheese and Final Crunch
Sprinkle the 1.5 cups shredded cheddar cheese evenly over the dressing. The sharp cheddar will melt slightly when the salad sits, creating a creamy, cheesy sauce that binds everything together. Don’t worry if it looks like too much—it’ll distribute perfectly throughout the layers.
For the final crunch layer, add the 1 cup black olives, sliced, followed by the 0.5 cup blue cheese crumbles. The olives add briny contrast while the blue cheese brings that signature tangy creaminess. Top with the 2 cups fresh crackers arranged in a circular pattern around the edge—this not only adds structural support but also provides that satisfying crunch with every bite.
⏰ Step 5: Chill and Serve
Cover the bowl with plastic wrap and refrigerate for at least 2 hours (overnight is even better). This chilling time allows all the flavors to meld together and the dressing to fully absorb into the layers. The salad will hold its shape beautifully after chilling, making it perfect for serving directly from the bowl.
When ready to serve, give the salad a gentle stir to redistribute any settled ingredients. The layers should still be visible but now perfectly integrated. Serve straight from the bowl with forks—this salad is designed to be eaten layer by layer, with each bite delivering that perfect balance of crunch, creaminess, and protein. The creamy elements will have thickened slightly from the chilling, creating that signature 9-layer salad texture we all love.
Pro Tips For Making 9 Layer Salad
- CHOP CELERY SMALL: The celery in a 9-layer salad isn’t just for looks—it needs to be cut into thin, even matchsticks so it actually gets eaten (not just picked out). I used to leave it in big chunks, and half the batch would end up in the trash. Aim for 1/8-inch slices—thin enough to blend into every bite.
- DRY THE LETTUCE: Iceberg lettuce holds onto water like a sponge, and soggy layers ruin the whole stack. After washing, spin it dry in a salad spinner or pat it with paper towels until it’s almost bone-dry. Wet lettuce means your salad will leak dressing and collapse faster than you can assemble it.
- COOK CHICKEN TO 165°F: Overcooked chicken turns dry and chewy, while undercooked chicken is a food safety nightmare. Pull it off the heat at 160°F and let it rest 5 minutes—it’ll hit the right temp while you prep the rest. No thermometer? Cut into the thickest part; if juices run clear, you’re good. If not, microwave it 10 seconds and try again.
- LAYER IN THIS ORDER: The classic 9-layer sequence isn’t arbitrary—it’s about texture and stability. Start with the hardest ingredients (carrots, celery, bell pepper) at the bottom, then chicken, dressing-soaked crackers (if using), and finally the lettuce on top. This keeps the salad from falling apart when you slice it, and the crunch stays where it belongs.
Perfect pairings for this 9 layer salad
Crispy Additions
Add toasted pita chips or crushed tortilla chips to the cracker layer for extra crunch. I like to toast mine in a 350°F oven for 5-7 minutes until golden—this adds a warm, slightly crispy texture that contrasts perfectly with the cool salad.
For a nutty twist, sprinkle ½ cup chopped walnuts or pecans on top before chilling. 🌟
Dressing Upgrades
Swap out ranch for homemade blue cheese dressing by mixing ½ cup sour cream, ½ cup mayonnaise, ¼ cup buttermilk, 1 tbsp lemon juice, and 1 tbsp chopped chives.
This tangy upgrade elevates the blue cheese layer beautifully. For a lighter option, use Greek yogurt ranch—just replace half the mayo with plain Greek yogurt. 🥛
Protein Swaps
Need a vegetarian version? Swap chicken for crumbled feta or marinated artichoke hearts (drained and chopped). For seafood lovers, add ½ lb cooked shrimp or diced smoked salmon—just chill the salad for 30 extra minutes to keep the seafood fresh. 🦐
Cheese Alternatives
Skip cheddar for sharp white cheddar (even tangier!) or goat cheese crumbles for a creamy, slightly tangy flavor. Vegans can use nutritional yeast (¼ cup) mixed with 1 tbsp lemon juice for a cheesy taste without dairy. 🧀
Sweet Contrast
Add a drizzle of honey (1 tbsp) or maple syrup (1 tsp) to the dressing for a subtle sweetness that balances the salty olives and sharp cheese. A sprinkle of toasted coconut flakes on top adds a tropical touch that pairs surprisingly well. 🍯
Garnish Finishes
Top with fresh herbs like chopped parsley or dill for brightness. For a smoky note, add ½ tsp smoked paprika to the dressing. A final sprinkle of everything bagel seasoning (½ tsp) gives that savory, salty crunch you can’t resist. ✨
Nutrition facts
Frequently asked questions
Why does the 9-layer salad need to chill before serving?
Chilling for at least 2 hours (or overnight) lets the dressing fully absorb into the layers, creating that signature creamy texture without sogginess. The cold also helps the cheese melt slightly, binding everything together while keeping the lettuce crisp. Plus, the flavors meld beautifully when they have time to marry!
Can I make this salad ahead of time?
This salad actually tastes better when made 1-2 days ahead. Store it in airtight containers with layers separated by parchment paper to prevent sogginess. When ready to serve, just reassemble in the bowl and let it sit for 30 minutes to restore the perfect texture.
What if I don’t have all the ingredients?
No problem! The lettuce and cracker layers are the most critical for structure. Swap proteins (chicken → tofu, shrimp, or hard-boiled eggs) or cheeses (cheddar → Swiss, feta, or vegan alternatives). For dressing, any creamy option (Greek yogurt, mayo-based, or even vinaigrette) works—just adjust ratios to maintain creaminess.
How do I prevent the salad from getting soggy?
Keep ingredients dry before assembly and press layers gently as you build. The key is the 2-hour chill time—this lets the dressing set while preserving crunch. For extra insurance, add crackers or chips to the top layer right before serving to restore crispness.
Is this salad kid-friendly?
Yes! The familiar ingredients (cheese, chicken, veggies) make it a hit with kids. For picky eaters, let them build their own layers in individual bowls. Skip the blue cheese if they dislike strong flavors, and serve with a side of ranch for dipping. The cracker topping also makes it fun to eat!

- 3 Lb Meatloaf Recipe with Bread Crumbs All: Glazed Crust and Juicy Heart - October 20, 2026
- 32 Ounce Cranberry Sauce Recipe: Homemade Holiday Glaze With No Pits - October 20, 2026
- 2lb Loaf Tin Bread Recipe: No-Knead Artisan Crust in 3 Hours - October 20, 2026