
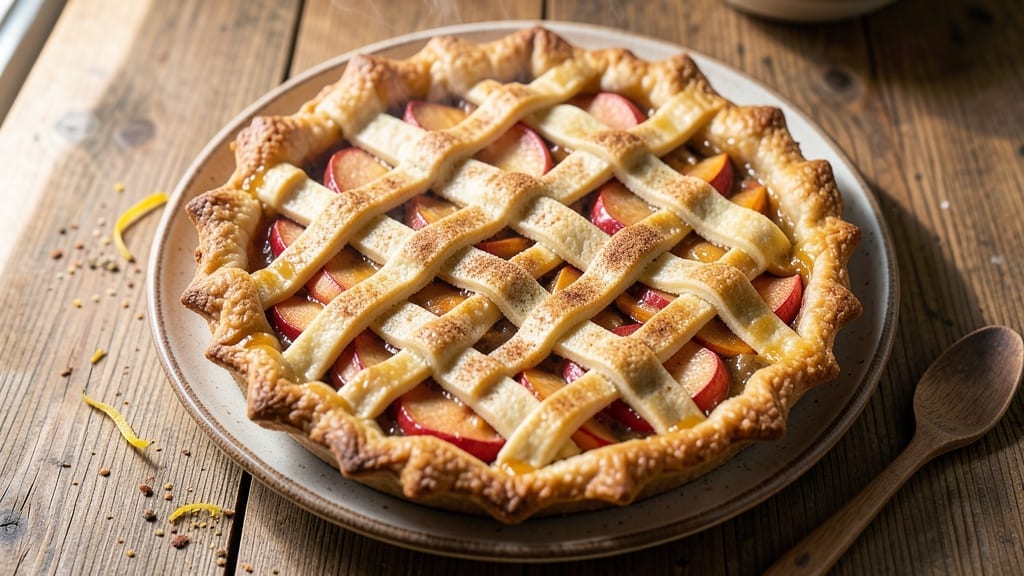
A 9×13 apple pie recipe is the ultimate dessert for gatherings—where flaky, golden crust meets cinnamon-spiced apples in perfect harmony. This approachable version delivers restaurant-quality results without requiring advanced techniques, making it ideal for both beginners and seasoned bakers.
The secret lies in a foolproof crust (homemade or store-bought) and a filling that balances sweetness with just the right tartness.
The filling combines tender apples (like Honeycrisp or Granny Smith) with a mix of sugar, cinnamon, and a touch of lemon juice for brightness. A simple cornstarch slurry ensures the filling thickens beautifully without turning gummy.
Baking at 375°F for about 45 minutes yields a golden-brown crust and bubbling edges—signs of a perfectly baked pie.
Once out of the oven, the pie needs time to set, allowing the filling to firm up while the crust stays crisp. Optional finishing touches like a simple glaze or caramel drizzle add extra shine and richness.
This pie is versatile enough for holidays, potlucks, or a cozy family dinner—where every slice feels like a warm hug.
For extra flair, try a lattice crust or sprinkle toasted nuts on top. The recipe scales easily, so you can adjust the size or shape to fit your baking needs. Let’s get started on a pie that’ll become your new classic.
Ingredients for 9 x 13 apple pie
Eight ingredients for a classic pie that tastes like nostalgia in every bite.
| Ingredient | Amount | Notes |
|---|---|---|
| All-Purpose Flour 🌾 | 3 ½ cups | Spooned and leveled measurement |
| Unsalted Butter 🧈 | 1 cup | Cold and cubed for crust |
| Granulated Sugar 🍚 | ½ cup | For crust and filling |
| Ice Water 💧 | ½ cup | Plus 1 tbsp extra |
| Large Egg 🥚 | 1 whole | For egg wash |
| Honeycrisp Apples 🍎 | 8 medium | Peeled, cored, sliced 1/4-inch thick |
| Brown Sugar 🍚 | ¾ cup | Packed firmly |
| Ground Cinnamon 🌿 | 2 tbsp | Freshly ground preferred |
| Lemon Juice 🍋 | 2 tbsp | Freshly squeezed |
| Cornstarch 🌾 | 2 tbsp | For thickening slurry |
| Salt 🧂 | ½ tsp | Fine sea salt |
| Vanilla Extract 🌸 | ½ tsp | Pure vanilla preferred |
The apples are non-negotiable here—Honeycrisp or Granny Smith hold up best during baking, but Fuji or Braeburn work too if that’s what’s available. Local farmers markets often have the freshest, firmest apples, but the grocery store produce section is fine if you pick ones that are firm and free of bruises. Slice them uniformly for even baking. The cinnamon? Penzeys or McCormick ground cinnamon has the best flavor, but regular grocery store brands are totally fine for home baking. Just make sure it’s fresh—if it smells like dust, toss it.
No vanilla extract? Vanilla bean paste works in a pinch, or even a pinch of vanilla sugar. Short on cornstarch? Arrowroot powder at the same amount does the trick. The butter in the crust is crucial—don’t use margarine, and unsalted butter gives you better control over the saltiness. For a shortcut crust, Pillsbury refrigerated pie crust works beautifully (just skip the extra butter). The lemon juice is key for balancing the sweetness—freshly squeezed makes all the difference, but bottled lemon juice in a pinch is better than nothing.
Prep the apples and filling a day ahead—they keep beautifully in the fridge. The crust can be made 2 days in advance and stored wrapped in plastic. Once baked, let the pie cool completely before slicing—at least 4 hours—so the filling sets properly. Leftovers keep for 4 days in the fridge, and slices freeze wonderfully for up to 3 months. I always make an extra filling cup for a second pie—trust me, you’ll want it.
Why You’ll Love This Recipe
- No-Roll Crust Magic: I swear by this butter-flour-egg combo—just cut, fold, press. No food processor, no chilling stress, and that flaky edge? Achieved with a fork and a glass of ice water. Honestly, it’s the kind of crust that makes me feel like a pro, even when I’m not.
- Sweet-Spiced Perfection: That sugar-butter crust paired with warm apples? It’s the kind of balance that makes you slow down. The crust stays crisp while the filling stays tender—no soggy bottoms here. Between us, it’s the reason I always bake this one.
- Leftovers for Days: One 9×13 pan feeds a crowd, and the best part? It reheats like a dream. Slice it warm with ice cream, or pack it cold for lunches. My kids ask for it more than any store-bought dessert—yes, even on a Tuesday night.
- Budget-Friendly Luxury: Four basic ingredients, zero specialty items. That’s right: flour, butter, sugar, and an egg. No fancy apples needed—just whatever’s on sale. It’s the kind of recipe that makes me feel fancy without breaking the bank.
Step-by-step instructions for 9×13 apple pie recipe
Here’s how to make a restaurant-quality apple pie with a flaky crust and perfectly spiced filling.
Make the Flaky Crust
In a large bowl, combine the 3.5 cups all-purpose flour and 0.5 teaspoon salt. Cut in the 1 cup cold unsalted butter using a pastry cutter or your fingers until the mixture resembles coarse crumbs with pea-sized butter pieces. This ensures you’ll get that signature flaky texture.
Add the 0.5 cup ice water and mix gently with a fork until the dough just comes together. Avoid overmixing—just until the dough holds when pressed. Divide the dough into two equal portions, flatten into discs, wrap in plastic, and refrigerate for at least 30 minutes. Cold dough prevents shrinking and makes rolling easier.
Prepare the Cinnamon-Spiced Filling
Peel, core, and slice the 8 medium Honeycrisp apples into ¼-inch thick slices. Toss them immediately with 2 tablespoons lemon juice to prevent browning—this keeps the filling bright and fresh-tasting. In a large bowl, combine the apple slices with 0.75 cup packed brown sugar, 2 tablespoons ground cinnamon, 0.5 teaspoon vanilla extract, and 2 tablespoons cornstarch. Mix gently but thoroughly to distribute the spices evenly.
Here’s the thing—don’t skip the cornstarch. It thickens the juices during baking, preventing a soggy bottom. Taste the mixture and adjust sweetness if needed, but remember the crust will add a touch of sweetness too. Let the filling sit for 15 minutes while you preheat the oven to 375°F. This resting time lets the flavors meld slightly.
Assemble the Pie
Roll out one dough disc on a floured surface to fit a 9×13-inch baking dish, about ⅛-inch thick. Press it gently into the pan, letting it extend slightly over the edges. Sprinkle the prepared apple filling evenly into the crust, mounding it slightly in the center. Dot the top with small pieces of the remaining cold butter—this adds extra richness and flakiness.
Roll out the second dough disc and place it over the filling. Press the edges together to seal completely, then crimp decoratively with a fork. Cut a few small slits in the top crust to allow steam to escape—this prevents a blown crust. Brush the top crust with the 1 whole large egg beaten with 1 tablespoon ice water for a golden finish.
Bake to Golden Perfection
Transfer the pie to the preheated 375°F oven and bake for 50-60 minutes until the crust is deep golden brown and the filling is bubbling. The edges should be puffed and slightly crisp, while the center still has a gentle jiggle. If the crust starts browning too quickly, loosely cover the edges with aluminum foil.
Here’s where patience pays off: the pie needs that full baking time to develop proper texture. When done, the filling should be thick but still slightly soft in the center—it’ll firm up as it cools. Let the pie rest for 2 hours before slicing. This resting period allows the juices to redistribute, ensuring each slice stays moist and flavorful.
Serve Warm with Vanilla Ice Cream
Slice the pie into 8 equal servings using a sharp knife dipped in hot water between cuts. The contrast of warm pie with cold vanilla ice cream makes every bite magical. Serve immediately while still warm, as the texture and flavors are at their peak.
Real talk: this pie tastes even better the next day, but if you can wait, the crust will develop even more flavor. Store leftovers covered at room temperature for up to 2 days, or refrigerate for up to 4 days. Reheat slices in a 350°F oven for 10-15 minutes to restore that fresh-baked appeal.
Pro Tips For Making 9 X 13 Apple Pie
- Chill the Dough Properly: Don’t just toss the pie dough in the fridge for “a while”—wrap it tightly in plastic and refrigerate for at least 2 hours (or overnight). I learned this the hard way when my crust turned out greasy and sticky because the butter didn’t firm up enough. Cold butter = flaky layers, every time.
- Cut Butter in Small Pieces: Use ½-inch cubes of cold butter instead of big chunks—this ensures even distribution and prevents pockets of unmelted fat. I was skeptical until I tried it: the crust now has consistent flakiness, and I don’t end up with random buttery spots in the dough.
- Prevent a Soggy Bottom: Sprinkle a thin layer of granulated sugar (about 1 tablespoon) over the pie filling before adding the top crust. It creates a light crust on the bottom while baking, soaking up any juices without turning to mush. (Yes, even if you’re impatient like me—just do it before the final crust goes on.)
- Use a Baking Sheet Under the Pan: Place the 9×13 pan on a baking sheet lined with parchment paper. This catches spills and ensures even heat distribution, especially if your oven runs hot. I skipped this once and ended up with a partially burned crust—now I never bake a pie without it.
Storing and reheating this dish
Refrigerator Storage
Let your pie cool completely before storing—this takes about 2 hours—to prevent condensation that can make the crust soggy. Once cooled, transfer the entire pie to an airtight container with a lid or cover it tightly with plastic wrap and aluminum foil.
Store in the fridge at 40°F or below for up to 4 days. The crust stays crisp, and the filling maintains its perfect texture when reheated properly. 💫
Freezer-Friendly Tips
For long-term storage, slice the pie into individual portions and wrap each slice tightly in plastic wrap, then place them in a freezer bag. This prevents freezer burn and makes reheating single servings easy. Label the bag with the date and freeze for up to 3 months.
Thaw overnight in the fridge before reheating for best results. I always freeze extra slices because they’re perfect for quick breakfasts or after-school snacks.
Reheating Slices
To restore that fresh-baked magic, preheat your oven to 350°F and place slices on a baking sheet. Reheat for 10-15 minutes until the crust is crisp and the filling is warm through.
For microwave reheating, cover the slice with a damp paper towel and heat on 50% power for 30-45 seconds. This keeps the crust from getting rubbery. A sprinkle of powdered sugar adds a nice touch if you’re feeling fancy. ✨
Reviving Day-Old Pie
If your pie has been sitting at room temperature for a day or two, don’t toss it! Pop the slices in a 375°F oven for 12-15 minutes to refresh the crust. The filling will warm up evenly, and the crust will regain its crispness.
For a shortcut, toast the slices in a skillet over medium heat for 2-3 minutes per side until golden. This works especially well for breakfast pies!
Glaze or Drizzle
Before reheating, add a quick glaze or drizzle for extra shine and flavor. Mix ¼ cup powdered sugar with 1 tbsp lemon juice and brush it over warmed slices. For a richer option, drizzle with caramel sauce or melted chocolate.
These finishes make reheated pie feel like a special treat. Trust me, your guests will think it’s freshly baked! 🍯
Nutrition facts
Frequently asked questions about 9×13 apple pie
Can I use store-bought crust instead of homemade?
For a shortcut, use two 9-inch refrigerated pie crusts (like Pillsbury) or a pre-made 9×13-inch crust from the grocery store. Just make sure to roll and press it into the pan evenly. The flavor won’t be as rich as homemade, but it’ll still taste delicious and save you time.
What if my crust gets soggy before baking?
Prevent soggy bottoms by chilling the crust for 15 minutes before adding filling, and sprinkle 1/4 cup crushed cornflakes or oats between the crust and filling. This creates a barrier that absorbs excess moisture. If your crust starts to puff too much during baking, cover the edges with aluminum foil after 20 minutes to protect them.
Which apples work best for this recipe?
Use a mix of firm and slightly tart apples like Granny Smith (for tartness) and Honeycrisp or Braeburn (for sweetness). Avoid overly soft apples like McIntosh—they’ll turn mushy. If you only have sweet apples, add 1 extra tablespoon lemon juice to balance the flavor.
How do I make a lattice crust instead of a double crust?
Roll out one crust as usual, fill the pie, then cut the second crust into 1-inch strips. Weave them over the filling in a basketweave pattern, leaving a 1-inch border uncovered. Brush with egg wash for extra shine. Lattice looks stunning and allows steam to escape, keeping the filling juicy. Practice makes perfect—start with a simple crisscross pattern if you’re new to lattice!
Can I bake this pie in a different-sized dish?
Yes! For a 9-inch pie plate, reduce the filling by about 1/3 and bake at 350°F for 40-45 minutes. For a 10×15-inch pan, increase the filling by 1/2 cup and bake for 50-60 minutes. Always adjust baking time based on your oven—look for a golden crust and bubbling filling. The key is proper pan size to crust ratio!

- 6 Oz Chocolate Chip Cookie Recipe: Perfectly Balanced Crispy Edges and Chewy Hearts - September 25, 2026
- 6-Inch Coffee Cake Recipe: Vanilla Bean Swirls and Buttery Streusel Topping - September 25, 2026
- 1 Hour Soup Recipe: Velvety Richness Without the Wait - September 25, 2026