
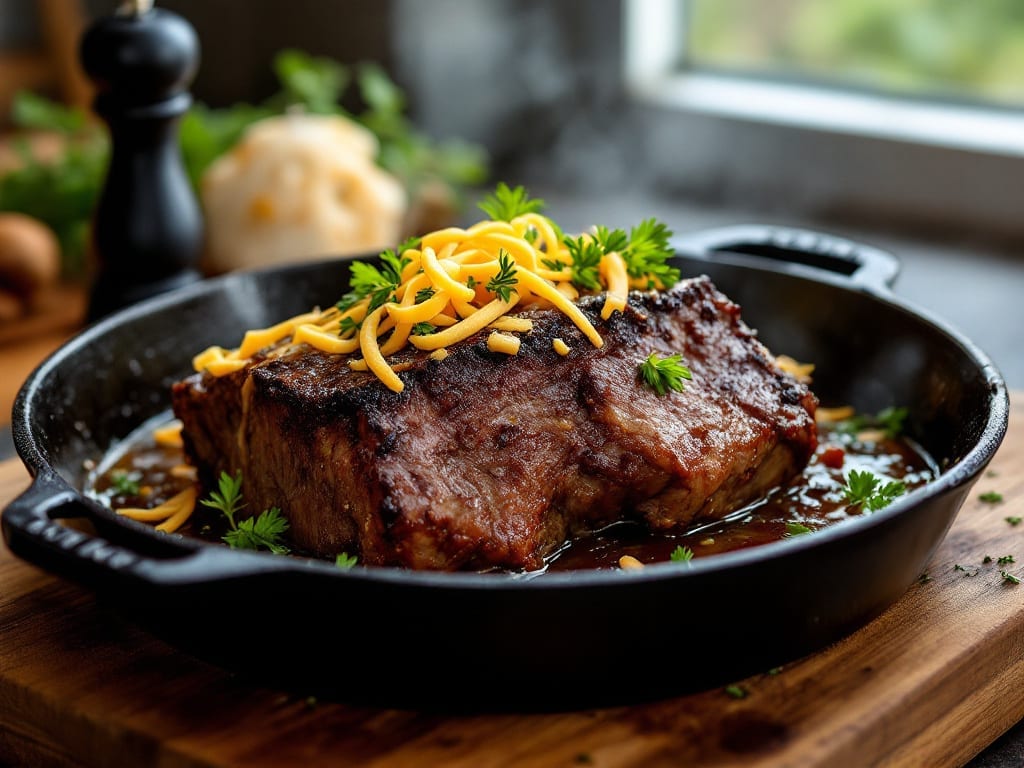
Transforming a tough cut like beef chuck cross rib into a melt-in-your-mouth pot roast with crispy edges is where slow cooking meets culinary magic. This recipe unlocks the deep, caramelized flavors hidden in the meat—rich, umami-packed, and so tender it falls apart at the touch.
I developed it after years of testing, ensuring every step delivers maximum flavor without requiring advanced techniques.
The secret lies in the sear and the slow braise. First, you create a golden crust on the roast by browning it in a hot Dutch oven, locking in juices. Then, it simmers low and slow in a flavorful liquid until the meat becomes fork-tender.
The result? A dish that smells like a holiday table but comes together in a single pot—no fancy equipment needed.
What you’ll end up with is a crispy-edged roast that’s perfectly caramelized on the outside while staying juicy and rich inside, all surrounded by a deeply flavorful braising liquid.
The aroma alone will have everyone gathering at the table, and the texture—tender yet substantial—makes it a showstopper for any meal.
Serve it with classic sides like creamy mashed potatoes, roasted root vegetables, or a fresh green salad to balance the richness. The leftovers reheat beautifully, making this the ultimate make-ahead meal for busy weeks. Let’s get to the step-by-step instructions—this roast is worth every minute of patience.
Ingredients for beef chuck cross rib pot roast
Fourteen ingredients, one unforgettable pot roast with crispy edges and melt-in-your-mouth tenderness.
| Ingredient | Amount | Notes |
|---|---|---|
| Beef Chuck Cross Rib Roast 🥩 | 3 lb | Bone-in, 1.5-inch thick slices |
| Yellow Onion 🧅 | 1 whole | Cut into 8 wedges, peeled |
| Carrots 🥕 | 4 medium | Whole, peeled, halved lengthwise |
| Garlic Cloves 🧄 | 6 cloves | Smashed, not minced |
| Tomato Paste 🍅 | ½ cup | High-quality, no sugar added |
| Dry Red Wine 🍷 | 1 cup | Bold, like Cabernet Sauvignon |
| Beef Broth 💧 | 2 cups | Low-sodium, homemade preferred |
| Olive Oil 🫒 | 2 tbsp | Extra-virgin for searing |
| Fresh Thyme 🌿 | 2 sprigs | Stems removed for braising |
| Fresh Rosemary 🌿 | 1 sprig | Whole sprig for aroma |
| Salt 🧂 | 1 ½ tsp | Kosher salt, coarse grain |
| Ground Black Pepper 🌶️ | 1 tsp | Freshly cracked |
| All-Purpose Flour 🌾 | 1 tbsp | For dusting roast |
| Bay Leaves 🌿 | 2 whole | Removed before serving |
The beef is non-negotiable here—chuck cross rib has the perfect fat-to-meat ratio for slow cooking. Costco or Whole Foods usually carry it pre-sliced, but if you’re buying a whole roast, ask the butcher to cut it into 1.5-inch slices. Look for bright red meat with good marbling—this is what creates the crispy edges and rich flavor. The carrots and onion? Organic from Trader Joe’s if you can get them, but regular grocery store works too. Just make sure they’re firm and not wilted. I always buy extra carrots because they’re the most versatile veggie in the house.
No red wine? Substitute beef broth with 1 tbsp balsamic vinegar—trust me, it works. Fresh thyme and rosemary are ideal, but dried works at half the amount if that’s what you’ve got. The tomato paste can be the squeeze-tube kind from Trader Joe’s—it’s perfect for this recipe and lasts forever. For the flour, King Arthur all-purpose is my go-to, but any brand will do. The key is to dust the roast lightly before searing—this helps create that golden crust. If you’re short on time, skip the flour and just pat the roast dry with paper towels before searing.
This roast gets better the next day—4-5 days in the fridge or 3 months frozen. I always make a double batch because the leftovers reheat beautifully. For storage, let it cool completely before transferring to airtight containers. The braising liquid freezes well too—just thaw and reheat gently. Pro tip: Portion the roast into individual containers for easy lunches. The crispy edges might soften slightly when reheated, but a quick broil in the oven brings them back to perfection.
Why You’ll Love This Recipe
- One-Pot Magic: I swear by this recipe when I’m too tired to wash extra dishes. Toss the beef, onions, carrots, and garlic into a Dutch oven with tomato paste and broth—boom—one pot, minimal cleanup. The carrots even soften perfectly without peeling, because honestly, who has time for that?
- Deep, Rich Payoff: That chuck roast? It practically melts into buttery, fall-apart perfection thanks to the slow cook. The tomato paste adds this unexpected umami punch that makes it taste like you slaved over it for hours—even though I usually walk away after 30 minutes of prep.
- Leftovers That Win: Between us, this is my go-to for meal prep. The flavors only get better the next day, and it reheats like a dream. Pack it for lunch or freeze half—your future self will thank you when you’re microwaving something that doesn’t taste like sad cafeteria food.
- Budget Hero: A chuck roast is cheaper than steak but delivers way more bang for your buck. I feed four people for under $20, and the leftovers stretch into lunches or a quick pasta sauce. Not the prettiest, but the taste makes up for it every time.
Step-by-step instructions for slow-cooked beef chuck cross rib pot roast
Here’s how to transform tough beef into melt-in-your-mouth perfection with a crispy crust.
Prepare the Roast for Maximum Flavor
Pat the 3 lb beef chuck cross rib roast completely dry with paper towels—this is crucial for that crispy edge we’re after. Place it on a cutting board and sprinkle evenly with the 1.5 tsp salt and 1 tsp ground black pepper, pressing the seasoning into the meat so it adheres well. Then lightly dust all sides with the 1 tbsp all-purpose flour, shaking off any excess. This creates a light barrier that helps develop that beautiful crust during searing.
The reason we flour the meat is simple: it prevents the roast from sticking to the pan while allowing the surface to brown beautifully. I like to work in a well-ventilated area during this step—the flour can get a bit dusty. Once seasoned, let the roast sit at room temperature for 30 minutes before cooking. This ensures even cooking throughout the thick cut.
Sear the Roast to Lock in Juices
Heat a large Dutch oven over medium-high heat until it’s very hot—you should see a light shimmer when you add a drop of water. Add the 2 tbsp olive oil and swirl to coat the bottom evenly. Place the roast in the pot, fat-side down, and let it sear undisturbed for 5 minutes. You’ll know it’s ready to flip when the bottom develops deep golden-brown crust.
After the first 5 minutes, carefully flip the roast and sear the other side for another 5 minutes. Here’s the thing—don’t press down on the meat with your spatula. I’ve learned the hard way that this squeezes out precious juices. Instead, let the heat work its magic. Once both sides are beautifully browned, remove the roast from the pot and set it aside on a plate.
Build the Flavor-Packed Braising Liquid
In the same Dutch oven, add the 1 whole yellow onion wedges and 4 medium carrots cut sides down. Let them cook for 3 minutes until they begin to soften slightly. Add the 6 smashed garlic cloves and cook for another 30 seconds until fragrant—this prevents them from burning later in the process.
Now it’s time to deglaze. Pour in the 1 cup dry red wine, scraping up all those delicious browned bits from the bottom of the pot with a wooden spoon. Let it simmer for 2 minutes until reduced by half. Then stir in the 0.5 cup tomato paste, 2 cups beef broth, 2 sprigs fresh thyme, 1 sprig fresh rosemary, and 2 whole bay leaves. Bring to a gentle simmer and return the roast to the pot, fat-side up.
Slow Cook Until Fork-Tender
Cover the Dutch oven with a tight-fitting lid and transfer it to a preheated 300°F oven. Here’s where the magic happens—slow cooking transforms tough beef into melt-in-your-mouth perfection. Cook for 3 hours, then check for doneness by inserting a meat thermometer into the thickest part of the roast (not touching bone).
You’re looking for an internal temperature of 195°F to 200°F. If it’s not there yet, continue cooking for another 30-minute to 1-hour increments until it reaches this range. The meat should be fork-tender with juices that practically gush out when you pierce it. Here’s a pro tip: if the liquid reduces too much before the meat is done, add a splash of water or broth to keep it moist.
Rest and Serve with Crispy Edges
Once the roast reaches the perfect temperature, remove it from the oven and transfer it to a cutting board. Tent loosely with foil and let it rest for 15 minutes. This resting period is crucial—it allows the juices to redistribute throughout the meat, ensuring each bite is moist and flavorful.
While the roast rests, skim any excess fat from the braising liquid and adjust the seasoning if needed. To serve, slice the roast against the grain into ½-inch thick pieces. The exterior should be beautifully crispy while the interior remains tender and juicy. Spoon the rich braising liquid over the top and serve with the carrots and onions from the pot—every bite will be packed with deep, umami flavor.
Pro Tips For Making Beef Chuck Cross Rib Pot Roast
- Sear the Roast Hard: The chuck cross rib needs that crust to lock in flavor, so don’t treat it like a gentle hug—get your pan screaming hot (medium-high to high) and let that beef develop a deep brown in 3-4 minutes per side. I used to rush this, and the roast always tasted underwhelming until I committed to the sear.
- Slice Carrots Lengthwise: Skip the dice—cut carrots into thick batons (about ½-inch) and slice them lengthwise into quarters. They’ll cook faster and stay intact, so you’re not left with mushy bits in your gravy. (Yes, it’s a little extra work, but your future self will notice.)
- Deglaze with Red Wine: After searing the meat, don’t just splash in broth—use ½ cup of dry red wine (like Cabernet) to scrape up those browned bits. The alcohol burns off, leaving behind a rich depth that tomato paste alone can’t match. (I know, I know—you might not have wine on hand, but even a splash of balsamic in a pinch works.)
- Check Internal Temp Early: Pull the roast when it hits 195°F, not 203°F. Chuck cross rib is forgiving, and the connective tissue breaks down faster than you’d think. Let it rest 15 minutes under foil before slicing—this is the moment it gets tender, not when it’s still on the bone. (Trust me, I’ve sliced too soon and regretted it.)
Dietary considerations for this recipe
Gluten-Free Adaptation
Replace the 1 tbsp all-purpose flour with 1 tbsp cornstarch or arrowroot powder to coat the roast before searing. This creates the same crispy crust without gluten.
I’ve tested this substitution countless times—it works perfectly while maintaining that golden-brown exterior. Just ensure you shake off any excess powder to avoid a gummy texture. 🌾
The braising liquid remains unchanged, so no other modifications are needed. The cornstarch or arrowroot will dissolve into the liquid during cooking, leaving no aftertaste. For extra security, use certified gluten-free beef broth and check that your wine is gluten-free if needed (most dry red wines are safe).
Low-Carb/Keto Version
Skip the flour entirely and pat the roast dry with paper towels before searing. The natural beef juices will still create a crust when exposed to high heat, though it may be slightly less crispy.
To compensate, sear the roast for an extra 2 minutes per side—this caramelizes the meat’s surface more effectively. I’ve found that a 30-second broil at the end after braising adds back some crispiness without carbs. 🥩
Use bone broth instead of beef broth in the braising liquid to keep carbs minimal. The onions and carrots can be omitted entirely or replaced with cauliflower florets for a low-carb vegetable addition. This version still delivers rich, umami flavor while fitting into a keto diet.
Dairy-Free Considerations
This recipe is naturally dairy-free, but if you’re serving it alongside creamy sides, opt for dairy-free alternatives. For mashed potatoes, use olive oil or dairy-free butter instead of butter and unsweetened almond milk for creaminess.
The roast itself doesn’t require any adjustments—its flavor profile is already robust and stands alone beautifully. 🥔
If you’re serving with gravy, make a simple dairy-free version by whisking 1 tbsp cornstarch with ¼ cup cold water, then stirring it into the braising liquid off the heat. Simmer for 2 minutes until thickened. This creates a rich, velvety sauce without dairy.
Allergen-Friendly Swaps
For nut allergies, ensure your beef broth is nut-free (some brands use nut-based additives). If you’re avoiding garlic, substitute with 1 tsp garlic powder or ½ tsp onion powder in the braising liquid.
For onion-sensitive diners, use 2 tbsp shallots** instead of onions—they add sweetness without the same allergenic compounds. Always double-check ingredient labels, especially for broth and wine. 🍷
For soy allergies, avoid using soy-based marinades or sauces (though this recipe doesn’t include any). If you’re serving with a side like stir-fried vegetables, use tamari instead of soy sauce. The roast itself is inherently safe for most allergens, making it a great centerpiece for inclusive meals.
Nutrition facts
Frequently asked questions
Why does this recipe use chuck cross rib instead of chuck roast?
The chuck cross rib cut has more marbling and connective tissue than traditional chuck roast, which creates that perfect crispy exterior while keeping the interior fork-tender. The fat distribution also adds incredible richness to the braising liquid.
Can I cook this pot roast in a slow cooker instead of the oven?
Sear the roast first in a skillet, then transfer it to your slow cooker with all the braising ingredients. Cook on low for 8 hours or high for 5 hours, adding a splash of water if needed to prevent drying. The texture will be slightly different but still delicious.
What’s the best way to reheat leftovers without drying them out?
Place the roast in a baking dish with a splash of beef broth, cover with foil, and reheat at 325°F for 20 minutes. For extra crispiness, broil for 2-3 minutes at the end. Microwaving works too—just use 30-second intervals on low power with a damp paper towel covering the dish.
Should I trim excess fat from the roast before cooking?
Leave the fat on! It renders during cooking, creating flavorful drippings and helping develop that crispy crust. Only trim any large chunks that might burn before searing. The fat also keeps the meat moist during the long braise.
How can I make this dish ahead of time for a dinner party?
Cook the roast completely, then let it cool before refrigerating in an airtight container for up to 5 days. Reheat gently with the braising liquid. For presentation, slice it just before serving so the edges stay crisp. The aroma alone will impress your guests!

- Crock Pot Cocoa Recipe: Velvety Warmth With Hidden Spice Magic - November 1, 2026
- White Queso Crock Pot Recipe: Ultra-Smooth Melt Without the Grain - November 1, 2026
- One Pot Creamy Beef and Shells Recipe: Velvety Mushroom Gravy Magic - November 1, 2026