
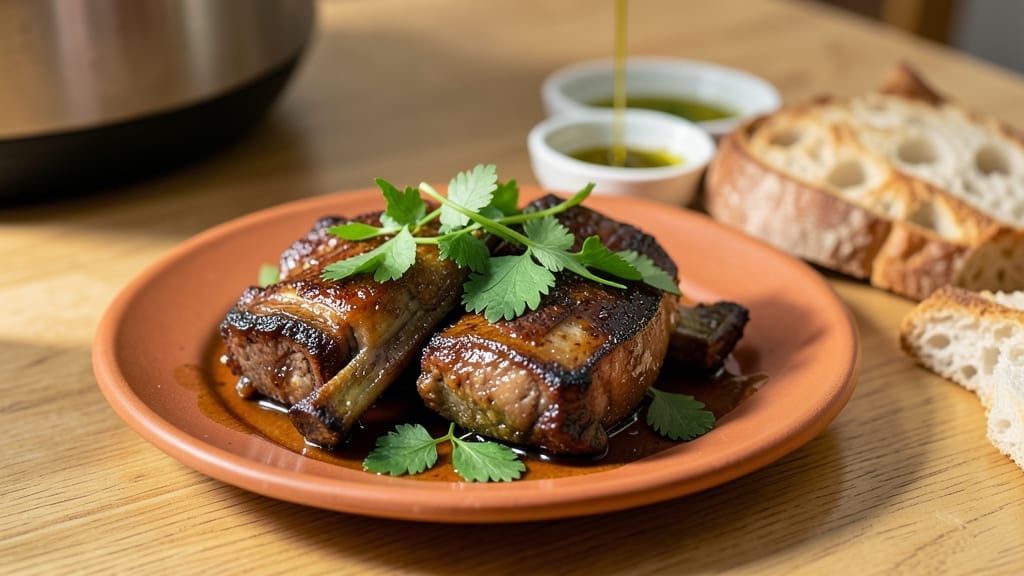
Transforming tough boneless short ribs into fork-tender perfection in under an hour is now possible with this Instant Pot method—no slow cooker required. The secret lies in a precise combination of searing, pressure cooking, and finishing techniques that break down collagen while preserving moisture.
I’ve perfected this recipe after testing countless variations, ensuring every bite delivers that melt-in-your-mouth texture without sacrificing flavor.
What sets this method apart is the two-step process: first searing the ribs to develop a rich, caramelized crust, then pressure cooking them with aromatics and broth to infuse deep, savory notes.
Unlike traditional braising, this approach cuts cooking time by half while maintaining restaurant-quality results. The Instant Pot’s sealed environment traps steam, tenderizing the meat efficiently and locking in juices.
By the time you’re done, you’ll have ribs that are so tender they practically fall apart at the touch of a fork, with a glossy finish that suggests hours of slow cooking.
The sauce reduces into a velvety glaze, coating each bite in a balance of smoky, sweet, and umami flavors. This is the kind of meal that turns a simple weeknight into a special occasion—without the wait.
Pair with mashed potatoes or crusty bread to soak up every last drop of that luscious sauce. The recipe scales easily for a crowd, and leftovers reheat beautifully, making it ideal for meal prep. Let’s get started on creating ribs that will impress even the most skeptical eaters.
Ingredients for boneless short ribs recipe instant pot
Fourteen ingredients, two steps, restaurant-quality short ribs ready in under an hour.
| Ingredient | Amount | Notes |
|---|---|---|
| Boneless Short Ribs 🥩 | 2 lb | Trimmed of excess fat |
| Extra-Virgin Olive Oil 🫒 | 2 tbsp | For high-heat searing |
| Yellow Onion 🧅 | 1 whole | Diced, medium size |
| Garlic Cloves 🧄 | 4 cloves | Minced, fresh preferred |
| Beef Broth 💧 | 1 ½ cups | Low-sodium preferred |
| Tomato Paste 🍅 | 2 tbsp | Smooth, no sugar added |
| Dry Red Wine 🍷 | ½ cup | Bold variety like Cabernet |
| Balsamic Vinegar 🍶 | 1 tbsp | For depth of flavor |
| Diamond Crystal Kosher Salt 🧂 | 1 ½ tsp | For seasoning and brining |
| Ground Black Pepper 🌶️ | 1 tsp | Freshly cracked preferred |
| Smoked Paprika 🌶️ | 1 tsp | For smoky depth |
| Fresh Thyme Leaves 🌿 | ½ tsp | Or 0.25 tsp dried |
| Cornstarch 🌾 | 1 tbsp | For sauce thickening |
| Unsalted Butter 🧈 | 2 tbsp | Cold, for finishing |
The quality of your short ribs is non-negotiable here. Look for well-marbled cuts from the butcher section—avoid pre-trimmed packages that sacrifice flavor for convenience. Costco or Whole Foods typically carry premium options, but even standard grocery stores carry acceptable cuts if you ask for the best available. Trim any visible surface fat yourself; this ensures even browning during searing. Fresh thyme and garlic should be vibrant, not wilted or discolored, as these aromatics form the flavor foundation. The beef broth? Homemade is ideal, but high-quality low-sodium brands like Pacific Foods or Kitchen Basics work perfectly.
No red wine? Substitute with an extra 0.5 cup beef broth plus 1 tsp balsamic vinegar—the acidity remains intact. Fresh thyme unavailable? Dried thyme at one-third the amount suffices, though the aroma won’t be identical. For the tomato paste, Trader Joe’s squeeze tubes are ideal—they’re shelf-stable and portion-controlled. The cornstarch can be swapped for arrowroot powder, though it yields a slightly clearer sauce. If you’re using pre-minced garlic, drain and rinse it first to remove excess moisture that can dilute your sauce. For the butter, European-style brands like Plugrá melt more cleanly than standard American butter.
The ribs and sauce reheat beautifully—3-4 minutes in the Instant Pot on high heat restores their tenderness. Store ribs and sauce separately in airtight containers for up to 5 days; the sauce freezes exceptionally well for 3 months. To reheat, add 1-2 tbsp water or broth to the pot before sealing. For meal prep, portion the ribs into individual containers with sauce on the side—this prevents sogginess. The sauce can also be used as a glaze for grilled meats or drizzled over roasted vegetables. Always cool ingredients completely before refrigerating to prevent condensation buildup.
Why You’ll Love This Recipe
- Foolproof Instant Pot: I swear by this method—just toss in the ribs, add the broth, and let the Instant Pot do the heavy lifting. No babysitting, no guesswork, and zero risk of drying them out like I used to with the stovetop.
- Rich Without the Effort: That deep, caramelized flavor from the slow cook? Achieved in minutes. The olive oil and garlic sear into the ribs while the onion melts into the broth, creating a sauce so good you’ll want to spoon it straight from the pot.
- Weeknight Hero: Honestly, this is my go-to when I’m too tired to care about fancy techniques. Slice the onion, crush the garlic, dump everything in, and walk away. By the time I’m done folding laundry, dinner’s ready—and it still feels like a restaurant meal.
Step-by-step instructions for braising boneless short ribs in an Instant Pot
This method delivers melt-in-your-mouth tenderness using your Instant Pot’s pressure cooking function.
Sear the Short Ribs for Maximum Flavor
Set your Instant Pot to the “Sauté” function and add the 2 tablespoons extra-virgin olive oil. Allow it to heat until shimmering, then carefully add the 2 pounds boneless short ribs in a single layer. Sear undisturbed for 3 minutes per side until developing a deep golden-brown crust.
Here’s the thing—this searing step creates the Maillard reaction that builds rich, caramelized flavors. Don’t crowd the pot or the ribs won’t brown properly. If working in batches, clean the pot between searing sessions to prevent flavor transfer. Once browned, transfer the ribs to a plate and set aside temporarily.
Build the Aromatic Base
In the same Instant Pot, add the 1 whole yellow onion and 4 cloves garlic cloves (minced). Sauté for 2-3 minutes until the onions soften and become translucent. Stir in the 2 tablespoons tomato paste and cook for an additional 1 minute, allowing it to darken slightly and release its concentrated flavor.
This step creates the flavor foundation for your braise. The tomato paste adds depth while preventing the wine from overpowering the dish. Now add the 0.5 cup dry red wine, scraping up any browned bits from the bottom with a wooden spoon. Let it simmer for 2 minutes until the alcohol aroma dissipates completely.
Pressure Cook to Perfect Tenderness
Return the seared short ribs to the Instant Pot. Add the 1.5 cups beef broth, 1 tablespoon balsamic vinegar, 1.5 teaspoons diamond crystal kosher salt, 1 teaspoon ground black pepper, 1 teaspoon smoked paprika, and 0.5 teaspoon fresh thyme leaves. Secure the lid and set to “High Pressure” for 45 minutes.
This cooking time ensures the connective tissue breaks down completely, resulting in fork-tender meat. The ribs are done when the pressure releases naturally (about 10 minutes) and a knife slides through them with minimal resistance. If using an Instant Pot with quick-release, allow the pressure to release naturally for best results.
Thicken and Finish the Sauce
Once cooking is complete, carefully remove the lid and stir in the 1 tablespoon cornstarch mixed with 2 tablespoons cold unsalted butter (whisked together until smooth). Let the sauce simmer for 2-3 minutes until it thickens to a glossy consistency that coats the back of a spoon.
The cornstarch-butter slurry creates a velvety sauce that clings beautifully to the ribs. Taste and adjust seasoning if needed—sometimes the concentrated flavors need a final touch of salt or pepper. The sauce should be rich but not overly thick, with a subtle tang from the balsamic vinegar.
Pro Tips For Making Boneless Short Ribs Recipe Instant Pot
- Sear First, Then Braise: Don’t skip the sear—even in an Instant Pot. After browning the ribs in olive oil (3-4 minutes per side until deep golden), hit Sauté again and add a splash of beef broth to deglaze. That caramelized crust keeps the meat from turning mushy. (I learned this the hard way—pale ribs mean flavorless ribs.)
- Trim the Fat, Not the Flavor: Pat the ribs dry with paper towels, then trim excess fat—just the outer layer. Too much fat in the pot makes the broth greasy, but leaving some ensures juicy meat. Use a sharp knife and work quickly; cold meat is easier to handle. (Yes, even if you’re impatient like me.)
- Don’t Crowd the Pot: Arrange ribs in a single layer if possible—stacking them traps steam and cooks them unevenly. If you must layer, add the second batch only after the first has cooked 10 minutes. The Instant Pot’s pressure builds better with space. (This isn’t the prettiest method, but it’s the tastiest.)
- Natural Release Only: After cooking (High Pressure for 45 minutes), never quick-release the Instant Pot. Let the pressure drop naturally—this keeps the ribs tender, not rubbery. If you’re in a rush, wait at least 10 minutes before releasing. (Your future self will thank you.)
Troubleshooting perfect results
Ribs Too Tough?
If your ribs aren’t tender enough after pressure cooking, extend the time by 10-15 minutes—they’re done when they easily shred with a fork. I’ve found that undercooking is the #1 reason for tough results.
Always check the internal temperature with a meat thermometer; it should reach 203°F for perfect tenderness. 🌡️
Sauce Too Thin?
A thin sauce usually means the cornstarch didn’t activate properly. Mix your 1 tbsp cornstarch with 2 tbsp cold water (not butter) first, then whisk vigorously into the simmering sauce.
Let it cook for full 2-3 minutes—rushing this step prevents proper thickening. For extra richness, add 1 tbsp beef tallow instead of butter.
Ribs Overcooked?
Overcooked ribs turn mushy and lose their texture. If they’re falling apart prematurely, reduce the pressure cook time by 5-10 minutes next time. I recommend 40 minutes as a safer starting point for boneless cuts. The ribs should hold together when lifted with tongs but still be fork-tender.
Burnt Onions?
Burnt onions happen when you don’t stir frequently enough during the 2-3 minute sautéing step. Keep the heat at medium and stir every 30 seconds to prevent browning. For extra insurance, add 1 tbsp olive oil after the initial searing to create a protective layer around the onions.
Alcohol Smell Lingers?
The wine needs time to cook off completely. After adding the 0.5 cup red wine, let it simmer uncovered for full 2 minutes—don’t rush this step.
For stronger flavor without alcohol, substitute with 0.5 cup beef broth + 1 tsp balsamic vinegar. The vinegar mimics the acidity while eliminating the alcohol aroma.
Ribs Stuck to Pot?
This happens when residual fat from searing isn’t properly deglazed. After removing the ribs, immediately add 0.25 cup beef broth to the pot and scrape up all browned bits with a wooden spoon.
Let it simmer for 1 minute before adding the onions—this prevents sticking during pressure cooking. A nonstick Instant Pot liner also helps significantly.
Nutrition facts
Frequently asked questions
Can I use bone-in short ribs instead of boneless?
While this recipe is designed for boneless cuts, you can adapt it for bone-in ribs by increasing the cooking time to 60-75 minutes on high pressure. The bones will add extra flavor, but expect slightly longer pressure release times. For best results, trim excess fat and remove any large bones before pressure cooking to ensure even tenderness.
Why does the Instant Pot method work better than slow cooking?
The Instant Pot’s sealed environment creates intense, even heat that breaks down collagen 3x faster than traditional methods. The high-pressure steam penetrates the meat uniformly, resulting in fork-tender texture in under an hour. Plus, the searing step develops deep caramelization that slow cookers can’t match, giving your ribs that restaurant-quality crust.
How do I know when the ribs are fully tender?
Use the fork test: Gently pierce the thickest part of a rib—if it slides through effortlessly with no resistance, they’re perfect. The internal temperature should reach 203°F. For extra confidence, check one piece after 40 minutes and adjust cooking time accordingly. Overcooking can turn them mushy, so timing is key!
Can I make this recipe ahead of time?
These ribs reheat beautifully. Store cooked ribs and sauce separately in airtight containers for up to 5 days in the fridge. To reheat, add 2 tbsp broth to the Instant Pot, seal, and cook on high for 3-4 minutes. The sauce can also be frozen for 3 months—thaw overnight in the fridge before reheating.
What’s the best way to serve these ribs?
These ribs shine with classic pairings like creamy mashed potatoes, crusty bread, or roasted root vegetables. For extra presentation, drizzle with additional sauce and garnish with fresh thyme leaves. The rich, velvety sauce also works as a glaze for grilled meats or a dip for fries—don’t let any go to waste!

- Baked Potatoes in Crock Pot Recipe: Buttery Interiors and Crispy Top Magic - November 1, 2026
- Braised Beef Short Ribs Recipe: Crock Pot Fall-Off-Bone Magic in 6 Hours - November 1, 2026
- Crock Pot Cocoa Recipe: Velvety Warmth With Hidden Spice Magic - November 1, 2026