
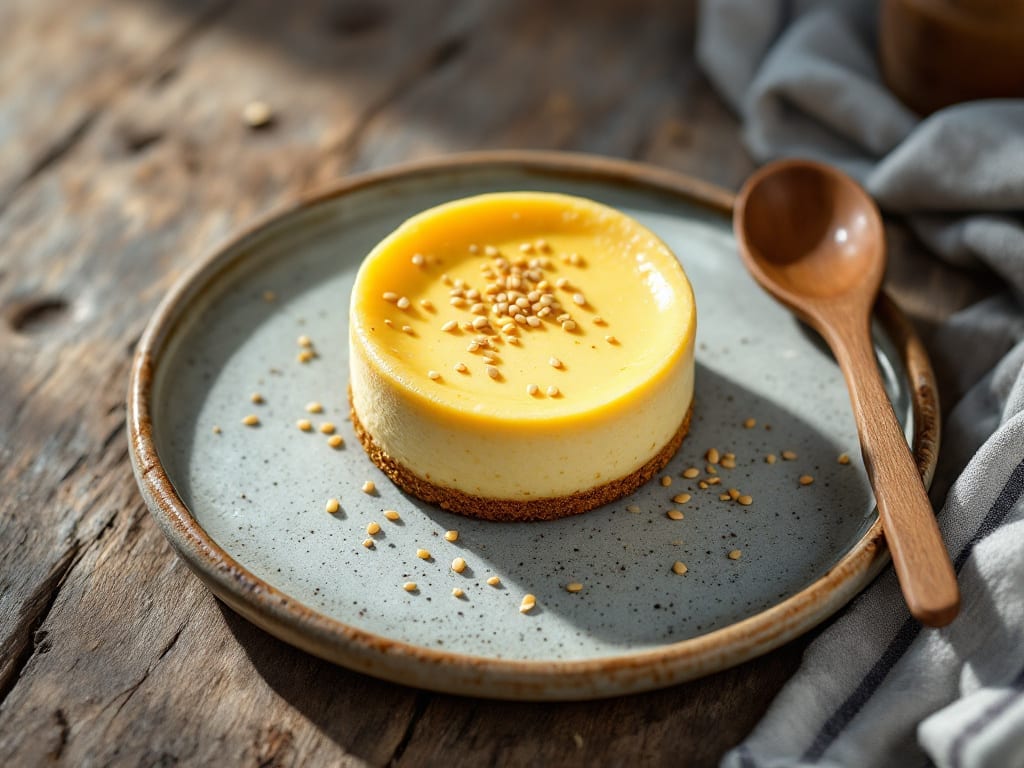
Creating Instant Pot mini cheesecakes with that perfect silky texture and no watery cracks is easier than you think—this method delivers professional results in just 30 minutes.
The secret lies in precise ingredient ratios and Instant Pot pressure cooking, which creates a smooth, creamy center that holds its shape without splitting. I’ve tested countless variations to perfect this technique, and it never fails to impress.
What sets this recipe apart is the foolproof method that eliminates common cheesecake pitfalls. By combining cream cheese, sour cream, and a touch of cornstarch, we create a batter that bakes evenly under pressure, resulting in a velvety texture that’s rich yet light.
The key is using the Instant Pot’s high-pressure setting followed by a natural release, which ensures a perfectly set crust without overcooking the filling.
You’ll end up with six perfectly portioned mini cheesecakes—each with a tender, crack-free top and a creamy interior that melts in your mouth. These bite-sized treats are ideal for parties, potlucks, or satisfying a sweet craving without the mess of a full-sized dessert.
The best part? No water bath or special equipment needed—just your Instant Pot and a few simple steps.
Serve them chilled with a dollop of whipped cream or fresh berries for a restaurant-quality dessert that’s surprisingly simple to make. Let’s get started—your Instant Pot is about to become your new favorite baking tool!
Ingredients for instant pot mini cheesecake
Six perfect mini cheesecakes with restaurant-worthy texture—no cracks or watery centers!
| Ingredient | Amount | Notes |
|---|---|---|
| Full-Fat Cream Cheese 🧀 | 8 oz | Room temperature for blending |
| Sour Cream 🥛 | ½ cup | Full-fat for creaminess |
| Granulated Sugar 🍚 | ½ cup | Superfine preferred for smoothness |
| Cornstarch 🌾 | 1 tbsp | Prevents watery texture |
| Vanilla Extract 🍯 | 1 tsp | Pure extract, not imitation |
| Large Eggs 🥚 | 2 whole | Room temperature for blending |
| Unsalted Butter 🧈 | ¼ cup | Melted, not water-packed |
| Graham Cracker Crumbs 🍪 | 1 cup | Finely crushed, no lumps |
| Melted Butter 🧈 | ¼ cup | For crust binding |
| Salt 🧂 | ¼ tsp | Fine sea salt |
| Lemon Juice 🍋 | 1 tsp | Freshly squeezed |
| Heavy Whipping Cream 🥛 | ¼ cup | Optional, for topping |
| Fresh Berries 🍓 | ½ cup | For garnish (optional) |
The cream cheese is non-negotiable—Philadelphia brand is your best bet for that ultra-smooth texture. Grab the full-fat version (none of that low-fat nonsense) and let it sit at room temperature for at least 30 minutes before mixing. The sour cream should be full-fat too (trust me on this), and I always go for Trader Joe’s or Whole Foods brands for the best quality. For the graham cracker crumbs, crush them in a food processor until they’re finely ground—no chunks allowed. The cornstarch is your secret weapon here; it’s what keeps these babies from turning into cheesecake soup. And vanilla extract? Only pure—none of that imitation junk.
No full-fat sour cream? Greek yogurt at half the amount works in a pinch, but the texture won’t be quite as rich. Short on graham crackers? Digestive biscuits or vanilla wafers crushed up will do the trick. The lemon juice adds brightness—skip it if you prefer a sweeter flavor, but I promise it makes all the difference. For the berries, fresh is ideal, but frozen works too (just thaw and drain them first). The whipping cream topping is optional, but it’s worth the extra minute if you’ve got time—just whip it to stiff peaks and dollop right before serving. Pro tip: room temperature eggs blend smoother, so take them out 15 minutes before mixing.
These keep beautifully for up to 5 days in the fridge, so make a double batch if you can. They’re even better the next day once the flavors have time to meld. For freezing, let them cool completely, wrap each one individually in plastic wrap, and store in a sealed container for up to 3 months. Thaw overnight in the fridge before serving. And here’s the best part: no water bath needed—just line your Instant Pot with a silicone sleeve or parchment paper for easy removal. These are perfect for parties, potlucks, or just satisfying that late-night sweet tooth!
Why You’ll Love This Recipe
- No Mixing Madness: I swear by this recipe because it’s one bowl—just cream cheese, sour cream, sugar, and a pinch of cornstarch. No whisking until your arm falls off, no straining for lumps. The Instant Pot does all the heavy lifting while you sip your coffee.
- Creamy Edge, Crispy Truth: That cornstarch? It’s the secret weapon. You get a silky center with a just-set top—like biting into a cloud with a hint of structure. Honestly, it’s the kind of texture that makes you pause mid-bite and think, “Wait, how is this real?”
- Party in a Jar: These little cheesecakes are perfect for gatherings—no one fights over slices, and they’re easy to grab. Pop them in the fridge for a potluck, use them as dessert after a holiday meal, or just eat three at 2 PM. No judgment.
- Zero Waste, Maximum Payoff: You’ll have leftovers, and that’s a win. The recipe scales effortlessly, so make a batch and freeze half for when you’re too tired to bake. Plus, the ingredients? Basic pantry stuff—no specialty items, no breaking the bank. Just pure, reliable dessert.
Step-by-step instructions for Instant Pot mini cheesecakes
Here’s the foolproof method that guarantees silky, crack-free mini cheesecakes every time.
Prepare the Crust Mixture
In a medium bowl, combine the 1 cup graham cracker crumbs with the 0.25 cup melted butter. Mix thoroughly with a fork until the crumbs are uniformly moistened and clump together when pressed. The texture should resemble damp sand—if it’s too dry, add 1 teaspoon water to bind it.
Press this mixture firmly into the bottom of a 6-cup mini muffin tin, using the back of a spoon to create an even, compact layer. The crust should be about ¼-inch thick in each cup. Tap the tin gently on the countertop to settle the crumbs and remove any air pockets. Real talk—this step makes all the difference in preventing crumbly bases later.
Blend the Cheesecake Filling
In a separate large bowl, beat the 8 oz full-fat cream cheese with the 0.5 cup sour cream and 0.5 cup granulated sugar using an electric mixer on medium speed until completely smooth and creamy. This should take about 2-3 minutes—don’t rush it, as any lumps will translate to texture issues in your finished cheesecakes.
Add the 2 whole large eggs, one at a time, mixing just until each is fully incorporated after each addition. Stir in the 1 tbsp cornstarch, 1 tsp vanilla extract, 0.25 tsp salt, and 1 tsp lemon juice. The mixture should be thick but pourable. Here’s the thing—cornstarch is our secret weapon against watery centers, so don’t skip this step.
Assemble and Cook in the Instant Pot
Pour the cheesecake batter evenly over the prepared crusts in the muffin tin. Gently tap the tin again to release any air bubbles that may have formed during pouring. Place the muffin tin into the Instant Pot and secure the lid.
Set the Instant Pot to high pressure and cook for 18 minutes. The reason for this shorter cook time is to prevent overcooking, which leads to dense, rubbery textures. When the cooking cycle completes, allow a 10-minute natural pressure release before carefully removing the lid. The cheesecakes should be just set but still slightly jiggly in the center.
Finish and Chill for Perfect Texture
Remove the muffin tin from the Instant Pot and let the cheesecakes cool at room temperature for 15 minutes. This gradual cooling prevents cracking as they set. Once cooled, transfer the tin to the refrigerator and chill for at least 4 hours, or preferably overnight.
Before serving, you can optionally top each mini cheesecake with a dollop of 0.25 cup heavy whipping cream and garnish with 0.5 cup fresh berries**. The chilling time is crucial—it allows the flavors to meld and the texture to become silky rather than grainy. Trust me, skipping this won’t give you the same result.
Pro Tips For Making Instant Pot Mini Cheesecake
- SOFTEN CREAM CHEESE FIRST: I learned this the hard way—room-temperature cream cheese blends smoothly and avoids lumps. Microwave it for 20 seconds (covered) or let it sit in warm water for 5 minutes. Cold cream cheese fights you every step of the way, and no one wants to scrape gunk out of their Instant Pot later.
- WHISK UNTIL SILKY: Don’t just “mix” the batter—whisk it until it coats the back of a spoon for 30 seconds. That’s how you get the signature silky texture. The cornstarch needs to fully dissolve, and skipping this step means a denser, grainier cheesecake. (Yes, even if you’re impatient like me.)
- PRESS OUT AIR BUBBLES: After pouring the batter, grab a butter knife and drag it across the surface in a crosshatch pattern. This breaks surface bubbles that’ll pop into unsightly holes during cooking. No one wants a cheesecake that looks like it’s been attacked by tiny explosions.
- NATURAL RELEASE COOL: Resist the urge to open the lid right away—let the pressure release naturally for 10 minutes. Then, quick-release the rest. Rushing this step risks cracking the tops or making them sink. Patience here = clean slices later. (Your future self will thank you.)
Essential equipment for perfect results
Instant Pot Essentials
The only must-have equipment for this recipe is your Instant Pot—any model with a steam or sauté function works, but I recommend the Instant Pot Duo Crisp for even better browning capabilities.
The 6-cup mini muffin tin is critical for portion control; I use Wilton’s non-stick version for easy release. A silicone sleeve or parchment paper placed in the Instant Pot prevents sticking and makes cleanup a breeze. 🧑🍳
Mixing Tools
An electric mixer (like a KitchenAid stand mixer or handheld Cuisinart) is ideal for blending the filling smoothly, but a hand whisk works in a pinch if you’re patient. A medium mixing bowl (8-10 cups) ensures enough space to avoid splatter.
For the crust, a fork or small spatula helps press it evenly into the muffin tin. Pro tip: Room-temperature ingredients blend better, so take your cream cheese and eggs out 15 minutes before mixing.
Measuring Precisely
This recipe relies on accurate measurements—use a digital kitchen scale for the cream cheese (8 oz) and a fine-mesh sieve for the graham cracker crumbs to avoid lumps. A liquid measuring cup ensures the sour cream and melted butter are precise.
The cornstarch (1 tbsp) is non-negotiable for texture, so measure it with a level scoop for consistency. I also keep a small bowl nearby to catch any overflow during mixing.
Optional Extras
For garnishing, a piping bag (with a small round tip) makes dolloping whipped cream effortless, but a spoon works too. Fresh berries can be prepped in a small bowl while the cheesecakes chill.
If you’re freezing leftovers, plastic wrap and an airtight container are essential. For serving, a slotted spoon helps remove the mini cheesecakes cleanly from the tin without crumbling the crust.
Safety First
Always use potholders when handling the Instant Pot lid—pressure releases can get hot! A trivet or rack in the Instant Pot elevates the muffin tin for even heat distribution.
If your Instant Pot lacks a trivet, a heat-safe silicone mat works. Never skip the 10-minute natural release—quick releases can cause uneven cooking or cracks. 🚨
Nutrition facts
Frequently asked questions
Why do these mini cheesecakes turn out so creamy without cracking?
The cornstarch (1 tbsp) is the secret ingredient that prevents watery centers, while the 10-minute natural pressure release ensures even cooking. The high-pressure setting creates a gentle baking environment that sets the texture perfectly without overcooking. Chilling for 4+ hours also helps stabilize the structure.
Can I make these in a regular oven instead of an Instant Pot?
Yes, but the texture will differ slightly. Bake at 325°F for 18-20 minutes in a water bath (muffin tin in a larger pan with boiling water). The Instant Pot method gives a denser, creamier result due to pressure cooking, while oven-baked versions may be slightly lighter. For best results, stick with the Instant Pot!
How do I fix a cheesecake that came out watery?
This usually happens from overmixing or skipping the cornstarch. Next time, ensure your batter is just combined (not whipped) and use 1 tbsp cornstarch as written. For a quick fix, chill the batch longer (up to 6 hours) or layer with whipped cream to mask the texture. The Instant Pot method should prevent this if followed exactly.
Can I use a different crust instead of graham crackers?
Try vanilla wafers, digestive biscuits, or even crushed Oreos for a chocolate twist. Just ensure your crumbs are finely ground and mix with 0.25 cup melted butter for binding. The crust should still be pressed firmly into the muffin tin for structure.
How long can I store these mini cheesecakes?
They stay fresh in the fridge for 5 days when stored in an airtight container. For longer storage, freeze individual portions wrapped in plastic for up to 3 months. Thaw overnight in the fridge before serving to preserve texture. The flavors actually improve after 24 hours of chilling!

- Crock Pot Round Steak Recipe: Slow-Sear Crust With Juicy Center - November 6, 2026
- Candied Sweet Potatoes Crock Pot Recipe: Caramelized Sweetness With Zero Effort - November 6, 2026
- Steak Recipe Crock Pot: Juicy, Caramelized Crust in 4 Hours - November 6, 2026