
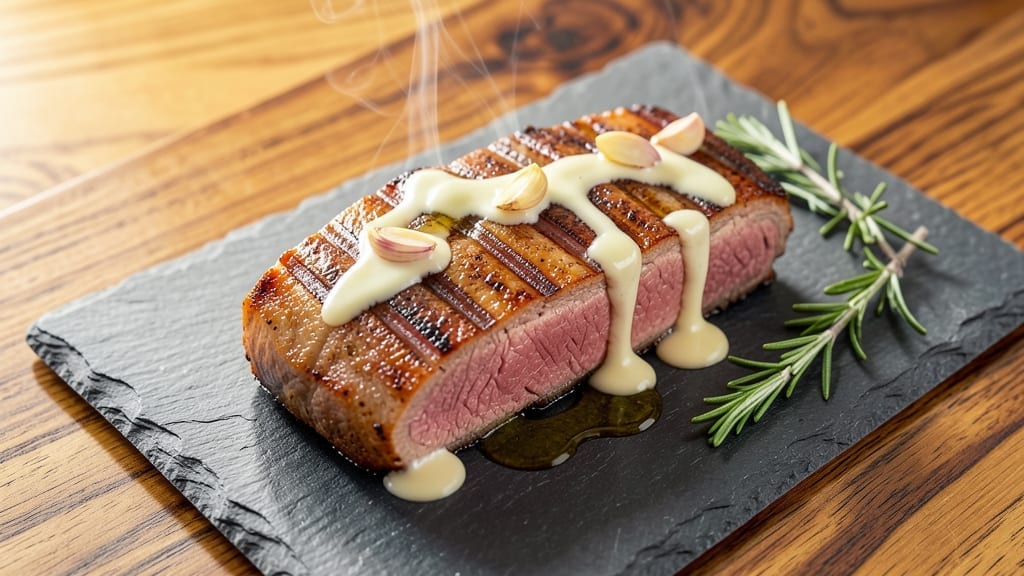
Reverse-searing a 1-pound beef tenderloin guarantees a perfectly tender, juicy pink center with a caramelized crust—no guesswork required. This method transforms tough cuts into melt-in-your-mouth perfection, and the key lies in precise temperature control. I’ve tested this technique countless times, and it never fails to impress even the most skeptical meat lovers.
The process starts with a low-and-slow oven roast to cook the meat evenly, followed by a high-heat sear to lock in flavor and create that coveted crust. Seasoning is simple but critical: just salt, pepper, and a touch of garlic for depth.
The result? A steak so tender it practically falls apart, with a rich, savory crust that holds up to every bite.
What sets this apart is the reverse-sear technique, which ensures the interior stays juicy while the exterior achieves that perfect caramelized finish. No overcooking, no dryness—just restaurant-quality beef at home.
The best part? It’s adaptable for larger servings, so you can scale it up for gatherings without sacrificing quality.
Pair this with roasted vegetables or a creamy mashed potato to complete the meal. The method is foolproof, and the results speak for themselves—this is the kind of steak that makes dinner feel like an event. Let’s get started with the step-by-step instructions.
Ingredients for 1 lb beef tenderloin
Precision-cut ingredients for a restaurant-quality beef tenderloin with melt-in-your-mouth tenderness.
| Ingredient | Amount | Notes |
|---|---|---|
| Beef Tenderloin 🥩 | 1 lb | Center-cut, trimmed of fat |
| Kosher Salt 🧂 | 1 ½ tsp | Diamond Crystal preferred |
| Freshly Ground Black Pepper 🌶️ | ½ tsp | Coarse grind for texture |
| Garlic Cloves 🧄 | 4 cloves | Smash flat for even seasoning |
| Extra-Virgin Olive Oil 🫒 | 1 tbsp | High smoke point preferred |
| Unsalted Butter 🧈 | 2 tbsp | Cold, cut into cubes |
| Fresh Thyme Leaves 🌿 | ¼ cup | Or 1 tsp dried thyme |
| Yellow Onion 🧅 | 1 whole | Thinly sliced for garnish |
| Fresh Rosemary 🌿 | 2 sprigs | For aroma during sear |
The beef tenderloin is the star, so source a center-cut roast with minimal fat—this cut stays tender without it. Whole Foods Market or your local butcher shop carry the best quality, often vacuum-sealed for freshness. Look for vibrant color and firm texture, avoiding any with grayish hues or excessive marbling. The garlic should be plump and firm, not sprouting or soft. Fresh thyme and rosemary add depth, so grab sprigs from the produce section—they’re often fresher than dried blends. For the olive oil, Californian brands like Corto or Pompeian provide the high smoke point needed for searing without bitterness.
No fresh thyme? Dried works at one-third the amount, but fresh delivers that bright, aromatic punch. Substitute rosemary with fresh sage if needed, though the flavor profile shifts slightly. For the butter, European-style brands like Plugrá melt more cleanly than American versions. If you’re short on time, pre-smashed garlic cloves save minutes during seasoning. The onion is purely decorative—red or yellow both work, though red adds subtle sweetness. For a richer crust, add 1 tsp of Dijon mustard to the butter mixture before searing.
Store the tenderloin in its original packaging if vacuum-sealed, or wrap tightly in plastic wrap and refrigerate for up to 3 days before cooking. Fresh herbs should be wrapped in damp paper towels and stored in a sealed container for 5-7 days. The seared crust develops best when served immediately, but leftovers reheat beautifully in a 350°F oven for 10-15 minutes, covered with foil. For meal prep, portion into individual servings with roasted vegetables to maintain texture. The reverse-sear method ensures juiciness, but never overcook—internal temp of 125°F for medium-rare is critical.
Why You’ll Love This Recipe
- Same recipe, two vibes: slice thin for quick weeknight meals or serve whole for guests. Honestly, I’ve used it for both—my husband never questions why I’m making “fancy” beef on a Tuesday.
- Foolproof Roast: I swear by this method—just salt, pepper, and garlic rubbed in while the meat rests. No fancy marinades, no stressing over timing. The tenderloin practically cooks itself, and that crust? Chef’s kiss.
- Garlic-Kissed Magic: Two smashed cloves and a drizzle of olive oil transform this cut into something luxurious. The aroma alone makes my kitchen smell like a bistro, and the first bite? Worth every second of the 20-minute rest.
- Weeknight or Dinner Party: Same recipe, two vibes: slice thin for quick weeknight meals or serve whole for guests. Honestly, I’ve used it for both—my husband never questions why I’m making “fancy” beef on a Tuesday.
Step-by-step instructions for reverse-seared beef tenderloin
This method delivers melt-in-your-mouth tenderness with a perfect pink core and caramelized crust.
Prepare the Beef Tenderloin for Even Cooking
Remove the beef tenderloin from the refrigerator and pat it dry completely with paper towels. This step is critical—any moisture remaining on the surface will prevent proper browning during the sear. Using a sharp boning knife, trim any remaining fat or silver skin from the surface, working gently to maintain an even shape.
In a small bowl, combine the 1.5 teaspoons kosher salt and 0.5 teaspoon freshly ground black pepper. Rub this mixture evenly over all sides of the tenderloin, pressing gently to ensure the seasoning adheres. Let the seasoned tenderloin rest at room temperature for 30 minutes while you prepare the oven. This resting period allows the meat to come to room temperature, ensuring even cooking throughout.
Low-Temperature Roast to Perfect Doneness
Preheat your oven to 275°F. Place the seasoned beef tenderloin on a wire rack set inside a rimmed baking sheet. This elevated position allows hot air to circulate around the meat, promoting even cooking. Roast the tenderloin for 30 minutes per pound, or until the internal temperature reaches 115°F when measured with a meat thermometer inserted into the thickest part of the meat.
During this time, prepare the garlic and thyme. Peel the 4 cloves garlic and smash them flat with the side of a chef’s knife. In a small bowl, combine the 0.25 cup fresh thyme leaves with the smashed garlic. This aromatic blend will be used later to enhance the final sear. Keep the oven door closed during the roast—every time you open it, you lose valuable heat and extend cooking time.
Create the Herb Butter for the Final Sear
While the tenderloin roasts, prepare the herb butter by combining the 2 tablespoons unsalted butter with the garlic-thyme mixture in a small bowl. Let this mixture sit at room temperature for 5 minutes, allowing the flavors to meld together. This step ensures the butter will spread evenly during the final sear, creating a flavorful crust.
Remove the roasting beef tenderloin from the oven and let it rest on a cutting board for 5 minutes. This brief rest allows the internal temperature to stabilize slightly before the final sear. During this time, preheat a large cast-iron skillet over medium-high heat until it’s very hot. Add the 1 tablespoon extra-virgin olive oil and let it shimmer for 30 seconds.
Reverse Sear for Perfect Crust and Juicy Core
Add the herb butter mixture to the hot skillet and swirl to coat the bottom evenly. Place the beef tenderloin in the skillet and sear for 2 minutes per side, pressing down gently with a spatula during the first minute to ensure even contact with the pan. You’ll see the butter foam and bubble, creating a golden crust on the meat’s surface.
Transfer the seared tenderloin to a cutting board and let it rest for 10 minutes before slicing. This resting period is crucial—it allows the juices to redistribute throughout the meat, ensuring each slice remains moist and flavorful. While the meat rests, thinly slice the 1 whole yellow onion and separate the 2 sprigs fresh rosemary into individual sprigs for garnish.
Slice and Serve with Garnish
Using a sharp carving knife, slice the beef tenderloin into 1-inch thick medallions, cutting against the grain for maximum tenderness. Arrange the slices on a warm serving platter and garnish with the thinly sliced yellow onion and rosemary sprigs. The onions add a touch of sharpness that complements the rich beef, while the rosemary enhances the herbal notes from the sear.
Serve immediately with your choice of sides. Each slice should be perfectly pink in the center with a caramelized crust that gives way to tender, juicy meat. The reverse sear method guarantees this level of doneness while maintaining the beef’s natural moisture and flavor. Enjoy the results of your careful preparation—this technique transforms simple ingredients into an extraordinary dining experience.
Pro Tips For Making 1 Lb Beef Tenderloin
- SEAR HARD, THEN BAKE: Get that pan screaming hot—we’re talking smoke-just-starting-to-rise heat—before adding the tenderloin. After the first 2 minutes of searing, pull it to 400°F (200°C) and bake uncovered; the crust will form in the oven, not your stovetop. I used to rush this, and the meat always tasted undercooked no matter the thermometer.
- SALT THE GARLIC: Crush those garlic cloves with a pinch of kosher salt before mincing—it keeps them from turning to mush and adds a subtle depth. I learned this the hard way after my garlic turned to paste in a pan sauce. Works for the tenderloin’s seasoning too: salt it generously 45 minutes before cooking, not just before searing.
- DON’T CUT INTO IT: Let that 1 lb tenderloin rest for at least 10 minutes under foil before slicing—yes, even if you’re dying to eat it. The juices redistribute, or you’ll end up with a dry, sad pile of meat. I know, I know, but trust the process. Your knife will thank you too.
- USE THE FAT: After searing, don’t pour out that golden beef fat—it’s liquid flavor. Deglaze the pan with a splash of olive oil (if needed) and a splash of red wine or broth, then reduce it into a quick sauce. This isn’t the prettiest method, but it’s the tastiest, and it takes 5 minutes max.
Best sauces and condiments for this dish
Herb Butter Crust
The star of this dish is the herb butter crust, where 2 tablespoons cold unsalted butter infused with 4 smashed garlic cloves and ¼ cup fresh thyme creates a luxurious, golden finish. I always use Plugrá European-style butter—it melts cleaner than American brands and adds subtle richness.
For extra depth, add 1 teaspoon Dijon mustard to the butter mixture before searing. This isn’t just decoration; it’s the flavor bridge between the tenderloin’s richness and the garlic’s sharpness. 🌿
Red Wine Reduction
For a bold, elegant sauce, deglaze the cast-iron skillet after searing with ½ cup dry red wine (like Cabernet Sauvignon or Merlot). Simmer until reduced by half, then whisk in 1 tablespoon cold butter to gloss the sauce.
Strain and drizzle over sliced tenderloin—this adds a sophisticated touch without overpowering the beef’s natural flavor. A splash of beef stock (about 2 tablespoons) can thicken it further if needed.
Chimichurri Brightness
Balance the richness with homemade chimichurri: pulse 1 cup parsley, ¼ cup cilantro, 3 garlic cloves, 2 tablespoons red wine vinegar, ½ cup olive oil, and 1 teaspoon red pepper flakes in a food processor.
Spoon over slices for a vibrant, herby contrast. I love this on medium-rare cuts—it cuts through the fat while adding freshness. Store leftovers in an airtight container for up to 3 days.
Balsamic Glaze
For a sweet-tangy finish, simmer ¼ cup balsamic vinegar in a small saucepan until reduced to 2 tablespoons (about 5 minutes). Drizzle over slices just before serving—this adds a glossy sheen and brightens the plate.
Pair with roasted root vegetables for a restaurant-worthy presentation. For extra flair, add 1 teaspoon honey to the reduction for depth.
Garlic Aioli Dip
Whisk ½ cup mayonnaise, 1 roasted garlic clove, 1 teaspoon lemon juice, and ½ teaspoon smoked paprika for a creamy dip. Serve alongside sliced tenderloin for guests to dip their bread or extra meat.
This adds a cool, creamy contrast to the seared crust. Store in the fridge for up to 2 days—it’s perfect for leftovers.
Nutrition facts
Frequently asked questions
How do I know when the beef tenderloin is done with the reverse-sear method?
Use a meat thermometer to check the internal temperature. For medium-rare, aim for 125°F before slicing. The reverse-sear method ensures a juicy pink center while creating a caramelized crust. Never rely on color alone—beef can look done on the outside but remain undercooked inside.
Can I cook a 1 lb beef tenderloin at a higher temperature?
While you can roast it at 325°F instead of 275°F, the reverse-sear method relies on the low-and-slow approach to prevent overcooking. Higher temperatures risk drying out the meat before the final sear. Stick to 275°F for best results—it’s the secret to that perfect pink center.
What’s the best way to slice the beef tenderloin?
Always slice against the grain into 1-inch thick medallions for maximum tenderness. Use a sharp carving knife and cut perpendicular to the muscle fibers. For a cleaner presentation, slice at a slight angle. Rest the meat for 10 minutes before slicing to keep juices inside.
Can I use this recipe for a larger tenderloin?
Yes! Scale the cooking time by 30 minutes per pound at 275°F, but adjust the final sear time to 3-4 minutes per side for larger cuts. For example, a 2 lb tenderloin would need 60 minutes in the oven. Use a meat thermometer to guide doneness—125°F for medium-rare.
What if my cast-iron skillet isn’t hot enough for the final sear?
If the skillet isn’t smoking hot, the butter won’t brown properly, and you’ll miss that flavorful crust. Preheat it over medium-high heat for 5 minutes before adding oil. Test readiness by flicking a drop of water—it should sizzle and evaporate instantly. If needed, boost heat to high for 1-2 minutes.
