
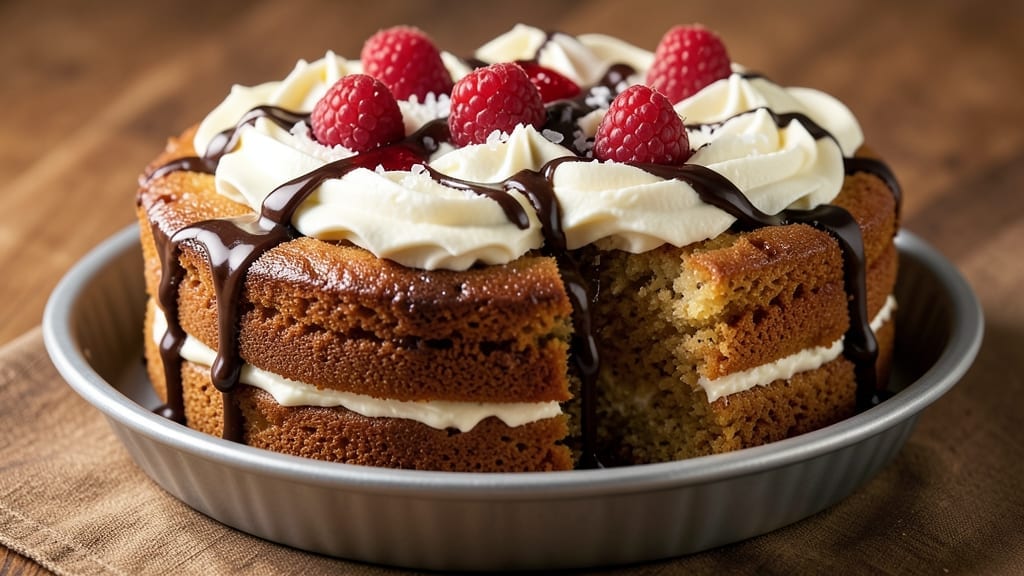
A 1 lb butter pound cake delivers the ultimate in rich, moist layers that crumble just right—every bite packed with vanilla essence and buttery decadence. This recipe uses a full pound of butter to create that signature tender crumb and dense texture that keeps slices perfect for days.
The secret lies in precise mixing and a gentle baking approach that preserves moisture without drying out the cake.
What sets this pound cake apart is its ability to handle generous frosting or fruit toppings without crumbling, making it ideal for celebrations or everyday indulgence. The cake’s layers stay moist for hours, thanks to the butter-to-flour ratio and a touch of sour cream in the batter.
Professional bakers swear by this method for achieving that signature pound cake texture at home.
By the time you pull it from the oven, you’ll have golden, even layers with a delicate crumb that’s both tender and sturdy enough to slice cleanly. The vanilla extract infuses every bite with warmth, while the butter creates that melt-in-your-mouth richness.
This cake is the foundation for any dessert—whether you’re frosting it with vanilla buttercream or serving it plain with fresh berries.
Perfect for birthdays, holidays, or whenever you crave a classic dessert that feels special. The recipe scales easily for larger gatherings, and leftovers stay fresh for days when stored properly. Let’s make this timeless treat that’ll become your new favorite.
Ingredients for 1 lb butter pound cake
Buttery richness meets vanilla bliss in this classic pound cake—every ingredient matters for that signature tender crumb.
| Ingredient | Amount | Notes |
|---|---|---|
| Unsalted Butter 🧈 | 1 lb | Room temperature, European style preferred |
| All-Purpose Flour 🌾 | 3 cups | Sifted, spooned and leveled |
| Granulated Sugar 🍚 | 2 cups | Superfine preferred for even texture |
| Pure Vanilla Extract 🌿 | 2 tbsp | Bourbon or Madagascar preferred |
| Large Eggs 🥚 | 6 whole | Room temperature, separated |
| Sour Cream 🥛 | ½ cup | Full-fat for moisture |
| Baking Powder 🧂 | 1 tbsp | Aluminum-free preferred |
| Salt 🧂 | ½ tsp | Fine sea salt |
| Milk 🥛 | ½ cup | Whole milk preferred |
| Vanilla Buttercream Frosting 🍰 | 2 cups | Classic vanilla buttercream |
| Powdered Sugar 🍚 | 1 cup | For buttercream |
| Heavy Whipping Cream 🥛 | 1 cup | Cold for buttercream |
The butter is non-negotiable here—European-style unsalted butter gives the most flavor, but any good-quality butter works. Plugrá or Land O’Lakes European Style are my go-tos, but even store-brand butter delivers if it’s fresh. Room temperature is key—press the butter with your fingers, and if it leaves a slight indent, it’s ready. The vanilla extract? Bourbon or Madagascar adds depth, but imitation works in a pinch. For the flour, King Arthur or Gold Medal are my favorites—they’re consistent and reliable. Sift it first to avoid dense layers, and spoon it into your measuring cup to pack it down properly.
No European butter? Regular unsalted butter works fine—just reduce the salt slightly if needed. Short on vanilla extract? Vanilla sugar works at half the amount, but real extract gives that professional touch. The sour cream keeps the cake moist, but Greek yogurt at the same quantity is a great swap. For the buttercream, store-bought frosting in a pinch—just add a splash of milk to loosen it. The powdered sugar should be sifted to avoid lumps, and the heavy cream should be very cold** for stiff peaks. If your buttercream is too sweet, add another tablespoon of milk to balance it out.
This cake stays fresh for 5-6 days wrapped tightly in the fridge, but honestly, it’s best eaten within 2 days. For longer storage, slice and freeze portions between parchment paper for up to 3 months. Bring slices to room temperature before serving—they’ll taste even better. The buttercream can be made a day ahead and stored in the fridge, just rewhip it before using. If you’re prepping for a party, assemble the cake the morning of—it holds up beautifully for 8 hours at room temperature.
Why You’ll Love This Recipe
- That 1: 1 butter-to-sugar ratio and vanilla extract? It delivers a moist, tender crumb with a whisper of buttery richness. Honestly, I’ve tried boxed mixes, but nothing beats this—it’s like biting into a cloud with a hint of sweetness.
- No-Fuss Mixing: I swear by this recipe’s simplicity—just cream butter and sugar, toss in eggs one at a time, and fold dry ingredients until just combined. No overmixing, no stress, and that rich butter flavor? It’s all in the creaming.
- Velvet Texture Magic: That 1:1 butter-to-sugar ratio and vanilla extract? It delivers a moist, tender crumb with a whisper of buttery richness. Honestly, I’ve tried boxed mixes, but nothing beats this—it’s like biting into a cloud with a hint of sweetness.
- Weeknight Wonder: Slice it fresh for breakfast or bake it ahead for dessert—this cake keeps beautifully for days. I’ll be real: I’ve had it cold, room temp, and even reheated with a sprinkle of powdered sugar. It’s my go-to for lazy mornings and impromptu guests.
Step-by-step instructions for 1 pound butter pound cake
Here’s how to create that legendary rich, moist pound cake with perfect layers and velvety vanilla frosting.
Prepare the Cake Pans and Mix Dry Ingredients
Preheat your oven to 350°F and generously grease two 9-inch round cake pans with the 1 lb unsalted butter, coating the bottom and sides thoroughly. Dust with 3 cups all-purpose flour and tap out any excess. Line the bottoms with parchment circles for easy removal.
In a medium bowl, whisk together the 3 cups all-purpose flour, 1 tbsp baking powder, and 0.5 tsp salt. Sift this mixture once to aerate it – this prevents dense cake layers. Set aside while you prepare the wet ingredients. The flour mixture should look light and fluffy, with no lumps remaining.
Cream Butter and Sugar Until Light and Fluffy
In a stand mixer fitted with the paddle attachment, beat the 1 lb unsalted butter (at room temperature) on medium speed until completely smooth with no lumps, about 2-3 minutes. Gradually add the 2 cups granulated sugar and beat on high speed for 4-5 minutes until the mixture is light, fluffy, and pale in color.
This creaming process incorporates air into the butter, which creates that signature tender crumb. You’ll know it’s ready when the mixture nearly doubles in volume and leaves ribbons when the beaters are lifted. Scrape down the sides of the bowl to ensure even mixing before adding the next ingredients.
Add Eggs and Sour Cream Alternately
Add the 6 whole large eggs, one at a time, mixing on low speed after each addition until fully incorporated. After the eggs are mixed in, add the 0.5 cup sour cream and mix until smooth. The batter should be thick and creamy at this stage.
With the mixer running on low speed, gradually add the dry ingredients in three additions, mixing just until combined after each addition. Be careful not to overmix – you want to maintain that light, airy texture. The batter should be thick but pourable. Scrape the bowl again to ensure all ingredients are evenly incorporated.
Divide Batter and Bake to Perfect Doneness
Divide the batter evenly between the prepared cake pans. Tap each pan gently on the counter to release any air bubbles. Bake for 25-30 minutes or until a toothpick inserted in the center comes out clean and the tops spring back when touched.
I like to rotate the pans halfway through baking for even browning. The cakes should be golden on top but not overly browned. Let them cool in the pans for 10 minutes before transferring to a wire rack to cool completely. This gradual cooling prevents cracking and helps the layers set properly.
Prepare and Frost the Vanilla Buttercream
While the cakes cool, prepare the 2 cups vanilla buttercream frosting by beating the 1 lb unsalted butter (softened) with the 1 cup powdered sugar and 2 tbsp pure vanilla extract until light and fluffy. In a separate bowl, whip the 1 cup heavy whipping cream to soft peaks, then gently fold it into the buttercream mixture.
Once the cakes are completely cool, level the tops if needed. Spread a thin layer of frosting on each cake layer to create a “crumb coat.” Chill in the refrigerator for 15 minutes to set. Then frost the entire cake with the remaining buttercream, creating smooth sides and swirling the top with a spatula for that classic pound cake look.
Pro Tips For Making 1 Lb Butter Pound Cake
- CREAM BUTTER FIRST: Mix the butter and sugar until it’s pale and thick—about 3-5 minutes with a stand mixer. I used to rush this, and the cake turned out dense and greasy. The butter needs to fully emulsify with the sugar to create that signature tender crumb.
- WEIGH YOUR FLOUR: Scoop and level the flour—don’t pack it or dump it straight from the bag. A pound cake is all about precision, and too much flour makes it dry. Use a kitchen scale if you can; it’s the only way to guarantee consistency.
- DON’T OVERMIX: Stop folding in the flour as soon as it’s just combined—lumps and all. Overmixing develops gluten, and that’s how you end up with a tough, chewy cake instead of the delicate texture this recipe promises.
- LET IT RISE: Bake it until the top springs back when gently pressed, not a second longer. I’ve seen people pull cakes too soon, and they sink like a lead balloon. A toothpick test is fine, but don’t rely on it—watch the center, not the edges.
Pro cooking tips for 1 lb butter pound cake
Butter Temperature Matters
The butter must be room temperature—press your finger into it, and it should leave a slight indent. If it’s too cold, the cake will be dense; if too soft, it won’t incorporate properly.
I use Plugrá European-style butter because it has a higher fat content and richer flavor, but Land O’Lakes European Style works too. Pro tip: Let it sit at room temperature for 1-2 hours before using. 🧈
Creaming for Perfect Texture
Cream the butter and sugar until light and fluffy—this step is non-negotiable. Use a stand mixer with the paddle attachment and beat on high speed for 4-5 minutes until the mixture nearly doubles in volume.
You’ll know it’s ready when it leaves ribbons when you lift the beaters. Scrape the bowl often to prevent overheating. This aeration creates the signature tender crumb. ⚡
Alternate Additions Prevent Overmixing
Add the eggs one at a time, mixing just until incorporated. Then alternate with the dry ingredients in three additions, mixing only until combined. Overmixing develops gluten, making the cake tough.
I use a spatula to gently fold in the last addition to preserve that light texture. The batter should be thick but pourable—like pudding. 🥣
Baking Time and Rotation
Bake at 350°F for 25-30 minutes until a toothpick comes out clean. Rotate the pans halfway through for even browning. The tops should be golden but not dark.
Let the cakes cool in the pans for 10 minutes before transferring to a wire rack. This gradual cooling prevents cracking and helps the layers set properly. 🔥
Crumb Coat Secret
Before frosting, spread a thin layer of buttercream on the cooled layers. Chill the cake for 15 minutes to set this “crumb coat.” This step prevents crumbs from ending up in your final frosting.
Once set, add the remaining frosting for a smooth, professional finish. Trust me, it makes all the difference! ✨
Buttercream Consistency
For the buttercream, beat the softened butter until light and fluffy, then gradually add powdered sugar. Whip the heavy cream to soft peaks and fold it in gently. If the frosting is too thick, add 1 tbsp milk at a time.
If too sweet, add another splash of milk to balance. The goal is a spreadable but stable consistency. 🍰
Nutrition facts
Frequently asked questions
Why does this pound cake use a full pound of butter?
The 1 lb butter creates that signature rich, moist texture that traditional pound cakes are famous for. The high fat content tenderizes the crumb while keeping it dense enough to hold up to generous frosting. This ratio (equal parts butter, sugar, eggs, and flour by weight) is what makes it different from lighter cakes.
Can I make this cake in a different pan size?
Yes! For a 9×13-inch pan, reduce baking time to 20-25 minutes at 350°F and use only one layer. For 8-inch pans, bake 30-35 minutes but you’ll need three layers. Always check doneness with a toothpick—it should come out clean. Adjust frosting quantity accordingly.
What’s the best way to store leftovers?
Wrap the cake tightly in plastic wrap and store at room temperature for 2 days or in the fridge for 5-6 days. For longer storage, slice and freeze portions between parchment paper for up to 3 months. Let slices return to room temperature before serving—they taste best when not cold!
My cake turned out dense—what went wrong?
Most likely your butter wasn’t room temperature or you overmixed the batter. Always press your finger into butter—it should leave a slight indent. Mix just until combined after adding dry ingredients. Also ensure your oven isn’t too hot (use an oven thermometer if needed) and don’t open the oven door during baking.
Can I substitute sour cream with something else?
Yes! Use ½ cup Greek yogurt or ½ cup buttermilk as direct substitutes. Both add moisture but may slightly alter texture—Greek yogurt makes it slightly tangier while buttermilk keeps it neutral. For a dairy-free option, try ½ cup coconut yogurt** (though flavor will differ).

- 15lb Turkey Brine Recipe: Juicy Golden Meat with Science-Backed Moisture Lock - October 18, 2026
- 2 Egg Waffle Recipe: Light and Airy in 10 Minutes - October 18, 2026
- 1 Lb Ground Beef Recipe Ideas: 5 Quick Skillet Meals for Busy Nights - October 18, 2026