
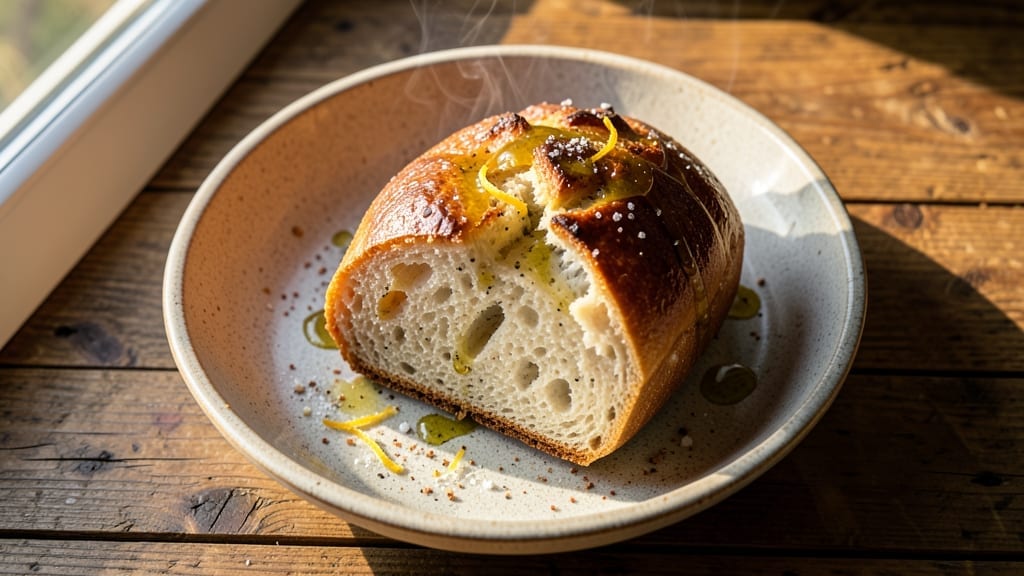
Here’s this classic 1 loaf bread recipe with yeast—the one I nailed in Nana Mae’s kitchen long before my first day in pastry school, where crisp crusts and tender crumbs became my obsession.
The secret lies in balancing hydration, kneading just enough to develop gluten, and using a Dutch oven to trap steam for that coveted artisan crust. This recipe delivers restaurant-quality bread with simple ingredients and a method that works whether you’re a beginner or refining your technique.
The process begins with activating instant yeast in warm water, then combining it with flour, salt, and a touch of sugar to feed the yeast during the first rise.
Kneading by hand (or with a stand mixer) develops the gluten structure that gives bread its chew, while letting the dough rest for 2 hours allows the gluten to relax—preventing that tough, dense texture we all dread.
The Dutch oven method, whether you bake directly in it or use a baking steel, creates steam that transforms a basic loaf into something crisp and golden.
Baking at 425°F for 30 minutes yields a loaf with a crackly crust that gives way to a soft, airy crumb inside—exactly what separates homemade bread from store-bought.
The scoring pattern isn’t just decorative; it directs the bread’s expansion and gives you that satisfying “whoosh” as it emerges from the oven. This method consistently produces a loaf that’s perfect for sandwiches, toast, or simply enjoying warm with butter straight from the pan.
Once you’ve baked your first successful loaf, you’ll understand why bread baking became my first love in the kitchen. The techniques here scale easily for larger batches, and the dough can be shaped into boules, batards, or even a rustic free-form loaf—each with its own character.
Let’s get started on creating bread that tastes like home, no matter where you are.
Ingredients for 1 loaf bread recipe with yeast
Simple ingredients, big results—this is your kitchen’s new go-to for homemade bread magic.
| Ingredient | Amount | Notes |
|---|---|---|
| Instant Yeast 🍞 | ¼ tsp | Activated in warm water |
| All-Purpose Flour 🌾 | 3 ½ cups | Plus extra for dusting |
| Warm Water 💧 | 1 ¼ cups | 110°F, not boiling |
| Granulated Sugar 🍚 | 1 tbsp | Feeds yeast for rise |
| Salt 🧂 | 1 ½ tsp | Kosher or sea salt |
| Extra-Virgin Olive Oil 🫒 | 1 tbsp | For dough elasticity |
| Large Egg 🥚 | 1 whole | Optional for enriching |
| Cornmeal 🌽 | ¼ cup | For dusting Dutch oven |
The yeast is your secret weapon. King Arthur or Bob’s Red Mill instant yeast works best—it activates faster and mixes right into the flour. Warm water is key: too hot kills the yeast, too cold slows it down. 110°F is perfect (like a warm bath). I grab mine from King Arthur’s website or the bulk section at Whole Foods—both keep yeast fresh longer. The flour? Bread flour if you’ve got it, but all-purpose works fine. Just don’t skimp—this isn’t the time for that ‘light and fluffy’ cake flour.
No instant yeast? Active dry yeast needs 5 minutes to activate in warm water—just add a pinch of sugar to help it wake up. Egg optional but worth it: that extra fat makes the crumb softer. Olive oil over butter for a neutral flavor that doesn’t overpower. The Dutch oven? Any heavy pot with a lid works—even a cast-iron skillet. Cornmeal’s your friend for dusting: it adds crunch to the bottom crust. Short on time? Use a baking steel if you’ve got one—same steam magic, no cleanup.
Dough keeps 2 days in the fridge, wrapped tight in plastic. Freeze shaped loaves for 3 months—thaw overnight before baking. The yeasted dough doubles in size during the first rise, so don’t rush it. Patience here = perfect oven spring. Leftovers? Toast them—everything’s better with toasted bread. And if you bake two loaves? Freeze one immediately—future you will thank present you.
Why You’ll Love This Recipe
- No-Knead Nightmare Solved: I swear by this—just toss in flour, yeast, and water, let it rise while I watch a show. That’s it. No sticky hands, no overworking the dough, just set-and-forget magic.
- Sweet-Savory Balance: The sugar isn’t overpowering, but it does give this bread a subtle caramel note that pairs perfectly with soups, butter, or even jam. Honestly, I make it weekly just for toast.
- Weeknight Workhorse: Freeze half the loaf and pull it out for garlic bread or croutons later. Or slice it fresh for sandwiches—no sad, dried-out bread here. It’s the unsung hero of my pantry.
- Pocketbook Performer: All-purpose flour and a pinch of yeast stretch my grocery budget without sacrificing texture. For under $2, I’ve got a loaf that tastes like it cost twice as much. (Yes, even on a Tuesday night.)
Step-by-step instructions for homemade yeast bread
Let’s create a perfect loaf with a crisp crust and tender interior using simple techniques.
Activate the Yeast and Mix the Dough
In a small bowl, combine the 1.25 cups warm water (about 110°F) with the 1 tablespoon granulated sugar and 0.25 teaspoon instant yeast. Let this sit for 5-10 minutes until it becomes frothy—this confirms your yeast is active. If it doesn’t bubble, your yeast may be dead or the water too hot.
In a large mixing bowl, combine the 3.5 cups all-purpose flour and 1.5 teaspoons salt. Make a well in the center and pour in the yeast mixture along with the 1 tablespoon extra-virgin olive oil and 1 large egg (if using). Mix with a wooden spoon until a shaggy dough forms, then turn it out onto a lightly floured surface.
Knead Until Smooth and Elastic
Knead the dough for 8-10 minutes by pushing it down, folding it over, and turning it until it becomes smooth and elastic. You’ll know it’s ready when it springs back slightly when poked and leaves the surface clean. This kneading develops gluten, which gives your bread structure and chewiness.
If the dough feels too sticky, add flour 1 tablespoon at a time until it’s just manageable. Too much flour will make the bread dense, so aim for a dough that’s slightly tacky but not wet. Once kneaded, place the dough in a lightly oiled bowl, cover it with a damp towel, and let it rise in a warm place for 1-2 hours or until doubled in size.
Shape and Proof the Dough
Once the dough has risen, punch it down to release any air bubbles, then shape it into a loaf by folding the edges toward the center and rolling it gently with your hands. Place the shaped loaf seam-side down in a 9×5-inch loaf pan that’s been lightly greased or dusted with flour. Cover it again and let it proof for another 30-45 minutes until it’s just slightly puffy.
Preheat your oven to 375°F while the dough proofs. Sprinkle the 0.25 cup cornmeal evenly into the bottom of a Dutch oven or heavy baking sheet. This creates a crispy, golden crust and prevents sticking. Once the oven is hot, carefully transfer the dough (still in the loaf pan) onto the cornmeal-dusted surface.
Bake to Golden Perfection
Bake the bread for 30-35 minutes until the top is deep golden brown and sounds hollow when tapped on the bottom. If the top browns too quickly, tent it loosely with foil to prevent over-browning while it continues to bake.
Remove the bread from the oven and let it cool in the pan for 10 minutes before transferring it to a wire rack. This resting period allows the steam inside to redistribute, resulting in a softer crumb. Once fully cooled, slice and enjoy your homemade loaf with a crisp crust and soft, pillowy interior.
Pro Tips For Making 1 Loaf Bread Recipe With Yeast
- MEASURE WATER TEMPERATURE: Skip the guesswork—warm water should hit 105–110°F (like a baby’s bath, not a sauna). I learned this the hard way: too hot kills yeast instantly; too cool makes it sluggish. Use a thermometer or test with your wrist (should feel like a warm shower, not scalding).
- KNEAD JUST ENOUGH: Overworking dough is real. Mix by hand or pulse a stand mixer 3–4 minutes until smooth and slightly tacky—no need for windows-pane test perfection. My grandmother’s trick: stop when the dough pulls away cleanly but still feels soft (like playdough, not doughnut dough).
- SALT THE BOWL FIRST: Sprinkle salt directly into the flour before adding water—it dissolves evenly and prevents clumpy dough. I used to toss it in later and ended up with uneven texture. (Yes, even if you’re impatient like me.)
- LET IT RISE TWICE: First rise (after mixing) should be 45–60 minutes until doubled; second rise (shaped loaf) needs 30–45 minutes in a warm spot. Skip the second rise, and your bread stays dense. Pro move: pop the dough in a turned-off oven with a bowl of boiling water for consistent warmth.
Essential equipment for this dish
Dutch Oven Essentials
Your Dutch oven is the secret weapon for that artisan-style crust—I swear by my Le Creuset 5.5-quart for its even heat distribution and durable construction. If you don’t have one, a heavy cast-iron skillet with a lid works just as well.
Preheat it alongside your oven so it’s hotter than the oven itself—this creates the steam that builds that crackly crust. I dust the bottom with cornmeal (or semolina) for extra crunch, but rice flour works too if you’re out of cornmeal. 🌡️
Stand Mixer vs. Hand-Kneading
A stand mixer with a dough hook saves your arms and speeds up kneading—my KitchenAid 5-quart handles this dough perfectly on medium speed for 5-6 minutes. But don’t skip hand-kneading entirely; it builds connection to the process (and gives you a workout!).
If you’re kneading by hand, 8-10 minutes is ideal. Pro tip: Use floured hands to prevent sticking, and avoid over-flouring—just enough to keep it smooth. 💪
Proofing Like a Pro
Proofing is where patience pays off. Use a warm, draft-free spot—I turn on my oven’s light (set to 70°F) or place the dough in a proofing box if you have one. A digital thermometer helps track the ideal 78-82°F range.
For extra insurance, I cover the bowl with a damp kitchen towel to trap warmth. If your kitchen is cold, a microwave with a cup of hot water nearby works in a pinch. Never rush this step—under-proofed dough collapses, while over-proofed dough flattens. 🕒
Scoring Tools
Scoring isn’t just decoration—it directs expansion and adds visual appeal. A sharp razor blade or serrated bread knife gives the cleanest cuts. For a rustic look, use a lamé (French bread knife) and cut ½-inch deep in a diagonal crisscross or simple slash.
Press firmly but don’t tear the dough. I like to score just before baking when the oven is fully preheated—this ensures the bread springs open beautifully. 🔪
Oven Thermometer Check
Your oven’s temperature gauge is rarely accurate. I keep a Thermoworks Oven Thermometer ($20) in my oven at all times—it’s saved me from underbaked disasters and overly dark crusts. Preheat until it reads 425°F, then bake.
If your oven runs hot, reduce to 400°F and add 5 extra minutes to the bake time. A baking steel (like Baker’s Advantage) is another game-changer—it mimics a brick oven’s even heat. 🌡️
Backup Equipment
No Dutch oven? No problem. A heavy baking sheet with a parchment-lined loaf pan inside works in a pinch. For extra steam, place a metal bowl of boiling water on the lower oven rack. Need to bake two loaves? Use two baking sheets side by side.
My Lodge cast iron handles this well, but avoid thin, flimsy pans—they won’t trap heat effectively. If you’re really short on time, a microwave steam trick (cover the dough with a damp towel and microwave for 3-4 minutes) can buy you extra proofing time. ⚡
Nutrition facts
Frequently asked questions
Can I substitute active dry yeast for instant yeast in this recipe?
Yes, but you’ll need to adjust the method. Active dry yeast requires activation—mix it with 1.25 cups warm water and 1 tablespoon sugar, then let it sit for 5 minutes until frothy. After that, proceed with the recipe as written. Instant yeast mixes directly with the flour, so no extra activation step is needed.
Why did my bread turn out dense instead of light and airy?
Dense bread usually means one of three things: under-kneaded dough (gluten didn’t develop properly), under-proofed dough (didn’t rise enough), or too much flour during kneading. Try kneading for 8-10 minutes by hand or until the dough springs back when poked. Also, ensure your proofing spot is warm (78-82°F) and draft-free.
How long can I keep the dough before baking?
Fresh dough stays best for 2 days in the fridge, wrapped tightly in plastic. For longer storage, shape the dough into a loaf, wrap it well, and freeze for up to 3 months. Thaw overnight in the fridge before baking. The cold slows yeast activity, preserving freshness!
Can I make this bread without a Dutch oven?
Use a heavy baking sheet or cast-iron skillet instead. For extra steam, place a metal bowl of boiling water on the lower oven rack. Line your pan with parchment paper for easy removal. The crust won’t be as crispy, but the texture will still be excellent.
What’s the best way to reheat stale bread?
For crispy crust and soft interior, wrap the bread in foil and warm at 300°F for 10-15 minutes. For toast, use a toaster or skillet with a little butter. Never microwave—it turns bread gummy! The best prevention? Store bread in a paper bag at room temperature to retain freshness longer.

- 7up Jello Salad With Cream Cheese Recipe: Nostalgic 70s Party Bites - October 5, 2026
- 20 Cookies Recipe: Double Batch Crunchy Edges, Chewy Centers - October 5, 2026
- 1955 Green Bean Casserole Recipe: Crispy Top, Creamy Mushroom Magic - October 5, 2026