
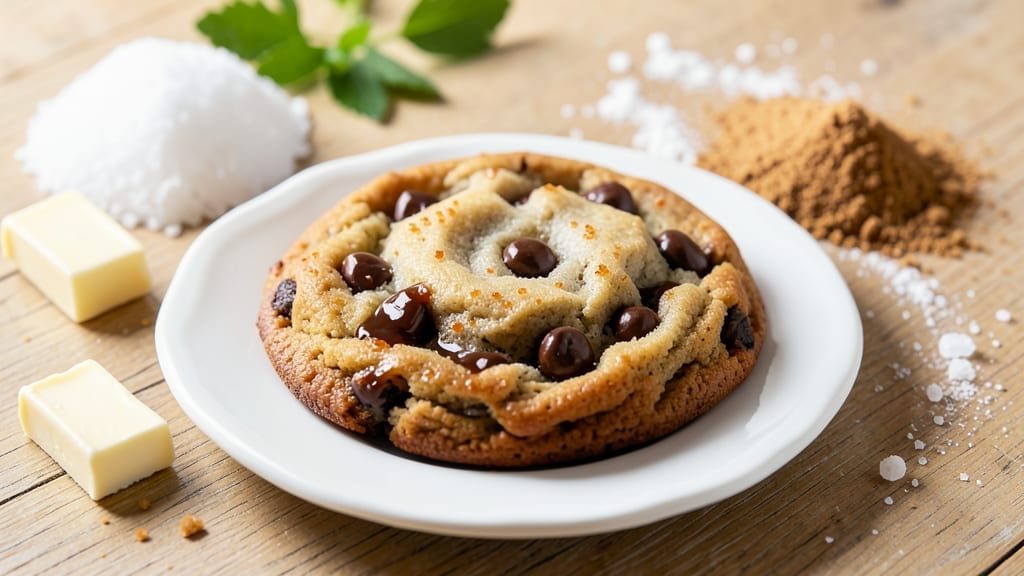
This 1-minute microwave chocolate chip cookie recipe delivers the same warm, gooey magic you crave without the 15-minute wait. 🔥 Perfect for late-night cravings or when you need a quick dessert fix, this method transforms simple ingredients into crispy-edged, chewy-centered cookies in just 60 seconds.
The secret lies in precise microwave timing and a few clever tricks to ensure they bake evenly without drying out.
What makes this recipe work is the combination of butter, sugar, and chocolate chips—all mixed together and microwaved in a single mug. No rolling dough, no oven preheating, and no mess.
The key is using a high-wattage microwave (1000W or higher) and stopping the cooking process just before the edges look set. This ensures the centers stay soft and gooey while the edges develop that perfect golden-brown crust.
By the time you pull your cookie from the microwave, you’ll have a warm, melty chocolate chip cookie with crispy edges and a tender center that’s impossible to resist.
The aroma alone will make your kitchen smell like a bakery, and the texture—crispy yet soft—is exactly what you’d expect from a freshly baked cookie. It’s the perfect balance of convenience and indulgence.
This method works equally well for single-serving cookies or a batch of four made in a microwave-safe dish. Whether you’re craving a quick treat or need a fast dessert for guests, this recipe delivers restaurant-quality results in minutes.
Ready to transform your microwave into a cookie maker? Let’s get started!
Ingredients for 1 minute microwave chocolate chip cookie
Four ingredients transform into crispy-edged, gooey chocolate chip cookies in just 60 seconds—no oven needed!
| Ingredient | Amount | Notes |
|---|---|---|
| Unsalted Butter 🧈 | ½ cup | Softened, not melted, for best texture |
| Granulated Sugar 🍚 | ½ cup | Light brown sugar for chewier cookies |
| Packed Brown Sugar 🍚 | ¼ cup | Enhances moisture and caramel flavor |
| All-Purpose Flour 🌾 | ½ cup | Sifted for even baking |
| Baking Powder 🍞 | ½ tsp | Ensures proper rise |
| Salt 🧂 | ¼ tsp | Kosher salt for balanced flavor |
| Vanilla Extract 🌸 | 1 tsp | Pure vanilla for authentic flavor |
| Semi-Sweet Chocolate Chips 🍫 | ½ cup | High-quality chips for melty texture |
| Milk 🥛 | 1 tbsp | Any kind, for moisture |
The butter is non-negotiable here—use unsalted for full flavor control. Trader Joe’s or Land O’Lakes are great for quality, but any brand works. Softened butter (not melted) gives you that perfect cookie texture. The sugars? Brown sugar is key—it keeps the cookies chewy and adds that caramelized depth. If you’re short on time, light brown sugar is fine, but dark brown will give you a deeper molasses flavor. The chocolate chips? Nestlé or Ghirardelli are my go-tos—they melt beautifully and don’t get grainy. Pro tip: if your chips are old, toast them in the microwave for 20 seconds first to revive their snap.
No vanilla extract? Vanilla bean paste works too—just use half the amount. Short on milk? Heavy cream or even water will work in a pinch, but milk adds that perfect tenderness. The baking powder is crucial—don’t skip it or your cookies will be flat. If you’re making these for a crowd, double the batch and use a microwave-safe mug or small bowl for each serving. The flour? King Arthur or Bob’s Red Mill are my favorites, but any all-purpose will do. Just make sure it’s fresh—flour loses its lift over time. And if you’re feeling fancy, swap half the chocolate chips for white chocolate or butterscotch chips—trust me, it’s a game-changer.
These cookies are best eaten immediately after microwaving—that’s when they’re at their peak gooeyness. But if you need to reheat, pop them back in the microwave for 5-10 seconds. Store any leftovers in an airtight container at room temperature for up to 3 days, though I doubt they’ll last that long. For extra crispy edges, press the dough firmly into the mug before microwaving. And if your microwave isn’t high-wattage? Use a microwave-safe plate instead of a mug—it cooks more evenly. The secret to perfect cookies every time? Stop microwaving when the edges look just set—they’ll keep cooking for a few seconds after you take them out.
Why You’ll Love This Recipe
- Here’s what sold me: the brown sugar caramelizes just enough to give these edges that perfect snap, while the butter keeps them tender. Add chocolate chips, and suddenly you’ve got a cookie that tastes like it spent hours in the oven—not 60 seconds.
- No Mixing Needed: I swear by this—just toss the softened butter, sugars, and flour into a bowl, stir it until it looks right (no measuring cups, no fuss), then microwave it. The dough comes together faster than I can scroll through my phone.
- That Crispy-Chewy Magic: Here’s what sold me: the brown sugar caramelizes just enough to give these edges that perfect snap, while the butter keeps them tender. Add chocolate chips, and suddenly you’ve got a cookie that tastes like it spent hours in the oven—not 60 seconds.
- Last-Minute Hero: Between us, these are my go-to when I forgot to pull out the cookie dough or when company shows up unannounced. They’re ready while your coffee’s still brewing, and honestly? No one will guess they’re microwave-made.
Step-by-step instructions for 1 minute microwave chocolate chip cookies
Here’s how to transform simple ingredients into warm, gooey cookies in under a minute—no oven required!
🍳 Step 1: Mix Wet Ingredients for Perfect Texture
In a microwave-safe bowl, combine the 0.5 cup unsalted butter and both sugars (0.5 cup granulated sugar and 0.25 cup packed brown sugar). Microwave for 10-15 seconds until the butter just begins to melt—it should be soft and creamy, not liquid. This creates the perfect base for chewy cookies.
Add the 1 tsp vanilla extract and 1 tbsp milk, then mix vigorously with a fork until completely combined. The mixture should look thick and glossy—this ensures your cookies will have that signature chewy texture. If it seems too stiff, add an extra ½ tbsp milk to loosen it slightly.
👨🍳 Step 2: Fold in Dry Ingredients and Chocolate
In a separate bowl, whisk together the 0.5 cup all-purpose flour, 0.5 tsp baking powder, and 0.25 tsp salt. Gradually add this dry mixture to the wet ingredients, folding gently with a spatula until just combined—you should still see small flour streaks. Overmixing develops gluten, which makes cookies tough.
Fold in the 0.5 cup semi-sweet chocolate chips by hand, ensuring even distribution. The chips should be spread throughout the dough but not completely submerged—this guarantees pockets of melty chocolate in every bite. Once mixed, transfer the dough to a microwave-safe plate or bowl.
🔥 Step 3: Shape and Microwave for Instant Cookies
Using a spoon or small scoop, portion the dough into 4 equal mounds (about 1.5 tablespoons each), spacing them 2 inches apart on a microwave-safe plate. Flatten each mound slightly with your fingers—this prevents them from spreading too much during cooking.
Microwave on high power for 45-60 seconds. Watch closely after 30 seconds—you’re aiming for golden edges with a slightly soft center. The cookies will continue cooking from residual heat, so pull them out when they look 80% done. If they seem undercooked, microwave for an additional 5-10 seconds.
⏰ Step 4: Rest and Serve for Maximum Gooeyness
Let the cookies rest on the plate for 1-2 minutes before transferring to a wire rack. This brief pause allows the chocolate chips to soften completely and the cookies to set slightly—preventing them from being too crumbly. The edges should be crisp, while the centers remain soft and chewy.
Serve immediately while still warm for the ultimate experience. These cookies are best enjoyed straight from the microwave, with a glass of cold milk or a cup of coffee. The chocolate chips should be melty and the edges just firm enough to hold their shape—proof that microwave magic can deliver restaurant-quality results!
Pro Tips For Making 1 Minute Microwave Chocolate Chip Cookie
- Melt Butter Slowly: I learned this the hard way—dumping cold butter straight into the microwave makes it splatter like a science experiment. Instead, cut the butter into small cubes (think rice-sized) and microwave it for 10 seconds first. Stir it up, then add the sugars. This keeps things from getting messy and ensures even melting.
- Pack That Brown Sugar: Brown sugar is sneaky—it holds moisture like a sponge. If you scoop it straight from the bag, you’re adding extra liquid to your dough. Pack it firmly into your measuring cup and level it off. Trust me, your cookies will be chewier and less cakey if you skip the loose sugar.
- Don’t Overmix the Dough: This isn’t pie dough—you’re not trying to make it smooth. Once the flour and butter mix hits, stir just until combined. Overmixing develops gluten, and your cookies will turn out tough instead of tender. A few lumps? Doesn’t matter. Taste matters more.
- Use a Greased Plate: Microwave cookies stick like glue if your plate isn’t prepped. Lightly grease it with butter or spray it with oil—just enough so they slide off cleanly. No one wants to pry cookies off with a spatula. (Yes, even if you’re impatient like me.)
Regional styles of these flavors
Classic American Mug Cookies
This is the original version you’ve likely seen on social media—perfect for quick cravings. The recipe uses a single mug for each cookie, making it ideal for single servings. I recommend using a 12-ounce ceramic mug (like Pyrex or Corelle) for even cooking.
The key here is portioning the dough into 4 equal mounds in the mug, spacing them apart, then microwaving for 45-60 seconds on high. The mug’s shape helps create crispy edges while keeping the center soft. 🔥
Japanese Onigiri-Style Cookies
For a fun twist, try making these like Japanese onigiri—small, handheld bites. Use mini muffin liners or small silicone molds to shape the dough into tiny balls before microwaving. The result is a mini cookie about the size of a golf ball, perfect for snacking.
Microwave for 30-45 seconds—these cook faster due to their small size. Add a pinch of matcha powder to the dough for a Japanese-inspired flavor.
Southern-Style S’mores Cookies
Take your cookies to the next level by adding a graham cracker crumble and marshmallow fluff on top before microwaving. Press the dough into a small cast-iron skillet (microwave-safe) and top with 2 tbsp marshmallow fluff and 1 tbsp crushed graham crackers.
Microwave for 50-60 seconds until golden. The marshmallow will melt into a gooey layer, creating a s’mores-inspired cookie that’s perfect for campfire lovers.
European-Style Butter Cookies
For a richer, buttery texture, swap the milk for heavy cream and add 1 tbsp powdered sugar to the dough. This European-inspired version has a lighter, airier texture with a crispy edge.
Microwave in a small ramekin (about 4-ounce size) for 40-50 seconds—ramekins distribute heat evenly for a more refined result. Finish with a sprinkle of flaky sea salt for a gourmet touch.
Mexican Chocolate Twist
Give your cookies a Mexican-inspired flavor by replacing half the chocolate chips with Mexican chocolate chunks (like Abuelita or Iberia). Add ½ tsp cinnamon and ¼ tsp cayenne pepper to the dough for a subtle kick.
Microwave in a small cast-iron pan for 50-60 seconds—the spices deepen the chocolate flavor while keeping the texture chewy. Serve with a side of Mexican hot chocolate for the full experience. 🌶️
Kids’ Fun-Shaped Cookies
Let the kids get creative with cookie cutters! Press the dough into mini cookie cutters (like stars or hearts) on a microwave-safe plate before baking. Microwave for 30-40 seconds—smaller shapes cook faster.
For extra fun, add sprinkles on top before microwaving. These are perfect for birthday parties or after-school treats. Use Wilton mini cookie cutters for easy shaping.
Nutrition facts
Frequently asked questions
Can I make these cookies in a regular oven instead of a microwave?
For oven-baked versions, spread the dough into 1-inch thick rounds on a parchment-lined baking sheet and bake at 350°F for 10-12 minutes. The oven method creates slightly thicker cookies with a more traditional texture.
Why did my microwave cookies turn out dry or crumbly?
Overcooking is the most common issue—microwave times vary by wattage. Always stop when edges are 80% done and let them rest 1-2 minutes after microwaving. Also, ensure your butter is softened (not melted) and use a high-wattage microwave (1000W+).
Can I use a different type of chocolate?
Yes! Try white chocolate chips, dark chocolate chunks, or even peanut butter chips for variety. For a gourmet touch, fold in toasted nuts or sea salt flakes. Just remember that white chocolate melts faster, so watch closely during microwaving.
How do I adjust this recipe for dietary restrictions?
For gluten-free cookies, substitute the flour with a 1:1 gluten-free baking blend. Vegan versions replace butter with coconut oil and milk with almond milk. Reduce sugar by 20% if using sugar substitutes, but expect slightly denser cookies. Always check labels for cross-contamination warnings.
Can I make these cookies ahead of time?
Freshness is key, but you can prepare the dough 1 day ahead and store it in an airtight container in the fridge. When ready to bake, simply microwave as directed. For best results, eat within 3 days—the texture changes slightly after that. Freezing isn’t recommended as the chocolate chips may lose their snap.

- 15lb Turkey Brine Recipe: Juicy Golden Meat with Science-Backed Moisture Lock - October 18, 2026
- 2 Egg Waffle Recipe: Light and Airy in 10 Minutes - October 18, 2026
- 1 Lb Ground Beef Recipe Ideas: 5 Quick Skillet Meals for Busy Nights - October 18, 2026