
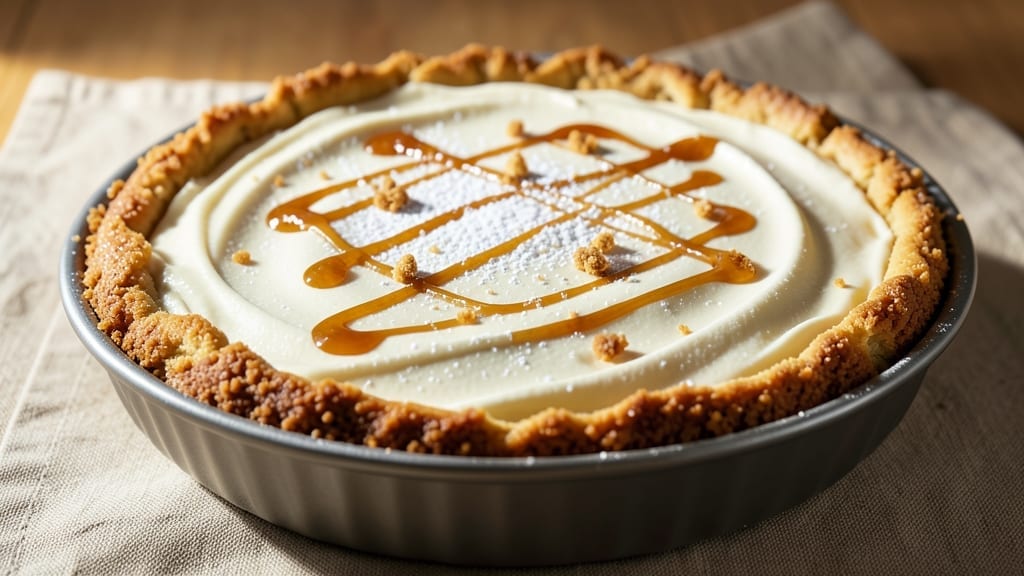
This 8-inch cheesecake recipe no bake delivers restaurant-quality results without a single minute in the oven—just layers of creamy filling, a buttery crust, and chilled perfection that impresses every time.
The secret lies in proper stabilizers (like gelatin or cornstarch) that create that signature silky texture while keeping the filling firm enough to slice. I’ve perfected this 8-inch version for parties, potlucks, or whenever you crave dessert with minimal effort and maximum impact.
The foundation starts with a foolproof crust—whether you choose a classic graham cracker base or a shortcut store-bought option—followed by a velvety filling that requires only a few minutes of mixing before chilling.
What sets this apart is the balance of sweetness and acidity in the filling, which prevents that dreaded “too sweet” aftertaste while keeping the cheesecake rich and satisfying. The key is patience during chilling; rushing this step is what causes cracks and uneven slices.
What you’ll end up with is a smooth, creamy cheesecake with clean slices that hold their shape, topped with fresh berries or a dusting of powdered sugar for that final touch of elegance.
This recipe scales perfectly for special occasions while remaining simple enough for weeknight cravings. Ready to master the art of no-bake cheesecake? Let’s get started with the ingredients.
For those watching their sugar intake, I’ve included a lightened-up variation using Greek yogurt and a touch of honey, though the classic version remains the crowd-pleaser.
The beauty of this recipe is its versatility—whether you’re serving it at room temperature or straight from the fridge, it delivers that cool, creamy satisfaction that makes it worth every bite. Here’s what you’ll need to create yours.
Ingredients for 8 inch cheesecake recipe no bake
Eight simple ingredients create this creamy, no-bake masterpiece that’s perfect for any occasion.
| Ingredient | Amount | Notes |
|---|---|---|
| Graham Cracker Crumbs 🍪 | 1 ½ cups | Homemade or store-bought, crushed finely |
| Unsalted Butter 🧈 | ½ cup | Melted, full-fat for best flavor |
| Granulated Sugar 🍚 | ½ cup | For crust sweetness balance |
| Cream Cheese (Full-Fat) 🧀 | 16 oz | Room temperature for smooth mixing |
| Heavy Whipping Cream 🥛 | 1 cup | Cold for best whipping |
| Sour Cream 🍶 | ½ cup | Full-fat for creaminess |
| Vanilla Extract 🌸 | 2 tsp | Pure vanilla for authentic flavor |
| Lemon Juice 🍋 | 2 tbsp | Freshly squeezed, balances sweetness |
| Cornstarch 🌾 | 2 tbsp | Stabilizes filling texture |
| Unflavored Gelatin 🍬 | 1 ½ tsp | Bloomed in 3 tbsp warm water |
| Powdered Sugar 🍚 | ¼ cup | For final dusting |
| Fresh Berries 🍓 | 1 ½ cups | Optional garnish (strawberries, raspberries) |
The cream cheese is the star here—full-fat, room-temperature blocks make all the difference. I always grab Philadelphia brand from the grocery store’s dairy section, but any quality brand works. The graham crackers? Honey Maid is my go-to for that buttery flavor, but any graham cracker crumbs will do. For the crust, don’t skip melting the butter first—it creates that perfect buttery base that sets the whole cheesecake apart. The cornstarch and gelatin might seem like small amounts, but they’re what give this cheesecake that signature no-bake firmness without being too dense.
No gelatin on hand? 2 extra tbsp of cornstarch will help stabilize, though texture might be slightly softer. Substituting sour cream? Full-fat Greek yogurt works too—just add an extra tablespoon of lemon juice to balance. Want to lighten it up? Swap half the cream cheese for low-fat cottage cheese (blended smooth), though the classic version remains the crowd-pleaser. The berries can be fresh or frozen (thawed)—whatever’s in season. For the crust, if you’re short on time, store-bought graham cracker crust from the baking aisle cuts prep time in half without sacrificing flavor.
This cheesecake needs patience—at least 4 hours in the fridge for perfect slices. I always make mine the night before so it’s ready to serve. The crust keeps well in an airtight container for 3 days, while the filling stays fresh for 5 days. For special occasions, I like to wrap individual slices in parchment and plastic wrap—they keep beautifully for 2 days** at room temperature. The berries should go on right before serving, or they’ll get soggy. Trust me on the chilling time—rushing this step is what causes cracks and uneven slices.
Why You’ll Love This Recipe
- No oven? No problem.: This cheesecake comes together while you sip your coffee—just mix, chill, and serve. No baking, no stress, no waiting for the house to smell like a bakery.
- Creamy with crunch.: That buttery graham crust gives way to silky cream cheese filling, and the sugar-kissed whipped cream topping? Honestly, it’s the kind of texture combo that makes you take a second slice without guilt.
- Weeknight hero.: I’ve used this for potlucks, last-minute dessert dates, and even packed it for lunch—yes, really. The 8-inch size is perfect for sharing, but also for when you’re too tired to care about portions.
- Budget-friendly indulgence.: Full-fat cream cheese and heavy cream make it rich, but it’s still cheaper than store-bought. Between us, this is the dessert I reach for when I want to feel fancy without breaking the bank.
Step-by-step instructions for no-bake cheesecake
Here’s how to build this creamy, chilled dessert with no oven required.
Prepare the Crust and Bloom the Gelatin
Start by melting the 0.5 cup unsalted butter in a small saucepan over low heat until it’s completely liquid but not browned. Remove from heat and stir in the 1.5 cups graham cracker crumbs and 0.5 cup granulated sugar until evenly coated. Press this mixture firmly into an 8-inch springform pan, using the back of a spoon to create an even, compact layer. Chill in the refrigerator while you prepare the filling.
In a small bowl, sprinkle the 1.5 tsp unflavored gelatin over 3 tablespoons warm water (not boiling) and let it bloom for 5 minutes. The gelatin will absorb the water and become translucent—this is your secret to a perfectly set filling. Keep this mixture nearby as you work on the cheesecake base.
Mix the Cheesecake Filling
In a large mixing bowl, beat the 16 oz cream cheese (full-fat) with an electric mixer on medium speed until completely smooth and free of lumps. This step is crucial—room temperature cream cheese blends more easily. Gradually add the 1 cup heavy whipping cream and 0.5 cup sour cream, mixing until fully incorporated. The mixture should be creamy and uniform, with no streaks of white.
Add the 2 tbsp lemon juice and 2 tsp vanilla extract, mixing just until combined. Then stir in the 2 tbsp cornstarch and the bloomed gelatin mixture. The cornstarch helps stabilize the texture, while the gelatin ensures a firm yet creamy finish. Scrape down the sides of the bowl with a spatula to make sure all ingredients are evenly distributed.
Assemble and Chill the Cheesecake
Pour the filling over the chilled crust in the springform pan, spreading it evenly with a spatula. Tap the pan gently on the counter a few times to remove any air bubbles that may have formed. Cover the pan with plastic wrap and refrigerate for at least 6 hours, or preferably overnight. This long chilling time is what gives this cheesecake its perfect texture—smooth, creamy, and firm enough to slice.
I like to set a timer for the 6-hour mark so I don’t forget. The cheesecake will keep in the fridge for up to 3 days, making it a great make-ahead dessert for gatherings or last-minute treats.
Serve with Fresh Berries
Once the cheesecake is fully set, run a knife around the edge to loosen it from the pan. Remove the springform ring and dust the top with the 0.25 cup powdered sugar using a fine-mesh sieve for an elegant finish. Arrange the 1.5 cups fresh berries on top or around the cheesecake for a pop of color and freshness.
Slice with a warm knife (dip it in hot water and wipe dry between cuts) for clean, perfect portions. Serve immediately or store any leftovers covered in the fridge for up to 2 days. The contrast of the cool, creamy cheesecake with the bright, juicy berries makes this dessert truly special.
Pro Tips For Making 8 Inch Cheesecake Recipe No Bake
- Melt Butter Slowly: I learned this the hard way—dumping melted butter into graham cracker crumbs too fast makes a soggy mess. Warm the butter in 10-second bursts in the microwave (just until liquid, not hot), then stir it into the crumbs gradually while pressing into the pan. The crust stays crisp without turning greasy.
- Chill Cream Cheese First: Full-fat cream cheese is stubborn when soft. Take it out of the fridge 30 minutes before mixing, but don’t let it sit too long—it’ll get grainy. If your kitchen’s warm, pop it in the freezer for 10 minutes to firm up before whipping. Trust me, your mixer will thank you (and so will your arms).
- Whip Cream to Stiff Peaks: Heavy whipping cream is finicky—overwhipped means butter, underwhipped means flat. Stop mixing when the peaks hold but still bend slightly. If you’re unsure, fold a spoonful into the cream cheese mixture: if it holds shape but doesn’t drip, you’re golden. No guesswork.
- Press Crust Evenly: Uneven pressure = cracks later. Use the bottom of a glass to press the crust firmly into the pan, especially the edges. Pack it tight enough that it resists when you lift the glass, but don’t overdo it—you’re not making a brick. A flat, even base keeps the filling from leaking.
Flavor customization for this dish
Citrus Twist Variations
Brighten up your cheesecake by swapping the lemon juice for orange zest and 1 tbsp lime juice. The citrus oils add a refreshing aroma that pairs beautifully with berries. I like to add 1 tsp grated orange zest directly to the filling for a subtle, sunny flavor.
For a stronger tropical vibe, try ½ cup passion fruit puree instead of lemon juice—it adds tangy sweetness without extra sugar. 🍊
Chocolate Lover’s Swap
Transform this into a decadent chocolate cheesecake by replacing the graham cracker crust with 1 cup crushed Oreos (or homemade chocolate cookie crumbs) mixed with 0.25 cup melted butter. For the filling, melt 4 oz dark chocolate (70% cocoa) with the heavy cream, then proceed with the recipe.
Top with whipped cream and chocolate shavings for a showstopper dessert. 🍫
Coffee & Spice Fusion
Add depth with 1 tbsp instant espresso powder dissolved in the warm water for blooming gelatin, then mix it into the filling. For warmth, fold in ½ tsp cinnamon and a pinch of cardamom with the vanilla.
Garnish with a dusting of cocoa powder and a sprinkle of crushed hazelnuts for texture. This variation is perfect for coffee lovers and holiday gatherings. ☕
Creamy Caramel Infusion
For a rich, buttery caramel flavor, replace the lemon juice with ½ cup caramel sauce (homemade or store-bought like Trader Joe’s).
Swap the graham cracker crust for a pecan shortbread crust (mix 1 cup pecans, ½ cup butter, and ½ cup sugar), then bake briefly for 5 minutes to set. The caramelized notes elevate the cheesecake to next-level indulgence. 🥜
Lightened-Up Greek Yogurt Version
Reduce sugar by using 8 oz low-fat cream cheese and ½ cup Greek yogurt (full-fat or nonfat) in place of sour cream. Add 1 tbsp honey and 1 tsp vanilla bean paste for natural sweetness.
The yogurt adds tanginess while cutting calories by about 20%. Top with fresh berries and a drizzle of honey for a balanced, lighter dessert. 🍯
Boozy Berry Liqueur Boost
Infuse the filling with 2 tbsp Chambord raspberry liqueur or 1 tbsp Grand Marnier> for a sophisticated twist. Pair with a blackberry compote** topping made by simmering 1 cup blackberries, 1 tbsp sugar, and 1 tsp balsamic vinegar until thickened.
The alcohol cooks off slightly, leaving behind fruity depth. 🍸
Nutrition facts
Frequently asked questions
Can I use a different crust instead of graham crackers?
For a nutty flavor, try 1.5 cups crushed pecans or 1 cup crushed gingersnaps mixed with melted butter. Chocolate lovers can use 1 cup crushed Oreos or a store-bought chocolate cookie crust. Just press it firmly into your 8-inch pan and chill before adding filling. The key is using 1.5 cups total crumbs to maintain structure.
Why does my no-bake cheesecake get watery?
Watery texture usually means the gelatin didn’t bloom properly or the chilling time was too short. Always bloom gelatin in warm water (not hot) for 5 minutes—it should become translucent. Also ensure you’re chilling for at least 6 hours (overnight is ideal). If it’s still too soft, add 1 extra tbsp cornstarch to the filling next time.
How do I prevent cracks in my cheesecake?
Cracks happen when the cheesecake sets too quickly or isn’t properly stabilized. Tap the pan gently on the counter after pouring filling to remove air bubbles, then chill uncovered for 1 hour before covering. For extra insurance, add 1 extra tbsp cornstarch to the filling. Also, avoid opening the fridge door frequently during chilling.
Can I make this cheesecake ahead of time?
Yes! This recipe is perfect for making ahead. Assemble the cheesecake 1 day before serving—it actually tastes better after 24 hours as flavors meld. Store covered in the fridge for up to 3 days. For serving, bring to room temperature for 30 minutes before slicing. The crust stays crispy when properly chilled.

- 6 Oz Chocolate Chip Cookie Recipe: Perfectly Balanced Crispy Edges and Chewy Hearts - September 25, 2026
- 6-Inch Coffee Cake Recipe: Vanilla Bean Swirls and Buttery Streusel Topping - September 25, 2026
- 1 Hour Soup Recipe: Velvety Richness Without the Wait - September 25, 2026