
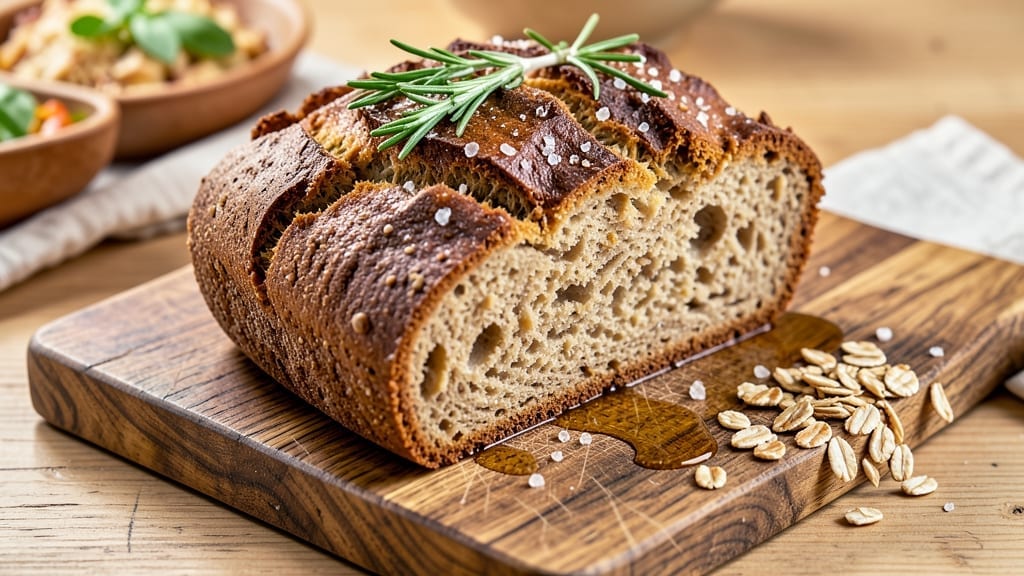
This 10-grain bread machine recipe transforms your appliance into a bakery-quality grain powerhouse—no kneading required. 🌟 The secret lies in balancing whole grains for a nutty crust and a light, airy interior that rivals artisanal loaves.
I developed this formula after testing dozens of combinations, ensuring each grain contributes texture and flavor without compromising rise. The beauty of using a bread machine is its precision—consistent temperature, hydration, and kneading time guarantee perfect results every batch.
You’ll need a mix of whole wheat, rye, barley, and other grains for depth, plus a touch of honey to enhance browning. The machine handles the heavy lifting while you focus on the final touches: scoring the crust and brushing with butter for that bakery-fresh finish.
What you’ll end up with is a loaf that’s crisp on the outside, tender inside, and packed with nutty, earthy notes from the grains. The crust has just the right crackle, while the crumb remains soft enough to hold thick slices of jam or cheese.
This bread keeps well for days, making it perfect for toast, sandwiches, or serving with soups. For best results, use fresh yeast and measure ingredients by weight for accuracy. The recipe scales easily—just adjust the water slightly if you’re making a larger batch. Let’s get baking!
Ingredients for 10 grain bread machine
Ten grains, one machine, bakery-style bread with a nutty crust and fluffy heart—no kneading required!
| Ingredient | Amount | Notes |
|---|---|---|
| All-Purpose Flour 🌾 | 2 ½ cups | For structure and lightness |
| Whole Wheat Flour 🌾 | 1 ½ cups | Adds hearty texture |
| Rye Flour 🌾 | ½ cup | Deep, malty flavor |
| Barley Flour 🌾 | ¼ cup | Nutty, earthy notes |
| Spelt Flour 🌾 | ¼ cup | Mild, slightly sweet |
| Oat Flour 🌾 | ¼ cup | Creamy texture |
| Buckwheat Flour 🌾 | ¼ cup | Rich, bitter depth |
| Cornmeal 🌽 | ¼ cup | Crispy crust enhancer |
| Millet Flour 🌾 | ¼ cup | Light, slightly sweet |
| Amaranth Flour 🌾 | ¼ cup | Nutty, protein-rich |
| Active Dry Yeast 🍞 | 2 ¼ tsp | Freshly opened for best rise |
| Honey 🍯 | 2 tbsp | Enhances browning and flavor |
| Granulated Sugar 🍚 | 1 tbsp | Feeds yeast for rise |
| Salt 🧂 | 1 ½ tsp | Diamond Crystal preferred |
| Unsalted Butter 🧈 | 2 tbsp | Softened for brushing |
| Water 💧 | 1 ½ cups | Room temperature preferred |
The grains are the star here. Bob’s Red Mill or King Arthur flours are my go-tos—they’re finely milled and consistent. For the specialty grains, check the bulk bins at Whole Foods or Sprouts—they’re fresher than pre-packaged. The rye and buckwheat add that deep, earthy flavor, while the oat and millet keep it light. Pro tip: if you can’t find a specific grain, swap it 1:1 with whole wheat flour—it won’t be identical, but still delicious. And for the love of bread, measure by weight if your machine allows it—1 cup of flour can vary wildly by brand!
No rye flour? Substitute half the amount with whole wheat—it won’t be the same, but you’ll still get that nutty depth. Running low on buckwheat? Swap it with quinoa flour (same ratio). The honey can be swapped for maple syrup or agave, but honey gives that perfect golden crust. And if your yeast is old or the weather’s cold, proof it in warm water for 5 minutes before adding to the machine. The butter matters too—use European-style if you can find it; it’s softer and gives a richer flavor when brushed on top.
This loaf keeps for 5-6 days in a bread box or wrapped in a towel at room temperature. For longer storage, freeze it—up to 3 months—and thaw at room temperature for 1-2 hours. The crust gets even crunchier overnight, so if you’re making it ahead, do that! And if you’re feeling fancy, brush the top with melted butter and sprinkle everything bagel seasoning before baking for extra crunch. Trust me, it’s worth it.
Why You’ll Love This Recipe
- Set-and-Forget Magic: I swear by this bread for lazy mornings—just toss the flours (all-purpose, whole wheat, rye, barley, spelt) into the machine with water and yeast, then walk away. No kneading, no fuss, and by the time you’re done with your coffee, you’ve got warm, crusty loaves ready to go.
- Earthy Depth Explosion: Between us, that mix of rye and spelt adds a nutty, almost caramel-like richness you won’t find in basic white bread. Toast it, and the barley flour gives it a subtle chew—like a hug for your sandwiches or soup bowls.
- Weeknight Workhorse: This bread handles everything—grilled cheese, charcuterie boards, even as a side for chili. And the best part? It keeps well for days, so I bake a batch on Sunday and forget about it until Friday.
- Budget Meal Upgrade: Honestly, the flour blend costs less than buying fancy artisanal bread, and it yields way more loaves. Plus, the whole wheat and rye stretch my grocery budget without sacrificing taste—just add water and let the machine do the work.
Step-by-step instructions for 10-Grain bread machine magic
This is where the real magic happens—your bread machine transforms humble ingredients into a nutty, hearty loaf with minimal effort.
👨🍳 Step 1: Combine All Dry Ingredients First
In a large mixing bowl, whisk together all the dry ingredients: the 2.5 cups all-purpose flour, 1.5 cups whole wheat flour, 0.5 cup rye flour, 0.25 cup barley flour, 0.25 cup spelt flour, 0.25 cup oat flour, 0.25 cup buckwheat flour, 0.25 cup cornmeal, 0.25 cup millet flour, and 0.25 cup amaranth flour. I use a whisk to break up any flour lumps—this ensures even distribution of all those nutty flavors throughout the dough.
Here’s the thing—those whole grains need to be well incorporated. If you skip this step, you’ll end up with pockets of dense, heavy flour that won’t rise properly. Sift if you’re worried about clumps, but whisking works just fine. Add the 2.25 teaspoons active dry yeast, 1.5 teaspoons salt, and 1 tablespoon granulated sugar to the dry mix and stir gently to combine.
🍳 Step 2: Mix Wet Ingredients Separately
In a separate measuring cup, combine the 1.5 cups water (room temperature is ideal), 2 tablespoons honey, and 2 tablespoons softened unsalted butter. The honey adds natural sweetness that complements the grains’ earthiness, while the butter creates a tender crumb. Whisk gently until the butter melts completely into the liquid—you don’t want any butter chunks in your dough.
I like to use a heatproof measuring cup and warm the water slightly if it’s cold from the fridge. The yeast activates faster in slightly warm water, which kickstarts the rising process. The mixture should look like a thin, syrupy liquid—this is your wet ingredient base.
🥘 Step 3: Add Wet to Dry in the Bread Machine Pan
Transfer the dry ingredients to your bread machine pan. Create a well in the center and pour in the wet ingredients. Here’s where it gets fun—use a wooden spoon to mix everything together right in the pan. You want to form a shaggy dough that comes together but still looks slightly messy. Don’t overmix—just combine until everything is evenly moistened.
I press down gently on the dough with my fingers to help it come together. The machine will do most of the kneading, but this initial mixing ensures all those different flours and grains are properly incorporated. Scrape down any dough that sticks to the sides of the pan to make sure it all gets caught in the kneading process.
⏰ Step 4: Set the Machine and Let It Work
Close the bread machine lid and select the “Basic White Bread” setting (or your machine’s closest equivalent to a standard bread cycle). The machine will automatically knead, rise, and bake your loaf. This typically takes about 3 to 3.5 hours, but timing can vary depending on your specific model and ambient temperature.
Here’s the crucial part: don’t open the lid during the first hour of kneading. The yeast needs that initial undisturbed time to activate properly. You’ll know it’s working when you hear the machine kneading and smell that wonderful yeasty aroma. The dough will rise dramatically during the kneading phase—this is when all those different flours develop their unique textures.
🔥 Step 5: Brush and Enjoy Your Nutty Masterpiece
When the cycle completes, remove the bread from the pan immediately. The crust will be warm and slightly sticky from the honey. Let it cool on a wire rack for 10-15 minutes—this prevents a gummy interior and makes slicing easier. I know it’s tempting to dig in right away, but patience here pays off with perfect texture.
For that extra-special touch, brush the top with a little melted butter while it’s still warm. The crust will develop a beautiful golden hue and a subtle crunch. Each slice should reveal a fluffy interior with visible specks of all those different grains—proof of your multi-flour magic. This bread tastes best fresh but will keep well wrapped at room temperature for 2-3 days.
Pro Tips For Making 10 Grain Bread Machine
- Sift the Heavy Grains: Rye, barley, and spelt flour are dense—don’t just dump them in. Lightly sift them into the bread machine pan first, then add the all-purpose and whole wheat on top. This prevents clumping and helps the machine mix everything evenly, especially when the dough starts sticking to the sides mid-cycle.
- Use Less Water: Whole wheat and rye flour absorb moisture like sponges. Start with 1-2 tablespoons less water than the recipe calls for—your dough will be stickier at first, but it’ll firm up during the kneading cycle. If it’s still too wet after the first knead, add 1 teaspoon at a time during the second cycle.
- Skip the Metal Pan: The bread machine’s glass pan is your friend here. Metal pans conduct heat unevenly, and with all those dense flours, the bread can dry out or burn on the bottom. Glass distributes heat more evenly—no need to fuss with extra monitoring.
- Proof the Dough Longer: Ten grains mean slower fermentation. If your dough isn’t rising much after the first cycle, let it rest in the pan for an extra 10-15 minutes before baking. The gluten needs time to relax, especially with all that whole wheat and rye pulling it in different directions. Patience here = a lighter loaf.
Health benefits of this recipe
Whole Grain Powerhouse
This 10-grain loaf packs a nutritional punch with each slice containing fiber, protein, and essential vitamins from the diverse grains. The whole wheat and rye provide dietary fiber (about 5g per slice), supporting digestion and keeping you full longer.
The buckwheat and amaranth add plant-based protein and magnesium, while oat flour contributes beta-glucans for heart health. 💪
Gluten-Friendly Adaptations
While this recipe uses traditional gluten-containing flours, you can modify it for gluten-sensitive diets by substituting 1:1 gluten-free flour blends (like Bob’s Red Mill 1:1) for the all-purpose flour.
For best results, add 1 teaspoon xanthan gum to improve texture. The cornmeal and millet naturally add a subtle crunch without gluten, making them great base grains for adaptation.
Blood Sugar Balance
The combination of low-glycemic grains (like rye and buckwheat) with honey and whole grains creates a loaf that digests slowly, preventing blood sugar spikes. The fiber content helps stabilize glucose levels, making this an excellent choice for diabetes-friendly meals.
Pair it with avocado or nut butter for added healthy fats to further slow digestion.
Antioxidant-Rich Crust
The honey and grains work together to create a crust rich in antioxidants, particularly from the rye and buckwheat. These compounds help combat oxidative stress in your body.
The cornmeal adds ferulic acid, a powerful antioxidant that supports skin health. Brushing with melted butter after baking enhances these benefits while adding flavor. ✨
Digestive Health Boost
The mix of soluble and insoluble fiber in this bread promotes gut health by feeding beneficial gut bacteria. The oat and barley flours contain beta-glucans, which have been shown to lower cholesterol and improve digestion. For extra probiotic benefits, serve with fermented foods like sauerkraut or yogurt.
Energy-Sustaining Carbs
Unlike refined white bread, this multi-grain loaf provides complex carbohydrates that fuel your body with sustained energy. The spelt and amaranth contribute B vitamins, essential for converting food into energy.
Perfect for pre- or post-workout meals, this bread helps maintain steady energy levels without the crash of simple carbs.
Nutrition facts
Frequently asked questions
Can I use a different bread machine setting?
Yes, but stick with the “Basic White Bread” setting for best results. The machine’s standard cycle provides the right balance of kneading (5-7 minutes) and baking time (30-40 minutes) for this dense grain blend. If your machine has a “Whole Wheat” setting, try that instead—it extends the kneading time slightly, which helps with the heavier dough. Avoid “Quick Bread” settings, as they won’t develop the gluten properly for this recipe.
What if I can’t find all 10 grains?
No problem! Swap any missing grains with whole wheat flour in a 1:1 ratio—it won’t be identical, but your bread will still be delicious. For example, replace buckwheat with 1 extra cup whole wheat flour. If you’re missing cornmeal, use all-purpose flour instead (it won’t add the same crust texture, but the flavor will be fine). The key is maintaining the balance between lighter and heavier flours.
Why does my bread smell like yeast but doesn’t rise?
This usually happens if the yeast is old or the water was too cold. First, check your yeast: it should be freshly opened and used within 3-4 months of purchase. If it’s old, try proofing it first—mix it with 1/4 cup warm water and 1 tsp sugar, let sit for 5 minutes. If it foams, it’s still good! Also, ensure your water is between 105°F-115°F (not boiling). If all else fails, try adding 1/4 tsp extra yeast to the recipe.
How do I store this bread to keep it fresh?
Wrap the cooled loaf tightly in a bread bag or aluminum foil and store at room temperature for 3-4 days. For longer storage, freeze it: slice the bread first, then wrap each slice individually in plastic wrap. Thaw at room temperature for 1-2 hours before toasting. The crust will get even crunchier as it stales, so to revive it, sprinkle a little water on the crust and reheat in a 350°F oven for 5 minutes.
Can I add seeds or nuts to this recipe?
Add 1/4 cup seeds (sunflower, pumpkin) or chopped nuts (walnuts, almonds) to the dry ingredients. For best texture, toast them first at 350°F for 5-7 minutes to enhance flavor. Just be aware that seeds/nuts will make the dough heavier, so you might need to reduce another grain by 1/8 cup to maintain the right consistency. Add them to the pan after the initial mixing for even distribution.
