
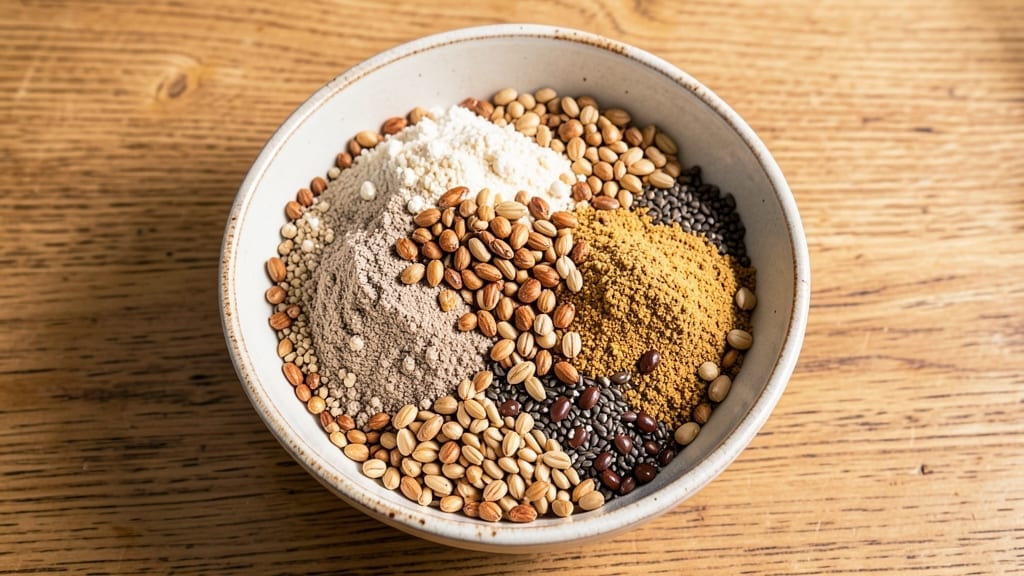
This 10-grain bread mix recipe transforms whole-grain baking from intimidating to effortless—no kneading required. The secret lies in a carefully balanced dry mix that develops flavor and texture through proper hydration and proofing.
I designed this recipe after years of perfecting the art of no-knead bread, ensuring a loaf with crusty exterior and tender crumb every time, even with dense whole grains.
The beauty of this method is its flexibility: use it for sandwich loaves, dinner rolls, or even pizza dough. The dry mix includes 10 whole grains—from hearty wheat berries to nutty flax—for superior nutrition without sacrificing texture.
The key steps (proper proofing time, steam for oven spring) make all the difference between dense bread and a light, airy loaf with restaurant-quality crunch.
What you’ll end up with is a golden-brown loaf with a crisp crust and soft interior, packed with nutty, whole-grain flavor. The no-knead technique saves time while delivering professional results—ideal for busy weeknights or weekend baking projects. Once you try this, store-bought bread will never compare again.
For best results, let the dough rest overnight in the fridge—this slow fermentation develops deeper flavor and improves texture. Whether you’re a beginner or seasoned baker, this recipe delivers foolproof whole-grain perfection with minimal effort.
Ingredients for 10 grain bread mix
Ten whole grains and simple pantry staples create restaurant-quality bread with no kneading required.
| Ingredient | Amount | Notes |
|---|---|---|
| Wheat Berries 🌾 | ½ cup | Toasted lightly for nutty flavor |
| Spelt Flour 🌾 | 1 ½ cups | Stone-ground for optimal texture |
| Whole Wheat Flour 🌾 | 1 cup | High-protein for structure |
| Brown Rice Flour 🌾 | ½ cup | Adds chewiness to crumb |
| Flaxseeds 🌾 | ¼ cup | Ground for omega-3 richness |
| Oat Groats 🌾 | ¼ cup | Steamed for digestibility |
| Buckwheat Flour 🌾 | ¼ cup | Earthy depth to flavor |
| Quinoa Flour 🌾 | ¼ cup | Complete protein source |
| Barley Flour 🌾 | ¼ cup | Malt flavor development |
| Rye Flour 🌾 | ¼ cup | Dark, robust character |
| Active Dry Yeast 🍞 | 2 tsps | Freshly opened for viability |
| Honey 🍯 | 1 tbsp | Feeds yeast and adds sweetness |
| Kosher Salt 🧂 | 2 tsps | Diamond Crystal preferred |
| Olive Oil 🫒 | ½ cup | Extra-virgin for richness |
| Warm Water 💧 | 1 ½ cups | 105°F for optimal yeast activation |
The grain selection is non-negotiable for texture and nutrition. Bob’s Red Mill or King Arthur Flour carry all these flours in bulk, making it easy to stock up. For the wheat berries, toast them lightly in a dry pan before grinding to enhance their nutty flavor—this step makes all the difference. If you can’t find buckwheat flour, toasted buckwheat groats ground into flour work perfectly. The quinoa and flaxseeds add protein and structure, while the rye brings depth. Store all flours in airtight containers away from light to prevent rancidity.
No spelt flour? Substitute with whole wheat flour, though texture will be slightly denser. Running short on honey? Maple syrup at a 1:1 ratio works beautifully. The yeast must be active—test it in warm water with a pinch of sugar; if it bubbles within 5 minutes, it’s fresh. For the olive oil, avoid light or refined oils—they lack the fruity notes that carry through to the crust. If you’re making this for high-altitude baking, increase the yeast by 25% and reduce the water by 10% to compensate for drier conditions.
This dry mix keeps 3 months in a sealed container at room temperature, but the yeast will lose potency after 2 months. For best flavor development, ferment the dough overnight in the fridge—this slow rise enhances the grain flavors dramatically. Once baked, cool the loaves completely on a wire rack to prevent sogginess. Store wrapped in a clean kitchen towel for 3 days at room temperature, or freeze for up to 3 months in airtight bags. Reheat slices at 350°F for 5 minutes to restore crispness.
Why You’ll Love This Recipe
- No-Fuss Mix: I swear by this blend—just toss in water, let it sit, then bake. No kneading, no fuss, and the wheat berries and spelt add texture without the work.
- Nutty Earthy Crunch: That first bite? The toasted wheat berries and flaxseeds give it a satisfying bite, while the spelt keeps it tender. It’s the kind of bread that makes you slow down and savor.
- Lunchbox Legend: Between us, this is my go-to for school lunches or office snacks. The brown rice flour keeps it sturdy, and the whole wheat adds that “I packed this myself” vibe—no sad soggy sandwiches here.
- Pantry Stretch: Honestly, this mix uses ingredients you might already have, and what’s left over? Freeze it for next week. I’ve made a loaf from scraps of brown rice flour and still ended up with something solid.
Step-by-step instructions for 10-Grain bread mix recipe
This no-knead method transforms your grain blend into artisanal bread with minimal effort.
Prepare the Grain Components
Toast the 0.5 cup wheat berries in a dry skillet over medium heat for 5-6 minutes, stirring constantly until they release an aromatic, nutty scent and develop light golden spots. Transfer immediately to a bowl and let cool completely—this prevents moisture from interfering with the yeast activation later.
In a separate bowl, steam the 0.25 cup oat groats by covering them with 1 cup boiling water and letting them sit for 10 minutes. This process softens them for better digestibility while preserving their texture. Drain any excess water through a fine-mesh strainer before adding to your dry ingredients.
Combine Dry Ingredients
In a large mixing bowl, whisk together all the flours: 1.5 cups spelt flour, 1 cup whole wheat flour, 0.5 cup brown rice flour, 0.25 cup buckwheat flour, 0.25 cup quinoa flour, 0.25 cup barley flour, and 0.25 cup rye flour. Sift the mixture through a fine-mesh sieve to eliminate any lumps and aerate the flours for a lighter crumb structure.
Add the ground 0.25 cup flaxseeds, 2 tsps kosher salt, and the cooled toasted wheat berries to the flour mixture. Mix gently with a wooden spoon to distribute the ingredients evenly. This step ensures each bite contains the complex flavors and textures from all ten grains.
Activate the Yeast
In a separate bowl, combine the 1.5 cups warm water (tested at 105°F with a thermometer) with 1 tbsp honey and 2 tsps active dry yeast. Let this mixture sit for 5-10 minutes until it becomes foamy and develops a slight yeasty aroma. This confirms the yeast is active and ready to leaven your bread.
If the mixture doesn’t foam within 10 minutes, discard it and start fresh with new yeast—this is critical for proper rise. The honey not only feeds the yeast but also adds subtle sweetness that complements the earthy grain flavors.
Mix and Hydrate the Dough
Create a well in the center of your dry ingredients and pour in the yeast mixture along with the 0.5 cup olive oil. Using a sturdy wooden spoon or dough whisk, gradually incorporate the liquids into the dry ingredients, mixing just until a shaggy dough forms. Avoid overmixing at this stage—you want to preserve the individual grain textures.
The dough should be thick but manageable, similar to wet sand. If it appears too dry, add 1 tablespoon warm water at a time until it reaches this consistency. The olive oil provides richness and helps create a tender crumb while preventing the bread from drying out during baking.
First Rise and Shape
Cover the mixing bowl with a damp kitchen towel and let the dough rise in a warm place (ideally 75-80°F) for 1.5 to 2 hours, or until it has nearly doubled in volume. You’ll know it’s ready when the dough springs back slowly when gently pressed with a finger—this indicates proper fermentation.
Once risen, transfer the dough to a lightly floured surface and shape it into a round loaf. For best results, use a bench scraper to create a smooth surface and tighten the dough from the bottom up. This shaping technique creates tension in the dough that translates to an open crumb structure in the final loaf.
Final Proof and Bake
Place the shaped dough on a parchment-lined baking sheet and cover it again with the damp towel. Let it proof for an additional 30-45 minutes until it has risen about 25% more. The dough should look slightly puffy and feel springy when touched.
Preheat your oven to 375°F with a Dutch oven inside for 30 minutes to create a steam environment. Carefully transfer the dough (with parchment) into the hot Dutch oven, cover, and bake for 30 minutes. Remove the lid and bake for another 15-20 minutes until the bread develops a deep golden-brown crust and sounds hollow when tapped on the bottom.
Cool and Enjoy
Remove the bread from the oven and transfer it to a wire rack to cool completely for at least 1 hour. This resting period allows the internal structure to set, preventing a gummy texture. The bread will continue to develop its full flavor as it cools.
Slice the bread with a serrated knife for clean cuts that showcase the beautiful open crumb structure. Each slice should reveal the distinct textures from the various grains—from the chewy brown rice flour to the nutty wheat berries. Store any leftovers wrapped in a bread bag at room temperature for up to 3 days or freeze for longer storage.
Pro Tips For Making 10 Grain Bread Mix
- TOAST THE BERRIES: DESCRIPTION: Skip the raw wheat berries—toss them in a dry pan over medium heat for 5-7 minutes until they smell nutty and pop. I learned this the hard way: raw berries make the dough dense and chewy. This step adds depth without extra work.
- GRIND FLAXSEEDS FRESH: DESCRIPTION: Don’t use pre-ground flaxseed meal—it goes rancid fast. Grind whole flaxseeds in a spice grinder or coffee grinder right before mixing. The texture stays consistent, and the flavor stays fresh. (Yes, even if you’re impatient like me.)
- WEIGH FLOURS PRECISELY: DESCRIPTION: Spoon and level your flours—especially the brown rice flour—into the scale. Packing it down changes hydration, and this mix is already tricky. A kitchen scale guarantees consistent results. (Your future self will thank you.)
- COLD PROOF THE DOUGH: DESCRIPTION: After kneading, let the dough rest in the fridge overnight. The gluten relaxes, and the flavors meld—no extra effort, just patience. I skip this when I’m lazy, but the bread is noticeably better when I don’t.
Pro cooking tips for perfect results
Proofing Perfection
The first rise is where the magic happens—don’t rush it! Place your dough in a warm spot (I use my oven with the light on) for 1.5-2 hours until it nearly doubles.
A good test: gently press a finger into the dough—if it springs back slowly (not immediately), it’s ready. Overproofing here leads to dense bread, while underproofing means poor oven spring. 🌡️
For the final proof, aim for 30-45 minutes until the dough rises 25% more. Cold weather? Extend proofing by 15-20 minutes. The goal is a slightly puffy, springy loaf that’s ready to bake.
Pro tip: Use a digital thermometer to confirm your kitchen is 75-80°F—yeast works best in consistent warmth.
Dutch Oven Secrets
Preheat your Dutch oven in the oven for 30 minutes before baking—this creates steam that’s essential for oven spring. I use a 5-quart Lodge Dutch oven because it retains heat perfectly.
When transferring the dough, slide it onto parchment paper first to avoid sticking. The steam helps develop that crusty exterior and open crumb you’re after.
After 30 minutes covered, remove the lid and bake uncovered for 15-20 minutes until golden brown. Tap the bottom—it should sound hollow. If the crust browns too quickly, tent with foil to prevent burning. The internal temperature should reach 190-200°F for a perfect bake.
Steam Control
Steam is your best friend for a crusty exterior. If you don’t have a Dutch oven, create steam by placing a metal bowl of boiling water on the oven rack.
For extra crunch, I spray the dough with water before baking—this helps develop the Maillard reaction for that deep golden color. Just don’t overdo it, or you’ll end up with a soggy loaf.
For a shinier crust, brush the baked loaf with melted butter or olive oil while still warm. This adds flavor and keeps the bread moist longer.
Store leftovers in a bread bag, but for maximum freshness, slice and freeze—just reheat slices in a 350°F oven for 5 minutes to restore crispness.
Troubleshooting Tips
If your dough feels too sticky, add 1 tablespoon flour at a time until it’s manageable. Too dry? Add 1 tablespoon water. Overmixing? The dough will be tough—stop as soon as it comes together.
For a denser loaf, check your yeast (it might be old) or reduce proofing time slightly. Underproofed dough collapses during baking, so always err on the side of patience. 💪
No Dutch oven? Use a baking stone or steel—preheat it in the oven for 1 hour before baking. For a softer crumb, reduce the rye flour slightly (it’s denser).
If your bread tastes bland, let it cool completely before slicing—flavor develops as it rests. And if the crust is pale, bake uncovered for 5 extra minutes at the end.
Nutrition facts
Frequently asked questions
Can I make this 10-grain bread mix without a Dutch oven?
If you don’t have a Dutch oven, use a baking stone or steel instead. Preheat it in the oven for 1 hour before baking to create steam. For extra crunch, place a metal bowl of boiling water on the oven rack during the first 15 minutes of baking. This mimics the steam environment needed for a crispy crust and open crumb.
How do I store the dry mix before using it?
Keep your 10-grain bread mix in an airtight container at room temperature for up to 3 months. For longer storage, freeze the mix in a sealed bag for up to 6 months. Just make sure to let it come to room temperature before using. The yeast will lose potency after 2 months, so for best results, use the mix within that time frame.
Can I substitute any of the flours in this recipe?
Yes, but with some adjustments. For example, if you can’t find spelt flour, substitute it with whole wheat flour, though the texture will be slightly denser. For buckwheat flour, toasted buckwheat groats ground into flour work well. If you’re avoiding gluten, you can replace up to 50% of the flours with certified gluten-free options like brown rice flour or sorghum flour, but expect a different texture.
Why is my bread turning out dense instead of light and airy?
Dense bread usually results from underproofing, old yeast, or overmixing. Make sure your yeast is active by testing it in warm water with a pinch of sugar—it should foam within 5 minutes. Also, ensure your dough rises until it nearly doubles in size during the first proof. If your kitchen is cold, extend proofing time by 15-20 minutes or use a warm spot like your oven with the light on.
Can I make this bread mix into dinner rolls instead of a loaf?
Yes! Divide the dough into 8 equal portions and shape them into balls. Place them on a parchment-lined baking sheet, cover, and let them proof for 45-60 minutes until puffy. Bake at 375°F for 15-18 minutes until golden brown. For extra flavor, brush the rolls with melted butter or olive oil after baking. This works especially well for sandwiches or serving with soups.

- 12 Bean Chili Recipe: Hearty Slow-Cooked Depth With 12 Legumes - October 17, 2026
- 5 Seed Bread Recipe: Nutty Crunch and Artisan Flavor in One Loaf - October 17, 2026
- 1 Lb Macaroni Salad Recipe: Bold, Crunchy, and Crowd-Pleasing - October 17, 2026