
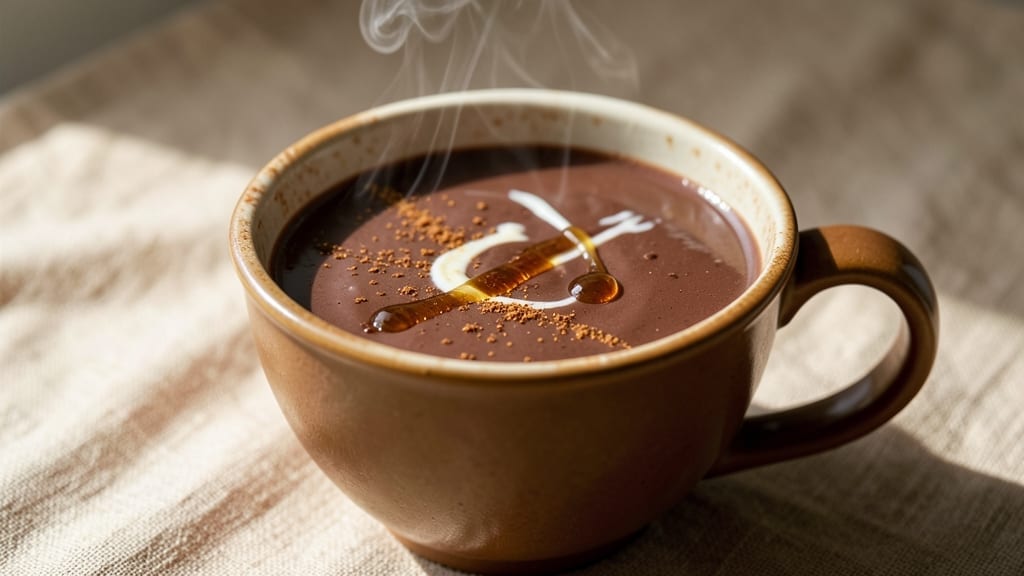
This 100% cocoa hot chocolate recipe delivers the deepest, smoothest chocolate experience without the bitterness—perfect for cozy evenings or special treats. The secret lies in tempering the cocoa properly, which unlocks its natural richness while keeping the texture velvety.
I developed this version after years of testing, ensuring every sip feels luxurious yet balanced, even with plant-based milk.
The process is surprisingly simple: melt the cocoa with a splash of milk to create a smooth paste, then gradually whisk in the remaining liquid while heating. This method eliminates graininess and ensures a silky, restaurant-quality finish.
Optional spices like cinnamon or vanilla add warmth without overpowering the cocoa’s pure flavor—trust me, the difference is noticeable.
What you’ll end up with is a deep chocolate drink that swirls beautifully in your mug, with a frothy top that feels indulgent yet stays light.
The cocoa’s natural sweetness shines through, while a pinch of salt enhances the flavor profile. Serve with dairy-free marshmallows or whipped coconut cream for extra decadence.
This recipe works equally well for holiday gatherings or solo comfort nights—just adjust sweetness to taste. The beauty of 100% cocoa is its versatility: use it as a base for spiced drinks, mix-ins for smoothies, or even a rich glaze for desserts. Let’s make it!
Ingredients for 100 cocoa hot chocolate
Rich cocoa, velvety plant milk, and subtle spices transform into luxurious hot chocolate.
| Ingredient | Amount | Notes |
|---|---|---|
| Unsweetened Cocoa Powder 🍫 | ½ cup | 100% cocoa, Dutch-processed preferred |
| Unsweetened Plant-Based Milk 🥛 | 2 cups | Oat or almond milk for creaminess |
| Pure Maple Syrup 🍯 | ¼ cup | Grade B for robust flavor |
| Coconut Oil 🫒 | 2 tbsp | Refined for neutral flavor |
| Vanilla Extract 🌿 | 1 tsp | Pure Madagascar vanilla preferred |
| Ground Cinnamon 🍃 | ½ tsp | Ceylon cinnamon for subtle warmth |
| Fine Sea Salt 🧂 | ¼ tsp | Diamond Crystal preferred |
| Dairy-Free Marshmallows 🍬 | ½ cup | Mini marshmallows for topping |
| Whipped Coconut Cream 🥥 | ¼ cup | Chilled for fluffy texture |
| Dark Chocolate Chips 🍫 | ¼ cup | 70% cocoa, vegan-friendly |
| Orange Zest 🍊 | 1 tsp | Freshly grated for brightness |
The cocoa powder is the foundation—100% cocoa, Dutch-processed ensures a smooth, bitterness-free base. Navitas or Guittard brands deliver consistent quality, but any high-quality powder works. For the milk, oat milk provides the best creaminess, though almond or cashew milk are solid alternatives. The coconut oil serves as both a fat source and emulsifier, creating that signature velvety texture. I always grab Grade B maple syrup for its robust flavor, but Grade A works in a pinch. Freshly grated orange zest adds brightness without overpowering the chocolate’s depth—organic oranges from the produce section work best.
No cocoa powder? Melted dark chocolate (70% or higher) works—just omit the coconut oil since chocolate contains fat. Swap maple syrup for agave nectar or date syrup if needed. For the spices, Mexican cinnamon has a bolder flavor than Ceylon, but use half the amount. The marshmallows can be any dairy-free brand—Dandies or Trader Joe’s are reliable choices. If you prefer a lighter finish, reduce the whipped coconut cream by half. The dark chocolate chips add texture and can be omitted if you prefer a smoother drink, but I find they elevate the overall experience.
Store the dry ingredients—cocoa, cinnamon, salt—in airtight containers in a cool, dark place for up to 12 months. The plant-based milk should be refrigerated and used within 5 days of opening. For a quick assembly, pre-portion the cocoa, spices, and sweetener in small jars. The whipped coconut cream should be chilled until ready to use, as it firms up nicely. This recipe reheats beautifully—simply whisk in a splash of hot water or plant milk to restore creaminess. Leftovers keep for 3 days in the fridge, though I recommend making fresh batches for the best experience.
Why You’ll Love This Recipe
- This is my winter go-to: sipped by the fire, packed in thermoses for hikes, or even turned into a quick dessert (yes, I’ve drizzled it over ice cream). Works for date nights or solo movie marathons—no judgment.
- Just 5 Ingredients: I swear by this—no cluttered pantry raid, no measuring cup chaos. You grab cocoa, milk, syrup, coconut oil, and vanilla, then melt them together. That’s it. No substitutions, no stress.
- Rich Without Guilt: The cocoa powder packs a serious punch, but the maple syrup keeps it from tasting bitter. The coconut oil? Smooths it out like a velvet blanket, and the vanilla ties it all together—deep, warm, and just sweet enough.
- Cold Nights, Hot Fix: This is my winter go-to: sipped by the fire, packed in thermoses for hikes, or even turned into a quick dessert (yes, I’ve drizzled it over ice cream). Works for date nights or solo movie marathons—no judgment.
Step-by-step instructions for 100% cocoa hot chocolate
Transform pure cocoa into velvety hot chocolate with balanced richness and subtle brightness.
Melt the Cocoa and Coconut Oil
In a medium saucepan over medium-low heat, whisk together the 0.5 cup unsweetened cocoa powder and 2 tablespoons coconut oil. The cocoa should dissolve completely, creating a smooth paste. I like to use a whisk here to prevent any clumping—this is your flavor foundation.
Stir continuously for 2-3 minutes until the mixture reaches 160°F and becomes fully integrated. You’ll notice the aroma deepen as the cocoa releases its complex chocolate notes. This step is crucial—if you rush it, you’ll end up with grainy hot chocolate. The coconut oil helps create that luxurious mouthfeel without dairy.
Incorporate Liquid Ingredients
Gradually whisk in the 2 cups unsweetened plant-based milk, 0.25 cup pure maple syrup, and 1 teaspoon vanilla extract while maintaining medium-low heat. The mixture will thicken slightly as it warms, creating a rich base. I add the milk slowly to prevent any sudden temperature spikes that could cause the cocoa to separate.
Continue whisking for 5-7 minutes until the mixture reaches 175°F and becomes thick but still pourable. You’ll see the surface develop a glossy sheen—this indicates proper emulsification. The maple syrup here balances the cocoa’s intensity while adding natural sweetness. If you notice any scum forming on top, skim it off immediately to keep your chocolate smooth.
Season and Finish the Base
Remove the saucepan from heat and stir in the 0.5 teaspoon ground cinnamon, 0.25 teaspoon fine sea salt, and 1 teaspoon orange zest. The cinnamon adds warmth while the salt enhances all the flavors. The orange zest might seem unusual, but it brightens the richness without overpowering the chocolate.
Let the mixture rest for 2 minutes to allow the flavors to meld. You’ll notice the aroma become more complex—chocolatey with citrusy undertones. This is where the magic happens. The orange zest might seem subtle now, but it will become more pronounced as the chocolate cools. Taste and adjust sweetness if needed, though the maple syrup and cocoa should balance perfectly.
Create the Signature Swirls
Pour 2/3 of the hot chocolate into individual mugs. In a small bowl, gently fold together the 0.25 cup whipped coconut cream and 0.25 cup dark chocolate chips until just combined. The coconut cream should remain light and fluffy—don’t overmix or it will deflate.
Using a spoon, carefully layer the coconut cream mixture over the hot chocolate in each mug. Then, using a skewer or long spoon, gently swirl the mixture in circular motions to create marbled patterns. The contrast between the rich chocolate and creamy topping should be visually striking. For extra drama, you can even add a sprinkle of cinnamon on top.
Top and Serve Immediately
Return the remaining 1/3 of hot chocolate to the saucepan and gently reheat to 180°F—just until steaming. Pour this over the swirled layers to create a gradient effect. Top each mug with 0.5 cup dairy-free marshmallows and serve immediately while the contrast between hot and cold elements is most dramatic.
The marshmallows should puff slightly from the heat, creating a delightful textural contrast. Each sip should deliver layers of flavor: the deep cocoa base, the citrusy brightness, and the creamy coconut finish. For best results, serve with a cinnamon stick for stirring and enjoy while the chocolate maintains its velvety texture.
Pro Tips For Making 100 Cocoa Hot Chocolate
- Whisk in Stages: Dump all the cocoa powder in at once and you’ll end up with lumps—trust me, I’ve done it. Instead, sprinkle half the cocoa into the warm milk first and whisk until smooth before adding the rest. This keeps the texture velvety, not grainy.
- Melt the Coconut Oil First: If you’re using solid coconut oil, melt it into the milk before adding cocoa—no need to wait for it to dissolve later. Just heat the milk and oil together until the oil vanishes, then proceed. Saves time and avoids clumpy bits.
- Don’t Overheat the Maple Syrup: Simmering maple syrup too long turns it bitter, and you’ll taste it in every sip. Just warm it gently (or even microwave it for 20 seconds) until it’s fluid enough to stir in. The goal is warmth, not caramelization.
- Use Cold Vanilla Extract: Add the vanilla extract last, straight from the fridge, to lock in its flavor. Warm vanilla loses its punch—this is the difference between a subtle hint and a bold aroma. A splash of cold milk to the extract first helps too.
Troubleshooting your 100 cocoa hot chocolate
Grainy Texture Fix
If your hot chocolate turns grainy, you likely heated it too quickly or didn’t melt the cocoa properly. Solution: Always use medium-low heat and whisk constantly while melting the 0.5 cup cocoa powder with 2 tbsp coconut oil first.
For extra insurance, sift the cocoa powder before adding it to the pan—this prevents clumps from forming. If graininess appears, whisk in 1 tbsp extra coconut oil or a splash of hot plant milk to smooth it out. 🌟
Too Thin or Watery
A thin, watery consistency usually means you used too much liquid or didn’t reduce the mixture enough. Fix it: Simmer the hot chocolate uncovered over low heat for 3-5 extra minutes, stirring frequently.
If it’s still too thin, whisk in 1 tbsp cornstarch mixed with 1 tbsp cold water to thicken it. For future batches, reduce the plant milk by ¼ cup or increase the cocoa powder by 1 tbsp.
Bitter Aftertaste
Excessive bitterness happens when the cocoa isn’t balanced with enough sweetness or fat. Adjust it: Add 1 extra tbsp maple syrup or ½ tsp vanilla extract to mellow the flavor. If the bitterness persists, try using Dutch-processed cocoa (like Navitas)—it’s naturally smoother.
For a quick fix, stir in 1 tsp coconut cream to round out the taste. A pinch of salt also helps balance bitterness by enhancing sweetness.
Separation Issues
If your hot chocolate splits into layers, it’s likely due to temperature shocks or insufficient emulsification. Prevent it: Never add cold milk directly to hot cocoa—always temper it by mixing in warm milk first. For a quick fix, whisk vigorously until smooth, then reheat gently.
To avoid future separation, use oat milk (it emulsifies better than almond milk) and stir continuously while heating. A hand mixer can help blend stubborn separations.
Lumpy Cocoa
Lumps form when cocoa isn’t fully dissolved or clumps are stirred in. Solve it: Sift the cocoa powder before adding it to the pan, then whisk it into the coconut oil first to create a smooth paste.
If lumps appear later, blend the hot chocolate with an immersion blender for 10-15 seconds—this breaks up any remaining clumps. For future batches, ensure your cocoa powder is finely ground and store it in an airtight container to prevent clumping.
Weak Flavor
Muted flavor often means the cocoa wasn’t heated long enough or the spices weren’t incorporated properly. Boost it: Reheat the hot chocolate to 180°F, then whisk in ½ tsp extra cinnamon or ½ tsp orange zest for brightness.
For a deeper chocolate taste, add 1 tbsp melted dark chocolate (70% cocoa) and stir until smooth. If the flavor still feels flat, try using high-quality cocoa powder like Guittard or Valrhona—they deliver richer, more complex notes. 💫
Nutrition facts
Frequently asked questions
Why does this recipe use coconut oil instead of butter?
Coconut oil creates a luxuriously smooth texture without dairy, making it perfect for vegan hot chocolate. It also helps emulsify the cocoa better than plant-based butter, preventing separation. Plus, its neutral flavor lets the 100% cocoa shine through!
Can I make this recipe without orange zest?
The orange zest adds brightness, but you can omit it or substitute with ½ tsp vanilla bean paste for warmth. If you prefer a simpler flavor, just use the 1 tsp vanilla extract already in the recipe. The cocoa’s richness will still stand out beautifully.
How do I adjust sweetness for kids?
For children, reduce the maple syrup to ¼ cup and add 1-2 tbsp extra coconut cream to balance the flavor. The cocoa’s natural sweetness will still come through, but the creaminess will make it more approachable. You can also top with extra dairy-free marshmallows for fun!
Will this work with almond milk instead of oat milk?
Yes, but oat milk creates a creamier texture. If using almond milk, add 1 extra tbsp coconut oil to compensate. For best results, choose barista-style almond milk—it froths better and blends more smoothly with the cocoa. The flavor difference is minimal!
Can I make this recipe ahead of time?
For the base, yes! Store the finished hot chocolate (without toppings) in an airtight container for up to 3 days. Reheat gently over low heat, whisking frequently. For the swirl topping, prepare it fresh—whipped coconut cream loses its fluffiness when chilled. Assemble just before serving for the best texture!

- 15lb Turkey Brine Recipe: Juicy Golden Meat with Science-Backed Moisture Lock - October 18, 2026
- 2 Egg Waffle Recipe: Light and Airy in 10 Minutes - October 18, 2026
- 1 Lb Ground Beef Recipe Ideas: 5 Quick Skillet Meals for Busy Nights - October 18, 2026