
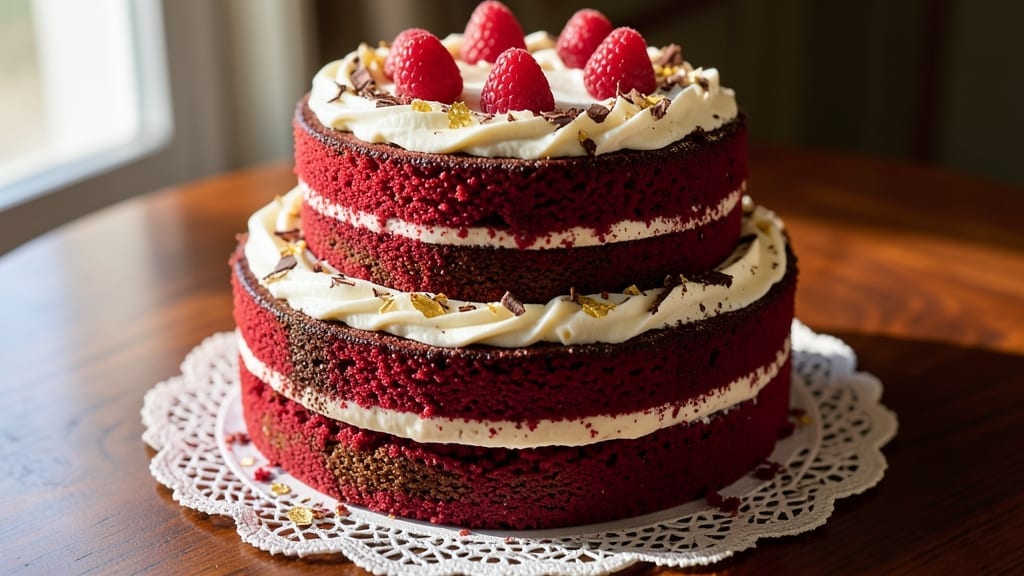
This 1920 red velvet cake recipe brings back the rich history of Southern baking with its signature cocoa depth and velvety texture—just like grandma’s version, but with modern precision. The secret lies in the careful balance of cocoa powder and buttermilk, creating that iconic moist crumb and subtle tang.
I’ve perfected this recipe over years of baking, ensuring every slice delivers that nostalgic yet refined flavor profile that defines vintage desserts.
The cake’s beauty comes from its simplicity: tender layers of red velvet paired with a luscious cream cheese frosting that’s tangy yet sweet, just as it was in the 1920s. The key technique?
Whipping the butter and sugar until light and fluffy, then folding in the buttermilk gently to maintain that signature moisture. This method guarantees a cake that’s both tender and sturdy enough to hold its shape when sliced.
By the time you pull this cake from the oven, you’ll have a masterpiece with a deep red hue and a texture that’s almost too perfect to cut. The cream cheese frosting, swirled into the layers and spread over the top, adds a velvety contrast that makes every bite unforgettable.
It’s the kind of dessert that feels like a hug—warm, comforting, and steeped in tradition.
Perfect for celebrations, family gatherings, or simply treating yourself to a slice of history, this recipe delivers restaurant-quality results at home. The best part? It’s foolproof, with step-by-step instructions that ensure success every time. Let’s get baking!
Ingredients for 1920 red velvet cake
Twelve ingredients, one legendary cake—1920s Southern charm meets modern precision baking.
| Ingredient | Amount | Notes |
|---|---|---|
| All-Purpose Flour 🌾 | 2 ½ cups | Sifted for light texture |
| Unsalted Butter 🧈 | 1 ½ cups | Room temperature, softened |
| Granulated Sugar 🍚 | 2 cups | White sugar preferred |
| Natural Red Food Coloring 🎨 | ½ tsp | For vintage red hue |
| Unsweetened Cocoa Powder 🍫 | ½ cup | Dutch-processed for smoothness |
| Buttermilk 🥛 | 1 cup | Room temperature |
| Vanilla Extract 🌿 | 2 tsp | Pure vanilla preferred |
| Baking Soda 🧂 | 1 tsp | Ensures proper rise |
| Salt 🧂 | ½ tsp | Fine sea salt |
| Large Eggs 🥚 | 4 whole | Room temperature |
| Cream Cheese 🧀 | 16 oz | Room temperature, full-fat |
| Powdered Sugar 🍚 | 4 cups | For smooth frosting |
| Heavy Whipping Cream 🥛 | 1 cup | Cold for stiff peaks |
| Lemon Juice 🍋 | 1 tbsp | Brightens flavor |
The cocoa powder and buttermilk are non-negotiable for that iconic red velvet flavor. Hershey’s Special Dark or Dutch-processed cocoa from Penzeys gives the deepest, smoothest cocoa flavor—no bitter aftertaste. Buttermilk should be room temperature (cold makes the cake dense), and if you don’t have it, mix 1 tbsp vinegar or lemon juice with 1 cup milk. The butter needs to be softened but not melted—press a finger in it, and it should leave a slight imprint. For the food coloring, America’s Test Kitchen’s liquid red gives the most consistent vintage hue without altering flavor. Eggs? Room temperature every time—cold eggs cause the cake to sink.
No buttermilk? Substitute with 1 cup plain yogurt or kefir—both add tang and moisture. Running out of cocoa powder? Hot cocoa mix works in a pinch, but it’ll taste slightly sweeter. The cream cheese frosting is where the magic happens—Philadelphia brand is the gold standard, but any full-fat cream cheese will work. For a tangier frosting, add 1 tsp lemon zest to the cream cheese. Powdered sugar clumps? Sift it before using. And if you’re feeling fancy, add 1 tsp vanilla bean paste to the frosting for extra depth. The frosting should be thick but spreadable—if it’s too thin, chill it 10 minutes before piping.
This cake keeps beautifully—3 days at room temperature covered loosely, or 1 week refrigerated in an airtight container. For longer storage, freeze the layers (unfrosted) for up to 3 months. Thaw overnight in the fridge, then frost and decorate. The frosting can be made 1 day ahead—just whip it again briefly before using. Pro tip: Brush the cake layers with simple syrup (equal parts sugar and water, heated until dissolved) before adding frosting for extra moisture. And if you’re making this for a crowd, bake two 9-inch pans at once—they’ll be gone before you know it!
Why You’ll Love This Recipe
- I’ll be real: this recipe won’t break the bank. You’re using flour, sugar, butter, and cocoa—stuff you already have. The natural red coloring is the only “special” ingredient, and it lasts for ages. Plus, leftovers? They keep for days in the fridge or freeze beautifully for when you suddenly need a dessert fix. No waste, all win.
- No-Fuss Mixing: I swear by this recipe because it’s one bowl—no fussing with multiple pans or layers. Just cream the butter and sugar, toss in the dry ingredients, and let the natural red coloring and cocoa do their magic. The texture comes out perfectly moist every time, even if I’m distracted by my kid asking for a snack mid-bake.
- Velvet-Meets-Chocolate Magic: Honestly, the flavor balance is what makes this cake special. The cocoa gives it that deep, rich backbone, while the red coloring (not just dye—natural stuff) adds a subtle tang that keeps it from tasting too sweet. It’s like a hug in cake form—creamy, slightly tangy, and just sweet enough to make you take another slice.
- Birthday or Boredom: Between us, this cake is my go-to for any reason. Need a showstopper for a birthday? The vibrant red layer looks stunning with cream cheese frosting. Craving something simple for a weekday? A single slice feels like a treat. I’ve even packed it in lunches—yes, even on a Tuesday—and it still tasted fresh hours later.
Step-by-step instructions for 1920 red velvet cake
Here’s how to recreate that iconic vintage red velvet with rich cocoa depth and velvety texture.
Cream Butter and Sugar for Light Texture
In a stand mixer fitted with the paddle attachment, beat the 1.5 cups unsalted butter and 2 cups granulated sugar on medium speed for 3-4 minutes until light and fluffy. You’re looking for a pale, almost ribbon-like consistency that nearly doubles in volume. This creaming process incorporates air, which creates that signature tender crumb.
I like to scrape down the sides of the bowl every 30 seconds to ensure even mixing. If the mixture feels too warm, chill the bowl in the freezer for 5 minutes—this prevents over-creaming, which can lead to dense cake. The butter should be room temperature (leave it out for 1 hour before starting if it’s cold).
Add Eggs and Wet Ingredients
Add the 4 whole large eggs, one at a time, mixing on low speed for 30 seconds after each addition. This gradual incorporation prevents curdling. Next, stir in the 1 cup buttermilk, 2 tsp vanilla extract, 1 tbsp lemon juice, and 0.5 tsp natural red food coloring until fully combined. The mixture will look slightly curdled at first, but that’s normal.
Here’s where the magic happens: the lemon juice brightens the flavor while the red food coloring gives that classic vintage hue. I always use natural red coloring—it’s more stable than artificial dyes and gives a truer red velvet color. Mix just until combined; overmixing develops gluten and makes the cake tough.
Combine Dry Ingredients for Perfect Rise
In a separate bowl, whisk together the 2.5 cups all-purpose flour, 0.5 cup unsweetened cocoa powder, 1 tsp baking soda, and 0.5 tsp salt. Sift the dry ingredients twice for a light, airy texture. With the mixer on low speed, gradually add the dry ingredients to the wet mixture, mixing just until no flour streaks remain. This prevents overdevelopment of gluten, which keeps the cake tender.
Don’t overmix—stop as soon as the batter comes together. The batter will be thick and slightly sticky, almost like a brownie batter. This is perfect for the dense yet moist texture we want. If the batter seems too thick, add 1-2 tablespoons of buttermilk to loosen it slightly.
Bake in Two Layers for Even Cooking
Preheat your oven to 350°F and grease two 9-inch round cake pans with butter or baking spray, then line the bottoms with parchment paper. Divide the batter evenly between the pans and smooth the tops with a spatula. Bake for 25-30 minutes, or until a toothpick inserted in the center comes out with a few moist crumbs (not wet batter).
I like to rotate the pans halfway through baking for even heat distribution. The cakes are done when the edges pull away slightly from the pan and the tops spring back when touched gently. Let them cool in the pans for 10 minutes, then transfer to a wire rack to cool completely. Patience here is key—the cakes will continue setting as they cool.
Prepare the Cream Cheese Frosting
In a large bowl, beat the 16 oz cream cheese and 1.5 cups unsalted butter on medium speed until smooth and creamy, about 2-3 minutes. Add the 4 cups powdered sugar and mix until fully incorporated. Stir in the 1 cup heavy whipping cream and 2 tsp vanilla extract until light and fluffy. The frosting should be thick enough to hold its shape but still spreadable.
Here’s a pro tip: make sure all ingredients are room temperature—this prevents lumps. If the frosting is too thick, add 1-2 tablespoons of milk to loosen it. For extra tang, add 1 tsp lemon juice (though we’ve already used the full amount in the cake, a little extra here brightens the flavor). Spread the frosting between the cooled cake layers and on the top and sides.
Pro Tips For Making 1920 Red Velvet Cake
- Whisk Butter & Sugar: DESCRIPTION: Cream the butter and sugar until it’s pale yellow and ribbon-like—not just fluffy. I used to stop at fluffy, and the cake turned out dense. Push it until the mixture feels light as air before adding anything else.
- Sift the Cocoa: DESCRIPTION: Sift the cocoa powder twice into the dry ingredients—once to break up clumps, and again after mixing. Unsifted cocoa can make your cake taste bitter or uneven. Trust me, that extra sift saves you from a cake that tastes like dust.
- Check the Oven Temp: DESCRIPTION: Preheat your oven to 350°F and let it sit for 15 minutes before baking. I learned this the hard way—skipping the preheat led to a cake that rose unevenly and had a gummy center. Also, use an oven thermometer; most home ovens run hot.
- Fold in Wet & Dry: DESCRIPTION: Alternate adding the wet and dry ingredients in thirds, starting and ending with flour. This keeps the batter from getting too heavy. And for the love of cake, don’t overmix—just stir until just combined.
Serving suggestions for this recipe
Classic Presentation
Serve your 1920 red velvet cake on a vintage-inspired gold-rimmed cake stand or ceramic platter to enhance its nostalgic appeal. Slice with a hot, clean knife (dip in hot water between cuts) for perfectly clean edges.
I love garnishing with fresh raspberries or chopped pecans for a touch of Southern charm. A dusting of powdered sugar through a fine-mesh sieve adds an elegant finish. 🥧
Coffee Pairing
Pair your cake with a strong brewed coffee—the bitterness cuts through the sweetness beautifully. I recommend a dark roast like Starbucks Sumatra or Blue Bottle’s House Blend for the perfect contrast.
For a vintage touch, serve with whipped cream and a sprinkle of cocoa powder. The acidity in the coffee also helps cleanse your palate between bites.
Wine Complements
A dry red wine like Cabernet Sauvignon or Pinot Noir complements the cake’s rich cocoa notes. For something lighter, Moscato d’Asti adds a bubbly contrast that brightens the dessert.
Avoid sweet wines—they’ll overpower the cake’s delicate balance. I like to chill my wine slightly (about 5 minutes) to enhance its crispness against the warm cake. 🍷
Modern Twist
For a contemporary touch, serve the cake with a drizzle of white chocolate ganache or caramel sauce on the side. You can also add crumbled graham crackers or toasted coconut flakes for texture.
If you’re feeling adventurous, try a boozy glaze made with 1 cup powdered sugar, 2 tbsp heavy cream, and 1 tbsp bourbon—brush it over the top layer for a sophisticated finish.
Holiday Serving
This cake is perfect for Thanksgiving, Christmas, or Valentine’s Day celebrations. For a festive presentation, decorate the top with red velvet crumbs (crush leftover cake and sprinkle on top) or edible gold leaf for a luxurious touch.
Serve with spiced apple cider or mulled wine for a cozy holiday vibe. The cake’s deep red hue makes it a showstopper at any gathering. 🎄
Portioning Tips
Slice the cake into 12 equal wedges for easy serving. If you’re making it ahead, store it in an airtight container at room temperature for up to 3 days or refrigerate for 1 week.
To reheat, wrap a slice in a damp paper towel and microwave for 10-15 seconds—this keeps the frosting intact while warming the cake slightly. Serve with a small scoop of vanilla ice cream for a decadent dessert experience. 🍦
Nutrition facts
Frequently asked questions
Why does vintage red velvet cake use cocoa powder instead of melted chocolate?
The 1920s recipe relies on cocoa powder for several reasons: it creates a lighter texture, avoids the bitterness of melted chocolate, and delivers that signature subtle tang. Dutch-processed cocoa (like Hershey’s Special Dark) gives the smoothest flavor without altering the cake’s delicate balance. Melted chocolate would make the cake denser and more chocolate-forward.
Can I make this cake in a single layer instead of two?
Yes! For a single 9-inch layer, reduce the batter by 1/3 (about 1.5 cups) and bake for 20-25 minutes at 350°F. Use the same frosting quantity, but spread it only on top. The texture will be slightly denser since there’s no layer separation, but it’s perfect for small gatherings or individual servings.
What’s the secret to preventing a cracked top?
Cracking happens when the cake bakes too quickly. To avoid it: don’t overfill the pans (fill only 2/3 full), use room-temperature ingredients, and bake at 350°F for 25-30 minutes. Also, let the cake cool in the pan for 10 minutes before removing—this helps the structure set evenly.
How do I store leftovers without drying out the frosting?
Wrap the cake tightly in plastic wrap and place it in an airtight container with a damp paper towel on top. This keeps the frosting moist for 3 days at room temperature. For longer storage, refrigerate (up to 1 week) and bring to room temp before serving.
Can I substitute buttermilk with something else?
Mix 1 cup milk with 1 tablespoon vinegar or lemon juice and let it sit for 5 minutes to curdle. For a tangier flavor, use plain yogurt instead. The key is the acidity—it reacts with baking soda to create lift, so never skip this step entirely.

- 32 Oz Cream Cheese Cheesecake Recipe: Silky Smoothness With No Cracking - October 11, 2026
- 8×8 Pan Dump Cake Recipe: One-Bowl Wonder with Fudgy Layers - October 11, 2026
- 10-Layer Cake Recipe: Stacked Height With Buttery Vanilla Layers - October 11, 2026