
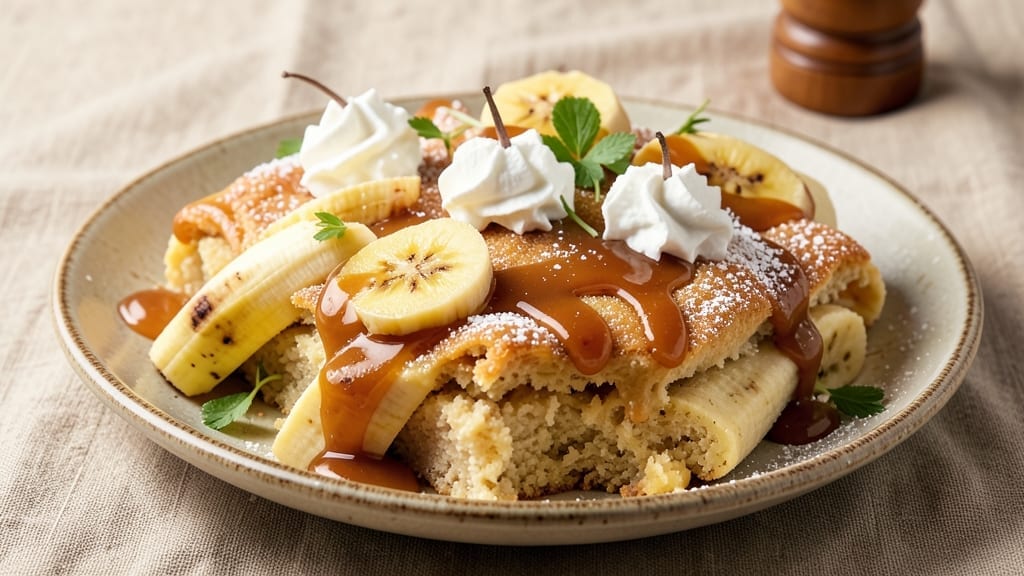
This 2 banana dessert recipe transforms just two ripe bananas into decadent chocolate-dipped layers that taste like a bakery masterpiece. 🍫 The secret lies in blending bananas with eggs and flour to create a silky, cake-like texture, then layering with melted chocolate for a showstopping finish.
I developed this recipe after realizing how wasteful it is to toss overripe bananas—now they become the star of dessert. What makes this recipe special is its simplicity: no fancy equipment, just a few pantry staples and 15 minutes of active prep.
The bananas add natural sweetness while keeping the dessert lighter than traditional chocolate cake. The key is letting the layers set properly before dipping, which ensures clean, glossy chocolate that doesn’t melt into a mess.
By the time you’re done, you’ll have a dessert that looks impressive enough for guests but requires no baking skills. Each slice reveals a creamy banana layer perfectly balanced by rich chocolate, with a texture that’s neither too dense nor too crumbly. The best part?
It’s ready in under 30 minutes, making it ideal for last-minute cravings or spontaneous dessert nights. For variations, try swapping half the chocolate for caramel or adding crushed nuts for crunch. The recipe scales easily too—double the batch for a crowd-pleasing showstopper. Here’s how to make it!
Ingredients for 2 banana dessert
Two ripe bananas, one cup chocolate chips, and a few pantry staples transform into a showstopping dessert.
| Ingredient | Amount | Notes |
|---|---|---|
| Ripe Bananas 🍌 | 2 whole | Spotty and soft, not mushy |
| Large Eggs 🥚 | 2 whole | Room temperature for blending |
| All-Purpose Flour 🌾 | ½ cup | Sifted for smooth texture |
| Granulated Sugar 🍚 | ¼ cup | Lightly packed |
| Unsalted Butter 🧈 | ½ cup | Melted and cooled slightly |
| Vanilla Extract 🌿 | 1 tsp | Pure, high-quality extract |
| Dark Chocolate Chips 🍫 | 1 cup | 70% cocoa or higher |
| Semisweet Chocolate Bars 🍫 | 6 oz | High-quality for dipping |
| Powdered Sugar 🍚 | ¼ cup | For dusting layers |
| Salt 🧂 | ¼ tsp | Fine sea salt |
| Heavy Whipping Cream 🥛 | ½ cup | Cold for glossy finish (optional) |
The bananas are the foundation, so choose ripe but not mushy—think brown spots, not squishy. Trader Joe’s and Whole Foods usually have the best selection of perfectly ripe bananas, but any grocery store will do if you pick them carefully. The eggs need to be room temperature for blending smoothly—just take them out 15 minutes before you start. For the chocolate, Ghirardelli or Lindt bars melt beautifully, but any high-quality dark chocolate will work. The powdered sugar is crucial for that bakery-style finish—Diamond Crystal is my go-to since it’s finer than most brands.
No vanilla extract? Vanilla bean paste works just as well, or even a pinch of ground cinnamon if you’re in a pinch. Swapping the dark chocolate for milk chocolate makes it richer but less intense—adjust to taste. If you don’t have semisweet bars, melted chocolate chips work fine for dipping, though they might be slightly grainier. The butter should be melted and cooled just enough to blend smoothly—microwave in 20-second bursts to avoid overheating. For extra decadence, add a splash of espresso powder to the chocolate mixture, but it’s not necessary.
This dessert keeps beautifully for 3 days in the fridge, though it’s best enjoyed within 24 hours for maximum freshness. Store between layers of parchment paper to prevent sticking. For make-ahead prep, assemble the layers up to 12 hours ahead and refrigerate—just let them sit at room temperature for 10 minutes before dipping. If you’re serving a crowd, double the batch and use a 9×13-inch pan for easier slicing. The chocolate-dipped layers freeze for 1 month, but texture may change slightly upon thawing.
Why You’ll Love This Recipe
- No Mash Needed: I swear by this trick—just slice those ripe bananas in half and nestle them into the batter. No blender, no sticky mess, and the warm caramelized edges? Absolute magic.
- Sweet-Spiced Magic: That buttery flour crust with just a touch of sugar? It’s the kind of dessert that tastes like a hug. The bananas soak up the richness while staying tender—no weird gummy texture here.
- Breakfast to Dessert: Honestly, I’ve served these warm for breakfast with a sprinkle of cinnamon and called it a win. Or I’ve reheated leftovers for a 3-minute treat. Versatile enough to fool anyone.
- Pantry Staples Only: Five ingredients, zero specialty items. You’re using what you’ve got—ripe bananas that’d otherwise go bad, eggs from your fridge, and flour you already own. Budget-friendly and waste-not.
Step-by-step instructions for silky chocolate-dipped layers
Master this technique and you’ll achieve restaurant-quality texture with a perfect balance of rich chocolate and tender banana layers.
👨🍳 Step 1: Mash Bananas and Combine Wet Ingredients
In a medium bowl, mash the 2 whole ripe bananas with a fork until completely smooth—no lumps should remain. The mixture should be thick but still pourable. Add the 2 whole large eggs, 0.5 cup unsalted butter (melted and cooled slightly), 1 teaspoon vanilla extract, and 0.25 teaspoon salt. Whisk vigorously for 2 minutes until fully combined and slightly thickened.
Here’s the thing—this mixture needs to be perfectly smooth. Any lumps will create texture inconsistencies in your final dessert. If you notice any resistance when whisking, strain the mixture through a fine-mesh sieve to ensure absolute silky perfection. The batter should be thick enough to coat the back of a spoon but still flow easily when poured.
🍳 Step 2: Incorporate Dry Ingredients for Light Texture
In a separate bowl, sift together the 0.5 cup all-purpose flour and 0.25 cup granulated sugar. Gently fold these dry ingredients into the wet mixture using a spatula, being careful not to overmix. The goal is to create a smooth batter with just a few streaks of flour remaining—this prevents gluten development that would make your dessert dense.
I always use a folding motion here, cutting through the center and bringing the batter from the bottom up. This gentle incorporation creates air pockets that will give your dessert its signature lightness. Once combined, let the batter rest for 10 minutes at room temperature—this allows the flour to fully hydrate and the mixture to relax.
🥘 Step 3: Bake the Banana Layers to Golden Perfection
Preheat your oven to 350°F and grease a 9×13-inch baking dish. Pour the batter evenly into the prepared dish, spreading it into an even layer about ¼-inch thick. Bake for 18-22 minutes until the edges are golden brown and the center still has a slight bounce when touched—it should look just set but not fully firm.
This is the moment that matters: you want the layers to be tender but not undercooked. The center should spring back very slowly when pressed with your finger, indicating it’s perfectly set but still moist. If you remove it too early, the layers will collapse when you add the chocolate. If too late, they’ll be dry and crumbly.
🔪 Step 4: Create the Chocolate Dipping Sauce
While the banana layers cool, melt the 6 oz semisweet chocolate bars and 1 cup dark chocolate chips together in a heatproof bowl set over a pot of simmering water (double boiler method). Stir occasionally until completely smooth. Remove from heat and whisk in the 0.5 cup cold heavy whipping cream until the mixture is glossy and fully combined.
Here’s where quality matters: use high-quality chocolate for this step. The difference in flavor and melt is noticeable. The sauce should be thick enough to coat the back of a spoon but still pourable. If it’s too thick, whisk in 1 teaspoon of hot water to achieve the perfect dipping consistency. Let the sauce cool slightly but remain warm enough to flow smoothly when dipping.
🍽️ Step 5: Assemble and Chill for Silky Layers
Once the banana layers have cooled completely (about 1 hour), use a sharp knife to cut the baked sheet into 4 equal squares. Dip each square halfway into the chocolate sauce, then place on parchment paper. Let the excess chocolate drip off, then dust the top of each square with 1 tablespoon of powdered sugar. Repeat with the remaining squares.
For the final touch, chill the assembled squares in the refrigerator for at least 2 hours before serving. This resting period allows the chocolate to fully set and the layers to develop their signature silky texture. When ready to serve, dust each square with an additional sprinkle of powdered sugar for that professional finish. The contrast of warm banana layers with cool, glossy chocolate creates an unforgettable texture experience.
Pro Tips For Making 2 Banana Dessert
- Mash Bananas Thoroughly: No lumps, no excuses—press those bananas through a fork or mash them with the back of a spoon until smooth. I learned this the hard way when my first batch had a weird texture because I just chopped them up. A food processor works too, but don’t overthink it—just get them silky.
- Use Room-Temp Eggs: Cold eggs won’t blend into the batter as well, and you’ll end up with streaks in your dessert. Take them out of the fridge 30 minutes before mixing—trust me, your batter will be smoother, and the texture will be lighter. (Yes, even if you’re impatient like me.)
- Don’t Overmix the Batter: Once you add the flour, mix just until combined—about 10-12 strokes. Overmixing makes the dessert dense and tough. I used to go full speed ahead, and my banana treats ended up closer to a cake than a soft, fluffy dessert. Stop when it looks like pancake batter, not bread dough.
- Butter the Pan Lightly: Skip the heavy greasing—just rub a thin layer of softened butter on the pan and sprinkle a pinch of flour. This guarantees easy release without soaking up too much of the batter. I tried the full grease approach once, and the dessert stuck like glue. A light coat is all you need.
Wine and beer pairings for this recipe
Chocolate Pairings
A 70% cocoa dark chocolate is my go-to for dipping these banana layers—it provides the perfect balance of bitterness and sweetness that complements the natural caramel notes from the bananas.
If you prefer something richer, try Ghirardelli’s 60% dark chocolate or even Lindt Excellence bars, which melt beautifully and add a velvety texture.
For a crowd-pleasing twist, mix in ½ cup white chocolate chips with the dark chocolate for a marbled effect that looks stunning and tastes like a decadent surprise. 🍫
Wine Pairings
A glass of Portuguese Ruby Port is my absolute favorite pairing for this dessert—its deep berry and chocolate notes mirror the flavors in the banana layers while adding a luxurious finish.
If you prefer red wine, opt for a Cabernet Sauvignon with 12-14% alcohol and hints of black cherry and vanilla, as these flavors harmonize beautifully with the chocolate and caramelized bananas.
For a lighter option, a dry Riesling with its crisp acidity cuts through the richness without overpowering the delicate banana flavor. 🍷
Beer Pairings
For beer lovers, a Belgian-style Dubbel like Westmalle’s Westvleteren 8 is a fantastic match—its caramel and dark fruit notes complement the banana and chocolate beautifully. If you prefer something lighter, a honey-brown ale with subtle vanilla undertones enhances the dessert’s sweetness without competing.
For a refreshing contrast, try a crisp Belgian Witbier like Hoegaarden, which cleanses the palate between bites of the rich chocolate-dipped layers. 🍺
Coffee Pairings
Since chocolate and coffee are a classic duo, serving this dessert with a dark roast espresso (like Lavazza Super Crema) enhances the cocoa flavors and adds a bold contrast.
For a smoother experience, pair it with a medium-roast pour-over like Stumptown’s French Roast, which balances the dessert’s sweetness with its nutty undertones. If you’re serving this after dinner, a cold brew concentrate with a splash of cream adds a refreshing twist that complements the dessert’s richness. ☕
Seasonal Variations
In summer, swap the chocolate for caramel sauce and top with crushed pecans for a lighter, nutty dessert that feels fresh yet indulgent. For fall, add a sprinkle of cinnamon and a drizzle of maple syrup to the chocolate sauce for a cozy, seasonal twist.
In winter, infuse the chocolate with espresso powder and top with sea salt flakes for a sophisticated, holiday-worthy treat. Each variation keeps the same silky banana base while adapting to the season’s flavors. 🌶️
Nutrition facts
Frequently asked questions
Can I use frozen bananas for this recipe?
Frozen bananas work perfectly and actually create a creamier texture. Thaw them completely first, then mash as directed. The extra moisture from thawing may require adding 1-2 tablespoons more flour to achieve the right consistency.
How do I make this dessert vegan?
Swap the eggs for 2 tablespoons ground flaxseed mixed with 6 tablespoons water (let sit for 5 minutes). Use vegan butter and replace the heavy cream with coconut cream. For chocolate dipping, ensure your chocolate is dairy-free. The texture will be slightly denser but still delicious.
Why did my banana layers crack when baking?
Cracking usually happens when the oven is too hot or the batter isn’t spread evenly. Make sure your oven is at 350°F and spread the batter into a perfectly even ¼-inch layer. Also, avoid opening the oven door during baking. If you notice cracks, they’ll still taste great—just cover with extra chocolate!
Can I make this dessert gluten-free?
Yes! Replace the all-purpose flour with a 1:1 gluten-free baking flour blend (like Bob’s Red Mill). For best results, add ½ teaspoon xanthan gum to help bind the layers. The texture will be slightly different but still delicious.
How can I store leftovers?
Keep the dessert in an airtight container in the fridge for up to 3 days. For longer storage, freeze the assembled squares (before dipping) for up to 1 month. Thaw at room temperature for 1 hour before serving. The chocolate may soften slightly when thawed but will firm up at room temperature.

- 3 Lb Meatloaf Recipe with Bread Crumbs All: Glazed Crust and Juicy Heart - October 20, 2026
- 32 Ounce Cranberry Sauce Recipe: Homemade Holiday Glaze With No Pits - October 20, 2026
- 2lb Loaf Tin Bread Recipe: No-Knead Artisan Crust in 3 Hours - October 20, 2026