
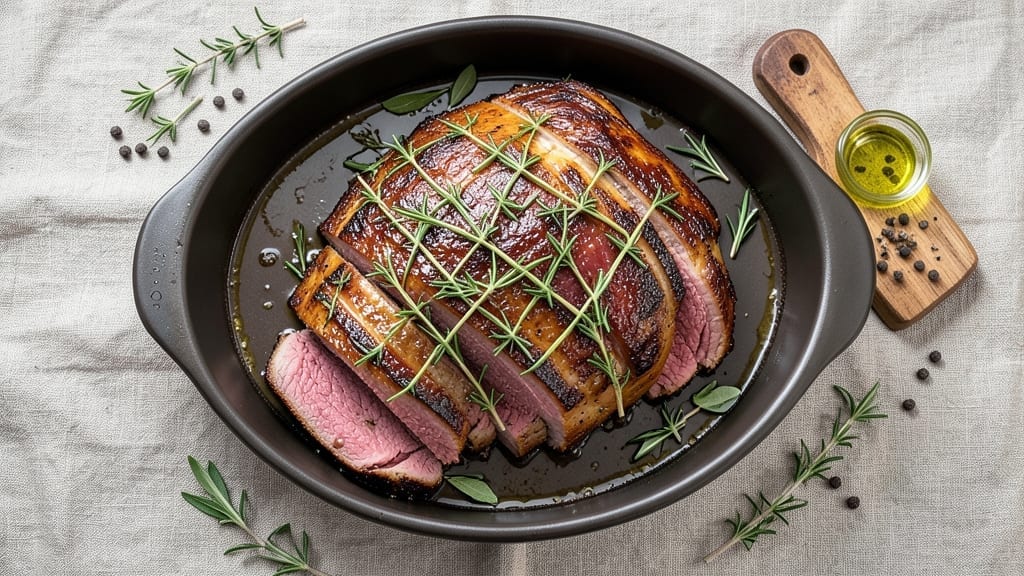
A 2 lb tenderloin roast cooked to a perfect medium-rare finish delivers melt-in-your-mouth tenderness and a juicy pink core that’s impossible to resist. This reverse-seared method ensures even cooking while preserving moisture, transforming a simple cut into a showstopping centerpiece for any dinner table.
The secret lies in precise temperature control and a high-heat sear that locks in those flavors without overcooking the delicate interior.
Professional chefs rely on this technique for restaurant-quality results at home, and it’s easier than you might think.
With just a few key ingredients—high-quality beef, salt, and a touch of oil—you’ll achieve a roast that’s tender enough to cut with a fork and juicy enough to make every bite worth savoring.
The reverse sear method eliminates guesswork by cooking the meat slowly to the target temperature before finishing with a quick, high-heat crust.
What sets this recipe apart is the attention to detail that prevents common mistakes like overcooking or drying out the meat. By using a meat thermometer and controlling the oven environment, you’ll achieve consistent results every time.
The final product will have a caramelized exterior that gives way to perfectly pink, buttery meat—proof that great steakhouse-quality meals don’t require expensive equipment or years of experience.
Pair this roast with classic sides like roasted garlic mashed potatoes or a fresh herb salad to complete the meal. The technique works equally well for special occasions or casual family dinners, making it a versatile addition to your cooking repertoire.
Let’s get started on creating a tenderloin roast that will impress even the most discerning guests.
Ingredients for 2 lb tenderloin roast
High-quality beef and precise seasoning transform a simple roast into restaurant-worthy perfection.
| Ingredient | Amount | Notes |
|---|---|---|
| Beef Tenderloin Roast 🥩 | 2 lb | Center-cut, trimmed of silver skin |
| Kosher Salt 🧂 | 1 ½ tbsp | Diamond Crystal preferred, coarse grain |
| Extra-Virgin Olive Oil 🫒 | 2 tbsp | High-quality, fruity variety |
| Fresh Rosemary 🌿 | 1 sprig | Woody stems removed, leaves chopped |
| Fresh Thyme 🌿 | 1 sprig | Leaves only, finely chopped |
| Black Peppercorns 🌶️ | 1 tsp | Freshly cracked, coarse grind |
| Garlic Cloves 🧄 | 4 cloves | Smash flat with side of knife |
| Unsalted Butter 🧈 | 2 tbsp | Cold, cubed for final sear |
| Vegetable Oil 🫒 | 1 tbsp | High smoke point for searing |
The beef tenderloin is the star—look for a center-cut roast with minimal marbling and no surface bruising. Whole Foods or D’Artagnan carry premium cuts, but most high-end grocery stores stock quality tenderloins. The roast should feel firm to the touch and have a vibrant red color. If buying whole, trim the silver skin carefully—it doesn’t add flavor and can make the meat tough. For best results, use the roast within 2-3 days of purchase and let it sit at room temperature for 30 minutes before cooking. The fresh herbs should be fragrant and vibrant; if they smell musty, skip them. Penzeys bulk spices are ideal for the rosemary and thyme if you want to stock up.
No fresh rosemary? Dried works at one-third the amount, but fresh delivers that piney aroma. Substitute lemon zest for brightness if needed, though it won’t replicate the herb’s depth. For the salt, Diamond Crystal is ideal—it’s coarser and dissolves beautifully into the meat’s surface. The olive oil should be extra-virgin with noticeable fruitiness; California Olive Ranch is a reliable brand. If you’re short on time, pre-smash the garlic cloves to save 2 minutes during cooking. The butter for the final sear must be cold—pull it from the fridge just before using. For a lighter touch, replace half the butter with ghee to prevent burning.
The roast keeps beautifully in the fridge for 3-4 days if wrapped tightly in butcher paper, then foil. For longer storage, portion into 1-inch slices and freeze for up to 3 months. Reheat slices in a skillet with a splash of beef broth to restore moisture. The reverse-seared method means leftovers reheat exceptionally well—350°F for 10-15 minutes covered with foil. For meal prep, slice against the grain and store in airtight containers. The caramelized crust will soften slightly but remains flavorful. Always let the meat rest 10 minutes before slicing to retain juices.
Why You’ll Love This Recipe
- No-Fuss Roast Night: I swear by this—just a quick rub of olive oil, salt, and those fresh herbs tied around the tenderloin. No basting, no fussing, and still comes out with that perfect crust.
- Herb-Packed Magic: That rosemary and thyme? They cling to the meat like a hug, releasing their aroma as it roasts. The first bite has this bright, earthy punch that makes it taste like a restaurant cut in half.
- Leftovers That Shine: Roast a 2-pound tenderloin, and you’ve got dinner for three nights: thinly sliced for sandwiches, diced into pasta, or even tossed in a grain bowl. It’s the ultimate “make it stretch” protein.
- Weeknight Hero: Between us, this is my go-to when I’m exhausted but need something impressive. Thirty minutes in the oven, and suddenly? You’ve got a showstopper that feels like a Sunday meal—no stress, no stressing.
Step-by-step instructions for reverse-seared tenderloin roast
Master the reverse-sear technique for a perfectly tender, juicy center-cut roast with a crisp exterior.
Season and Prepare the Tenderloin
Begin by patting the 2 lb beef tenderloin roast dry with paper towels—this ensures maximum contact with the seasoning and promotes even browning. In a small bowl, combine the 1.5 tbsp kosher salt, chopped leaves from the 1 sprig fresh rosemary, chopped leaves from the 1 sprig fresh thyme, and the 1 tsp freshly cracked black peppercorns. Gently massage this mixture over the entire surface of the roast, including the ends.
Next, smash the 4 cloves garlic flat with the side of a knife and rub them directly onto the meat. The garlic’s oils will infuse into the tenderloin as it cooks. Place the seasoned roast on a wire rack set over a rimmed baking sheet—this allows heat to circulate evenly on all sides, preventing steam buildup that would make the exterior soggy.
Low-Temperature Roast to Internal Temperature
Preheat your oven to 275°F. This low temperature is critical for achieving an even cook without over-browning the exterior. Place the seasoned roast in the oven and cook for 30-40 minutes per pound, or until the internal temperature reaches 110-115°F when measured with a meat thermometer. For our 2 lb roast, this should take approximately 1 hour to 1 hour 10 minutes.
Here’s the key: resist the urge to open the oven door during this time. Every time you peek, you lose heat and extend cooking time. The roast will develop a subtle pink center while the exterior remains pale—this is exactly what we want before the final sear. The meat should feel slightly firm but still yield slightly when pressed.
Rest Before Searing for Crisp Exterior
Once the roast reaches 110-115°F, remove it from the oven and transfer it to a cutting board. Tent loosely with aluminum foil and let it rest for 10-15 minutes. This resting period allows the internal temperature to rise slightly to 115-120°F, which is ideal for that perfect pink center. The exterior will remain pale—this is normal and essential for the final sear.
While the roast rests, prepare your searing station. Heat a large oven-safe skillet over high heat until it’s screaming hot. Add the 1 tbsp vegetable oil and let it shimmer for 1 minute. Then add the 2 tbsp cold cubed unsalted butter—the butter will foam and sizzle, creating a flavorful crust.
Final Sear for Crisp Exterior
Carefully place the rested roast in the hot skillet, fat-side down first. Let it sear undisturbed for 2-3 minutes until a deep golden-brown crust forms. Flip the roast and sear the other side for another 2-3 minutes. You’ll see the butter pool around the meat—this is your signal that the crust is forming perfectly. The internal temperature should now read 125-130°F.
For an even more dramatic finish, transfer the skillet to a 425°F preheated oven and roast for 5-7 minutes until the internal temperature reaches 130-135°F. This final step ensures a beautifully caramelized exterior while keeping the interior juicy and pink. The roast is now ready to slice and serve immediately.
Slice and Serve with Confidence
Using a sharp carving knife, slice the roast into ½-inch thick medallions against the grain. The meat should be tender enough to slice easily but still retain a slight resistance—this indicates perfect doneness. Serve immediately with any pan juices reduced slightly if desired, or pair with roasted vegetables and a red wine reduction.
Each slice should reveal a beautiful pink center surrounded by a crisp, golden-brown crust. The reverse-sear method guarantees juicy, tender meat with restaurant-quality presentation every time. For best results, serve within 15 minutes of slicing to enjoy the optimal texture and temperature.
Pro Tips For Making 2 Lb Tenderloin Roast
- USE A THERMOMETER: I learned this the hard way—tenderloin’s small size means it hits perfect doneness fast. A probe thermometer at 130°F (medium-rare) takes the guesswork out, and pulling it at 125°F lets it carryover to 130°F while you rest it.
- DRY THE MEAT FIRST: Pat that roast thoroughly with paper towels before searing. I used to skip this, and my crust would always come out pale and sad. A dry surface = better Maillard reaction = that golden, flavorful crust you’re after.
- SALT THE HERBS: Toss your rosemary and thyme sprigs in a light dusting of kosher salt before placing them on the roast. This keeps them from floating away during roasting and adds a subtle herbal punch—no more picking them off your plate.
- SEAR IN BATCHES: A 2 lb roast won’t fit in most pans without crowding. Sear it in stages: start with one side, flip, then rotate 90 degrees to get even browning. Rushed batches end up steamed, not seared—your future self will thank you for the patience.
Serving suggestions for this dish
Classic Side Pairings
For a timeless presentation, serve your tenderloin with creamy garlic mashed potatoes—whip up 3 cups of Yukon Gold potatoes with ½ cup unsalted butter, ½ cup heavy cream, and 4 minced garlic cloves.
The richness balances the beef’s elegance. Alternatively, roasted asparagus with lemon zest and toasted almonds adds freshness and crunch. 🥔
Wine & Sauce Pairings
A bold Cabernet Sauvignon from Napa Valley complements the roast’s richness—look for Caymus Vineyards or Opus One for depth. For a sauce, try a red wine reduction: simmer 1 cup red wine, 2 tbsp balsamic vinegar, and 1 tbsp brown sugar> until syrupy.
Drizzle over slices for extra drama.
Global Flavor Twists
Transform your plate with Middle Eastern spices: swap thyme for 1 tsp ground cumin and ½ tsp smoked paprika> in the seasoning. Serve with harissa yogurt sauce—mix ½ cup Greek yogurt with 1 tbsp harissa paste and fresh dill.
For Asian-inspired sides, pair with sesame-ginger green beans sautéed in 1 tbsp sesame oil.
Vegetarian-Friendly Sides
Keep the meal balanced with wild mushroom risotto—sauté 1 lb mixed mushrooms in 2 tbsp olive oil, then cook with 1½ cups Arborio rice, 4 cups vegetable broth, and ½ cup white wine.
Finish with Parmesan cheese and parsley. A quinoa salad with roasted beets, walnuts, and orange vinaigrette also shines.
Make-Ahead Garnishes
Prep ahead with herb butter: mix 4 tbsp softened butter with 1 tbsp chopped chives and 1 tsp lemon zest>. Store in the fridge and dollop on slices before serving.
For a pop of color, arrange edible flowers (like nasturtiums) or microgreens on the plate. A sprinkle of flaky sea salt enhances the crust’s caramelization.
Kid-Friendly Adaptations
Soft, buttery mac and cheese with a crispy breadcrumb topping is a crowd-pleaser. For veggies, serve steamed broccoli with 1 tsp honey> and a pinch of salt. Cut the roast into ½-inch thick strips> for easy handling, and pair with apple slices** for a sweet contrast. 🍎
Nutrition facts
Frequently asked questions
Why does the recipe call for a low oven temperature first?
The reverse-sear method starts with a 275°F oven to cook the meat evenly to 110-115°F without over-browning. This gentle heat ensures the center stays perfectly pink while the exterior remains pale for that final high-heat sear. Skipping this step risks drying out the meat or creating an uneven crust.
Can I cook this recipe without a meat thermometer?
While possible, a meat thermometer is critical for perfect results. Without it, you risk overcooking—tenderloin can go from perfect to dry in just 5°F. If you don’t have one, use the finger test: press the meat gently—it should feel slightly firm but still yield slightly at 110-115°F.
How do I prevent the roast from drying out?
Never skip the resting period—this lets juices redistribute. Also, avoid overcrowding the pan during searing and use a wire rack to promote even air circulation. Pat the meat dry before seasoning to maximize crust formation, and don’t overcook beyond 130-135°F internal temp.
Can I use this method for a smaller or larger tenderloin?
Yes! Adjust cooking time by 30-40 minutes per pound for the low-temp phase. For a 3 lb roast, expect 1.5-2 hours at 275°F. The sear time remains similar, but larger cuts may need 1-2 extra minutes per side. Always use a thermometer to guide doneness.
What’s the best way to reheat leftovers?
Slice the roast and reheat in a skillet with 1 tbsp beef broth over medium-low heat for 2-3 minutes per side. Avoid microwaving—it makes the meat tough. For whole leftovers, wrap in foil and bake at 300°F for 15-20 minutes until warmed through.

- 12 Bean Chili Recipe: Hearty Slow-Cooked Depth With 12 Legumes - October 17, 2026
- 5 Seed Bread Recipe: Nutty Crunch and Artisan Flavor in One Loaf - October 17, 2026
- 1 Lb Macaroni Salad Recipe: Bold, Crunchy, and Crowd-Pleasing - October 17, 2026