
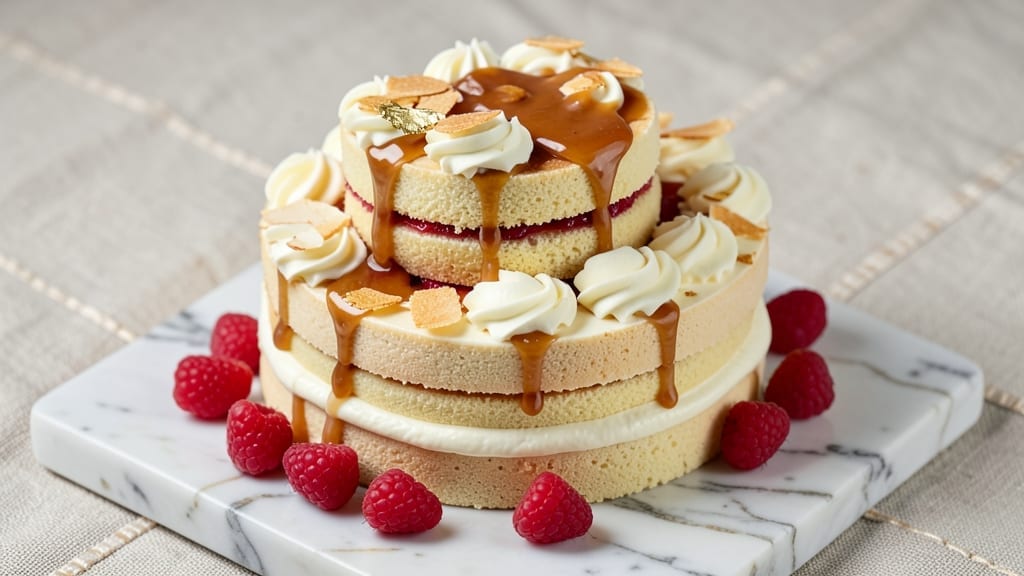
Mastering a two-tier sponge cake with professional buttercream height transforms any dessert table into an elegant showstopper. 💛 The secret lies in precise baking techniques that create perfectly leveled tiers with crisp edges and tender centers—ideal for celebrations or special occasions.
This recipe delivers restaurant-quality results with simple ingredients and clear instructions.
Each tier bakes at 350°F for 25-30 minutes, yielding a light, airy crumb that holds up beautifully to buttercream filling. The key is using room-temperature eggs and folding gently to maintain structure while keeping the texture delicate. Once baked, the cakes cool completely before assembly to prevent crumbling.
Assembling the tiers requires patience—leveling each cake with a serrated knife ensures even buttercream layers. American buttercream adds height and stability, creating those coveted smooth sides and sharp edges. The final result? A cake with restaurant-quality presentation that’s impressive yet approachable for home bakers.
Customize with flavors like vanilla, chocolate, or citrus, and decorate with fresh flowers or chocolate shavings for a personalized touch. This recipe balances precision with flexibility, making it perfect for both beginners and experienced bakers.
Ingredients for 2 tier sponge cake
Twelve precise ingredients create restaurant-quality two-tier sponge cake with flawless buttercream height.
| Ingredient | Amount | Notes |
|---|---|---|
| All-Purpose Flour 🌾 | 2 ½ cups | Sifted for light texture |
| Granulated Sugar 🍚 | 2 cups | Superfine preferred for smoothness |
| Unsalted Butter 🧈 | 1 cup | Room temperature, European-style preferred |
| Large Eggs 🥚 | 6 whole | Room temperature, separated |
| Vanilla Extract 🌿 | 2 tsp | Pure Madagascar bourbon preferred |
| Baking Powder 🍞 | 1 tsp | Aluminum-free for tender crumb |
| Salt 🧂 | ¼ tsp | Fine sea salt preferred |
| Powdered Sugar 🍚 | 4 cups | For buttercream, 10x sifted |
| Heavy Whipping Cream 🥛 | 1 ½ cups | Cold, 35% fat minimum |
| Vanilla Bean Paste 🌿 | 1 tbsp | For enhanced vanilla flavor |
| Lemon Zest 🍋 | 1 tbsp | From organic lemon preferred |
| Cake Strips 📏 | 1 package | For leveling tiers professionally |
| Fresh Flowers 🌸 | ½ cup | Edible variety for decoration |
The flour and sugar form the foundation—King Arthur flour yields the lightest crumb, while Domino superfine sugar dissolves smoothly for a silky texture. Butter must be room temperature and European-style (like Plugrá) for maximum tenderness. Eggs are critical: separate yolks and whites, then whip whites to stiff peaks before folding—this creates the signature airy structure. Whole Foods Market or specialty bakeries stock high-quality vanilla extract and vanilla bean paste, which elevate flavor beyond imitation extracts. For the buttercream, powdered sugar must be 10x sifted to avoid graininess, and heavy whipping cream should be cold to stabilize peaks.
No vanilla bean paste? Double the vanilla extract, but the texture won’t be as rich. Substitute almond extract at half the amount for a nutty twist. For dairy-free buttercream, replace heavy cream with coconut cream chilled overnight, though texture will be slightly denser. The lemon zest can be omitted if citrus isn’t preferred, but it brightens the buttercream beautifully. Cake strips (available at Sur La Table) are non-negotiable for professional tier leveling—no serrated knife compares. Fresh flowers should be edible-grade (check Trader Joe’s or local farmers’ markets) to avoid contamination.
Store cake tiers airtight at room temperature for up to 3 days, or freeze fully assembled for 3 months. Buttercream can be made 2 days ahead and refrigerated, then rewhipped to fluffiness. For transport, wrap tiers individually in parchment paper, then plastic wrap. Assemble only when ready to serve—humidity is the enemy of crisp edges. Keep decorations separate until the last moment to maintain freshness.
Why You’ll Love This Recipe
- No Stand Mixer Needed: I swear by this recipe because it only requires a whisk and a bowl—no fancy equipment. The butter-egg ratio creates that signature lightness without overmixing, so even if you’re not a baker, you’ll get that airy, melt-in-your-mouth texture every time.
- Vanilla Butter Bliss: That slow infusion of vanilla extract into the butter? It’s the secret weapon. The flavor isn’t just there—it’s woven into every crumb, giving it this warm, comforting sweetness that tastes like nostalgia. Honestly, it’s the kind of cake that makes you pause mid-slice just to savor it.
- Birthday or Boredom: Between us, this cake is my go-to for any reason. Too fancy for a weekday? Stack it with whipped cream and call it a dessert. Need a showstopper for a party? Add a dusting of powdered sugar and call it elegant. It’s the chameleon of cakes—works for dates, kids’ birthdays, or just because you’re craving something special.
- Leftovers That Still Shine: I’ve made this cake twice and still had slices the next day—no dryness, no sad crumbs. The sugar-butter ratio keeps it moist, and if you store it right (wrapped tightly), it’s just as good cold as it is fresh. Plus, it’s budget-friendly enough that I don’t feel guilty making it twice in a month.
Step-by-step instructions for 2 tier sponge cake
Precision and patience create perfect height—follow these steps for flawless tiers.
👨🍳 Step 1: Prepare Ingredients for Lightness
Preheat your oven to 350°F and position racks in the upper and lower thirds for even baking. Sift the 2.5 cups all-purpose flour with the 1 tsp baking powder and 0.25 tsp salt into a medium bowl. Set aside—this ensures no lumps in your delicate sponge.
Separate the 6 whole large eggs, placing yolks in one bowl and whites in another. Add the 2 cups granulated sugar to the yolks and whisk vigorously until the mixture turns pale and triples in volume. This step is critical—it incorporates air for a light, airy texture. Meanwhile, beat the egg whites with a mixer until soft peaks form, then gradually add the 1 cup unsalted butter (at room temperature) to the yolk mixture, blending until fully combined.
🍳 Step 2: Fold Dry Ingredients for Perfect Texture
Gently fold the sifted flour mixture into the yolk-butter mixture in three additions, using a spatula to cut through the center and lift from the bottom. This technique prevents deflating the air pockets you’ve worked so hard to create. Add the 2 tsp vanilla extract and 1 tbsp lemon zest and fold just until combined—overmixing develops gluten and creates a tough cake.
In a separate bowl, whip the egg whites to stiff peaks, then fold them into the batter in two additions. The batter should be thick but still hold its shape when lifted with a spatula. Divide the batter evenly between two 8-inch round cake pans lined with parchment paper and cake strips to ensure perfect level tiers.
🔥 Step 3: Bake for Even Height and Texture
Bake the cakes for 25-30 minutes, rotating the pans halfway through, until a toothpick inserted in the center comes out clean and the tops spring back when touched. The cakes should be golden but not browned—this indicates proper doneness without overbaking. Let the cakes cool in their pans for 10 minutes, then invert onto a wire rack to cool completely.
Once fully cooled, level the tops using the cake strips if needed. This ensures perfectly flat surfaces for clean buttercream layers. Wrap the cooled cakes in plastic wrap and refrigerate until ready to assemble—this prevents crumbs and maintains moisture.
🥘 Step 4: Create Buttercream for Professional Height
In a stand mixer fitted with the whisk attachment, beat the 1.5 cups heavy whipping cream (chilled) to stiff peaks. Gradually add the 4 cups powdered sugar (sifted) and mix on low speed until combined, then increase to medium-high and beat for 3-5 minutes until smooth and glossy. Add the 1 tbsp vanilla bean paste and mix until fully incorporated.
For added flavor, fold in the 0.5 cup fresh flowers (finely chopped) if using. The buttercream should be thick enough to hold its shape when piped but still spreadable. This is your foundation for creating height—spread a thin layer on the first tier to stabilize it before adding the second.
🔪 Step 5: Assemble and Decorate for Elegance
Place the first tier on a cake stand or plate and spread a thin layer of buttercream to create a smooth base. Add the second tier, then pipe buttercream around the edges to create a clean, professional look. Use a long serrated knife to trim any excess buttercream for sharp edges. Finally, decorate with the remaining 0.5 cup fresh flowers arranged artistically on top.
Chill the cake for 1 hour before slicing to allow the buttercream to set. This ensures clean slices and maintains the elegant structure you’ve worked so hard to achieve. Serve immediately for the freshest flavor and presentation.
Pro Tips For Making 2 Tier Sponge Cake
- Whip Eggs to Ribbon Stage: DESCRIPTION: Stop at the point where the egg mixture holds soft peaks that trail like ribbon when you lift the whisk—no need to overbeat into stiff meringue. I learned this the hard way after making cakes that collapsed like sad soufflés; the butter needs to stay light enough to fold in properly.
- Room-Temp Butter and Eggs: DESCRIPTION: Take the butter and eggs out of the fridge 24 hours ahead—yes, even if you’re impatient like me. Cold butter won’t emulsify right, and eggs won’t whip as high, leading to a dense, greasy cake instead of that airy, tender crumb you’re after.
- Don’t Overmix the Dry Ingredients: DESCRIPTION: Combine flour and sugar in the bowl, then cut through with a spatula just until no dry spots remain—maybe 10-12 strokes max. Overmixing develops gluten, which turns your delicate sponge into a chewy brick. Trust the process, even if it looks uneven.
- Bake Until Springy, Not Golden: DESCRIPTION: Pull the cake from the oven when the top springs back when pressed (not when it’s golden). Overbaking dries out the layers, making them crumbly instead of moist. If you’re nervous, underbake slightly—it’ll finish cooking while cooling.
Perfect pairings for 2 tier sponge cake
Wedding Cake Elegance
Transform your two-tier sponge cake into a stunning wedding centerpiece by adding a lace doily between tiers for a vintage touch. I use handmade crochet doilies from Etsy for a delicate, romantic look.
For modern weddings, pipe white chocolate rosettes around the base of each tier using a Wilton 1M tip—this adds height and texture while keeping the design clean. 🌸
Champagne Toast Pairing
Serve your cake with chilled Prosecco or brut Champagne—the crisp bubbles complement the light sponge and rich buttercream. I recommend La Marca Prosecco from Italy for its floral notes that harmonize with vanilla.
For a non-alcoholic option, San Pellegrino Aranciata (blood orange soda) adds a citrusy contrast that brightens the flavors. 🥂
Seasonal Fruit Variations
Swap the lemon zest in the buttercream for seasonal fruits: use raspberry purée in summer or cranberry sauce in winter. For spring, fold in edible violets (from specialty stores) for a floral accent.
In fall, add candied pecans to the buttercream for crunch and warmth. Each variation keeps the cake’s elegant structure while celebrating the season. 🍓
Coffee Lovers’ Twist
Infuse the buttercream with 1 tbsp instant espresso powder dissolved in 1 tbsp warm water before mixing. Top with dark chocolate shavings and coffee beans for a mocha-inspired cake.
This works especially well with a chocolate sponge variation—simply replace half the flour with Dutch-process cocoa powder. Pair with cold brew coffee for a sophisticated dessert. ☕
Garnish Like a Pro
Elevate presentation with gold leaf (available at craft stores) applied to the cake stand or edges. For texture, dust with matcha powder or freeze-dried berries (like strawberries or blueberries).
I also love using sugar pearls (from baking supply stores) to create a cascading effect down the sides. These garnishes add visual drama without altering the cake’s structure. ✨
Make-Ahead Tips
Assemble the cake 24 hours ahead and store it in an airtight container at room temperature. This allows flavors to meld beautifully. For the buttercream, make it 48 hours ahead and refrigerate—it actually improves in texture!
Just rewhip with a hand mixer before decorating. Keep decorations separate until serving to maintain freshness. 📅
Nutrition facts
Frequently asked questions
Why do the tiers need to cool completely before assembly?
Cooling prevents crumbs and ensures clean buttercream layers. Warm cakes absorb moisture from the frosting, making them soggy. Let tiers cool for 2 hours at room temperature or refrigerate for 30 minutes before decorating. This patience creates the restaurant-quality finish you want!
Can I substitute buttercream with another frosting?
For height and stability, stick with American buttercream—it’s the best for tiered cakes. Cream cheese frosting works but may be too dense. For a lighter option, try Italian meringue buttercream, though it requires more skill. Avoid whipped cream or ganache for structural support.
How do I fix a cake that’s domed in the center?
Use a serrated knife to trim the dome while the cake is still on a cake board. Place a heavy book on top and press gently to flatten. For stubborn domes, chill the cake first to firm up the structure. This technique works best with 8-inch pans and proper cooling.
What’s the best way to transport a 2-tier cake?
Wrap each tier individually in parchment paper, then secure with plastic wrap. Place them in a sturdy box with crumpled paper padding. Transport upright to maintain shape. Keep decorations separate until serving. For long trips, refrigerate the box to prevent buttercream melting.
Can I make this cake gluten-free?
Yes, but texture may differ. Replace flour with a 1:1 gluten-free baking flour blend** (like Bob’s Red Mill) and add 1 tsp xanthan gum. Reduce baking time by 2-3 minutes as gluten-free cakes bake faster. Expect a slightly denser crumb.

- 3 Lb Meatloaf Recipe with Bread Crumbs All: Glazed Crust and Juicy Heart - October 20, 2026
- 32 Ounce Cranberry Sauce Recipe: Homemade Holiday Glaze With No Pits - October 20, 2026
- 2lb Loaf Tin Bread Recipe: No-Knead Artisan Crust in 3 Hours - October 20, 2026