
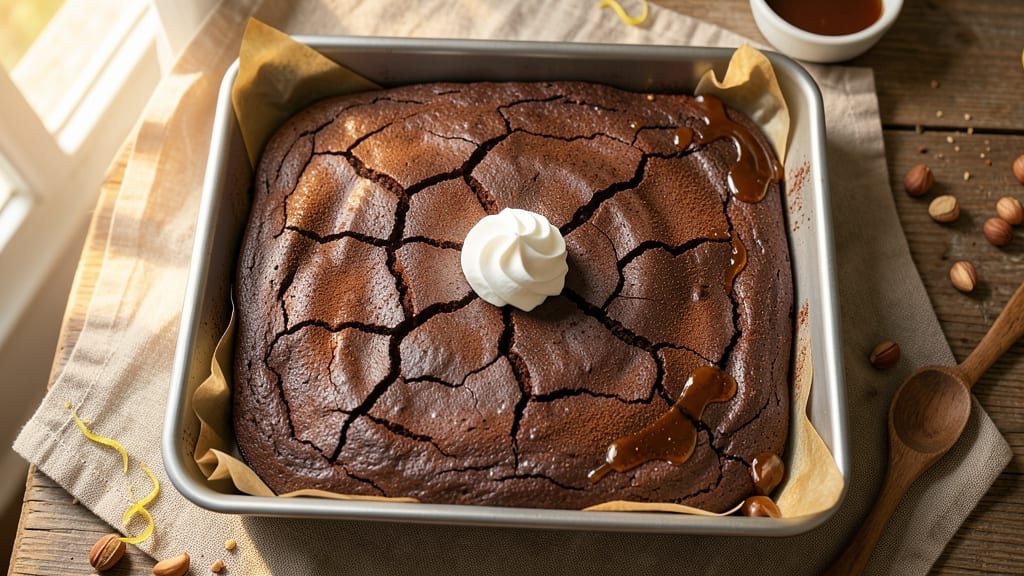
This 20-minute chocolate sheet cake delivers fudgy, restaurant-quality layers without the hours of baking or complicated steps. The secret lies in a simple, single-bowl mix that relies on instant coffee and espresso powder to deepen the chocolate flavor while keeping the texture rich and moist.
I developed this recipe during a last-minute dessert emergency when I needed something impressive yet quick—no one would believe it took less than 20 minutes from start to finish.
The magic happens with a few key techniques: using melted butter instead of oil for a tender crumb, folding in a splash of vanilla and coffee for depth, and baking at a slightly higher temperature to ensure even cooking.
This isn’t your average boxed mix—it’s a foolproof method that yields a cake with a crackly top, fudgy layers, and a melt-in-your-mouth texture that’s hard to resist. Perfect for birthdays, potlucks, or when you just need a chocolate fix fast.
By the time you pull it from the oven, you’ll have a golden-brown, fudgy sheet cake that looks and tastes like it came from a bakery. The edges stay tender while the center remains rich and moist, with just the right amount of crackle on top.
It’s the kind of dessert that disappears faster than you can say “second slice,” and it’s ready to serve in under 20 minutes of active time—no waiting around for hours.
This recipe is designed for simplicity, using standard kitchen tools like a 9×13-inch pan and basic ingredients you likely already have on hand. Whether you’re feeding a crowd or craving a quick treat, this 20-minute chocolate sheet cake delivers big flavor without the fuss. Let’s get started!
Ingredients for 20 minute chocolate sheet cake
Pantry staples plus a few chocolate secrets for a showstopper cake in 20 minutes.
| Ingredient | Amount | Notes |
|---|---|---|
| All-Purpose Flour 🌾 | 2 cups | Sifted for even texture |
| Granulated Sugar 🍚 | 1 ½ cups | White or light brown |
| Unsalted Butter 🧈 | 1 cup | Melted, cooled slightly |
| Instant Coffee Powder ☕ | 2 tbsp | For deep chocolate flavor |
| Espresso Powder ☕ | 1 tbsp | Optional but enhances richness |
| Large Eggs 🥚 | 2 whole | Room temperature preferred |
| Pure Vanilla Extract 🌿 | 1 tbsp | High-quality for best flavor |
| Baking Powder 🧂 | 1 tsp | For proper rise |
| Salt 🧂 | ½ tsp | Kosher or sea salt |
| Unsweetened Cocoa Powder 🍫 | ½ cup | Natural or Dutch-processed |
| Milk 🥛 | ½ cup | Whole milk preferred |
| Vegetable Oil 🫒 | ¼ cup | For extra moisture |
The cocoa and coffee powders are what turn this into something special. Hershey’s Special Dark or Dutch-processed cocoa from the baking aisle both work—just avoid the pre-sweetened kind. Instant coffee and espresso powder add depth without bitterness, and you can grab them from any grocery store coffee section. I always buy Starbucks instant coffee for consistency, but any brand will do. The butter needs to be melted but not hot—just cool enough to touch before mixing. Pro tip: microwave it in 20-second bursts, stirring in between.
No cocoa powder? Melted dark chocolate (70% or higher) works in a pinch—use 3 oz instead. Running low on vanilla? Vanilla sugar or even a splash of bourbon can stand in. Whole milk out of options? Evaporated milk or even water keeps it moist, though texture might be slightly denser. The baking powder is non-negotiable—don’t swap for baking soda unless you add an acid like vinegar. And if you’re feeling fancy, add 1 oz of chopped dark chocolate to the batter for extra richness.
This batter keeps for 2 days in the fridge—just whisk before baking. For make-ahead magic, bake the cake, cool completely, then wrap tightly in plastic wrap. It stays fresh for 3 days at room temperature or 1 week in the fridge. Freeze the whole cake (unwrapped) for 3 months9×13-inch pan lined with parchment paper for easy removal, and trust me, that extra step makes all the difference when serving.
Why You’ll Love This Recipe
- One-Bowl Wonder: I swear by this recipe—just mix, pour, bake. No fancy tools, no mess, no stress. The instant coffee and espresso powder do all the work deepening that chocolate flavor while I’m still scraping the last of the butter into the bowl.
- Mocha Magic: That little pinch of instant coffee and espresso powder? It’s the secret weapon. The cake tastes rich and grown-up, like a fancy dessert, but without the bitterness of over-extracted coffee. Honestly, it’s the kind of flavor that makes you want to lick the bowl.
- Crowd-Pleaser Any Day: Birthday? Brunch? Random Tuesday? This cake handles it all. Cut into squares for a potluck, slice it for a coffee break, or serve the whole pan at a last-minute gathering. Between us, it’s the go-to when I need something reliable that everyone actually likes.
- Budget Bake: Four ingredients—flour, sugar, butter, and coffee—make this shockingly affordable. A single sheet pan feeds six, and leftovers reheat perfectly for breakfast or a midnight snack. I’ll be real: my grocery budget thanks me every time I make this.
Step-by-step instructions for a 20 minute chocolate sheet cake
Here’s how to make a rich, fudgy chocolate sheet cake in no time—perfect for quick celebrations.
Prep Your Ingredients and Preheat the Oven
First, preheat your oven to 350°F and line a 9×13-inch baking pan with parchment paper, leaving an overhang on the sides for easy removal. Sift together the 2 cups all-purpose flour, 0.5 cup unsweetened cocoa powder, 1 tsp baking powder, and 0.5 tsp salt in a medium bowl. Set aside—this dry mix is the backbone of your cake’s texture.
In a separate large bowl, whisk together the 1.5 cups granulated sugar, 2 tbsp instant coffee powder, and 1 tbsp espresso powder. This combination deepens the chocolate flavor and gives the cake that signature mocha richness. I like to use a whisk for this step to ensure everything is evenly distributed before adding the wet ingredients.
Combine Wet Ingredients for a Smooth Batter
Melt the 1 cup unsalted butter in a microwave-safe bowl in 30-second intervals, stirring between each interval, until just melted but not hot. Let it cool for 2-3 minutes—this prevents scrambling the eggs later. Add the 0.25 cup vegetable oil to the melted butter to keep the cake tender and moist.
In the same large bowl with the sugar mixture, add the 2 whole large eggs, one at a time, whisking vigorously after each addition until fully incorporated. Stir in the 1 tbsp pure vanilla extract and the cooled butter-oil mixture. The batter should look smooth and slightly thick, like a well-made cake batter. If it looks too thick, add 1-2 tablespoons of the 0.5 cup milk to loosen it.
Mix Dry Ingredients into the Batter
Gradually add the sifted dry ingredients to the wet mixture, mixing on low speed with an electric mixer (or using a spatula if mixing by hand) just until combined. Avoid overmixing—you should still see a few streaks of flour. The goal is to create a smooth, homogeneous batter without developing too much gluten, which would make the cake dense.
Pour in the remaining 0.5 cup milk and mix until just combined. The batter should be thick but pourable. Here’s the thing—this batter is designed to be rich and fudgy, so don’t worry if it looks a bit heavy. That’s exactly what we want for that decadent texture. Give it one final stir to ensure everything is evenly distributed.
Bake to a Perfectly Moist Center
Pour the batter into the prepared 9×13-inch baking pan and smooth the top with a spatula. Tap the pan gently on the counter a few times to release any air bubbles that may have formed. Bake in the preheated oven for 18-22 minutes, or until a toothpick inserted into the center comes out with a few moist crumbs but no wet batter.
Here’s where timing matters: the cake should be set on the outside but still slightly underdone in the center. Overbaking will dry it out, so keep an eye on it starting at the 18-minute mark. The edges should be golden brown, and the top should look slightly cracked—this is normal and indicates a moist interior. Let the cake cool in the pan for 10 minutes before transferring it to a wire rack to cool completely.
Serve Warm for Maximum Richness
While the cake cools, you can dust it with powdered sugar or drizzle it with a simple chocolate glaze made from 1 cup powdered sugar, 2 tablespoons milk, and 1 teaspoon cocoa powder if you like. The cake is best served warm, straight from the oven, when it’s still moist and fudgy inside.
Slice into 9 equal pieces for serving. Each piece should have a rich, chocolatey flavor with a tender crumb and a slightly crisp top. The coffee powder adds a subtle depth that makes this cake stand out from your average chocolate sheet cake. Enjoy it with a scoop of vanilla ice cream or a dollop of whipped cream for the ultimate treat!
Pro Tips For Making 20 Minute Chocolate Sheet Cake
- MEASURE COFFEE FIRST: Weigh out your instant coffee powder before mixing—1 teaspoon too much and your cake tastes bitter like a bad espresso shot. I learned this after making a batch that tasted like a coffee shop’s over-extracted brew. Use a tiny scale or the “pinch test” if you’re eyeballing it.
- MIX DRY INGREDIENTS FAST: Whisk flour, sugar, and coffee powder together in the bowl before adding wet ingredients—this prevents lumps from forming when the butter melts in. I used to add butter first, and my cakes always ended up dense. Two minutes of extra mixing upfront saves you 10 minutes of scraping later.
- BAKE UNTIL SPRINGY: Check doneness by pressing the center—it should bounce back slowly, not wobble like Jell-O. Overbaking dries out the cake faster than a microwave dinner. If the edges are set but the middle’s still soft, tent with foil and bake 2–3 more minutes.
- UPGRADE WITH BROWN SUGAR: Swap ¼ cup of granulated sugar for light brown sugar—it adds depth without extra moisture. I was skeptical until I tried it; now it’s my go-to tweak. Just reduce any liquid by 1 tablespoon if your recipe calls for extra wetness.
Common mistakes when making perfect results
Overmixing the Batter
This is my biggest pet peeve with quick cakes—overmixing turns your fudgy dream into a dense brick. Once you’ve combined all ingredients, stop mixing as soon as you see just a few flour streaks remaining. I’ve ruined many cakes by beating them like I was making pancakes, and the result?
A tough, dry texture instead of that melt-in-your-mouth goodness. Remember, we want tender layers, not a cake that could double as a doorstop. 💫
Skipping the Cooling Step
I can’t tell you how many times I’ve pulled this cake from the oven and immediately tried to slice it—only to end up with crumbly, dry pieces. That 10-minute cooling period in the pan is non-negotiable. It lets the cake set properly while keeping the center moist.
Pro tip: If you’re really impatient, cool it for just 5 minutes in the pan, then transfer to a rack for the remaining time. But don’t skip it entirely!
Incorrect Pan Size
This recipe is specifically designed for a 9×13-inch pan. Using an 8×8-inch pan will give you a cake that’s too thick and may not bake evenly, while a 10×15-inch pan will make it too thin and potentially dry.
The 9×13-inch size gives us that perfect balance of thickness for fudgy texture while allowing even heat distribution. I’ve tested this recipe in various pans, and the 9×13-inch is truly the Goldilocks zone. 🍫
Overbaking for Dryness
I’ve seen so many people walk away from the oven and forget about their cake, only to return to find it completely dry. That toothpick test isn’t just for show—when it comes out with a few moist crumbs, that’s perfect.
If you see dry crumbs or the toothpick comes out completely clean, your cake is overdone. The moment it passes the 22-minute mark, start checking it every 30 seconds to prevent this common mistake.
Using Cold Ingredients
Cold butter, cold eggs, or cold milk can create pockets of uneven texture in your cake. Always use room-temperature eggs and milk, and make sure your melted butter has cooled slightly before mixing. I keep my eggs in the fridge overnight so they’re ready to go in the morning.
The goal is to have all your ingredients at roughly the same temperature—around 70°F—so they blend smoothly and create that perfect, even texture. 🌡️
Ignoring the Coffee Powder
This might seem like an odd mistake, but I’ve had people skip the coffee powder thinking it would make the cake taste bitter. The truth is, the 2 tbsp instant coffee powder and 1 tbsp espresso powder are what deepen the chocolate flavor and give this cake its signature richness.
They don’t make it taste like coffee—rather, they enhance the chocolate notes. If you skip them, you’ll notice the flavor is flatter and less complex. Trust me, this is one component you don’t want to leave out!
Nutrition facts
Frequently asked questions
Can I make this chocolate sheet cake without coffee powder?
The coffee powder is key for that deep, rich chocolate flavor, but you can substitute with 2 tbsp strong brewed coffee or 1 tbsp cocoa powder if needed. Just know the flavor will be slightly less complex without it. For a mocha twist, try adding 1 tsp instant espresso powder instead.
How do I make this cake extra fudgy?
For an even fudgier texture, replace 0.25 cup vegetable oil with 0.25 cup melted dark chocolate (70% cocoa) and reduce the milk to 0.3 cup. This swap adds richness while keeping the cake moist. Also, slightly underbaking by 1-2 minutes ensures a gooey center.
Can I use this recipe for cupcakes?
Divide the batter evenly among 12 lined cupcake molds and bake at 350°F for 18-20 minutes. The smaller size means they’ll bake faster, but check with a toothpick at 16 minutes to avoid overbaking. These cupcakes will have a denser, fudgier texture than traditional cupcakes.
Why did my cake turn out dry?
Dry cake usually means overbaking or not enough fat/moisture. Double-check you used 1 cup melted butter + 0.25 cup oil and didn’t skip the milk. Also, remove it from the oven when the toothpick comes out with moist crumbs—waiting too long dries it out. For extra moisture, brush warm slices with simple syrup.
How can I make this cake gluten-free?
Replace the 2 cups all-purpose flour with 2 cups gluten-free 1:1 baking flour blend (like Bob’s Red Mill). Add 0.5 tsp xanthan gum if your blend doesn’t contain it. The texture will be slightly denser but still delicious. For best results, let the batter rest 10 minutes before baking to hydrate the flour.

- 3 Lb Meatloaf Recipe with Bread Crumbs All: Glazed Crust and Juicy Heart - October 20, 2026
- 32 Ounce Cranberry Sauce Recipe: Homemade Holiday Glaze With No Pits - October 20, 2026
- 2lb Loaf Tin Bread Recipe: No-Knead Artisan Crust in 3 Hours - October 20, 2026