
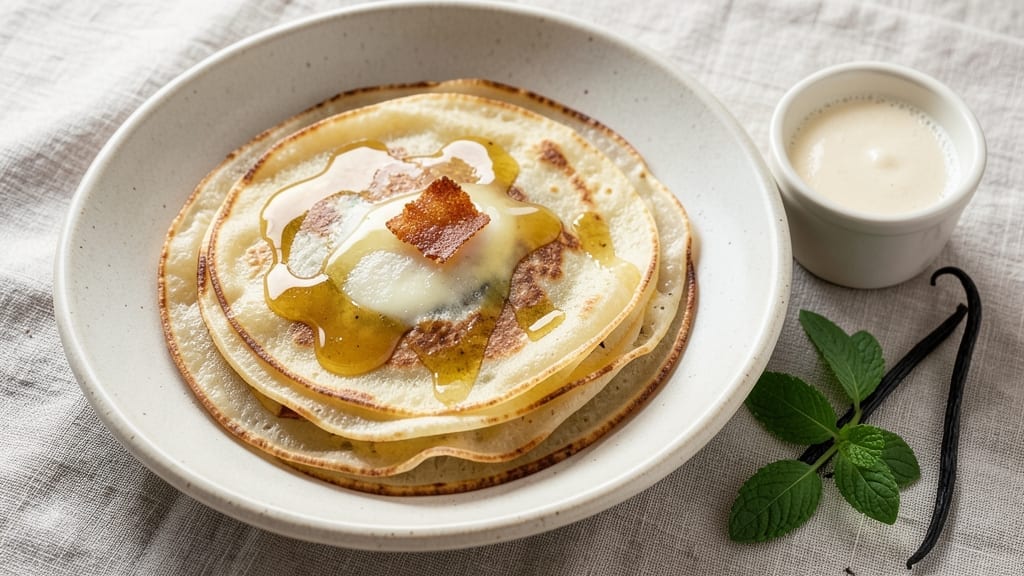
This 3-egg crepes recipe delivers the silky, buttery perfection you’ve been craving—thin, tender layers that practically melt in your mouth with every bite. The secret lies in precise heat control and a batter that balances eggs, milk, and a touch of vanilla for that signature delicate flavor.
I’ve perfected this technique over years of trial and error, ensuring each crepe comes out perfectly thin yet sturdy enough to hold fillings without tearing.
The beauty of this recipe is its versatility—whether you’re craving sweet Nutella-stuffed treats or savory ham-and-cheese masterpieces, the batter stays consistent. With just five simple ingredients and 10 minutes of active prep, you’ll have a stack of golden-brown crepes ready to fill in minutes.
The key? A non-stick pan and medium-low heat to maintain that signature crispness at the edges while keeping the center tender.
What sets these crepes apart is their restaurant-quality texture—crisp enough to hold fillings but soft enough to dissolve on your tongue. The batter’s lightness comes from whisking eggs and milk until smooth, then letting it rest briefly to develop flavor.
Once cooked, they’re ready to be rolled, folded, or filled with anything from fresh berries to melted brie.
Serve them warm for breakfast, brunch, or even dessert—this recipe scales effortlessly for crowds. The possibilities are endless, but the foundation remains the same: perfectly balanced batter, precise cooking, and buttery layers that make every bite worth it. Let’s get started!
Ingredients for 3 egg crepe
Five simple ingredients transform into silky crepes with buttery perfection every time.
| Ingredient | Amount | Notes |
|---|---|---|
| Large Eggs 🥚 | 3 whole | Room temperature for even cooking |
| All-Purpose Flour 🌾 | ¾ cup | Sifted for smooth batter texture |
| Whole Milk 🥛 | 1 cup | Full-fat for rich crepe layers |
| Unsalted Butter 🧈 | 2 tbsp | European-style preferred for flavor |
| Pure Vanilla Extract 🌿 | 1 tsp | High-quality for delicate flavor |
| Salt 🧂 | ¼ tsp | Fine sea salt for subtle seasoning |
| Vegetable Oil 🫒 | 1 tbsp | For pan coating (light neutral oil) |
The eggs and milk are the heart of this recipe—room temperature makes all the difference for even cooking. I always grab large eggs from the store’s refrigerated section, but let them sit out for 30 minutes before using. For the flour, King Arthur brand is my go-to—it’s finely milled and gives the perfect light texture. The butter? European-style (like Plugrá) has more flavor and lower water content, which prevents splattering. If you’re in a pinch, regular unsalted butter works, but trust me on the full-fat version for that signature richness. The vanilla extract should be pure, not imitation—look for brands like McCormick or Nielsen-Massey at the grocery store’s baking aisle.
No whole milk? Almond or oat milk works in a bind, but the batter will be slightly thinner—adjust with an extra tablespoon of flour. Running short on butter? Olive oil or coconut oil can substitute at the same amount, though the flavor will differ slightly. The vanilla can be swapped for vanilla bean paste if you’re feeling fancy, or even almond extract at half the amount for a different twist. For the oil in the pan, avocado oil has a higher smoke point if you’re cooking at high heat, but vegetable oil is perfectly fine for medium-low. Pro tip: if your batter seems too thick after mixing, add a splash of milk—it should be like heavy cream consistency.
The batter keeps well in the fridge for up to 24 hours—just give it a quick whisk before using. For longer storage, freeze portions in ice cube trays, then transfer to a bag. Thaw overnight in the fridge before cooking. Leftover crepes? Wrap them in parchment and freeze between layers for up to 3 months. When reheating, a dry non-stick pan over medium heat works best—just a few seconds per side to warm through. These reheat beautifully, making them perfect for meal prep—fill with whatever you like and store filled crepes for 2-3 days in the fridge.
Why You’ll Love This Recipe
- No-Measurement Guessing: I’ll be real—this recipe only needs three eggs. That’s it. No complicated ratios, no stressing over exact measurements. Just crack, whisk, and go. The milk and flour blend so smoothly you’ll wonder why you ever overcomplicated crepes before.
- Butter-Vanilla Magic: The moment you add that vanilla extract? Chef’s kiss. It’s not just sweet—it’s warm, cozy, and makes the whole batter smell like a bakery. And the butter? A little in the pan gives that golden, crispy edge while keeping the inside pillowy. Simple ingredients, but they work hard.
- Breakfast to Dessert: Here’s what sold me—these crepes are that versatile. Stuff them with Nutella and banana for a lazy Sunday, or fold them with scrambled eggs and cheese for a quick brunch. Even my picky teen will eat them plain with a drizzle of honey. One recipe, endless uses.
- Pantry Staple Power: Between us, this uses things you already have. Flour, eggs, milk—no specialty items, no last-minute grocery runs. And the leftovers? Toss them in the fridge, reheat with a little extra butter, and they’re just as good the next day. Budget-friendly and foolproof.
Step-by-step instructions for silky thin crepes
Here’s how to make flawless, delicate crepes that peel away effortlessly from the pan.
Whisk the Batter Until Smooth and Glossy
In a medium bowl, combine the 3 whole Large Eggs, 1 cup Whole Milk, 1 tsp Pure Vanilla Extract, and 0.25 tsp Salt. Whisk vigorously for 2 minutes until the mixture is completely homogeneous and slightly frothy. This step ensures no lumps remain, which would create uneven textures in your crepes.
Next, gradually sift in the 0.75 cup All-Purpose Flour while continuing to whisk. The batter should be thin but pourable—like heavy cream. If it thickens too much, add 1-2 tablespoons of milk to restore the right consistency. Let the batter rest for 10 minutes at room temperature. This resting period allows the flour to fully hydrate, resulting in smoother, more pliable crepes.
Heat the Pan and Test for Readiness
Place a 10-inch nonstick skillet over medium-high heat. Add 1 tbsp Vegetable Oil and swirl to coat the entire surface evenly. The oil should shimmer but not smoke—this indicates the perfect temperature (around 350°F). If it smokes, reduce the heat slightly and wait a minute for it to cool.
Here’s the trick: tilt the pan and gently pour in 2 tablespoons of batter, then quickly swirl the pan in a circular motion to create an even, paper-thin layer. The crepe should immediately begin to set at the edges while the center remains slightly runny. This is your visual cue that the pan is ready—if the batter sets too quickly, it’s too hot; if it pools in the center, it’s too cool.
Cook Until Golden and Lift with Confidence
Let the crepe cook undisturbed for 30-45 seconds until the edges lift slightly and the bottom turns golden brown in spots. Here’s where precision matters: resist the urge to flip too early. You’ll know it’s ready when you can gently lift an edge with a spatula and see it release cleanly from the pan.
Slide the spatula under the crepe and flip it with a quick, confident motion. Cook the second side for another 20-30 seconds until lightly golden. Transfer to a clean towel-lined plate and repeat with the remaining batter, stacking the crepes as you go. Each crepe should be 7-8 inches in diameter and perfectly translucent at the edges when held up to light.
Keep Warm and Fill with Creativity
To maintain flexibility, place a clean kitchen towel over the stack of crepes and cover loosely with another towel. This keeps them warm and prevents them from drying out. The crepes are best filled immediately—whether with sweet fruit compotes, whipped cream, or savory fillings—but they can be reheated briefly in a dry skillet over low heat if needed.
For perfect results, work quickly once the pan is hot. Each crepe should take no more than 2 minutes from batter to plate. The key to buttery perfection lies in the balance of heat and timing—too hot, and they brown too fast; too cool, and they turn out gummy. With practice, you’ll develop an instinct for that golden middle ground where every crepe turns out silky and flawless.
Pro Tips For Making 3 Egg Crepe
- Whisk Until Smooth: Don’t just stir—whisk the egg-milk mixture until it’s actually smooth, with no lumps. I used to rush this, but those tiny flour bits turn into dry patches in your crepes. Take the extra 30 seconds; your first batch will thank you.
- Use Cold Butter: Melt the butter for cooking, but keep the reserved butter (for brushing) cold in the fridge. Drizzling warm butter makes crepes soggy; cold butter adds shine and a buttery layer that actually sticks. Trust me, it’s worth the swap.
- Rest the Batter: Let the batter sit for 10–15 minutes after mixing. This relaxes the gluten just enough for thinner, more pliable crepes. I skipped this once and ended up with chewy, uneven sheets—now I never forget.
- Preheat Pan Proper: Get your pan ripping hot before adding batter—medium-high isn’t enough. Too cool? Your crepe will stick and tear. Too hot? It’ll brown before cooking through. Aim for a sizzle that’s loud but not smoking, and adjust as you go.
Serving suggestions for this dish
Sweet Fillings
For a decadent treat, spread 2 tbsp Nutella on half of each crepe, then fold into a half-moon. Roll in powdered sugar for a sweet finish. I love adding fresh strawberries or banana slices for a fruity contrast.
Warm caramel sauce drizzled on top takes it to the next level—just heat ½ cup heavy cream with ½ cup brown sugar until bubbly. 🍓
Savory Options
Stuff crepes with crispy ham, Gruyère cheese, and a spoonful of Dijon mustard> for a classic French brunch. For a vegetarian twist, mix sautéed mushrooms, spinach, and goat cheese> with a splash of cream.
I also love adding a pinch of black pepper and fresh thyme> to elevate the flavors. 🧀
Warm Drizzles
Elevate your crepes with warm toppings like honey> or maple syrup for sweet versions. For savory, a drizzle of balsamic glaze> or truffle oil> adds depth. I keep a small saucepan on hand to gently warm these toppings—just heat until steaming, then pour over the filled crepe.
A sprinkle of flaky sea salt> finishes the dish perfectly. ✨
Breakfast Brunch Stack
Layer crepes with scrambled eggs, crispy bacon, and avocado slices> for a hearty brunch. Add a dollop of sour cream> and a squeeze of hot sauce> for extra zing.
This stack is perfect for weekend mornings—just assemble and serve immediately. The crepes’ delicate texture contrasts beautifully with the hearty fillings. 🍳
Dessert Presentation
For a restaurant-worthy dessert, roll crepes with whipped cream, raspberries, and a sprinkle of toasted coconut flakes>. Serve on a chilled plate with a dusting of powdered sugar> and a mint leaf for garnish.
I also love adding a drizzle of chocolate ganache> for an extra touch of indulgence. Presentation matters—plate with care! 🍫
Make-Ahead Serving
Prep crepes ahead by cooking them plain and storing in the fridge for up to 2 days. When ready to serve, reheat in a dry pan for 10 seconds per side> and fill with your favorite toppings.
This is a lifesaver for busy mornings—just assemble and enjoy. Keep fillings separate until serving to maintain freshness. 📅
Nutrition facts
Frequently asked questions
Why does your recipe use 3 eggs instead of the usual 2?
The extra egg creates a slightly richer, more stable batter that yields thicker yet still delicate crepes perfect for both sweet and savory fillings. The additional protein helps prevent tears when folding, especially with heavier fillings like ham or cheese. For extra-light crepes, you could reduce to 2 eggs, but they may be more fragile.
Can I make these crepes ahead of time?
Cook the crepes plain and store them stacked between parchment paper in the fridge for 2 days or freeze for 3 months. To reheat, warm in a dry non-stick pan over medium-low heat for just 10-15 seconds per side—they’ll be ready for filling when pliable again. Keep fillings separate until serving to prevent sogginess.
What’s the secret to getting them perfectly thin?
The magic happens in two steps: swirling the pan while pouring the batter creates even thickness, and medium-low heat prevents rapid cooking. Use a 10-inch non-stick skillet and pour 2 tablespoons of batter—tilt the pan at a 45-degree angle and quickly rotate it in a circular motion while pouring. The edges should set in 15-20 seconds before flipping.
Can I substitute the milk with something else?
Yes! For a lighter version, use unsweetened almond milk (add 1 extra tbsp flour to thicken). For richness, try heavy cream or half-and-half. Avoid watery substitutes like skim milk—they won’t yield the same tender texture. If using dairy-free milk, let the batter rest 15 minutes longer to improve cohesion.
How do I fix crepes that tear when folding?
Tears usually mean the crepe cooled too much before filling. Keep them warm in a towel-lined basket and work quickly! For extra strength, add 1 tbsp cornstarch to the batter. If they’re already cooked, reheat briefly in the pan before folding—just enough to make them pliable again. For fillings, stick to soft ingredients first (like whipped cream) before trying heavier ones.

- 6 Oz Chocolate Chip Cookie Recipe: Perfectly Balanced Crispy Edges and Chewy Hearts - September 25, 2026
- 6-Inch Coffee Cake Recipe: Vanilla Bean Swirls and Buttery Streusel Topping - September 25, 2026
- 1 Hour Soup Recipe: Velvety Richness Without the Wait - September 25, 2026