
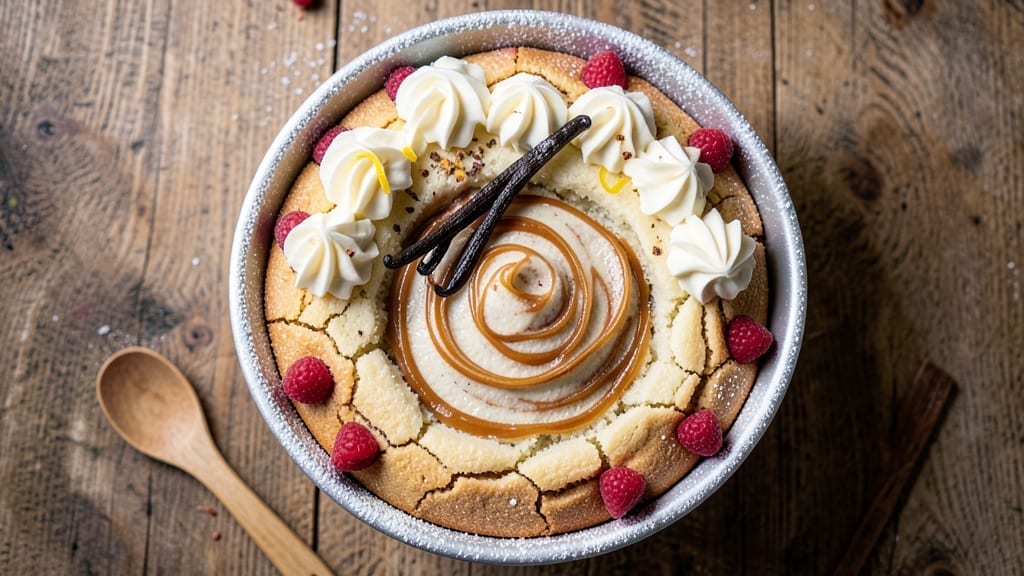
This 3-egg vanilla cake recipe promises that ideal mix of tender layers and deep vanilla taste—never heavy or crumbly. The secret lies in proper mixing techniques and precise baking times—this isn’t your grandma’s heavy cake.
With just three eggs, we create structure while keeping it tender, and the vanilla bean swirl adds a luxurious touch that makes it feel special without the complexity.
What sets this recipe apart is the foolproof method for achieving a moist crumb and even bake every time. We use a single bowl (no extra mixing required) and a two-step mixing process that incorporates air gently, preventing a tough texture.
The cake rises beautifully, with a fine crumb that melts in your mouth, and the vanilla bean swirl adds pockets of intense vanilla flavor in each slice.
By the time you pull it from the oven, you’ll have a golden, perfectly domed cake with a tender crumb and subtle vanilla aroma that fills your kitchen. The layers are light enough to cut cleanly, yet sturdy enough to hold frosting beautifully.
This is the kind of cake that tastes homemade but looks like it came from a bakery—no one will guess it uses just three eggs.
Whether you’re frosting it with buttercream, dusting with powdered sugar, or serving it plain with fresh berries, this cake is versatile enough for any occasion. The recipe scales easily, so you can adjust the size for a single layer or double it for a tiered masterpiece. Let’s get baking!
Ingredients for 3 egg vanilla cake
Three eggs, one bowl, layers so light they vanish on your tongue.
| Ingredient | Amount | Notes |
|---|---|---|
| Large Eggs 🥚 | 3 whole | Room temperature for even mixing |
| Granulated Sugar 🍚 | 1 ½ cups | White or light brown preferred |
| All-Purpose Flour 🌾 | 2 cups | Sifted for light texture |
| Unsalted Butter 🧈 | 1 cup | Softened to room temperature |
| Pure Vanilla Extract 🌿 | 1 tbsp | High-quality for deep flavor |
| Vanilla Bean Paste 🍮 | 1 tbsp | For swirls and extra flavor |
| Baking Powder 🧂 | 1 ½ tsp | Freshly opened for lift |
| Salt 🧂 | ½ tsp | Fine sea salt preferred |
| Whole Milk 🥛 | ½ cup | Room temperature for smooth batter |
| Vegetable Oil 🫒 | ¼ cup | Lightens texture without heaviness |
The eggs here are the magic—room temperature makes all the difference (pop them in warm water for 5 minutes if they’re cold). For flour, King Arthur or Bob’s Red Mill are my go-tos—they’re sifted and consistent. Butter? Plugrá or Land O’Lakes unsalted work perfectly, but don’t use salted. The vanilla matters too—McCormick Pure Vanilla Extract is reliable, but if you’re splurging, a Madagascar vanilla bean for the swirls changes the game. Pro tip: scrape the seeds from the pod and save the pod for tea—zero waste.
No vanilla bean? Double the extract and add a pinch of vanilla sugar (just mix powdered sugar with a scraped vanilla pod). Out of baking powder? Baking soda plus cream of tartar at half the amount works in a pinch. Milk substitute? Almond milk or oat milk both work, but add a splash of lemon juice to mimic dairy’s tang. And if your butter’s still cold, microwave it for 20 seconds—just until it’s pliable, not melted. Trust me on this.
Batter keeps for 24 hours in the fridge—perfect for making ahead. The vanilla bean swirls? Pipe them in just before baking so they don’t sink. Cake layers stay fresh for 3 days wrapped tightly, but honestly? It’s gone by day two. Freeze layers for up to 3 months if you’re prepping for a party. Just thaw overnight before frosting—never microwave, or the texture gets gummy.
Why You’ll Love This Recipe
- No Mixer Needed: I swear by this recipe when my mixer’s on the fritz—just cream the butter and sugar by hand until it’s light and fluffy. Three eggs do all the heavy lifting, so you’re not stuck beating dough for ages.
- Vanilla That Stays True: That pure vanilla extract? It’s not hiding in a synthetic aftertaste here. The butter keeps it rich, and the flour’s just enough to let the vanilla shine—like a warm hug in cake form.
- Birthday or Breakfast: Slice it for a crowd’s dessert or grab a piece straight from the fridge for your morning coffee. The texture holds up for days, so it’s my go-to for celebrations and lazy Sundays.
- Pantry-Friendly Magic: Three eggs, a stick of butter, and basic flour? This is the kind of recipe that won’t break the bank or your grocery list. Leftovers? They’ll disappear faster than you can say “second slice.”
Step-by-step instructions for light-as-air vanilla cake
Let’s create a cake so tender it practically melts in your mouth, with those signature swirls of vanilla bean goodness.
Prepare Your Vanilla Bean Swirls
In a small bowl, combine the 1 tbsp vanilla bean paste with 1 tbsp pure vanilla extract. This mixture will give your cake those beautiful swirls and an extra layer of vanilla flavor. Spread this mixture evenly across the bottom of an 8-inch round cake pan—about 2 tablespoons should do it. Be careful not to spread it too thin, or the swirls won’t show up as dramatically when you bake.
This step is what sets this cake apart from ordinary vanilla cakes. The paste adds depth of flavor and those gorgeous marbled patterns. If you don’t have vanilla bean paste, you can use the seeds scraped from a vanilla bean, but the paste gives a more consistent texture for swirling.
Cream Butter, Sugar, and Eggs
In a large mixing bowl, beat the 1 cup softened unsalted butter with the 1.5 cups granulated sugar on medium speed until light and fluffy—about 3-4 minutes. The mixture should nearly double in volume and look pale, almost like whipped butter. This step incorporates air, which is key for that light-as-air texture.
Add the 3 whole large eggs, one at a time, mixing well after each addition. Scrape down the sides of the bowl to ensure everything is fully incorporated. Here’s the thing—room temperature eggs mix more smoothly and create a lighter batter. If your eggs are cold, they might not blend as well, leading to a denser cake.
Combine Dry and Wet Ingredients
In a separate bowl, whisk together the 2 cups all-purpose flour, 1.5 tsp baking powder, and 0.5 tsp salt. Sift the flour mixture directly into the butter-sugar-egg mixture while mixing on low speed. This prevents gluten from developing too much, which keeps the cake tender. Add the 0.5 cup whole milk and 0.25 cup vegetable oil and mix just until combined—you should still see some dry flour streaks.
This is where the magic happens. The milk and oil help create a moist, velvety texture, while the sifted flour ensures a light crumb. Overmixing at this stage can make the cake tough, so mix just until everything is incorporated. The batter should be smooth but not too thin.
Fold in Vanilla and Bake
Gently fold the 1 tbsp pure vanilla extract and 1 tbsp vanilla bean paste into the batter using a spatula, being careful not to deflate the air you’ve incorporated. Pour the batter over the vanilla swirls you prepared in the cake pan, spreading it evenly. Tap the pan gently on the counter a few times to remove any air bubbles.
Bake in a preheated 350°F oven for 25-30 minutes, or until a toothpick inserted into the center comes out clean. The cake should be golden on top and spring back slightly when pressed in the center. Real talk: don’t open the oven too early—this can cause the cake to sink. The edges should pull away from the pan just slightly, indicating it’s done.
Cool and Serve
Let the cake cool in the pan for 10 minutes, then transfer it to a wire rack to cool completely. This gradual cooling prevents the cake from cracking. Once fully cooled, you can frost it with your favorite vanilla buttercream or dust it with powdered sugar for a simple finish. The swirls should be visible through the layers, adding a visual treat to the delicious flavor.
Slice and serve within a day for the best texture. The cake keeps well at room temperature, wrapped tightly in plastic wrap, for up to 3 days. Enjoy your light, airy vanilla cake with those beautiful swirls that make every bite feel special.
Pro Tips For Making 3 Egg Vanilla Cake
- Whip Eggs to Ribbon Stage: Beat those eggs and sugar until the mixture falls in slow ribbons when the whisk is lifted—about 3-5 minutes longer than you think. I learned this the hard way when my cake turned dense; that extra time incorporates air, making it light and fluffy. (Yes, even if your arm starts to protest.)
- Melt Butter Slowly: Warm the butter in the microwave for 20-30 seconds until just melted, then let it cool slightly before adding it to the egg mixture. Cold butter makes the batter seize, and you’ll end up with lumps that ruin the texture. Trust me, your cake will thank you.
- Sift the Flour Twice: Dump that flour into a sifter and give it two quick shakes—once before measuring, once after—then fold it in gently with a spatula. Skipping this step means you’re mixing in flour clumps, which turn into dry pockets in the cake. (Your future self will notice.)
- Bake at 325°F, Not Higher: Preheat your oven to 325°F and don’t peek for at least 25 minutes—hotter temps cause the outside to set before the inside is done, leading to cracks or a dry crumb. I used to rush it, and the cake always came out uneven. Patience here makes all the difference.
Common mistakes when making this recipe
Overmixing the Batter
This is the #1 culprit for tough, dense cake. Once you’ve sifted in the dry ingredients and added the milk and oil, mix just until combined—you should still see small flour streaks. I’ve ruined cakes by mixing too long, and the result was a sad, rubbery texture.
Use a spatula to gently fold in the vanilla at the end to preserve all that incorporated air. 🥄
Cold Ingredients
Cold butter, eggs, or milk can cause your cake to turn out dense or even fail to rise properly. Always use room-temperature ingredients—softened butter that’s pliable but not melted, eggs that feel warm to the touch, and milk that’s not straight from the fridge.
I learned this the hard way when my first batch came out like a brick. Pro tip: Run cold eggs under warm water for 5 minutes to bring them to room temp quickly.
Skipping the Swirl Prep
If you don’t spread that vanilla bean paste mixture evenly on the bottom of the pan first, you’ll miss out on two things: the beautiful swirl effect AND concentrated vanilla flavor in each slice.
I’ve made this mistake and ended up with a cake that tasted good but lacked that wow factor. Spread that paste thinly but evenly—about 2 tablespoons—and use the back of a spoon to create thin lines before adding batter.
Opening the Oven Too Soon
Peeking at your cake too early causes it to sink dramatically. The cake needs that full baking time to set properly. I’ve fallen into this trap when I was too excited to see if it was done.
Wait until the edges pull away from the pan slightly and a toothpick comes out clean. The top should be golden, not pale. Set a timer for 25 minutes and resist the urge to check earlier—trust the process!
Using Old Baking Powder
Old baking powder loses its lift, resulting in a flat, dense cake. Always check your baking powder’s expiration date—it should be fresh and sizzle when mixed with vinegar. I keep an extra can in my pantry specifically for baking.
If yours isn’t bubbling, toss it and start fresh. This small detail makes a huge difference in your cake’s rise and texture.
Incorrect Oven Temperature
Your oven might not actually be at 350°F—many ovens run hot or cold. Invest in an oven thermometer to check. I’ve had cakes come out underdone or overbaked because my oven was running 25°F hotter than the setting.
Preheat your oven for at least 20 minutes before baking, and place your cake on the middle rack for even heat distribution. This ensures consistent, perfect results every time. 🌡️
Nutrition facts
Frequently asked questions
Can I substitute vanilla extract for vanilla bean paste in this recipe?
Yes, but you’ll lose the visual swirls and some depth of flavor. Use 2 tbsp pure vanilla extract instead of the 1 tbsp paste + 1 tbsp extract called for. For best results, add a pinch of vanilla sugar (mix powdered sugar with scraped vanilla bean seeds) to mimic the paste’s intensity. The flavor will be good, but the marbled look disappears.
Why does your recipe use only 3 eggs when most vanilla cakes use 4 or 5?
This recipe achieves lightness through proper mixing techniques and room-temperature ingredients—not egg quantity. The 3 eggs provide structure while keeping the texture tender. The vegetable oil and milk create moisture without heaviness. Many traditional recipes overcompensate with extra eggs, leading to denser cakes. Our method proves less is more!
Can I make this cake in a different pan size?
Yes, but adjust baking time accordingly. For a 9-inch pan, bake 20-25 minutes—the cake will be thinner. For a 6-inch pan, bake 30-35 minutes—it will be taller. Always check with a toothpick. The key is baking until the center reaches 205°F (212°F for 9-inch). Use an oven thermometer to ensure accuracy.
How do I make this cake gluten-free?
Replace the 2 cups all-purpose flour with a 1:1 gluten-free baking flour blend (like Bob’s Red Mill 1-to-1). Add 1 tsp xanthan gum to help bind the cake. Also reduce the milk to 0.375 cup—gluten-free batters absorb more liquid. Note: texture may be slightly denser, but still delicious. Test with a small batch first.
Can I bake this cake in a convection oven?
Yes, but reduce temperature by 25°F (to 325°F) and check for doneness 5 minutes early. Convection’s faster heat can dry out the cake. Place your cake on the middle rack and avoid opening the door during baking. The edges may brown faster, so watch closely after 20 minutes.

- Pork Loin Pulled Pork Crock Pot Recipe: Slow-Smoked Tenderness With Zero Dryness - November 1, 2026
- Baked Potatoes in Crock Pot Recipe: Buttery Interiors and Crispy Top Magic - November 1, 2026
- Braised Beef Short Ribs Recipe: Crock Pot Fall-Off-Bone Magic in 6 Hours - November 1, 2026