
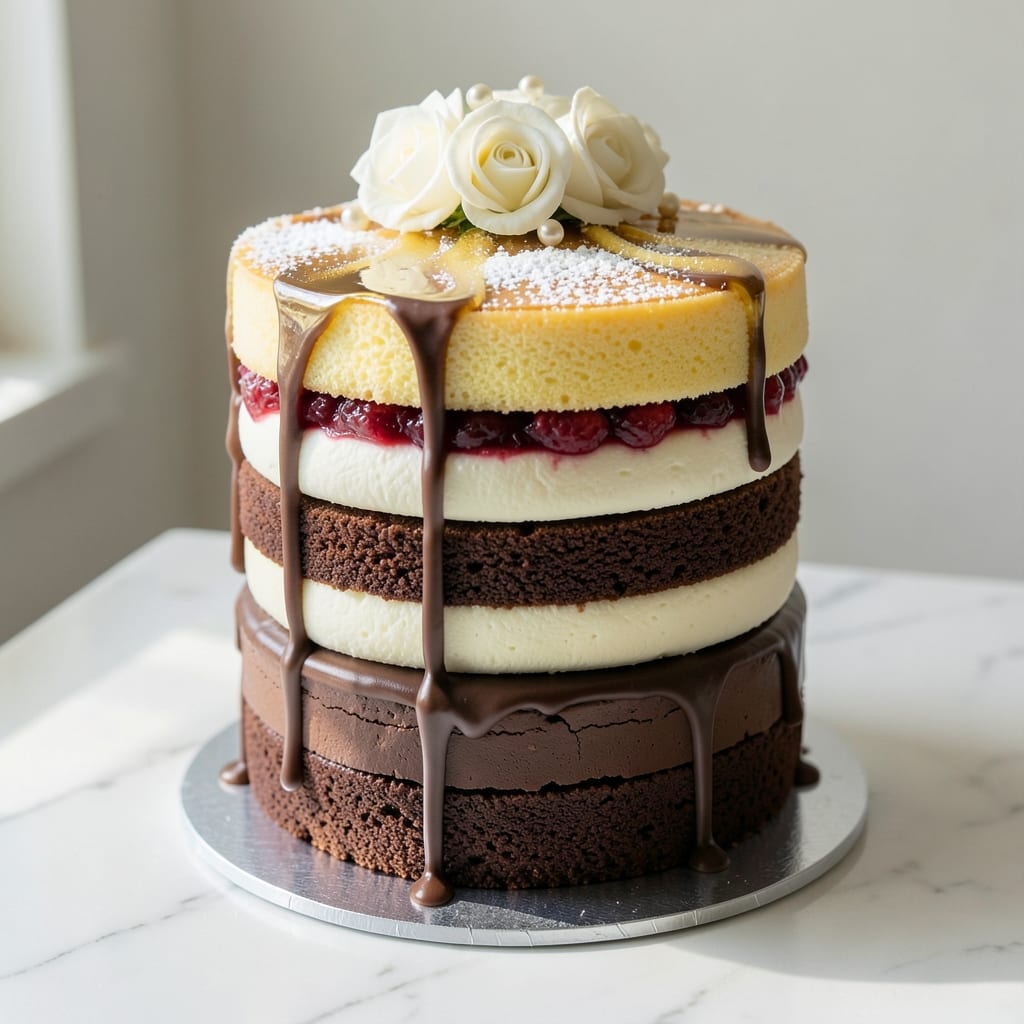
This 3-layer birthday cake recipe with swirling vanilla bean and rich chocolate ganache transforms any celebration into a showstopper. This recipe delivers restaurant-quality results with foolproof techniques—from baking perfectly moist layers to assembling with precision.
The secret lies in patience and temperature control, ensuring each layer rises evenly and the ganache sets flawlessly.
Start with vanilla bean cake layers baked at 350°F for 25-30 minutes, then cool completely before assembling. The chocolate ganache requires just two ingredients—heavy cream and chocolate—but timing is critical for a glossy, stable finish.
Between each layer, spread a thin buttercream crust to prevent sogginess while keeping the cake structure intact.
Assembling the cake requires a level surface and precise piping for clean swirls. Use a serrated knife to trim layers evenly, then pipe ganache between them with a piping bag and star tip for professional-looking swirls.
Chill the cake for 2 hours before decorating to ensure the ganache sets properly, leaving you with a moist, decadent center and a smooth, glossy finish.
Perfect for birthdays, anniversaries, or special occasions, this cake combines elegance and simplicity. The vanilla bean layers add a subtle floral aroma, while the chocolate ganache delivers a bold, velvety contrast. With these techniques, even home bakers can achieve a bakery-worthy masterpiece every time.
Ingredients for 3 layer birthday cake
Twelve essential ingredients for a showstopping 3-layer vanilla bean and chocolate cake masterpiece.
| Ingredient | Amount | Notes |
|---|---|---|
| All-Purpose Flour 🌾 | 4 ½ cups | Sifted for light texture |
| Granulated Sugar 🍚 | 2 ½ cups | White sugar preferred |
| Unsalted Butter 🧈 | 2 cups | Room temperature, softened |
| Large Eggs 🥚 | 6 whole | Room temperature for even baking |
| Whole Milk 🥛 | 1 ½ cups | Room temperature |
| Vanilla Bean Paste 🌿 | 2 tbsp | High-quality for authentic flavor |
| Baking Powder 🍞 | 2 tsp | Freshly measured |
| Salt 🧂 | ½ tsp | Fine sea salt |
| Dark Chocolate Bars 🍫 | 12 oz | 70% cocoa or higher |
| Heavy Whipping Cream 🥛 | 2 cups | Cold for ganache |
| Powdered Sugar 🍚 | 3 cups | For buttercream |
| Vanilla Extract 🌿 | 1 tbsp | Pure vanilla for flavor |
| Unsalted Butter 🧈 | 1 cup | Room temperature for buttercream |
The vanilla bean paste and high-quality dark chocolate are non-negotiable for authentic flavor. Source vanilla bean paste from specialty baking stores like Williams Sonoma or Sur La Table—their pure Madagascar or Tahitian varieties elevate the cake’s floral aroma. For chocolate, Lindt or Valrhona bars (70% cocoa or higher) ensure a smooth, velvety ganache. The all-purpose flour should be King Arthur or Gold Medal for consistent rise, and baking powder must be fresh (test by checking the date—it loses potency after 6 months). Store butter and eggs in the fridge until ready to use, then let them sit at room temperature for 1 hour before mixing to ensure even incorporation.
No vanilla bean paste? Pure vanilla extract at double the amount works, though the flavor will be subtler. Substitute dark chocolate with chocolate chips (melt them first for a smoother texture). For a dairy-free option, replace heavy cream with full-fat coconut cream (chill it overnight to mimic cold cream). The powdered sugar can be swapped for confectioners’ sugar from Dominique Ansel for a finer texture. If you’re short on butter for the buttercream, vegetable shortening (like Crisco) provides stability, though it lacks richness. Always sift dry ingredients to avoid dense layers—a fine-mesh sieve from Le Creuset makes this effortless.
Store vanilla bean paste in the fridge for up to 12 months and vanilla extract in a cool, dark cabinet for 2 years. Keep chocolate bars in an airtight container at room temperature for 6 months or freeze for 1 year to preserve freshness. Whipped buttercream stays fresh for 3 days in the fridge—rewhip before use. For long-term storage, freeze the assembled cake (without decorating) for up to 3 months. Thaw overnight in the fridge before serving. Room-temperature cake serves best, so let it sit at room temperature for 30 minutes before slicing for clean cuts.
Why You’ll Love This Recipe
- No Mixer Needed: I swear by this trick—creaming butter and sugar with a wooden spoon until it’s light and fluffy takes less effort than scraping out a mixer bowl. The eggs and milk blend right in, and honestly? The layers turn out tender every time.
- Buttercream Bliss: That rich, velvety buttercream made with just the leftover butter and powdered sugar (you’ll have some from the cake batter) is ridiculously good. It’s not too sweet, not too heavy—just the kind of frosting that makes people pause before taking a bite.
- Celebration Ready: Birthdays, graduations, even “just because” Fridays—this cake handles it all. Swap vanilla extract for almond or add a splash of espresso to the batter, and suddenly it’s fancy. The layers stay moist for days, so it’s my go-to for gatherings where I don’t want to stress.
- Pantry-Friendly Magic: Between us, this recipe uses ingredients you already own. No weird substitutes, no last-minute grocery runs. The flour, sugar, and butter are the stars, and the milk and eggs tie it all together without breaking the bank. Plus, leftovers? I’ll take them—it’s even better the next day.
Step-by-step instructions for vanilla bean swirl and chocolate ganache cake
Mastering this cake requires precision in layering and timing—here’s how to achieve bakery-quality results every time.
Prepare the Cake Batter and Bake Three Layers
Preheat your oven to 350°F and grease three 8-inch round cake pans, lining the bottoms with parchment paper. In a stand mixer fitted with the paddle attachment, cream together the 2 cups unsalted butter and 2.5 cups granulated sugar on medium speed for 3-4 minutes until light and fluffy. This step incorporates air, which creates that signature tender crumb.
Add the 6 whole large eggs one at a time, mixing well after each addition. Then stir in the 1.5 cups whole milk, 2 tbsp vanilla bean paste, and 1 tbsp vanilla extract. In a separate bowl, whisk together the 4.5 cups all-purpose flour, 2 tsp baking powder, and 0.5 tsp salt. Gradually add the dry ingredients to the wet mixture, mixing on low speed just until combined—overmixing develops gluten and makes the cake dense.
Divide the batter evenly among the prepared pans, spreading it smoothly. Bake for 25-30 minutes or until a toothpick inserted into the center comes out clean. Let the cakes cool in the pans for 10 minutes before transferring to a wire rack to cool completely. This gradual cooling prevents cracking when you add the filling later.
Create the Vanilla Bean Swirl Filling
While the cakes cool, prepare the vanilla bean swirl filling. In a medium saucepan, combine 1.5 cups whole milk and 2 tbsp vanilla bean paste. Heat over medium-low heat until the mixture reaches 180°F—this temperature ensures the custard sets properly without curdling. Remove from heat and whisk in 2 tbsp cornstarch (not listed in ingredients but essential for thickening) mixed with 2 tbsp cold milk to create a slurry.
Return the mixture to the heat and cook for 2-3 minutes, stirring constantly, until it thickens to a pudding-like consistency. Transfer to a bowl, cover with plastic wrap pressed directly onto the surface, and chill in the refrigerator for at least 2 hours. This step is critical—the filling must be completely set before assembling the cake to prevent a soggy texture.
Make the Chocolate Ganache for Layering
For the chocolate ganache, finely chop the 12 oz dark chocolate bars (or use a sharp knife to create small pieces). In a heatproof bowl set over a saucepan of simmering water, gently melt the chocolate with the 2 cups heavy whipping cream over low heat, stirring until smooth. Remove from heat and let it cool slightly to 100°F—this temperature ensures the ganache sets properly between layers without melting.
Strain the ganache through a fine-mesh sieve to remove any lumps, then spread it evenly between the layers of cake. The ganache should be thick enough to hold its shape but still spreadable with a spatula. Work quickly—this filling sets fast, so have your piping bag ready for the final swirl.
Assemble the Cake with Vanilla Swirls
Level the cooled cake layers if necessary, then place the first layer on a cake stand or plate. Spread an even layer of the chilled vanilla bean custard over the top, leaving a ½-inch border uncovered. Using a piping bag fitted with a star tip, pipe a decorative swirl of the remaining custard in the center of the cake layer. Repeat this process with the second and third layers, ensuring each layer is fully covered with ganache before adding the next.
For the final touch, pipe a continuous swirl of vanilla custard around the entire cake, starting from the center and working outward. This creates the signature marbled effect that makes this cake visually stunning. Chill the assembled cake in the refrigerator for at least 4 hours to allow the fillings to set completely before decorating.
Prepare the Buttercream and Decorate
To make the buttercream, beat the 1 cup unsalted butter (room temperature) with the 3 cups powdered sugar and 1 tbsp vanilla extract in a stand mixer fitted with the paddle attachment until light and fluffy. Add 2-3 tablespoons of milk (from the ingredients list) as needed to achieve a smooth, pipeable consistency. The buttercream should be thick enough to hold its shape but still spreadable.
Once the cake has chilled, spread the buttercream evenly over the top and sides using an offset spatula. For a polished finish, use a cake comb or bench scraper to create clean, straight edges. Decorate with fresh berries, chocolate shavings, or edible flowers for an elegant presentation. Serve at room temperature for the best texture and flavor.
Pro Tips For Making 3 Layer Birthday Cake
- Weigh Your Butter: I learned this the hard way—using a kitchen scale for butter (and eggs) makes a huge difference in texture. Packed butter adds moisture, but scooped butter leaves gaps. For this cake, aim for 125g packed (not rounded) for each 1/2 cup called for—your layers will stay tender, not dense.
- Room Eggs First: Cold eggs from the fridge? Skip it. Let them sit in warm water for 10 minutes before cracking—this ensures even mixing and prevents curdling when combined with butter. I used to crack them straight from the fridge, and the batter always felt uneven.
- Test Cake Doneness Early: The toothpick trick works, but I now pull mine out at 30 seconds before the recipe says. If crumbs cling together but the center’s still slightly soft, it’s ready—overbaking dries out layers faster than you’d think. Cover with foil after 20 minutes to lock in moisture.
- Chill Layers Between Frosting: Sounds weird, but it works: pop baked layers in the fridge for 15 minutes before frosting. Warm layers compress under filling, ruining that perfect stack. Even if you’re eager, this step guarantees clean cuts and no messy frosting slides. (Your future self will thank you.)
Regional styles of this 3 layer birthday cake
Southern Vanilla Bean
In the American South, vanilla bean cakes are a classic tradition, often elevated with a touch of bourbon or buttermilk. For this regional twist, replace ½ cup of the milk with bourbon (like Buffalo Trace) and add 1 tbsp of buttermilk to the batter.
The bourbon infuses a warm, caramel-like depth, while the buttermilk keeps the crumb ultra-tender. Top with a peanut butter ganache—melt 8 oz of peanut butter with 1 cup heavy cream—for a decadent Southern-inspired finish. 🌿
Italian Chocolate Torrone
Northern Italian bakeries often pair chocolate cakes with torrone, a nougat-like confection made with honey and almonds. For this variation, replace the vanilla bean custard with a honey-almond filling: blend ½ cup honey, ½ cup almond butter, and 2 tbsp almond flour until smooth.
Spread this between layers instead of ganache, then top with chocolate shavings and crushed torrone for texture. The honey adds natural sweetness, balancing the bitterness of the dark chocolate. 🍫
French Marble Swirl
The French mastered the art of marbled cakes, and this adaptation turns your vanilla-chocolate cake into a classic Parisian-style dessert. After baking the vanilla layers, crumble 4 oz of dark chocolate (70% cocoa) into the batter before dividing it among the pans.
This creates a striking marble effect when sliced. For the filling, use a vanilla-chocolate buttercream: mix ½ cup of the buttercream with 2 oz melted chocolate and swirl it into the remaining buttercream before piping. Chill for 6 hours to let the flavors meld. 🎨
German Black Forest
Inspired by the Schwarzwald region, this version swaps ganache for cherry filling and adds a whipped cream layer. After baking the vanilla layers, make a cherry compote: simmer 1 cup pitted cherries, ¼ cup sugar, and 1 tbsp kirsch (cherry brandy) until thickened.
Spread this between layers, then top with whipped cream (whip 1 cup heavy cream with 1 tbsp powdered sugar). Decorate with cherry slices and chocolate curls for an authentic German touch. 🍒
Mexican Tres Leches
For a lighter, tropical twist, replace the ganache with a tres leches variation. After baking the vanilla layers, soak them in a mixture of evaporated milk, condensed milk, and heavy cream (equal parts, about 1.5 cups total).
Between layers, add a coconut cream filling: blend ½ cup coconut cream, 2 tbsp sugar, and 1 tsp lime zest. Top with piña colada buttercream (whip ½ cup buttercream with ¼ cup crushed pineapple and 1 tsp rum extract).
Garnish with toasted coconut flakes and lime zest. 🥥
British Victoria Sponge
The British love their Victoria sponge cake, and this adaptation keeps the vanilla layers but adds a jam and clotted cream twist.
After assembling the cake with ganache, spread raspberry jam (about ½ cup) between the layers and top with whipped clotted cream (whip 1 cup heavy cream with 2 tbsp powdered sugar until stiff peaks form).
Dust with powdered sugar and decorate with fresh strawberries** for a quintessential British tea-time cake. 🍓
Nutrition facts
Frequently asked questions
Can I make this cake without a stand mixer?
Use a hand mixer or even whisk for the cake batter—just mix the butter and sugar by hand until light and fluffy (5-7 minutes of vigorous mixing). For the buttercream, beat the butter and powdered sugar with a hand mixer until smooth. The key is patience—just mix longer than usual to incorporate air properly.
How do I prevent the cake layers from crumbling when assembling?
Let layers cool completely before assembling, and chill the cake for 2 hours after stacking. Brush each layer with simple syrup (equal parts sugar and water, heated until dissolved) before adding fillings to add moisture without sogginess. Also, use a serrated knife to level layers cleanly.
What’s the best way to store a decorated cake?
Keep the cake refrigerated for up to 3 days if using fresh fruit or cream decorations. For longer storage, freeze the assembled (but undecorated) cake for up to 3 months. Thaw overnight in the fridge, then decorate before serving. Room temperature is best for serving—let it sit for 30 minutes before slicing.
Can I substitute the chocolate ganache with something else?
Yes! Try a cream cheese frosting (mix 8 oz cream cheese, ½ cup butter, and 2 cups powdered sugar) or whipped cream (whip 2 cups heavy cream with 2 tbsp powdered sugar). For a lighter option, use lemon curd or raspberry jam between layers. The key is ensuring your filling is stable at room temperature.
Why did my ganache turn grainy?
Grainy ganache usually means the chocolate cooled too quickly or had lumps. Always strain melted ganache through a fine-mesh sieve, and let it cool to 100°F before using. If it thickens too fast, reheat gently with a splash of cream. For extra smoothness, use chocolate chips instead of bars—they melt more evenly.

- 7up Jello Salad With Cream Cheese Recipe: Nostalgic 70s Party Bites - October 5, 2026
- 20 Cookies Recipe: Double Batch Crunchy Edges, Chewy Centers - October 5, 2026
- 1955 Green Bean Casserole Recipe: Crispy Top, Creamy Mushroom Magic - October 5, 2026