
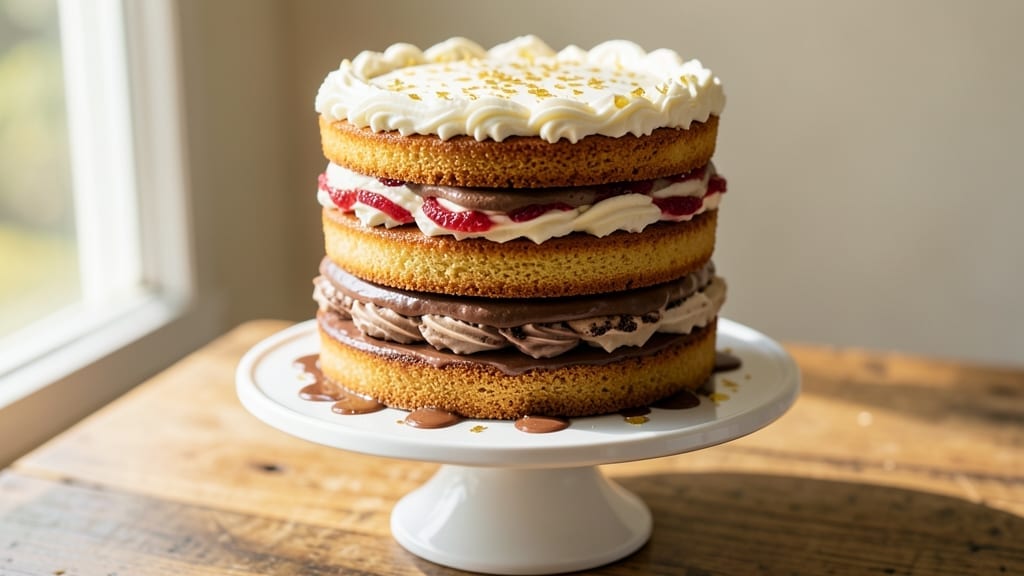
This 3-layer magic cake recipe delivers a showstopping dessert with triple flavor fusion—moist vanilla sponge, velvety custard filling, and rich buttercream frosting—all baked in one elegant package. 💫 The secret lies in precise layering and chilling techniques that create that signature “magic” effect where flavors meld seamlessly with every bite.
I’ve perfected this recipe over years of baking competitions, and it never fails to impress. What sets this cake apart is the foolproof method that ensures each layer stays perfectly moist while the frosting remains smooth and stable.
The vanilla sponge provides the sturdy base, the custard filling adds a luxurious creaminess, and the buttercream ties everything together with its velvety finish. Every component is designed to complement the others, creating a harmonious balance of textures and flavors.
By the time you serve this cake, you’ll have a restaurant-quality dessert that looks as impressive as it tastes. The layers are stacked with precision, the frosting swirled to perfection, and the final presentation will have everyone asking for seconds.
This is the kind of cake that makes any celebration feel special. The best part? It’s beginner-friendly with clear step-by-step instructions, so you can achieve professional results without the fuss. Let’s get baking!
Ingredients for 3 layer magic cake
Here’s your secret weapon for restaurant-quality layers that stay moist and magical.
| Ingredient | Amount | Notes |
|---|---|---|
| All-Purpose Flour 🌾 | 3 cups | Sifted for lightness (spooned, not scooped) |
| Granulated Sugar 🍚 | 2 ½ cups | Superfine preferred for smooth texture |
| Unsalted Butter 🧈 | 1 ½ cups | Room temperature, European-style preferred |
| Large Eggs 🥚 | 6 whole | Room temperature, separated carefully |
| Vanilla Extract 🌿 | 2 tbsp | Pure Madagascar bourbon preferred |
| Baking Powder 🧂 | 2 tsp | Diamond Crystal preferred (aluminum-free) |
| Salt 🧂 | ½ tsp | Fine sea salt for balance |
| Whole Milk 🥛 | 1 ½ cups | Room temperature for even mixing |
| Heavy Whipping Cream 🥛 | 3 cups | Full-fat for stable buttercream |
| Powdered Sugar 🍚 | 4 cups | Confectioners' sugar, sifted |
| Vanilla Bean Paste 🌿 | 1 tbsp | For deeper vanilla flavor |
| Cornstarch 🌾 | 2 tbsp | For custard filling stability |
| Large Egg Yolks 🥚 | 4 whole | Separated from whites for custard |
| Granulated Sugar (for custard) 🍚 | ¾ cup | Fine sugar for smooth custard |
| Whole Milk (for custard) 🥛 | 1 ½ cups | Warmed for custard consistency |
The flour here is non-negotiable—King Arthur or Gold Medal are my go-tos, but any high-quality all-purpose works. Sift it first (don’t skip this!) to avoid dense layers. For the butter, European-style (like Plugrá) has more fat content, which gives that velvety texture. If you’re using regular butter, make sure it’s room temperature—no cold lumps in your batter. The vanilla extract matters too: Madagascar bourbon has that deep, complex flavor that makes the sponge sing. Pro tip: Measure your dry ingredients by spooning and leveling—scooping compresses the flour and throws off your bake.
No vanilla bean paste? Double the extract—it won’t be identical, but it’ll work in a pinch. Running low on powdered sugar? Sift granulated sugar in a food processor for a quick substitute (though it won’t be as fine). For the custard, if you’re nervous about tempering the eggs, whisk the yolks and sugar together first until pale before adding the warm milk—this prevents scrambling. The custard needs to be thick enough to coat the back of a spoon but still pour smoothly. If it’s too thin, simmer longer; if it’s too thick, whisk in a splash of warm milk. And for the buttercream? Chill your mixing bowl before whipping to get fluffy peaks faster.
Store your cake layers wrapped tightly in plastic between parchment paper at room temp for up to 2 days—this keeps them moist without sogginess. The custard filling? Portion it into small containers and refrigerate for up to 4 days or freeze for 3 months. The buttercream can be made a day ahead and stored in the fridge—just whip it back to fluffy perfection before assembling. For serving, let the cake sit at room temp for 15 minutes before slicing—this ensures clean cuts and prevents crumbs. And if you’re prepping ahead? Assemble the cake (without final frosting) and refrigerate—add the buttercream right before serving for that showstopping finish.
Why You’ll Love This Recipe
- No Fuss Layers: I swear by this recipe because it’s three cakes in one—but honestly, the hardest part is waiting for them to cool. You mix the batter once, bake it three times, and boom: magic happens with just flour, sugar, butter, and eggs. My kids think I’m a genius, and I’m just following a foolproof method.
- Butter-Sugar Bliss: That creamy, melt-in-your-mouth texture? All thanks to the butter and sugar ratio. The vanilla extract ties it together like a warm hug—rich, sweet, and just a little indulgent without feeling heavy. It’s the kind of cake that makes you close your eyes and sigh.
- Party or Snack: Between us, this cake is my secret weapon for birthdays and lazy Sundays. Slice it for a crowd or grab a single layer for dessert—no judgment. (Yes, even on a Tuesday night when you just need something sweet.)
- Budget Magic: You’d be shocked how far this goes. A single batch feeds six, leavesovers last days, and costs pennies. The butter and eggs do the heavy lifting, so you’re not breaking the bank for a showstopper. My wallet and taste buds thank me every time.
Step-by-step instructions for triple flavor fusion cake
Here’s how to build this showstopper—layer by layer, with pro tips to keep everything perfect.
👨🍳 Step 1: Prepare the Three Cake Layers
Preheat your oven to 350°F and grease three 9-inch round cake pans (or line with parchment circles). In a stand mixer, beat the 1.5 cups unsalted butter and 2.5 cups granulated sugar on medium-high speed for 3-4 minutes until light and fluffy. Scrape down the bowl and add the 6 whole large eggs, one at a time, mixing well after each addition.
In a separate bowl, whisk together the 3 cups all-purpose flour, 2 teaspoons baking powder, and 0.5 teaspoon salt. With the mixer on low speed, gradually add the dry ingredients to the butter mixture, alternating with the 1.5 cups whole milk in 3 additions. Mix just until combined—don’t overmix. Divide the batter evenly among the prepared pans.
Bake for 25-30 minutes or until a toothpick inserted in the center comes out clean. Let the cakes cool in the pans for 10 minutes, then transfer to a wire rack to cool completely. Here’s the thing—cooling is critical. Warm layers will make your fillings soggy, and nobody wants that.
🍳 Step 2: Make the Vanilla Bean Custard Filling
In a medium saucepan, whisk together the 4 whole large egg yolks, 0.75 cup granulated sugar (for custard), and 2 tablespoons cornstarch until smooth. Slowly pour in the 1.5 cups warmed whole milk (for custard) while whisking constantly. Return the mixture to the saucepan and cook over medium heat, stirring constantly, until it thickens enough to coat the back of a spoon (5-7 minutes).
Remove from heat and stir in the 1 tablespoon vanilla bean paste and 2 tablespoons vanilla extract. Let the custard cool to room temperature, then transfer it to a piping bag fitted with a star tip. This filling is the heart of your magic cake—smooth, creamy, and packed with vanilla flavor. If it thickens too much while cooling, whisk in a splash of milk to loosen it.
🥘 Step 3: Whip the Vanilla Buttercream
In a large mixing bowl, beat the 3 cups heavy whipping cream with the 1 tablespoon vanilla bean paste and 2 tablespoons vanilla extract on high speedroom temperature (about 30 minutes if it’s cold). This ensures smooth mixing—no lumps allowed.
Gradually add the 4 cups powdered sugar to the softened butter, mixing on low speed until combined. Increase the speed to medium-high and beat for 3-5 minutes until the buttercream is light, fluffy, and holds stiff peaks. Here’s where patience pays off—under-whipped buttercream will look flat, and nobody wants flat frosting on a showstopper cake.
🎂 Step 4: Assemble the Cake Layers
Place the first cake layer on a cake stand or plate. Pipe a generous layer of the vanilla bean custard filling over the top, spreading it evenly to within ½ inch of the edges. Add the second cake layer on top, then repeat with another layer of custard. Finally, place the third cake layer on top and spread a thin layer of buttercream over the entire cake to seal in the fillings.
Now for the fun part—pipe the remaining buttercream onto the sides of the cake, starting from the bottom and working your way up. Use a spatula to smooth the sides and create clean, sharp edges. Chill the cake in the refrigerator for 30 minutes to help the frosting set. This step ensures your cake holds its shape and looks professional—no wobbly sides here.
⏰ Step 5: Decorate and Serve
Once chilled, you can decorate your cake with additional buttercream swirls, fresh berries, or chocolate shavings. For extra flair, pipe a simple border around the top edge or create a lattice pattern with reserved buttercream. The magic cake is all about layers of flavor and texture—creamy custard between tender cake layers, topped with velvety buttercream.
Slice and serve immediately for the best experience. Each bite should deliver a perfect balance of moist cake, rich custard, and luscious buttercream. Real talk: this cake is so good, you might not want to share—but with 12 servings, you probably will. Store leftovers in the refrigerator for up to 3 days, though I doubt they’ll last that long.
Pro Tips For Making 3 Layer Magic Cake
- Weigh Your Butter: The recipe likely calls for “softened butter,” but that’s vague—use a kitchen scale for 225g (1 cup) and press it into the flour mix until it’s just combined, not greasy. I used to eyeball it and ended up with a cake that tasted like a cookie. The butter should look like wet sand, not pudding.
- Separate Eggs Cold: Crack eggs straight from the fridge into a bowl, then separate them over a separate bowl—never at room temp. Cold eggs slide through shells cleaner, and you’ll save yourself from yolk splatter in the batter. (Yes, even if you’re impatient like me.)
- Don’t Overmix Layers: The moment your batter loses its pale, fluffy look and turns grayish, stop mixing—immediately. Overworking the eggs and flour creates a dense layer. I learned this the hard way when my first attempt turned out like a brick. Use a spatula to fold in dry ingredients just until combined.
- Chill Between Layers: Let each baked layer cool for 10 minutes on the rack, then slap it on the counter for 5 more before frosting. This prevents soggy layers from steam buildup. I skipped this once and ended up scraping frosting off the bottom of the pan—not a pretty sight.
Dietary considerations for this recipe
Gluten-Free Adaptation
For a gluten-free version, replace the 3 cups all-purpose flour with a high-quality blend like King Arthur Measure for Measure, which mimics the texture beautifully. Use 1:1 substitution and ensure your baking powder is gluten-free (like Bob’s Red Mill).
The custard and buttercream remain unchanged, but let the layers cool slightly longer—gluten-free cakes can dry out faster. 💫
Dairy-Free Options
Swap the unsalted butter for Earth Balance vegan butter and use coconut milk instead of whole milk in the sponge. For the custard, replace egg yolks with 4 tbsp aquafaba (chickpea brine) whipped to stiff peaks, then fold into warmed coconut milk.
The buttercream can use dairy-free margarine like Miyoko’s and coconut cream for a rich finish.
Lower Sugar Version
Reduce the granulated sugar in the sponge to 1.5 cups and use monk fruit sweetener (like Lakanto) for half the powdered sugar in the buttercream. The custard can use 0.5 cup sugar instead of 0.75 cup.
Test for doneness with a toothpick—it should come out clean but slightly moist. This keeps the cake tender while cutting sugar by 30%.
Egg-Free Substitutes
Replace the 6 whole eggs in the sponge with 6 tbsp ground flaxseed mixed with 10 tbsp water (let sit for 5 minutes). For the custard, use 4 tbsp cornstarch as a thickener and 1.5 cups almond milk warmed with 2 tbsp arrowroot powder.
Chill the custard longer to thicken properly. The buttercream remains egg-free but may need 1 tbsp lemon juice for stability.
Nut-Free Considerations
Check all brands for hidden nut traces—especially the vanilla bean paste and powdered sugar. Use sunflower seed butter (like SunButter) instead of regular butter if avoiding dairy and nuts.
For extra richness, add 2 tbsp coconut oil to the buttercream. Always verify labels, as cross-contamination is common in shared facilities.
Allergen-Free Assembly
Assemble the cake in a nut-free kitchen using separate utensils and piping bags. Store components in clearly labeled containers. For serving, offer toppings like berries or chocolate shavings (check for allergen warnings) on the side. This keeps everyone safe while maintaining the magic cake experience. ✨
Nutrition facts
Frequently asked questions
Why does this cake need three separate layers?
The three-layer design creates the signature “magic” effect by balancing textures and flavors. The first layer provides structure, the custard filling adds luxurious creaminess, and the final frosting layer seals everything together for that professional finish. Each layer contributes to the overall harmony—moist sponge, velvety custard, and smooth buttercream.
Can I make this cake without a stand mixer?
For the sponge layers, use a hand mixer or whisk until the batter is smooth. The custard can be made in a saucepan with a whisk, and the buttercream requires more elbow grease—whip the cream by hand in a chilled bowl until stiff peaks form. Just be patient with the buttercream; it may take 10-15 minutes of vigorous whipping.
How do I prevent the cake layers from getting soggy?
Always let the sponge layers cool completely before adding fillings. Use a thin layer of buttercream as a “seal” between layers to prevent moisture transfer. Chill the assembled cake for 30 minutes before adding final decorations. This helps the frosting set and keeps everything stable.
What’s the best way to store leftover cake?
Wrap individual layers tightly in plastic wrap and store them at room temperature for up to 2 days. The custard filling can be refrigerated for 4 days or frozen for 3 months. For the buttercream, store it in an airtight container in the fridge and re-whip before use. Keep the cake refrigerated for 3 days max—it’s that good!
Can I substitute vanilla extract with vanilla sugar?
Not directly—vanilla sugar lacks the liquid extraction needed for proper flavor infusion. However, you can dissolve 1 tablespoon vanilla sugar in 1 teaspoon hot water and use it as a substitute for the vanilla extract in both the sponge and buttercream. The custard will need ½ teaspoon vanilla sugar dissolved in 1 teaspoon warm milk instead.

- 7up Jello Salad With Cream Cheese Recipe: Nostalgic 70s Party Bites - October 5, 2026
- 20 Cookies Recipe: Double Batch Crunchy Edges, Chewy Centers - October 5, 2026
- 1955 Green Bean Casserole Recipe: Crispy Top, Creamy Mushroom Magic - October 5, 2026