
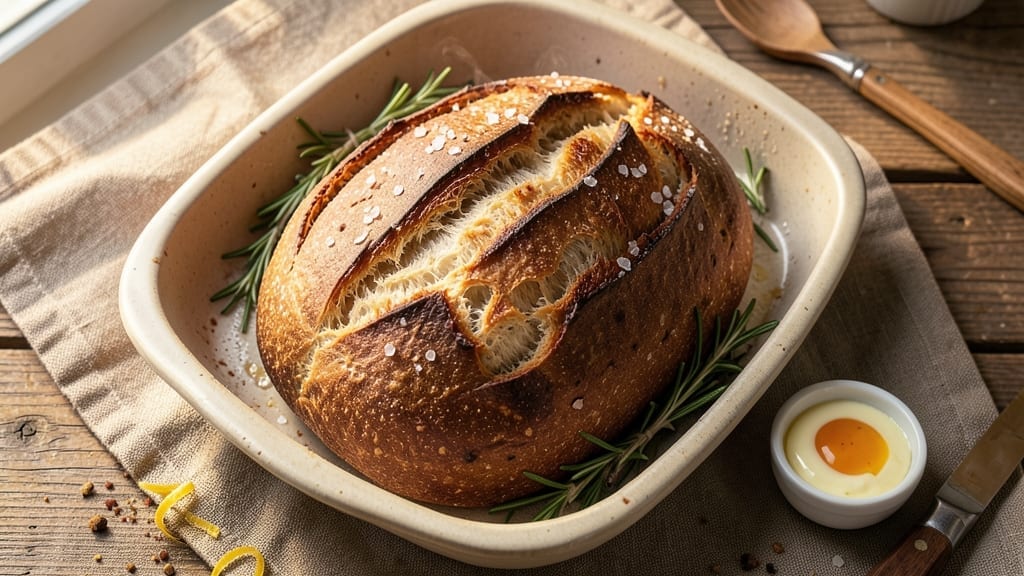
A 3-lb bread loaf with a Dutch oven crust so crispy and golden it’ll make you forget store-bought ever existed. This recipe delivers artisanal texture with minimal effort—no fancy equipment needed, just patience and a few key techniques.
The secret lies in high-heat baking and proper steam control, which transforms simple dough into a loaf with a crackling crust and airy crumb.
What sets this recipe apart is the foolproof method that ensures consistent results every time. We’ll use a standard home oven with a Dutch oven for even heat distribution, creating that coveted bakery-style crust.
The dough develops naturally through slow fermentation, resulting in flavor depth and structure that’s impossible to replicate with quick breads. No kneading machines or special tools required—just your hands and a little time.
By the time you pull that loaf from the oven, you’ll have a perfectly browned crust with a satisfying crunch, while the interior remains soft and pillowy. The aroma alone will have everyone gathering in the kitchen.
This loaf freezes beautifully for later, making it ideal for meal prep or gifting. Whether you’re serving sandwiches, toast, or fresh bread with butter, this recipe delivers restaurant-quality results at home.
Ready to master the art of homemade bread? Let’s get started with the ingredients and step-by-step instructions that will transform your kitchen into a bakery.
Ingredients for 3 lb bread loaf
Pantry staples plus a few key tricks for bakery-style bread at home.
| Ingredient | Amount | Notes |
|---|---|---|
| All-Purpose Flour 🌾 | 5 cups | Unbleached, high-protein preferred |
| Active Dry Yeast 🍞 | 2 ¼ tsp | Fresh yeast at half the amount |
| Granulated Sugar 🍚 | 1 ½ tbsp | Feeds yeast for fermentation |
| Unsalted Butter 🧈 | ½ cup | Cold, cubed for dough |
| Large Eggs 🥚 | 1 whole | Room temperature for mixing |
| Warm Water 💧 | 1 ¼ cups | 105-110°F for yeast activation |
| Diamond Crystal Kosher Salt 🧂 | 1 ½ tsp | Fine grain preferred |
| Extra-Virgin Olive Oil 🫒 | 1 tbsp | For dough enrichment |
| Bread Flour 🌾 | 1 cup | Optional for higher protein |
| Cornmeal 🌽 | ¼ cup | For Dutch oven dusting |
| Ice Water ❄️ | ¼ cup | For final dough shaping |
The flour makes all the difference here. King Arthur or Bob’s Red Mill are my go-tos—they handle the hydration well and give that perfect crumb. If you’re feeling fancy, swap 1 cup for bread flour for extra structure. The yeast needs to be fresh, so check the date on the package—expiration matters. Warm water is critical: too hot kills the yeast, too cold and it won’t activate. I always use a thermometer for this step, but if you’re eyeballing it, think ‘lukewarm bathwater’. The butter should be cold when you mix it in—soft, not melted, or you’ll end up with a gummy dough. For the Dutch oven, Lodge makes the best cast iron, but any heavy pot will work if it’s seasoned well.
No bread flour? Add 1 tbsp vital wheat gluten per cup of all-purpose for similar results. The yeast is non-negotiable—no active dry yeast means no rise. If you’re in a pinch, instant yeast works at the same amount, but don’t skip the sugar. The olive oil can be swapped for melted butter if you prefer, but it’ll make the dough richer. For the Dutch oven prep, if you don’t have cornmeal, semolina or rice flour works too. The ice water is my secret weapon—chill your hands before handling the dough too, or it’ll warm up and stick. And if your kitchen’s humid? Reduce water by 1 tbsp to avoid a gummy texture.
This dough is a patient recipe—first rise takes 1-2 hours, then another 1-2 after shaping. Keep it covered with a damp towel so it doesn’t dry out. The shaped loaf can chill in the fridge overnight for better flavor. For baking, preheat that Dutch oven for at least 30 minutes—it needs to be screaming hot. The bread keeps 3 days at room temp wrapped in a towel, or 1 week refrigerated. Freeze slices for up to 3 months—toast straight from frozen for crispy results. And that golden crust? Don’t cut into it for at least 2 hours—patience pays off.
Why You’ll Love This Recipe
- No-Knead Nightmare Over: I swear by this—just mix the flour, yeast, sugar, and warm butter until it looks like wet sand, then let the dough rise while you eat dinner. No stand mixer, no fuss, no waiting around like some kind of bread-making martyr.
- Butter So Rich: That melted butter folded into the dough? It’s what makes this loaf dangerously good—soft, slightly sweet, with a crust that’s crisp enough to make you pause mid-slice. Honestly, I’ve tried store-bought, and this beats it every time.
- Feeds a Crowd (or Not): A 3-pound loaf means I can make one for Sunday dinner and still have leftovers for toast all week. Or, if it’s just me, I’ll freeze half and thank myself later when I’m lazy and hungry.
- Pantry Staple Magic: All you need is flour, yeast, sugar, butter, and eggs—stuff you already have. No specialty ingredients, no last-minute grocery runs. Between us, this is my go-to when I’m broke or too tired to order in.
Step-by-step instructions for 3-Lb bread loaf with Dutch oven crust
Here’s how to craft a bakery-style loaf with a golden, crackling crust and tender crumb.
Activate the Yeast and Mix the Dough
In a large bowl, combine the 1.25 cups warm water (between 105-110°F), 1.5 tbsp granulated sugar, and 2.25 tsp active dry yeast. Let sit for 5-10 minutes until frothy—this confirms your yeast is alive and ready to work. If it doesn’t bubble, your yeast is likely dead, and you’ll need to start over.
In a separate large bowl, whisk together the 5 cups all-purpose flour, 1 cup bread flour (if using), and 1.5 tsp diamond crystal kosher salt. Make a well in the center and add the yeast mixture, 1 whole large egg, 0.5 cup cold cubed unsalted butter, and 1 tbsp extra-virgin olive oil. Using a wooden spoon or dough whisk, gently mix until a shaggy dough forms. The butter should still be in small lumps—this prevents overdevelopment of gluten.
Knead Until Elastic and Smooth
Turn the dough onto a lightly floured surface and knead for 8-10 minutes by hand, or use a stand mixer with a dough hook for 5-6 minutes on medium speed. You’re looking for a dough that’s smooth, elastic, and springs back when pressed. If it feels too sticky, add 1 tablespoon of all-purpose flour at a time until it comes together without sticking.
Real talk: The dough should be slightly tacky but not wet. Over-kneading develops too much gluten, resulting in a tough loaf. Test by poking the dough—if it springs back quickly, it’s ready. If it stays indented, knead for another minute or two. Once satisfied, place the dough in a lightly oiled bowl, cover with a damp towel, and let rise in a warm place for 1-2 hours, or until doubled in size.
Shape and Second Rise for Structure
Punch down the risen dough to release air, then turn it onto a lightly floured surface. Shape the dough into a 3-pound loaf by folding the edges toward the center, sealing the seam tightly. For a classic batard shape, roll the dough into a log, tap the ends to flatten slightly, and pinch the seams to seal. Place the shaped loaf seam-side down in a bowl, cover with a damp towel, and let rise for another 45-60 minutes until it’s noticeably puffy.
This second rise is critical—it ensures an open crumb and proper oven spring. If your kitchen isn’t warm enough, place the bowl near a turned-off oven with the light on, or use a proofing box. The dough should rise to about 50-75% more than its original size before baking. If it rises too quickly, it may collapse in the oven.
Preheat Dutch Oven and Prepare for Baking
Place a Dutch oven (with lid) in a 450°F oven and preheat for 45 minutes. While it heats, lightly dust the inside of the Dutch oven with 0.25 cup cornmeal, tapping out any excess. This creates a barrier between the dough and the pot, preventing sticking and promoting that coveted crispy crust.
Just before baking, carefully transfer the risen loaf to the preheated Dutch oven. The dough should be tight and springy—if it springs back quickly when pressed, it’s ready. If not, let it rise another 10-15 minutes. Once in the pot, cover with the lid and bake for 20 minutes. This steam phase builds structure and prevents cracking.
Uncover and Bake to Golden Perfection
After 20 minutes, remove the lid and bake for another 20-25 minutes until the loaf is deep golden brown and sounds hollow when tapped on the bottom. The internal temperature should reach 190-200°F—use an instant-read thermometer to check. If the top browns too quickly, tent loosely with foil to prevent over-browning while the center finishes cooking.
For that perfect crust, I like to spray the loaf with ice water just before the final 5 minutes of baking. This creates a dramatic contrast between the crispy exterior and soft interior. Let the loaf cool on a wire rack for at least 1 hour before slicing—this allows the crumb to set and prevents a gummy texture. The longer you wait, the better the texture, but even 30 minutes makes a noticeable difference.
Pro Tips For Making 3 Lb Bread Loaf
- Soften Butter First: Take that cold butter straight from the fridge and cut it into small cubes—don’t melt it. Toss it into the warm yeast mixture while it’s still doughy, and let the residual heat work its magic. I used to melt it first, and the bread always ended up denser. This way, the butter stays in little pockets, making every bite richer.
- Proof Until It Doubles: Skip the guesswork—your dough is done when it’s not just puffy but also jiggly at the top when you press it lightly. If it springs back too fast, give it another 15-20 minutes. I learned this the hard way when my loaf collapsed because I rushed it. Patience here means a lighter, airier crumb.
- Don’t Overmix the Dough: Once you add the flour, mix just until the dough comes together—no need to knead it like a pro. Overworking it develops too much gluten, and your bread turns out tough instead of tender. Two minutes of stirring by hand is all you need. Trust me, your arms will thank you.
- Use Room-Temp Eggs: Cold eggs drop straight to the bottom of your dough, creating weak spots that won’t rise properly. Whisk them first, then let them sit at room temperature for 10 minutes before adding. It’s a small step, but it makes a real difference in how evenly your loaf bakes. (Yes, even if you’re impatient like me.)
Flavor customization for this 3 lb bread loaf
Herb-Infused Variations
Add 1 tbsp fresh rosemary or thyme to the dough for a fragrant, herby loaf. Finely chop the herbs and mix them into the flour before adding liquids. For a stronger flavor, use 2 tbsp dried herbs—just steep them in the warm water first for 5 minutes before mixing.
I love adding 1 tsp garlic powder too for a subtle kick that pairs perfectly with soups or garlic butter. 🌿
Sweet Twists
Swap 1.5 tbsp granulated sugar for 1 tbsp honey or maple syrup in the dough for a lightly sweetened loaf. For cinnamon swirl bread, roll out the dough after shaping and spread 2 tbsp softened butter mixed with 1 tbsp cinnamon sugar before folding into a loaf.
Bake as directed—this version is perfect for French toast or dessert sandwiches. 🍯
Cheesy Goodness
Add ½ cup shredded cheddar or Gruyère to the dough during the final kneading stage. For a stronger flavor, use ¼ cup grated Parmesan instead. The cheese melts slightly during baking, creating pockets of gooey goodness.
I recommend using sharp cheddar for sandwiches or mild mozzarella for a milder taste. 🧀
Seeded Crunch
Mix 2 tbsp sesame seeds, poppy seeds, or flaxseeds into the dough for added texture. For a rustic look, sprinkle 1 tbsp seeds on top of the loaf before baking.
Sunflower seeds add a nutty flavor, while flaxseeds provide a subtle earthiness. Toast the seeds in a dry pan for 2 minutes before adding to enhance their flavor. 🌽
Whole Grain Boost
Replace 1 cup all-purpose flour with whole wheat or rye flour for a heartier loaf. For a nuttier taste, use spelt flour—it adds a subtle sweetness.
Whole grains absorb more moisture, so reduce water by 1 tbsp if needed. This version has a denser crumb but still delivers that perfect crust. 🌾
Spiced Up
Add ½ tsp ground coriander or cumin to the dough for a warm, earthy flavor. For a smoky twist, include ¼ tsp smoked paprika along with ½ tsp onion powder.
These spices pair beautifully with hearty stews or chili. If you love bold flavors, try 1 tsp za’atar** for a Middle Eastern-inspired loaf. 🌶️
Nutrition facts
Frequently asked questions
Can I make this 3-pound loaf without a Dutch oven?
If you don’t have a Dutch oven, use a heavy oven-safe pot with a lid or even a baking stone. For best results, place a metal bowl filled with boiling water on the lower oven rack to create steam during the first 20 minutes of baking. This mimics the steam effect of a Dutch oven and helps develop that bakery-style crust.
Why did my dough collapse after shaping?
Collapsed dough usually means the yeast wasn’t properly activated or the dough wasn’t fully proofed. First, check your yeast—it should bubble vigorously in the warm water. Also, ensure your kitchen is warm enough (at least 75°F) and the dough has doubled in size before shaping. If it rises too quickly, it may overproof and collapse in the oven.
How do I store leftover bread to keep it fresh?
Wrap the cooled loaf tightly in a clean kitchen towel or beeswax wrap, then place it in a paper bag at room temperature. This keeps it fresh for 3 days. For longer storage, slice the bread and freeze it in an airtight container for up to 3 months. Toast frozen slices directly for crispy results—no thawing needed!
Can I use this recipe for sandwich bread?
This recipe works perfectly for sandwiches! The 3-pound loaf yields about 12-14 slices, ideal for hearty sandwiches. For extra softness, brush the baked loaf with melted butter while still warm. If you prefer a lighter texture, reduce the bread flour to ½ cup and increase all-purpose flour to 5.5 cups for a more tender crumb.
What if my kitchen is too cold for proper rising?
If your kitchen is below 70°F, place the dough in a warm spot like near a turned-off oven with the light on, or use a proofing box. You can also create a warm environment by placing a bowl of hot water in the oven (turned off) while the dough rises. This mimics a warm kitchen and helps the dough rise properly in 1-2 hours.

- Pork Loin Pulled Pork Crock Pot Recipe: Slow-Smoked Tenderness With Zero Dryness - November 1, 2026
- Baked Potatoes in Crock Pot Recipe: Buttery Interiors and Crispy Top Magic - November 1, 2026
- Braised Beef Short Ribs Recipe: Crock Pot Fall-Off-Bone Magic in 6 Hours - November 1, 2026