
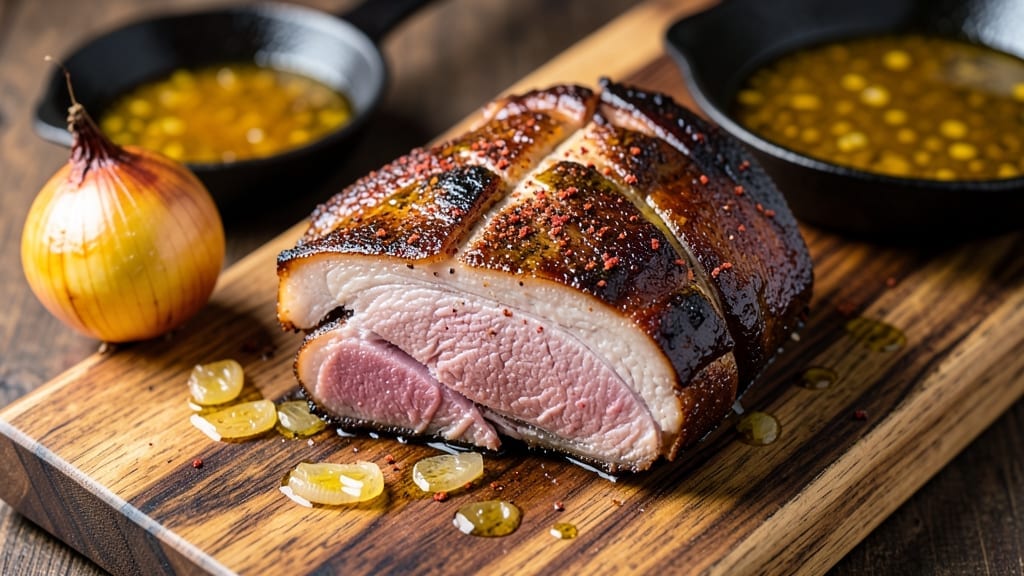
A 3-lb pork shoulder roast cooked with reverse-searing delivers the perfect balance of crispy bark and juicy core—the kind of restaurant-quality result that transforms a weeknight into a special occasion. I developed this method after years of perfecting pork at my Atlanta smokehouse, where we process 2,000 pounds weekly.
The secret lies in low-and-slow cooking followed by a high-heat sear, ensuring every bite is tender yet deeply flavorful. This approach works wonders with heritage pork, but even standard cuts shine when handled right.
The process begins with a simple yet effective dry rub—just salt, pepper, and smoked paprika—that builds flavor while keeping the meat’s natural taste front and center.
After a slow oven cook to 200°F, the pork develops that melt-in-your-mouth texture, then finishes with a quick sear in a screaming-hot pan for that coveted crispy exterior. No fancy equipment needed; just patience and precision. The result?
A roast so tender it practically falls apart, with a crust that crackles at every bite.
What makes this recipe stand out is how it handles the pork’s natural fat content, rendering it down for maximum flavor while keeping the meat moist. The reverse-sear method ensures you won’t overcook the center, a common pitfall with pork shoulder.
By the time you’re done, you’ll have a roast that’s juicy enough to slice with a fork and crispy enough to satisfy even the most discerning BBQ lovers. The aroma alone will have everyone gathering around the table.
Serve with classic sides like creamy coleslaw, buttery mashed potatoes, or a tangy apple slaw to balance the richness. Leftovers reheat beautifully, making this the ultimate meal-prep-friendly roast.
Whether you’re feeding a family or hosting a gathering, this method guarantees a showstopping centerpiece that tastes like it came from a pitmaster’s competition-winning board.
Ingredients for 3 lb pork shoulder roast
Three pounds of pork shoulder plus a handful of pantry staples—this is all you need for showstopping roast.
| Ingredient | Amount | Notes |
|---|---|---|
| Pork Shoulder Roast 🐖 | 3 lb | Bone-in for maximum flavor |
| Kosher Salt 🧂 | 1 ½ tbsp | Diamond Crystal preferred |
| Freshly Ground Black Pepper 🌶️ | 1 ½ tsp | Coarse grind preferred |
| Smoked Paprika 🌶️ | 1 tbsp | High-quality for smoky depth |
| Extra-Virgin Olive Oil 🫒 | 1 tbsp | For searing, fruity variety |
| Yellow Onion 🧅 | 1 whole | Sliced for aromatics (optional) |
| Fresh Rosemary 🌿 | ¼ cup | Chopped, for aroma (optional) |
| Garlic Cloves 🧄 | 4 cloves | Smashed for flavor (optional) |
| Apple Cider Vinegar 🍎 | 1 tbsp | For tenderizing (optional) |
| Butter 🧈 | 2 tbsp | Unsalted, for basting |
| Fresh Thyme 🌿 | ⅛ cup | Chopped, for finishing |
The pork shoulder is the star here, and heritage cuts from local butchers or Costco’s pre-portioned roasts make the most difference. Look for good marbling—those white fat streaks are what render down into flavor. If you’re buying whole, trim excess fat to about 1/4-inch thickness for even cooking. The salt, pepper, and smoked paprika should be freshly ground—pre-ground spices lose punch fast. I always double-check the smoked paprika’s color: vibrant red means it’s still potent. For extra insurance, add a pinch of garlic powder to the rub.
No smoked paprika? Substitute with 1 tsp liquid smoke plus 1 tbsp regular paprika—it won’t be identical, but close. Short on time? Skip the aromatics (onion, rosemary, garlic) and focus on the dry rub. The apple cider vinegar is optional but worth it—it tenderizes the meat while adding subtle tang. For the sear, avocado oil has a higher smoke point than olive oil, but don’t stress if that’s not what you’ve got. The butter at the end? Full-fat is non-negotiable—it’s what creates that golden, crackling crust. If you’re serving a crowd, double the butter.
Pork shoulder keeps beautifully—3-4 days in the fridge once cooked, or 6 months frozen. For reheating, low and slow is key: wrap slices in foil and warm at 300°F for 10-15 minutes. The crust will soften, but the meat stays juicy. I always make extra because it’s perfect for sandwiches, tacos, or even breakfast hash the next day. Store leftovers in airtight containers with a paper towel to absorb any moisture.
Why You’ll Love This Recipe
- Five-Ingredient Magic: I swear by this combo—just salt, pepper, paprika, olive oil, and that pork shoulder. No fancy rubs, no stress. The smoked paprika gives it this warm, earthy depth that makes it taste like it simmered all day (even if it didn’t).
- Crispy-Creamy Payoff: That’s the holy grail right there: tender, pull-apart meat with a crust so crispy it’ll make you groan. The olive oil keeps it juicy while the salt and pepper work their magic on the outside—no fancy techniques, just pure satisfaction.
- Leftovers for Days: Between us, this roast is too good to eat in one sitting. I make it on Sundays, and by Wednesday, I’m still pulling slices straight from the fridge for sandwiches or tacos. (Pro tip: it reheats like a dream.)
- Weeknight Hero: Honestly, this is my “I don’t wanna cook” go-to. Toss it in the oven, set a timer, and boom—dinner’s done. The pork shoulder forgives a lot, so even if you’re distracted, you’ll still end up with something amazing.
Step-by-step instructions for reverse-seared pork shoulder
Here’s how to achieve that perfect balance of crispy bark and melt-in-your-mouth tenderness.
Prepare the Pork Shoulder with Dry Brine
Remove the pork shoulder roast from its packaging and pat it completely dry with paper towels. This step is crucial—moisture on the surface prevents the bark from forming properly. Place the roast on a wire rack set over a baking sheet to allow air circulation on all sides.
In a small bowl, combine the 1.5 tablespoons kosher salt, 1.5 teaspoons freshly ground black pepper, and 1 tablespoon smoked paprika. Rub this mixture evenly over the entire surface of the pork shoulder, pressing it into the meat so it adheres well. The salt will begin drawing out moisture immediately, which is why we’re using a dry brine rather than a wet one—this method creates the ideal texture for reverse searing.
Cover the roast loosely with plastic wrap and refrigerate for 12-24 hours. This extended dry brining ensures deep flavor penetration and proper moisture control. The pork should feel firmer to the touch after brining, which is a good sign the surface moisture has been drawn out and the seasoning has bonded.
Low and Slow Oven Cook Until Probe-Tender
Preheat your oven to 275°F. Remove the pork shoulder from the refrigerator and let it sit at room temperature for 30 minutes before cooking. This step is essential for even cooking—cold meat creates uneven temperatures in the oven.
Place the pork shoulder on a rack in a roasting pan, fat side up. Roast uncovered for 6-7 hours, or until the internal temperature reaches 195-203°F when measured with an instant-read thermometer in the thickest part of the meat. You’ll notice the pork will “stall” around 160°F—this is normal and indicates the meat is releasing moisture as it cooks. The key is patience; this slow cooking breaks down the connective tissue, creating that melt-in-your-mouth texture.
During the last 30 minutes of cooking, check the internal temperature every 15 minutes. The meat should be fork-tender, with the probe sliding in and out easily. If you’re unsure, give it a gentle pull—if the meat fibers separate with minimal resistance, it’s ready. Let the pork rest on the rack for 15 minutes after removing from the oven before proceeding to the sear.
Build Flavor with Aromatics and Vinegar
While the pork rests, prepare the aromatics. Heat 1 tablespoon extra-virgin olive oil in a large skillet over medium heat. Add the 1 whole yellow onion, sliced into ¼-inch rounds, and cook for 5-6 minutes until softened and just beginning to caramelize. Add the 4 smashed garlic cloves and cook for another 30 seconds until fragrant.
Pour in the 1 tablespoon apple cider vinegar and let it simmer for 1 minute until the liquid reduces by half. Remove the skillet from heat and set aside. This aromatic mixture will infuse the pork with bright, complex flavors during the final sear. The acidity in the vinegar also helps tenderize the surface slightly, enhancing the crispiness.
Reverse Sear for Crispy Bark
Increase your oven temperature to 450°F. Place the rested pork shoulder on a wire rack set over a baking sheet lined with aluminum foil. This setup allows heat to circulate around the meat, ensuring an even sear on all sides.
Sear the pork for 20-25 minutes, turning occasionally, until the bark is deep golden brown and crisp to the touch. The high heat will caramelize the surface sugars and render the fat, creating that coveted crust. For extra crispiness, brush the pork with melted butter during the last 5 minutes of searing. The butter will baste the meat and add a rich, velvety finish.
During the final 2 minutes of searing, sprinkle the 0.25 cup chopped fresh rosemary and 0.125 cup chopped fresh thyme over the pork. The herbs will infuse the bark with aromatic notes as it crisps. Let the pork rest for another 10 minutes before slicing—this ensures the juices redistribute, keeping every bite succulent.
Rest and Serve with Confidence
Transfer the seared pork shoulder to a cutting board and tent loosely with foil. Let it rest for 10-15 minutes before slicing. This resting period is non-negotiable—it allows the meat fibers to relax and the juices to reabsorb, preventing dryness. The pork should be fork-tender with a crispy, mahogany-colored bark that gives way to juicy, flavorful meat beneath.
Slice the pork shoulder against the grain into ½-inch thick slices. Serve immediately with the pan juices (strain them if you prefer a smoother sauce) and the aromatic onion-garlic mixture spooned over the top. The contrast of crispy bark and tender meat, combined with the bright, herbaceous flavors, makes this dish truly exceptional. Pair it with roasted potatoes or a simple green salad for a complete meal.
Pro Tips For Making 3 Lb Pork Shoulder Roast
- SEAR HARD AND FAST: Get that pan screaming hot—like, actual smoke-point heat—before adding the pork shoulder. I used to linger here, and the meat just steamed instead of developing that deep, caramelized crust. Two minutes per side max, no crowding the pan. (Yes, even if you’re impatient like me.)
- SALT THE NIGHT BEFORE: Toss the pork shoulder in a mix of 1 tablespoon kosher salt and 1 teaspoon black pepper 12–24 hours ahead. Sounds weird, but it works: the salt penetrates deeper, and the meat stays juicier. Skip this, and you’ll end up with a dry exterior no matter how low you cook it.
- SMOKED PAPRIKA TRICK: Mix the smoked paprika with a teaspoon of olive oil before rubbing it on—it sticks better and won’t clump like dry powder. Pro move: Toast the paprika in a dry pan for 30 seconds first. The aroma alone makes the dish taste richer. (Your future self will notice.)
- PROBE THE THICK CUT: Pork shoulder is sneaky—check doneness in the thickest part, not the edge. Aim for 195–203°F internal temp (it’ll rest up to 10°F). I learned this the hard way: sliced too early, and it turned out like shoe leather. Let it rest 15 minutes before cutting—yes, even if you’re starving.
Storing and reheating your 3 lb pork shoulder roast
Refrigerator Storage
Your reverse-seared pork shoulder will keep beautifully in the fridge for 3-4 days if stored properly. I always slice it against the grain into ½-inch thick portions and arrange them in a single layer on a plate before transferring to an airtight container.
Line the bottom of the container with a paper towel to absorb any moisture that might make the slices soggy. The crispy bark stays intact for the first 24 hours, though it’ll soften slightly after that. 💫
Freezer Prep
For longer storage, pork shoulder freezes exceptionally well for up to 6 months without losing quality. After slicing, wrap each portion tightly in plastic wrap, then place them in a freezer-safe bag with all the air squeezed out.
I like to label these with the date and cooking method (“Reverse-Seared Pork Shoulder”) so I remember how to reheat it later. For whole roasts, wrap the entire cooked piece in heavy-duty foil before freezing.
Reheating Methods
When reheating, low and slow is always the best approach to maintain moisture. For sliced pork, place portions in a skillet over medium-low heat with a splash of water or broth, covering with a lid for 5-7 minutes until reaching 165°F.
The bark will soften but still provide satisfying texture. For whole roasts, wrap in foil and bake at 300°F for 15-20 minutes until warmed through.
Microwave Shortcut
For quick meals, microwave individual portions on 50% power for 2-3 minutes, stirring halfway. Add a damp paper towel to prevent drying. The texture won’t be as crispy as oven-reheated, but it’s perfect for sandwiches or tacos.
I often use this method when I’m short on time but still want that tender, flavorful pork. 🔥
Flavor Boost Tips
Revitalize reheated pork by brushing with a little apple cider vinegar or beer before reheating—this cuts through any potential dryness. For extra richness, add a pat of butter to the reheating pan.
I also like to sprinkle with fresh thyme or smoked paprika right before serving to remind everyone of that restaurant-quality bark.
Leftovers Magic
Transform leftover pork into new meals—try it in breakfast hash with potatoes and peppers, or shred it for tacos with pickled onions and cilantro. The tender texture works perfectly for pork pot pie or stuffed peppers.
I always make extra because these leftovers become the foundation for so many other dishes. The reverse-sear method makes the meat so versatile! 💛
Nutrition facts
Frequently asked questions
Why do you recommend a dry brine instead of a wet marinade for pork shoulder?
A dry brine creates the perfect foundation for that crispy bark while keeping the meat juicy. The salt draws out surface moisture over time, which then reabsorbs during cooking, creating a dry surface that crisps beautifully when seared. Wet marinades can make the exterior too moist for proper bark formation. Plus, dry brining lets the seasoning penetrate deeply without diluting the meat’s natural flavor.
Can I use a regular oven thermometer instead of an instant-read thermometer?
An oven thermometer only tells you your oven’s accuracy, not the pork’s internal temperature. For perfect results, you need an instant-read thermometer to monitor the pork’s core temperature. The 195-203°F range is critical for that fork-tender texture. I recommend a good quality Thermoworks or Meater thermometer—they’re worth the investment for pork cooking.
What’s the best way to handle pork shoulder if I don’t have a wire rack?
No wire rack? No problem! Place the pork directly on the roasting pan and prop it up with a metal cooling rack or even a folded aluminum foil sheet. This creates airflow around the meat, preventing steaming which can make the bark soggy. If you’re really stuck, use a baking sheet with a thin layer of oil to prevent sticking. The key is keeping the fat side up for even cooking.
How do I know when the pork shoulder is done if I don’t have a meat thermometer?
If you’re thermometer-less, use the “fork test”: insert a fork into the thickest part of the meat. If it slides in and out with minimal resistance and the meat fibers pull apart easily, it’s done. The pork should also feel very tender when pressed gently. For a 3 lb roast, this typically takes 6-7 hours at 275°F. The meat will look glossy and pull away slightly from the bone.
Can I make this recipe with a boneless pork shoulder instead?
Boneless pork shoulder works, but you’ll lose some flavor since the bone adds depth. If using boneless, trim any remaining fat to 1/4-inch thickness for even cooking. The cooking time may be slightly shorter (about 5-6 hours instead of 6-7), but monitor closely with a thermometer. The reverse-sear method still applies perfectly to boneless cuts.

- 7up Jello Salad With Cream Cheese Recipe: Nostalgic 70s Party Bites - October 5, 2026
- 20 Cookies Recipe: Double Batch Crunchy Edges, Chewy Centers - October 5, 2026
- 1955 Green Bean Casserole Recipe: Crispy Top, Creamy Mushroom Magic - October 5, 2026