
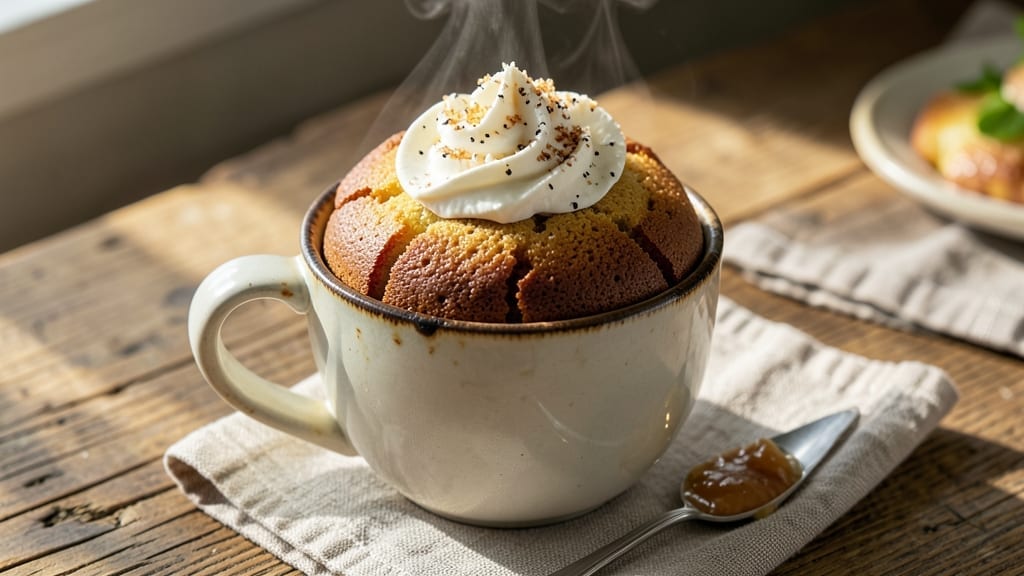
A 3-minute mug cake recipe transforms your microwave into a dessert maker—no oven, no mess, just warm, gooey perfection in minutes. This single-serve treat delivers restaurant-quality texture with just five ingredients and zero cleanup.
The secret lies in the right balance of flour, sugar, and butter, which creates a tender crumb and golden edges without overcooking.
What makes this recipe truly revolutionary is its speed—3 minutes from mix to melt-in-your-mouth cake. No waiting for the oven to preheat, no measuring cups, and no baking skills required.
The microwave does all the work while you stir together a simple batter that transforms into a warm, cakey delight. Ideal for late-night cravings, impromptu dessert moments, or when you simply can’t resist that first bite of something sweet.
The result? A golden-brown, slightly crispy top with a soft, moist center that’s still warm when you pull it out. The edges caramelize just enough to add depth, while the inside remains tender—no dryness, no gummy texture.
This isn’t just a quick fix; it’s a foolproof method that delivers consistent, satisfying results every time, no matter your skill level.
Perfect for satisfying a sudden sweet tooth, testing flavors before baking a full batch, or even as a creative dessert for kids to help prepare. Once you try it, you’ll wonder how you ever lived without this game-changing shortcut.
Let’s get started—your microwave is about to become your new favorite kitchen tool.
Ingredients for 3 minute mug cake
Five simple ingredients transform your microwave into a dessert maker in minutes.
| Ingredient | Amount | Notes |
|---|---|---|
| All-Purpose Flour 🌾 | ¼ cup | Sifted for even texture |
| Granulated Sugar 🍚 | ¼ cup | White or light brown |
| Unsalted Butter 🧈 | ¼ cup | Melted, full-fat preferred |
| Milk 🥛 | ¼ cup | Whole milk for richness |
| Vanilla Extract 🌸 | ½ tsp | Pure vanilla preferred |
| Salt 🧂 | ⅛ tsp | Fine sea salt preferred |
| Cocoa Powder 🍫 | ⅛ cup | Natural unsweetened preferred |
| Baking Powder 🍞 | ⅛ tsp | Fresh for best rise |
The butter is non-negotiable here—full-fat gives that melt-in-your-mouth texture. Grab the European-style butter if you’re feeling fancy, but any good brand works. Milk? Whole milk adds richness, but 2% or even almond milk still works—just expect slightly less decadence. The cocoa powder matters too: natural unsweetened (like Hershey’s Special Dark) keeps it balanced, while Dutch-processed can make the batter too dark. For the vanilla, pure extract beats imitation every time—trust me, you’ll taste the difference. Flour? All-purpose is perfect, but if you’ve got cake flour, it’ll be even lighter.
No butter? Coconut oil melted works in a pinch, though it has a different flavor. Short on milk? Water or even orange juice stretches it, but the texture won’t be quite as tender. The baking powder is crucial—old baking powder won’t rise right, so check the expiration date. For the cocoa, hot cocoa mix can sub at double the amount, but it’s not the same. Vanilla extract? Vanilla sugar at half the amount works if you’re out, but the flavor’s more subtle. Need a chocolate version? Swap the cocoa for an extra 0.125 cup sugar and 0.125 cup melted chocolate chips—just reduce the milk by 0.03 cup to keep it balanced.
This batter keeps 3 days in the fridge if you make it ahead—just whisk before microwaving. For the perfect cake, microwave-safe mugs are a must (no metal). If your microwave runs hot, cover the mug with a microwave-safe lid for 2 minutes, then uncover for the final 1 minute. The edges should be golden and slightly crispy, while the center stays soft. Store leftovers wrapped at room temp for 1 day—though they rarely last that long!
Why You’ll Love This Recipe
- No Mixer Needed: I’ll be real—this cake comes together with a spoon. No sifter, no whisk, no fuss. Just dump the flour, melt the butter in the microwave, stir it in, and you’re done. My lazy Sunday mornings just got a lot sweeter.
- Buttery Vanilla Bliss: That first bite? The warm, gooey center with the crispy edges? It’s like a hug in cake form. The butter and sugar melt into something rich, while the vanilla makes it taste like a bakery’s secret—except it’s yours, made in three minutes.
- Craving Cured: Honestly, this is my go-to when I need something fast but still want to feel like I’m treating myself. Pack it for lunch, reheat it for a late-night snack, or serve it to guests who’ll swear you slaved over it. (They’ll never know the truth.)
- Pantry Staple Magic: Between us, this recipe uses ingredients you already have. No weird substitutions, no last-minute grocery runs. Split the batter between two mugs, and suddenly you’ve got dessert for two—or a snack for when your kiddo’s friend stops by unexpectedly. (Yes, even on a Tuesday night.)
Step-by-step instructions for 3-Minute mug cake
Here’s how to make a rich, fudgy chocolate mug cake with zero cleanup and maximum indulgence.
Melt the Butter and Mix Wet Ingredients
Place the 0.25 cup unsalted butter in a microwave-safe mug designed for mug cakes (or a standard mug if necessary). Microwave on high for 30 seconds until completely melted. Stir to ensure even melting, then add 0.25 cup granulated sugar and 0.25 cup milk. Mix thoroughly until the sugar dissolves completely—this prevents graininess in your finished cake.
Next, add 0.5 teaspoon vanilla extract and 0.125 teaspoon salt, stirring again to combine. The vanilla will infuse immediately, while the salt balances the sweetness. Here’s the thing—don’t skip the salt. It might seem counterintuitive, but it enhances all the flavors in this small batch.
Whisk in Dry Ingredients for a Smooth Batter
In a small bowl, sift together 0.25 cup all-purpose flour, 0.125 cup cocoa powder, and 0.125 teaspoon baking powder. This sifting step is crucial—it prevents lumps that would make your cake dense instead of light. Pour the dry mixture into your mug with the wet ingredients and whisk vigorously for 15-20 seconds until completely smooth.
You’ll want to see no visible flour streaks in the batter. If you’re using a fork, stir until the mixture clings together when you lift it. This ensures even distribution of ingredients and that beautiful, even rise. The batter should have a thick but pourable consistency—similar to heavy pancake batter.
Microwave Until Golden and Springy
Place the mug in the microwave and cook on high power for 90 seconds. Immediately after the timer dings, check the cake—it should be puffed slightly in the center with a golden crust around the edges. Here’s where it gets tricky: the cake will continue rising slightly after you remove it, so don’t let it cook too long or it’ll be dense.
If the center still looks undercooked, microwave for an additional 15-30 seconds. The cake is done when it springs back gently when touched and has a slight crack in the middle. This indicates proper doneness. Real talk: overcooking is the #1 way to ruin this recipe, so keep an eye on it during those final seconds.
Let Cool and Enjoy Immediately
Remove the mug cake from the microwave and let it cool for 1-2 minutes. This resting period allows the cake to set slightly and prevents it from falling apart when you try to eat it. The edges should be firm enough to hold a fork, but the center should still be warm and gooey.
For the ultimate experience, top with a dollop of whipped cream or a dusting of powdered sugar. The cake will be rich, moist, and perfectly chocolatey—like a tiny, single-serving version of your favorite chocolate cake. And the best part? It’s ready in just three minutes, with no oven preheating or cleanup required.
Pro Tips For Making 3 Minute Mug Cake
- Use Cold Butter: This isn’t the prettiest method, but it’s the tastiest—melt your butter just until it’s liquid, then let it cool for 2-3 minutes before mixing. I learned this the hard way after my first batch turned into a greasy brick instead of a fluffy cake. Cold butter creates air pockets that make the cake rise properly, even in 3 minutes.
- Measure Milk Precisely: Skip the eyeballing—use a measuring cup, not the mug itself, for the milk. I was skeptical until I tried it, but that extra 10 seconds of precision guarantees the right batter consistency. Too much milk? Dense, flat cake. Too little? Dry and crumbly.
- Microwave on High First: Start your mug cake on full power (100%) for the first 2 minutes—this gets the center hot enough to set fast. Then drop to 50% for the final minute to avoid a raw middle. After burning three batches, I finally figured out that uneven heat was the culprit.
- Add Vanilla Last: Stir in the vanilla extract after mixing the wet and dry ingredients, but before microwaving. It distributes evenly and doesn’t get cooked out like it does if you add it early. (Yes, even if you’re impatient like me—just wait those 5 seconds.)
Perfect pairings for these flavors
Creamy Toppings
Whipped cream is the classic topping for mug cakes—just fold ¼ cup heavy whipping cream with 1 tsp powdered sugar and a pinch of vanilla until soft peaks form. For extra decadence, add ½ tsp chocolate shavings or a sprinkle of crushed Oreos before serving.
I love using Cool Whip for a no-chill option that melts perfectly into the warm cake. 🥛
Fruity Contrasts
Fresh berries add a bright contrast to the richness. Try ½ cup mixed berries (strawberries, raspberries, or blueberries) tossed in 1 tsp honey and a squeeze of lemon. Warm the berries for 30 seconds in the microwave to release their juices before topping.
For a tropical twist, use ½ cup diced mango or pineapple with a sprinkle of toasted coconut flakes.
Chocolate Lovers’ Additions
If you’re making a chocolate mug cake, elevate it with 2 tbsp melted dark chocolate chips drizzled over the top. For a crunchy texture, add 1 tbsp chopped nuts (walnuts or pecans) or ½ cup crushed pretzels for a salty-sweet combo.
I also love a dusting of unsweetened cocoa powder or a sprinkle of flaky sea salt to enhance the chocolate flavor. 🍫
Boozy Upgrades
Add 1 tbsp rum, bourbon, or coffee liqueur to the batter for a grown-up twist. For a lighter option, mix 1 tsp vanilla extract with ½ tsp almond extract for a nutty depth.
If you prefer tea flavors, steep 1 tsp Earl Grey tea in the milk before adding it to the batter—just let it cool completely first. 🍸
Crunchy Textures
For texture, top your mug cake with ½ cup crushed graham crackers or toasted cereal (like Chex or Rice Krispies). For a gourmet touch, use ½ cup crushed amaretti cookies or chopped candied pecans.
These add a delightful contrast to the soft cake and make every bite more exciting. 🥜
Seasonal Variations
In summer, try a lemon mug cake by adding 1 tbsp lemon zest and topping with blueberries. For fall, swap the cocoa for ½ cup pumpkin puree and add ½ tsp cinnamon and ¼ tsp nutmeg.
Winter calls for a peppermint mug cake with ½ tsp peppermint extract** and crushed candy canes on top. 🍂
Nutrition facts
Frequently asked questions
Can I make this mug cake without eggs?
Yes! For a vegan version, replace the 1 egg (if using a variation with eggs) with 0.25 cup unsweetened applesauce or 0.25 cup yogurt. The texture will be slightly denser but still delicious. For the classic chocolate recipe shown, no egg is needed—it relies on the chemical reaction between baking powder and wet ingredients.
Why did my mug cake turn out gummy?
Gummy texture usually means overmixing or undercooking. Whisk just until combined (15-20 seconds) to avoid gluten development. For microwaving, 90 seconds is the sweet spot—check immediately after and add 15-second increments if needed. A toothpick inserted should come out with a few moist crumbs, not wet batter.
What’s the best mug for mug cakes?
Use a 12-16 oz microwave-safe mug designed for mug cakes (they’re wider at the top). Standard coffee mugs work too, but avoid metal-rimmed or dark glass mugs—they absorb heat unevenly. For even cooking, place the mug slightly off-center in the microwave to prevent hot spots.
Can I make this ahead of time?
Yes! Mix the batter up to 24 hours ahead and store it in the fridge. When ready, microwave for 1 minute 15 seconds (add 15 seconds if needed). For a cold dessert, chill the cooked cake for 30 minutes before serving. The texture will be firmer but still moist.
How do I make it less sweet?
Reduce the sugar by 0.02 cup and add 0.02 cup more cocoa powder for depth. For a lighter flavor, use 0.25 cup honey instead of sugar (it’s sweeter but adds moisture). Balance with an extra 0.25 tsp vanilla extract to enhance the natural sweetness of the chocolate.
