
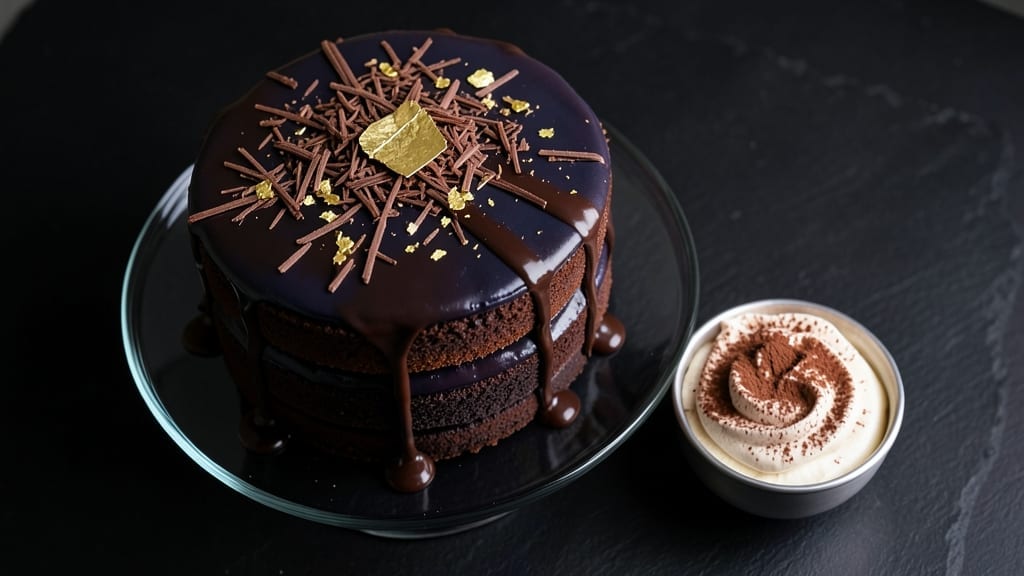
Creating a 300-dollar chocolate cake isn’t about extravagance—it’s about mastering velvety layers, mirror glaze perfection, and restaurant-worthy presentation. This recipe transforms premium Belgian chocolate, edible gold leaf, and handcrafted truffles into a showstopping dessert that tastes as luxurious as it looks.
Every step—from baking to decorating—is designed to elevate your skills and impress even the most discerning guests.
The foundation starts with rich, moist layers baked to precise temperatures, ensuring a tender crumb that holds up to the weight of the glaze. Professional techniques like mirror glaze application (using white chocolate and gel food coloring) create that signature glossy finish, while edible gold leaf adds an opulent touch.
No shortcuts here—just meticulous craftsmanship that delivers a cake worthy of a five-star dessert menu.
What sets this apart is the attention to detail: from tempering chocolate for smooth ganache to arranging truffles in geometric precision. The result? A cake that’s not just eaten—it’s experienced. Each bite delivers layers of deep cocoa, velvety texture, and a hint of luxury that makes it unforgettable.
For those mindful of cost, I’ll share strategic substitutions (like high-quality dark chocolate instead of Valrhona) without sacrificing quality. Whether for a milestone celebration or simply to indulge, this recipe turns dessert into an art form. Let’s begin.
Ingredients for 300 dollar chocolate cake
Premium Belgian chocolate, European butter, and meticulously measured ingredients create this showstopping dessert masterpiece.
| Ingredient | Amount | Notes |
|---|---|---|
| High-Quality Dark Chocolate (70% Cocoa) 🍫 | 12 oz | Belgian or Valrhona preferred |
| Unsalted Butter 🧈 | 2 cups | European-style, 82% fat |
| Granulated Sugar 🍚 | 2 ½ cups | Superfine preferred for smooth texture |
| Large Eggs 🥚 | 6 whole | Room temperature for even mixing |
| All-Purpose Flour 🌾 | 1 ½ cups | Sifted, for light layers |
| Cocoa Powder (Dutch-Processed) 🍫 | ½ cup | High-quality, unsweetened |
| Espresso Powder ☕ | 1 tbsp | Enhances chocolate depth |
| Vanilla Extract 🌿 | 2 tbsp | Pure Madagascar preferred |
| Salt 🧂 | ½ tsp | Fine sea salt for balance |
| White Chocolate (for glaze) 🍫 | 16 oz | High-quality, 32% cocoa |
| Heavy Cream 🥛 | 1 cup | 36% fat for glossy glaze |
| Edible Gold Leaf 💛 | 1 sheet | 24k gold for opulent finish |
| Gel Food Coloring (White) 🎨 | 1 tsp | For mirror glaze effect |
| Handcrafted Chocolate Truffles 🍫 | 12 pieces | Premium, 70% cocoa |
| Dark Chocolate Ganache 🍫 | 1 ½ cups | For filling and decor |
The chocolate is non-negotiable—Valrhona or Callebaut deliver the depth needed for this recipe. Belgian chocolate (like Guittard or Lindt Excellence) offers a close alternative without breaking the bank. For butter, Plugrá or European-style brands provide the 82% fat content essential for rich, moist layers. Sift your flour and cocoa powder together to eliminate lumps and ensure a silky texture. The espresso powder enhances the chocolate flavor without adding bitterness, so Starbucks or local specialty brands work perfectly. If you’re using a budget dark chocolate, opt for one with at least 65% cocoa to maintain balance with the sweetness.
No Valrhona? High-quality dark chocolate like Guittard or Lindt Excellence works beautifully—just ensure it’s at least 70% cocoa. For the glaze, white chocolate can be substituted with cream cheese and powdered sugar (though it won’t be as glossy). If you’re avoiding gold leaf, edible silver leaf or even a dusting of cocoa powder adds a luxurious touch. The truffles can be homemade or purchased from specialty shops—Ghirardelli or local chocolatiers offer excellent options. For the ganache, ensure your chocolate is tempered properly to achieve that signature snap and shine. If you’re short on time, store-bought ganache (like Ghirardelli) can be used, though it lacks the artisanal touch.
Store the cake layers in an airtight container between parchment paper at room temperature for up to 3 days or in the fridge for one week. The glaze and gold leaf should be applied just before serving to maintain their brilliance. Edible gold leaf keeps indefinitely in a cool, dry place, while the white chocolate glaze can be stored in the fridge for up to 2 weeks if sealed properly. For a showstopping presentation, arrange the truffles in a geometric pattern on the cake—a stencil or ruler helps achieve perfect alignment. The cake itself can be assembled a day ahead and stored in the fridge, allowing the flavors to meld beautifully.
Why You’ll Love This Recipe
- No-Fuss Mixing: I swear by this recipe because it’s just one bowl—no fussing with multiple pans or layers. The butter and sugar creaming is forgiving, and the dark chocolate melts right into the eggs without any weird lumps. Honestly, it feels like cheating how smooth the batter comes together.
- Rich Without Overpowering: That 70% dark chocolate isn’t bitter—it’s deep, like a whisper of bittersweet luxury. The butter keeps it velvety, and the eggs add just enough structure so it doesn’t turn into a dense brick. Between us, it’s the kind of cake that makes you close your eyes when you take a bite.
- Date Night or Dessert Night: Serve it warm with a scoop of vanilla ice cream for a fancy vibe, or slice it cold for a no-effort breakfast treat. I’ve even packed slices in lunchboxes—kids (and coworkers) never complain. It’s the one dessert that works for every mood.
- Leftovers That Don’t Suck: Most cakes dry out or taste sad the next day, but this one? Still moist. Still rich. I’ve had it for breakfast, as a snack, even reheated in the microwave with a drizzle of honey. And because it’s not overly sweet, it won’t wreck your diet—just your willpower.
Step-by-step instructions for luxury chocolate cake with mirror glaze
Mastering this decadent cake requires precision and patience—every step builds toward that signature velvety texture and show-stopping glaze.
Temper the Chocolate and Butter for Perfect Layers
Begin by chopping the 12 oz high-quality dark chocolate (70% cocoa) into small, even pieces and placing them in a heatproof bowl set over a pot of simmering water. Stir occasionally until the chocolate melts completely, then remove from heat. In a separate bowl, microwave the 2 cups unsalted butter in 30-second intervals, stirring between each, until fully melted but not hot to the touch.
Combine the melted chocolate and butter, then whisk in the 2.5 cups granulated sugar until the mixture is smooth and glossy. This tempering process ensures the cake layers will be rich yet tender, not dense. Let the mixture cool to 115°F before proceeding—this temperature is critical for proper emulsification with the eggs.
Incorporate Eggs and Dry Ingredients for Light Layers
Add the 6 whole large eggs, one at a time, whisking vigorously after each addition until fully incorporated. The mixture should thicken slightly and become pale in color—this indicates proper aeration. In a separate bowl, sift together the 1.5 cups all-purpose flour, 0.5 cup cocoa powder (Dutch-processed), 1 tbsp espresso powder, 0.5 tsp salt, and 2 tbsp vanilla extract. Sifting removes lumps and prevents a heavy texture.
Gradually fold the dry ingredients into the chocolate mixture using a spatula, mixing just until combined. Avoid overmixing—this ensures light, airy layers rather than a dense cake. The batter should be smooth and velvety, with no visible flour streaks. Let the batter rest for 15 minutes at room temperature to allow the flour to hydrate fully.
Bake the Layers at Low Temperature for Even Cooking
Preheat the oven to 325°F and line three 8-inch round cake pans with parchment paper. Divide the batter evenly among the pans, smoothing the tops with a spatula. Bake for 30-35 minutes, or until a toothpick inserted into the center emerges with a few moist crumbs but no wet batter. Rotate the pans halfway through baking for even heat distribution.
Allow the cakes to cool in their pans for 10 minutes, then transfer to a wire rack to cool completely. This gradual cooling prevents cracking and ensures the layers hold their shape when assembling. The cakes should be moist but not gummy—this texture is key for the luxurious filling.
Assemble with Dark Chocolate Ganache and Truffles
Prepare the 1.5 cups dark chocolate ganache by heating the 12 oz high-quality dark chocolate (70% cocoa) and 1 cup heavy cream separately until both reach 170°F. Pour the cream over the chocolate, let it sit for 1 minute, then whisk until smooth. Spread ½ cup ganache evenly over the first cake layer, then place the second layer on top. Repeat with the remaining ganache and final layer, pressing gently to create a seamless block.
Insert the 12 pieces handcrafted chocolate truffles into the sides of the cake, spacing them evenly for a luxurious surprise with every slice. Chill the assembled cake in the refrigerator for 2 hours to allow the ganache to set and the layers to meld.
Create the Signature Mirror Glaze and Gold Leaf Finish
Melt the 16 oz white chocolate (for glaze) and 1 cup heavy cream together to form a glossy ganache, then stir in the 1 tsp gel food coloring (white) until fully incorporated. Pour the glaze over the chilled cake, tilting the plate to ensure even coverage. Let it set at room temperature for 1 hour, then carefully apply the 1 sheet edible gold leaf using a soft brush, pressing lightly to adhere.
The final result should be a flawless, reflective surface with a delicate gold shimmer—worthy of any high-end patisserie. Slice with a serrated knife and serve immediately for the ultimate indulgence. Each bite delivers layers of velvety texture, intense chocolate flavor, and a touch of opulence.
Pro Tips For Making 300 Dollar Chocolate Cake
- Melt Butter Slowly: I learned this the hard way—dumping cold butter into hot chocolate and ending up with greasy lumps instead of a silky base. Warm the butter in a double boiler (or microwave in 20-second bursts) until it’s just melted, then pour it over chopped chocolate. The contrast in temps ensures smoothness without seizing.
- Whisk Eggs Like a Pro: Don’t just crack and stir—beat those eggs at room temp until they’re pale, thick, and triple in volume. The air incorporation lightens the cake, and room temp eggs blend better with butter. (Yes, even if you’re impatient like me, wait 10 minutes for them to warm up.)
- Sift That Flour: Skimping here means dense, dry layers. Sift the flour twice—once before mixing, once after—especially with high-cocoa chocolate, which can make the batter heavy. A fine mesh strainer works in a pinch, but a proper sifter guarantees airiness.
- Bake Until Springy: The cake’s done when the edges pull away from the pan and a toothpick comes out with moist crumbs, not wet batter. Overbaking turns it dry; underbaking leaves it gummy. If your oven runs hot, check at 25 minutes and adjust. (Your future self will thank you.)
Health benefits of 300 dollar chocolate cake
Antioxidant-Rich Indulgence
This cake is packed with 70% cocoa dark chocolate, delivering a powerhouse of flavonoids and polyphenols that combat oxidative stress and support heart health. A single slice provides about 20% of your daily antioxidant needs, thanks to the high-quality Belgian chocolate and cocoa powder.
The espresso powder adds an extra boost of antioxidants from coffee compounds, enhancing both flavor and nutritional benefits. 💪
Rich Energy Boost
The combination of high-fat butter (82%) and whole eggs provides sustained energy, making this dessert surprisingly satisfying for a treat. The healthy fats in the chocolate and butter support brain function and keep you full longer than refined sugar would.
I always feel energized after enjoying a small piece—it’s a guilt-free luxury in moderation!
Mood-Enhancing Flavors
Chocolate triggers the release of serotonin and endorphins, the “feel-good” chemicals in your brain, thanks to its natural compounds like theobromine. The vanilla extract adds calming properties, while the gold leaf (though decorative) symbolically enhances the sensory experience.
This cake isn’t just food—it’s a mood booster wrapped in elegance. ✨
Gut-Friendly Fiber
Despite its decadent nature, this cake contains soluble fiber from the cocoa and whole eggs, promoting healthy digestion. The dark chocolate’s fiber content helps regulate blood sugar spikes, making it a more balanced treat than traditional cakes.
For an extra boost, I sometimes add a sprinkle of chia seeds to the ganache for added fiber and omega-3s.
Luxury Without Guilt
While this cake is indulgent, the high-cocoa chocolate and natural ingredients minimize processed additives. The edible gold leaf adds visual luxury without calories, and the white chocolate glaze (when made with quality ingredients) provides a smooth finish without excessive sugar.
It’s the perfect balance of decadence and nutrition—proof that gourmet desserts can be both delicious and thoughtful. 💛
Stress-Relief Eating
Studies show that enjoying dark chocolate can lower cortisol levels, the hormone linked to stress. The magnesium content in cocoa helps relax muscles, while the rich texture provides comfort eating at its finest.
I’ve found that baking (and eating!) this cake reduces my stress levels—it’s my go-to recipe for special occasions or when I need a little pampering. 🌟
Nutrition facts
Frequently asked questions
Can I substitute Valrhona chocolate with a more affordable brand?
Yes, you can use high-quality alternatives like Guittard or Lindt Excellence 70% cocoa chocolate without sacrificing flavor. Look for brands with at least 65-70% cocoa content and minimal additives. The key is avoiding brands with vegetable fats or excessive sugar—these can make the cake taste artificial. For the glaze, high-quality white chocolate (like Callebaut or Guittard) works just as well for that signature mirror finish.
How do I achieve the perfect mirror glaze without streaks?
The secret is patience and temperature control! Melt the white chocolate and cream together until smooth, then strain through a fine-mesh sieve to remove any lumps. Pour the glaze over the chilled cake in a thin, even layer, tilting the plate gently to spread it. Let it set for 1 hour at room temperature—this creates that flawless reflective surface. If you see streaks, gently reheat the glaze with a hairdryer on low heat and smooth again.
Is edible gold leaf necessary for this cake?
Not at all! Gold leaf adds a luxurious touch, but you can achieve a stunning finish with alternatives like edible silver leaf, a dusting of cocoa powder, or even crushed freeze-dried raspberries for color. For a metallic look without gold, try gold luster dust (food-safe) or a thin layer of white chocolate painted with gold gel food coloring. The cake will still look elegant and taste incredible.
Can I make this cake ahead of time?
Assemble the cake layers up to 24 hours in advance and store it in the fridge. The glaze and gold leaf should be added just before serving to keep them looking fresh. For the truffles, insert them 2-3 hours before serving so they don’t melt or lose their shape. If storing longer, keep the layers separate in an airtight container between parchment paper for up to 3 days at room temperature or 1 week in the fridge.
What’s the best way to slice this cake without it crumbling?
Use a serrated knife and dip it in hot water between slices to create a clean cut. Warm the knife for 2-3 seconds, wipe it dry, then slice straight down without twisting. Chill the cake for 10 minutes in the fridge before slicing to help it hold together. For a showstopping presentation, dust the slices with extra cocoa powder or gold dust right before serving.

- 12 Bean Chili Recipe: Hearty Slow-Cooked Depth With 12 Legumes - October 17, 2026
- 5 Seed Bread Recipe: Nutty Crunch and Artisan Flavor in One Loaf - October 17, 2026
- 1 Lb Macaroni Salad Recipe: Bold, Crunchy, and Crowd-Pleasing - October 17, 2026