
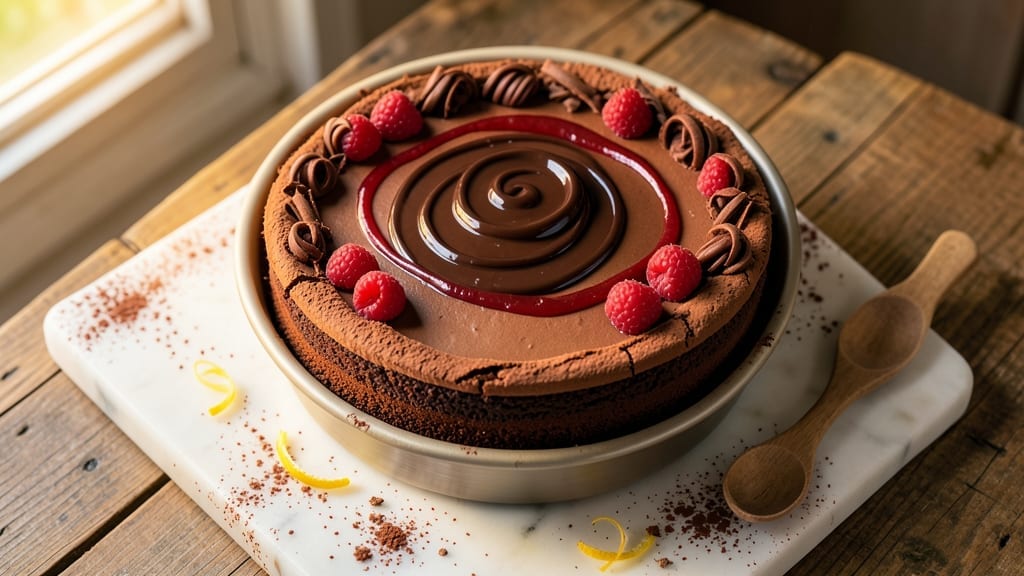
This 30th anniversary chocolate cake cheesecake recipe deserves a dessert that combines two iconic flavors in one showstopping creation—rich, velvety layers with a vanilla bean swirl at its heart.
The secret lies in baking a moist chocolate cake base that holds its structure while supporting a luscious cheesecake layer, all bound together by a swirl of vanilla-infused cream.
This isn’t just dessert; it’s a centerpiece that commands attention at every bite, with textures that shift from tender cake to creamy cheesecake and back again.
What sets this recipe apart is the balance—no soggy bottoms, no cracking cheesecake, and no compromise on flavor. The chocolate cake layer provides sturdy support while absorbing the cheesecake’s richness, while the vanilla bean swirl adds a bright, aromatic contrast that cuts through the decadence.
Baking each component separately ensures perfect results, and the assembly process is simpler than you’d expect, with no special equipment required beyond a springform pan and a steady hand.
By the time you serve this dessert, you’ll have a golden, glossy masterpiece that looks as impressive as it tastes. The chocolate cake remains moist and fudgy, the cheesecake layer stays silky and smooth, and the vanilla swirl adds a delicate, fragrant accent that ties everything together.
It’s the kind of dessert that makes guests pause mid-conversation—because nothing says “thirty years of love” like a dessert this extraordinary.
Pair it with fresh berries for a pop of color, a drizzle of chocolate ganache for extra decadence, or simply serve it as-is to let the layers shine. This recipe is designed to impress without stress, so you can focus on celebrating instead of baking. Let’s create something unforgettable.
Ingredients for 30th anniversary chocolate cake cheesecake
Rich layers and velvety swirls—this anniversary dessert needs just 15 ingredients to wow.
| Ingredient | Amount | Notes |
|---|---|---|
| All-Purpose Flour 🌾 | 2 cups | Sifted for light texture |
| Unsalted Butter 🧈 | 1 ½ cups | Cold, cubed for cake |
| Granulated Sugar 🍚 | 2 cups | Superfine preferred |
| Cocoa Powder 🍫 | ¾ cup | Dutch-processed for smoothness |
| Large Eggs 🥚 | 2 whole | Room temperature |
| Baking Powder 🧂 | 1 tsp | Freshly measured |
| Salt 🧂 | ½ tsp | Fine sea salt |
| Vanilla Extract 🌿 | 1 tbsp | Pure Madagascar bourbon |
| Whole Milk 🥛 | ½ cup | Room temperature |
| Cream Cheese 🧀 | 16 oz | Full-fat, room temperature |
| Powdered Sugar 🍚 | 1 ½ cups | For cheesecake layer |
| Vanilla Bean 🌿 | 1 whole | Seeds scraped |
| Heavy Cream 🥛 | 1 cup | Cold for swirl |
| Dark Chocolate Chips 🍫 | ½ cup | 70% cocoa, for garnish |
| Raspberry Jam 🍓 | ¼ cup | For filling between layers |
The cream cheese is non-negotiable—Philadelphia brand melts perfectly. Grab a 2-block (16 oz) package from the dairy case, not the pre-sliced singles. For the chocolate cake, King Arthur flour or Bob’s Red Mill ensures a tender crumb, but any all-purpose works. The vanilla bean? Worth the splurge at Whole Foods or Williams Sonoma—that floral aroma makes all the difference. Pre-sift your dry ingredients to avoid lumps, and measure the cocoa powder by weight if you’re picky (it compacts differently).
No vanilla bean? Double the extract, but you’ll miss that floral depth. Substitute raspberry jam for apricot if needed—just ensure it’s seedless. The heavy cream for the swirl should be cold when whipped, or it won’t hold its peaks. For a dairy-free option, replace milk and cream with full-fat coconut milk (though texture will differ slightly). The chocolate chips? Enjoy Life brand if allergies are a concern—they’re dairy-free and melt beautifully. Pro tip: Toast the chips briefly before garnishing for extra richness.
Assemble the cake and cheesecake layers day-of to prevent sogginess, but the vanilla swirl can be prepped 1 day ahead—just store it in the fridge. The full dessert keeps 3-4 days in the fridge, but the cheesecake layer freezes beautifully (wrap tightly in plastic wrap). For a showstopper, dust with powdered sugar right before serving—it settles into those swirls like magic. Leftovers? Reheat slices at 300°F for 10 minutes to restore creaminess.
Why You’ll Love This Recipe
- No-Fuss Layers: Mixing the cake batter and cheesecake filling is basically two bowls, one whisk—no fancy piping skills needed. The cocoa powder and butter create that perfect dense yet tender crumb, and the eggs tie it all together without a single drop of fuss.
- Rich Twice: That first bite? Chef’s kiss. The chocolate cake’s deep cocoa flavor meets the velvety cheesecake center—like a hug for your taste buds. Honestly, the sugar and butter combo makes it taste even better the next day (if you can wait).
- Double-Duty Dessert: This isn’t just for anniversaries—it’s my go-to for birthdays, holidays, or even a “I deserve this” Sunday night. Between us, I’ve served it cold, room temp, and even warmed with a scoop of ice cream. (Yes, even on a Tuesday night.)
- Leftovers Win: You’ll make this once and want to make it again—because the leftovers? Still magical. The cake stays moist, the cheesecake stays creamy, and honestly? It’s cheaper than ordering in when you’re feeding a crowd.
Step-by-step instructions for dual-layered chocolate cake cheesecake
Here’s how to create a showstopping dessert that combines rich chocolate cake and velvety cheesecake in perfect harmony.
Prepare the Chocolate Cake Layer
Preheat your oven to 350°F and grease a 9-inch springform pan thoroughly with butter, then dust with cocoa powder. In a large mixing bowl, cream together the 1.5 cups unsalted butter and 2 cups granulated sugar on medium speed until light and fluffy—this should take about 3-4 minutes. The mixture will nearly double in volume and turn pale.
In a separate bowl, sift together the 2 cups all-purpose flour, 0.75 cup cocoa powder, 1 teaspoon baking powder, and 0.5 teaspoon salt. With the mixer running on low speed, gradually add the dry ingredients to the butter mixture, alternating with the 2 whole eggs and 0.5 cup whole milk. Begin and end with the flour mixture to ensure even distribution. Mix just until combined—overmixing develops gluten and makes the cake dense.
Add the 1 tablespoon vanilla extract and mix for 30 seconds to blend. Pour the batter into the prepared pan and smooth the top with a spatula. Bake for 35-40 minutes, or until a toothpick inserted in the center comes out clean. Let the cake cool completely in the pan before proceeding—this prevents the cheesecake layer from sliding when you assemble.
Make the Vanilla Bean Swirl Cream
While the cake cools, prepare the swirl cream by scraping the seeds from the 1 whole vanilla bean into a medium bowl. Add the 1 cup heavy cream and 1.5 cups powdered sugar, then whisk until the sugar dissolves completely. The mixture should be smooth and glossy, with a delicate vanilla aroma that fills your kitchen.
Transfer the cream to a piping bag fitted with a star tip. This will create elegant swirls when you pipe it between the cake and cheesecake layers. If you don’t have a piping bag, a plastic zip-top bag with a small corner snipped off works perfectly. Chill the cream in the refrigerator until ready to use—this keeps it firm enough to hold its shape when piped.
Prepare the Cheesecake Layer
Reduce the oven temperature to 325°F. In a large bowl, beat the 16 oz cream cheese and 1.5 cups unsalted butter together until completely smooth and creamy—this can take 5-7 minutes with a hand mixer. Gradually add the 1.5 cups powdered sugar, mixing until fully incorporated. The batter should be thick but smooth, with no lumps.
Add the 2 whole eggs, one at a time, mixing well after each addition. Stir in the 1 tablespoon vanilla extract and a pinch of salt to balance the sweetness. Pour the cheesecake batter evenly over the cooled chocolate cake layer in the springform pan. Use a spatula to spread it smoothly, creating an even surface for the swirl cream.
Assemble and Bake the Dual-Layered Cake
Pipe the chilled vanilla bean swirl cream in elegant lines across the cheesecake layer, creating a decorative pattern. Spread the 0.25 cup raspberry jam evenly over the swirls—this adds a fruity contrast that complements both layers. Bake for 50-55 minutes, or until the edges are set and the center still has a slight wobble (it will firm up as it cools).
Turn off the oven and crack the door open slightly. Let the cake cool inside for 15 minutes to prevent cracking, then remove from the oven and cool completely at room temperature. Once fully cooled, refrigerate for at least 4 hours (overnight is ideal) to allow the flavors to meld and the texture to set properly.
Garnish and Serve
Before serving, run a knife around the edge of the springform pan to loosen the cake. Remove the side of the pan and transfer the cake to a serving plate. Melt the 0.5 cup dark chocolate chips in a double boiler or microwave, then drizzle over the top. Sprinkle with additional chocolate chips or crushed chocolate for a festive touch.
Slice the cake into 12 generous portions and serve chilled. Each bite will deliver the perfect balance of rich chocolate cake, velvety cheesecake, and the bright acidity of raspberry jam. The vanilla bean swirl adds an elegant contrast that makes this dessert truly special for any anniversary celebration.
Pro Tips For Making 30th Anniversary Chocolate Cake Cheesecake
- Melt Butter Slowly: I learned this the hard way—dumping cold butter into hot cocoa mix makes lumps that never fully dissolve. Instead, cut the butter into small cubes first, then melt it in a saucepan over low heat while stirring constantly. Once it’s just starting to bubble, pour it into the dry cocoa mixture—it’ll blend like butter (pun intended) and give you that silky texture.
- Sift the Cocoa: Unsifted cocoa powder is a sneaky culprit for dense, uneven layers. Sift it with the flour before mixing—it aerates the batter and prevents clumps that ruin the cake’s lightness. Trust me, your 30th anniversary guests will notice the difference in every forkful.
- Don’t Overmix the Batter: The moment the batter looks like pancake batter, stop stirring. Overmixing develops gluten, which turns your cake into a dense brick. Fold just until the flour disappears—about 10-12 strokes max. The cake will still be rich and moist, not tough.
- Chill the Cheesecake Layer: If you’re layering a cheesecake filling on top, let the cake cool completely before adding it. A warm cake will melt the bottom of the cheesecake layer, making a soggy mess. Pop it in the fridge for 30 minutes after baking—your future self will thank you when slicing.
Common mistakes when making perfect results
Overmixing Cake Batter
I’ve seen this happen more times than I can count—cake batter that turns dense and tough because someone mixed it like they were kneading bread dough. Stop mixing the moment all ingredients are combined, ideally within 1-2 minutes after adding the flour.
Overmixing develops gluten, which makes your chocolate cake layer dense instead of tender. Use a spatula to gently fold in the last bit of flour to avoid overworking the batter. 💫
Uneven Cheesecake Layer
The cheesecake layer is where many people struggle, and it usually comes down to uneven distribution. Pour the batter over the cooled cake layer in three equal parts, spreading each section with a spatula before moving to the next.
This prevents sinking in the center and ensures a smooth, even surface for piping the vanilla swirl. I’ve also seen people skip spreading the jam evenly—use an offset spatula to create a thin, even layer so the swirls peek through beautifully.
Skipping the Cooling Step
Rushing the cooling process is a fast track to disaster. The chocolate cake layer must cool completely before adding the cheesecake batter—otherwise, the heat will cause the cake to collapse or the cheesecake to slide off.
Let it sit in the pan for at least 1 hour at room temperature before proceeding. Trust me, this extra patience prevents a messy cleanup and ensures clean slices later. ⏰
Ignoring the Water Bath
This is a game-changer for preventing cracks in the cheesecake layer. Place the springform pan inside a larger roasting pan and add hot water to create a water bath—about 1 inch deep around the sides. This gentle steam bath helps the cheesecake bake evenly and reduces the risk of cracking.
I’ve seen people skip this step and end up with a cheesecake that looks like a cracked earthenware pot. Don’t be that person!
Overbaking the Cheesecake
Cheesecake is delicate, and overbaking turns it dry and rubbery. The center should have a slight wobble when the edges are set—it will firm up as it cools. If you’re unsure, check the internal temperature with a thermometer: it should read 150-155°F at the center.
Overbaking by even 5 minutes can ruin the texture, so keep an eye on it and use the oven’s light to peek without opening the door too often.
Assembling Too Soon
Patience is key when it comes to assembling this dessert. The cake and cheesecake layers need time to set properly before slicing. Refrigerate the assembled cake for at least 4 hours (overnight is ideal) to let the flavors meld and the textures firm up.
Serving it too soon leads to a runny cheesecake layer and a soggy cake base. Trust the process—your guests will thank you for the perfect bite. 💪
Nutrition facts
Frequently asked questions
Can I make this dessert without a springform pan?
Yes! Line a regular 9-inch round cake pan with parchment paper and grease it well. After baking, run a knife around the edges to loosen the cake before removing. For the cheesecake layer, pour the batter directly into the pan over the cooled cake. When serving, carefully transfer the entire cake to a plate using the parchment as a guide. This method works but may require extra care when slicing.
How do I adjust the recipe for a smaller or larger group?
This recipe serves 12—scale up by 1.5x for 18 servings (use two 9-inch pans) or down by 50% for 6 servings. For larger groups, bake two cakes simultaneously in separate pans. Keep in mind that baking times may vary slightly with different pan sizes, so check for doneness with a toothpick.
What’s the best way to store leftovers?
Wrap the entire cake tightly with plastic wrap, then place it in an airtight container. Store in the refrigerator for up to 4 days. To reheat individual slices, warm at 300°F for 10 minutes to restore creaminess. Freeze the cake (without garnish) for up to 2 months—thaw overnight in the fridge before serving.
Can I substitute the raspberry jam?
Use apricot, strawberry, or peach jam for a different flavor profile. For a non-fruit option, try a thin layer of chocolate ganache (melted chocolate + cream) between layers. Avoid overly watery jams—they can make the cake soggy. Seedless varieties work best to prevent texture issues.
Why does my cheesecake layer crack?
Cracking usually happens from rapid temperature changes or overbaking. Always let the cake cool gradually in the oven after baking (crack the door open slightly), then refrigerate slowly. Avoid opening the oven door frequently while baking. For extra insurance, place the pan in a water bath during baking to create a gentle steam environment.

- 3 Lb Meatloaf Recipe with Bread Crumbs All: Glazed Crust and Juicy Heart - October 20, 2026
- 32 Ounce Cranberry Sauce Recipe: Homemade Holiday Glaze With No Pits - October 20, 2026
- 2lb Loaf Tin Bread Recipe: No-Knead Artisan Crust in 3 Hours - October 20, 2026