
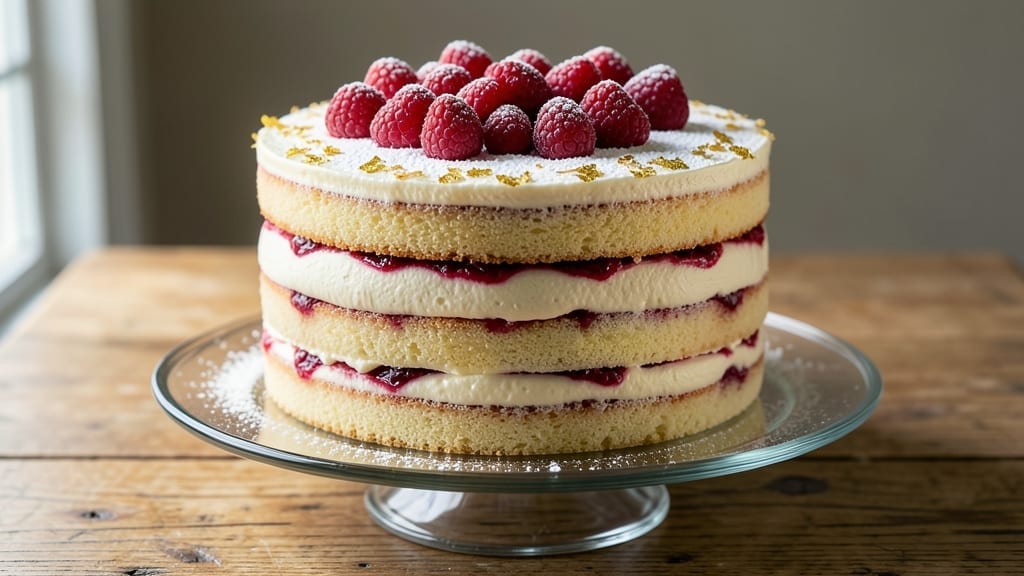
This 4-layer cake recipe delivers show-stopping height with perfectly balanced vanilla cake and luscious buttercream towers that’ll impress any crowd. 💛 The secret lies in precise layering techniques and a foolproof baking method that ensures each slice is moist, tender, and stacked to perfection.
Whether you’re celebrating a milestone or simply craving a decadent treat, this recipe combines classic elegance with modern flair—no fancy equipment required.
The foundation starts with a rich vanilla sponge cake baked in layers, then cooled and leveled for flawless stacking. Between each layer, vanilla buttercream—creamy, sweet, and perfectly piped—creates those iconic towering peaks that make this cake a centerpiece.
The key to success? Patience during assembly and chilling between layers to prevent crumbling. This isn’t just a cake; it’s a masterpiece that builds confidence with every slice.
What you’ll achieve is a towering dessert that’s as stunning to look at as it is to eat—golden layers encased in velvety frosting, with clean cuts and no mess. The buttercream holds its shape while remaining light enough to complement the cake’s natural flavor.
Serve at room temperature for the best texture, or chill briefly for a firmer bite if needed. This recipe delivers restaurant-quality results at home, every time.
For extra flair, consider adding fresh berries, edible gold leaf, or a dusting of powdered sugar between layers. The possibilities are endless, but the foundation—four perfectly baked and stacked layers—is what makes this cake unforgettable. Let’s get baking!
Ingredients for 4 cake
Twelve essential ingredients for a showstopping 4-layer cake with flawless stacking and velvety buttercream towers.
| Ingredient | Amount | Notes |
|---|---|---|
| All-Purpose Flour 🌾 | 3 ½ cups | Sifted, spooned and leveled |
| Granulated Sugar 🍚 | 2 ¼ cups | Divided for batter and frosting |
| Unsalted Butter 🧈 | 2 cups | Room temperature, cubed |
| Large Eggs 🥚 | 8 whole | Room temperature, separated |
| Vanilla Extract 🌿 | 2 tbsp | Pure, high-quality extract |
| Baking Powder 🧂 | 1 ½ tsp | Freshly measured |
| Salt 🧂 | ½ tsp | Fine sea salt |
| Milk 🥛 | 1 ½ cups | Whole milk preferred |
| Powdered Sugar 🍚 | 6 cups | Sifted for buttercream |
| Heavy Whipping Cream 🥛 | 2 cups | Cold, heavy cream |
| Vanilla Bean Paste 🌿 | 2 tbsp | For intense vanilla flavor |
| Cornstarch 🌾 | 2 tsp | For buttercream stability |
| Unflavored Gelatin 🍬 | 1 tsp | Bloomed in 2 tbsp cold water |
The foundation begins with all-purpose flour—King Arthur or Bob’s Red Mill are ideal for their protein balance. Sift it thoroughly to avoid dense layers, and measure it by spooning into the cup then leveling. Unsalted butter must be room temperature but not melted (press a thumbprint that holds shape). For the vanilla, Nielsen-Massey or McCormick pure extract delivers consistent flavor. Bloom your gelatin in cold water for 10 minutes before heating—this ensures perfect stability for your buttercream towers. Preheat your oven to 350°F and grease your 9-inch round cake pans with butter and parchment circles for flawless release. The powdered sugar should be sifted multiple times to eliminate lumps, especially for the buttercream where texture is critical. Diamond Crystal baking powder is preferred over aluminum-free brands for reliable rise.
Substitutions require precision. No vanilla extract? Use 1 vanilla bean scraped, or 2 tbsp vanilla sugar. For the buttercream, light cream works but lacks richness—heavy cream is non-negotiable for those signature peaks. No powdered sugar? Confectioners’ sugar from Domino works best, but sift it yourself. Milk substitutes? Evaporated milk or coconut milk add creaminess, but whole milk is ideal. Gelatin alternatives? Agar-agar at 1.5 times the amount works for vegan versions, though texture differs. Butter shortages? Vegetable shortening can replace up to half, but expect a slightly denser crumb. Room-temperature butter? Microwave in 20-second bursts, stirring between each, until pliable but not melted. Overmixed batter? Fold in an extra 1 tbsp flour to compensate. For the vanilla bean paste, McCormick or Lalique brands provide the best flavor intensity.
Store baked cake layers wrapped in plastic at room temperature for 2 days, or refrigerate for 5 days. Buttercream towers keep 3 days refrigerated, but bring to room temperature before serving for optimal texture. Frosted cake holds 4 days refrigerated—cover tightly with plastic wrap pressed directly against the frosting. For longer storage, freeze fully assembled cake (unfrosted or frosted) for up to 3 months. Thaw overnight in the fridge, then bring to room temperature before serving. Pro tip: Keep powdered sugar in an airtight container with a bay leaf to prevent clumping. Vanilla extract lasts indefinitely in a cool, dark place—Nielsen-Massey recommends storing it in the freezer for maximum shelf life.
Why You’ll Love This Recipe
- No Fuss Mixing: I swear by this recipe because it’s just three bowls—flour, butter-sugar, then eggs. No sifting, no weird ratios to memorize. Even if I’m half-asleep (looking at you, 6 AM baking), the batter comes together smoother than my morning coffee.
- Butter-Sugar Magic: That creamed butter and sugar combo? It’s the secret weapon. The texture is light yet rich, and the vanilla ties it all together—like a warm hug for your taste buds. Honestly, I’ve tried fancier cakes, but this one always wins.
- Birthday to Brunch: Serve it frosted for a party, slice it plain for breakfast, or even pack it for lunch. The simplicity means I can whip it up for my kid’s tea party or my own lazy Sunday. It’s the cake that does it all.
- Budget-Friendly Staples: Flour, sugar, butter—these are the basics I already have. No specialty ingredients or pricey shortcuts. And leftovers? They last days, whether I freeze slices or stash them in the fridge for quick snacks. Practicality at its best.
Step-by-step instructions for stacking a 4-Layer cake with vanilla buttercream towers
Precision matters here—each layer must be level, cooled properly, and assembled with confidence.
👨🍳 Step 1: Bake Four Perfectly Even Layers
Preheat your oven to 350°F and prepare four 8-inch round cake pans by greasing them thoroughly with softened butter and dusting with flour. Line the bottoms with parchment circles for easy removal. Divide the 2.25 cups granulated sugar into four equal portions—you’ll use ½ cup per layer—and set aside.
In a stand mixer fitted with the paddle attachment, cream together 2 cups unsalted butter and ½ cup granulated sugar on medium-high speed for 3-4 minutes until light and fluffy. Add 2 whole eggs (reserve the remaining 6 for later) one at a time, mixing well after each addition. In a separate bowl, whisk together ¾ cup all-purpose flour (divide the 3.5 cups total evenly), ⅓ tsp baking powder, and ⅛ tsp salt.
Gradually add the dry ingredients to the butter mixture in three additions, mixing just until combined after each. Scrape down the sides of the bowl as needed. Divide the batter evenly among the prepared pans. Bake for 25-30 minutes or until a toothpick inserted into the center comes out clean. Rotate the pans halfway through baking for even browning. Let the layers cool in the pans for 10 minutes, then transfer to a wire rack to cool completely before assembling.
⏰ Step 2: Prepare the Stabilized Vanilla Buttercream
While the cakes cool, prepare the buttercream by beating the 2 cups heavy whipping cream to soft peaks in a chilled bowl. In a separate, large mixing bowl, beat the 2 cups unsalted butter (softened to room temperature) on medium speed until smooth and creamy. Gradually add the 6 cups powdered sugar (sifted to prevent graininess) and mix until fully incorporated.
In a small bowl, bloom the 1 tsp unflavored gelatin by sprinkling it over 2 tbsp cold water and letting it sit for 5 minutes until fully dissolved. Gently fold the gelatin mixture into the buttercream to add stability. Add the 2 tbsp vanilla extract and 2 tbsp vanilla bean paste, mixing until smooth. Finally, fold in the whipped cream until fully combined. The buttercream should be thick enough to hold peaks but still pipeable—if it’s too stiff, soften it slightly with a few drops of milk.
🥘 Step 3: Level and Frost Each Layer
Use a long serrated knife or cake leveler to trim the tops of each cooled cake layer to create an even surface. Place the first layer on a cake stand or plate, then spread a thin layer of buttercream (about ¼ inch thick) over the top. This “crumb coat” prevents crumbs from mixing into the final frosting. Chill the cake for 15 minutes to set the crumb coat.
Apply a second, thicker layer of buttercream to the first cake layer, then place the second layer on top, pressing down gently to ensure a secure seal. Repeat this process for the remaining two layers, ensuring each layer is perfectly centered. The key here is patience—don’t rush the assembly, or you risk uneven layers or a wobbly cake.
🍰 Step 4: Create the Vanilla Buttercream Towers
Fill a piping bag fitted with a star tip (or a large round tip) with the remaining buttercream. Pipe four vertical “towers” of buttercream around the perimeter of the cake, starting from the base and working your way up. Each tower should be about 3-4 inches tall and spaced evenly around the cake. Use a small offset spatula to smooth the sides of the towers and create clean, sharp edges.
Once the towers are piped, use the spatula to gently press them into the cake, ensuring they adhere securely. Fill any gaps between the towers with additional buttercream, then use the spatula to create a smooth, continuous surface. For extra height, pipe additional buttercream swirls or rosettes on top of the towers. Finally, dust the cake with a fine layer of powdered sugar using a sieve for a polished finish.
Pro Tips For Making 4 Cake
- Cream Butter Slowly: When mixing butter and sugar, take your time—beat them together for at least 3-4 minutes until the mixture is pale and fluffy. I used to rush this step and ended up with a dense cake that tasted more like a cookie. The extra effort pays off with a lighter texture.
- Sift the Flour: Sift your all-purpose flour before adding it to the batter, especially if it’s old or clumpy. This aerates it and prevents lumps, which can make your cake uneven. (Yes, it’s a pain, but your future self will notice the difference.)
- Room-Temp Eggs Matter: Let your eggs sit out for 30 minutes before cracking them—room temperature eggs blend more smoothly and whip up faster. Cold eggs can make your batter look curdled, and you’ll end up with a cake that’s less tender.
- Don’t Overmix the Batter: Once the flour is incorporated, stop mixing as soon as it’s just combined—overmixing develops gluten, which turns your cake into a tough, chewy mess. Fold gently with a spatula instead of stirring like you’re trying to win a race.
Wine and beer pairings for 4 cake
Sweet Wine Pairings
For this 4-layer vanilla cake, opt for dessert wines that complement its buttery richness without overpowering the delicate vanilla notes. A Moscato d’Asti from Italy—light, fizzy, and subtly sweet—is my go-to choice.
Its 10-12% ABV and apple-peach flavors refresh your palate between bites of creamy buttercream. 🍷 Another excellent option is Sauternes, a luscious French dessert wine with honeyed apricot and citrus undertones that harmonize beautifully with vanilla.
Creamy Beer Options
If you prefer beer, a Belgian-style witbier like Hoegaarden adds a crisp, citrusy contrast to the cake’s sweetness. The wheat beer’s effervescence cuts through the buttercream’s richness, while its corianander and orange peel notes enhance the vanilla.
For a bolder pairing, try a Belgian dubbel—its caramel and raisin flavors create a surprising but delicious balance with the cake’s layers. Serve both wine and beer chilled for the best experience.
Coffee Liqueur Garnish
For an elevated touch, drizzle 2 tbsp Kahlúa or Tía María over the cake’s towers before serving. The coffee liqueur’s caramel and spice notes deepen the vanilla flavor while adding a sophisticated finish.
Pair this with a small espresso on the side—its bitterness tempers the cake’s sweetness beautifully. This combo is perfect for coffee lovers who want a dessert with depth. ☕
Seasonal Adaptations
In summer, swap the vanilla buttercream for a raspberry-infused version and pair with a sparkling rosé. The berry’s tartness brightens the cake, while the wine’s acidity keeps the palate fresh.
For fall, add a cinnamon-spiked buttercream and serve with a tawny port—its nutty, caramelized flavors mirror the season’s warmth. Adjust pairings to match your cake’s seasonal twists!
Nutrition facts
Frequently asked questions
Can I bake this 4-layer cake in smaller pans?
Yes, but you’ll need to adjust the baking time and quantity. Use 6-inch pans instead of 8-inch for a smaller version, but reduce each batter portion to ¼ cup per pan. Bake for 20-25 minutes instead of 25-30 since smaller cakes cook faster. The buttercream quantity should scale proportionally—reduce each ingredient by about 30% for a more manageable cake. Pro tip: Chill the smaller layers longer between frosting to prevent collapsing.
Why did my cake layers sink in the middle?
This usually happens from overmixing the batter, opening the oven too soon, or underbaking. To fix it: Whisk dry ingredients just until combined (no streaks), avoid opening the oven during the first 20 minutes of baking, and always check doneness with a toothpick—it should come out clean. If your cake already sank, try slicing off the top layer and rebuilding with extra buttercream for a smoother finish.
How do I make this cake gluten-free?
Replace the 3.5 cups all-purpose flour with a 1:1 gluten-free baking flour blend (like Bob’s Red Mill or King Arthur), plus an extra 1 tsp xanthan gum to improve structure. Use gluten-free vanilla extract and ensure your gelatin is certified gluten-free. The buttercream can stay the same, but add 1 tbsp cornstarch to stabilize it. Bake at 325°F instead of 350°F to prevent over-browning—gluten-free cakes dry out faster. Expect a slightly denser crumb but still delicious!
Can I make the buttercream ahead of time?
Prepare the buttercream up to 2 days in advance and store it in an airtight container in the fridge. Bring it to room temperature before piping, then re-chill for 10 minutes to firm up slightly. For extra stability, add 1 extra tsp cornstarch when making it ahead. If you’re short on time, you can even freeze the buttercream for up to 1 month—thaw it in the fridge overnight before using.
What’s the best way to transport a frosted cake?
Wrap the entire cake tightly in plastic wrap, then place it in a sturdy cake carrier box with a layer of tissue paper around it to prevent shifting. For long trips (1+ hour), refrigerate it first to keep the buttercream firm. Avoid temperature swings—never leave it in a hot car! If transporting unfrosted layers, stack them with parchment between each and secure with a rubber band. Serve within 4 hours of transport for best texture.

- Pea Soup Instant Pot Recipe: Velvety Green Smoothness in 20 Minutes - November 1, 2026
- Pork Loin Pulled Pork Crock Pot Recipe: Slow-Smoked Tenderness With Zero Dryness - November 1, 2026
- Baked Potatoes in Crock Pot Recipe: Buttery Interiors and Crispy Top Magic - November 1, 2026